By Jark Wu
I held a speech called Flink SQL 1.9.0 Technologies and Best Practices last Saturday at the Apache Kafka × Apache Flink Meetup in Shenzhen. The code that I demonstrated in my speech, entitled Flink SQL 1.9.0 Technologies and Best Practices, sparked a lot of interest from the audience. I’ve included in this article to share it with you. I hope it's helpful to new Flink SQL users.
The demo code is now available on GitHub: https://github.com/wuchong/flink-sql-submit
This code has two parts:
After this practice, you will understand:
At first, I wanted to use SQL Client to implement the entire demonstration process. Unfortunately, SQL CLI V1.9 does not currently support processing CREATE TABLE statements. Therefore, I had to write a simple submission script. This helps you understand how to use Flink SQL by using SQL statements and some programming skills.
SqlSubmit is mainly used to run and submit a SQL statement. Implement this easily by matching every statement block via regular expressions. If a statement starts with CREATE TABLE or INSERT INTO, SqlSubmit calls tEnv.sqlUpdate(...). If a statement starts with SET, SqlSubmit it sets the configuration in TableConfig. Here is the core code:
EnvironmentSettings settings = EnvironmentSettings.newInstance()
        .useBlinkPlanner()
        .inStreamingMode()
        .build();
// 创建一个使用 Blink Planner 的 TableEnvironment, 并工作在流模式
TableEnvironment tEnv = TableEnvironment.create(settings);
// 读取 SQL 文件
List<String> sql = Files.readAllLines(path);
// 通过正则表达式匹配前缀,来区分不同的 SQL 语句
List<SqlCommandCall> calls = SqlCommandParser.parse(sql);
// 根据不同的 SQL 语句,调用 TableEnvironment 执行
for (SqlCommandCall call : calls) {
  switch (call.command) {
    case SET:
      String key = call.operands[0];
      String value = call.operands[1];
      // 设置参数
      tEnv.getConfig().getConfiguration().setString(key, value);
      break;
    case CREATE_TABLE:
      String ddl = call.operands[0];
      tEnv.sqlUpdate(ddl);
      break;
    case INSERT_INTO:
      String dml = call.operands[0];
      tEnv.sqlUpdate(dml);
      break;
    default:
      throw new RuntimeException("Unsupported command: " + call.command);
  }
}
// 提交作业
tEnv.execute("SQL Job");
You can find a test dataset (taken from the publicly available Alibaba Cloud Tianchi Data Sets) in the flink-sql-submit project on GitHub. You can find it at src/main/resources/user_behavior.log. The data is in JSON format. Here is what it looks like:
{"user_id": "543462", "item_id":"1715", "category_id": "1464116", "behavior": "pv", "ts": "2017-11-26T01:00:00Z"}
{"user_id": "662867", "item_id":"2244074", "category_id": "1575622", "behavior": "pv", "ts": "2017-11-26T01:00:00Z"}
To make the data look more like a real Kafka data source, I also wrote a source-generator.sh (you can view the source code if you are interested). It automatically reads data from user_behavior.log and feeds the data to the user_behavior Kafka topic at a rate of 1 data record/ms.
After creating the data source, we can use the data definition language (DDL) statement to create a Kafka topic and then connect to this topic (for details, see src/main/resources/q1.sql)
CREATE TABLE user_log (
    user_id VARCHAR,
    item_id VARCHAR,
    category_id VARCHAR,
    behavior VARCHAR,
    ts TIMESTAMP
) WITH (
    'connector.type' = 'kafka', -- 使用 kafka connector
    'connector.version' = 'universal',  -- kafka 版本,universal 支持 0.11 以上的版本
    'connector.topic' = 'user_behavior',  -- kafka topic
    'connector.startup-mode' = 'earliest-offset', -- 从起始 offset 开始读取
    'connector.properties.0.key' = 'zookeeper.connect',  -- 连接信息
    'connector.properties.0.value' = 'localhost:2181',
    'connector.properties.1.key' = 'bootstrap.servers',
    'connector.properties.1.value' = 'localhost:9092',
    'update-mode' = 'append',
    'format.type' = 'json',  -- 数据源格式为 json
    'format.derive-schema' = 'true' -- 从 DDL schema 确定 json 解析规则
)
Note: Some users find some parameters (such as connector.properties.0.key) difficult to understand. Therefore, we plan to improve and simplify the connector parameter configuration in the next community edition.
Use the JDBC connector provided by Flink to connect to MySQL.
Example:
CREATE TABLE pvuv_sink (
    dt VARCHAR,
    pv BIGINT,
    uv BIGINT
) WITH (
    'connector.type' = 'jdbc', -- 使用 jdbc connector
    'connector.url' = 'jdbc:mysql://localhost:3306/flink-test', -- jdbc url
    'connector.table' = 'pvuv_sink', -- 表名
    'connector.username' = 'root', -- 用户名
    'connector.password' = '123456', -- 密码
    'connector.write.flush.max-rows' = '1' -- 默认5000条,为了演示改为1条
)
For instance, to calculate the page views (PVs) and unique visits (UVs) of a website for every hour, most developers may think of the tumbling window method. However, this article introduces another option: the Group Aggregation method.
INSERT INTO pvuv_sink
SELECT
  DATE_FORMAT(ts, 'yyyy-MM-dd HH:00') dt,
  COUNT(*) AS pv,
  COUNT(DISTINCT user_id) AS uv
FROM user_log
GROUP BY DATE_FORMAT(ts, 'yyyy-MM-dd HH:00')
This method uses the built-in DATE_FORMAT function to normalize log time into a "yyyy-MM-dd HH:00" string, and group data by this string (by hour). Next, use the COUNT(*) function to calculate the PVs, and the COUNT(DISTINCT user_id) function to calculate the UVs. This method does the incremental calculation (for example, +1) every time a new data record is received; it generates the latest result and provides high output in real-time.
Then use the INSERT INTO statement to write the query result into the pvuv_sink MySQL table that we have defined earlier.
During the meetup last Saturday, I introduced the ways to optimize the performance of this method in detail.
Install some required services before the demonstration:
1 Download and decompress the Flink 1.9.0 installation package. https://www.apache.org/dist/flink/flink-1.9.0/flink-1.9.0-bin-scala_2.11.tgz
2 Download the following dependency JAR packages and copy them to the flink-1.9.0/lib/directory. The operation is dependent on the implementation of each connector.
3 Change the taskmanager.numberOfTaskSlots value in flink-1.9.0/conf/flink-conf.yaml to 10 as the demo task may consume more than one slot.
4 Run the ./bin/start-cluster.sh file in the flink-1.9.0 directory to start the cluster.
In case the operation is successful, we should be able to access the Flink Web UI at http://localhost:8081.

Also, we need to fill the Flink installation path in the env.sh file of the flink-sql-submit project to submit SQL tasks. For example, the installation path on my PC is:
FLINK_DIR=/Users/wuchong/dev/install/flink-1.9.0Download and decompress the Kafka 2.2.0 installation package. https://www.apache.org/dist/kafka/2.2.0/kafka_2.11-2.2.0.tgz
Fill the installation path in the env.sh file of the flink-sql-submit project. For example, the installation path on my PC is KAFKA_DIR=/Users/wuchong/dev/install/kafka_2.11-2.2.0
Run ./start-kafka.sh under the flink-sql-submit directory to start the Kafka cluster.
Run the JPS on the command line. The Kafka cluster started successfully if you see the Kafka process and the QuorumPeerMain process.
Download MySQL from the official website and install it https://dev.mysql.com/downloads/mysql/
If you run a Docker environment, you can also install MySQL through Docker https://hub.docker.com/_/mysql
$ docker pull mysql
$ docker run --name mysqldb -p 3306:3306 -e MYSQL_ROOT_PASSWORD=123456 -d mysql
Then, create a database named flink-test in MySQL and create the pvuv_sink table based on the preceding schema.
1 Run the ./source-generator.sh file in the flink-sql-submit directory to automatically create the user_behavior topic and fill it with data in real-time.

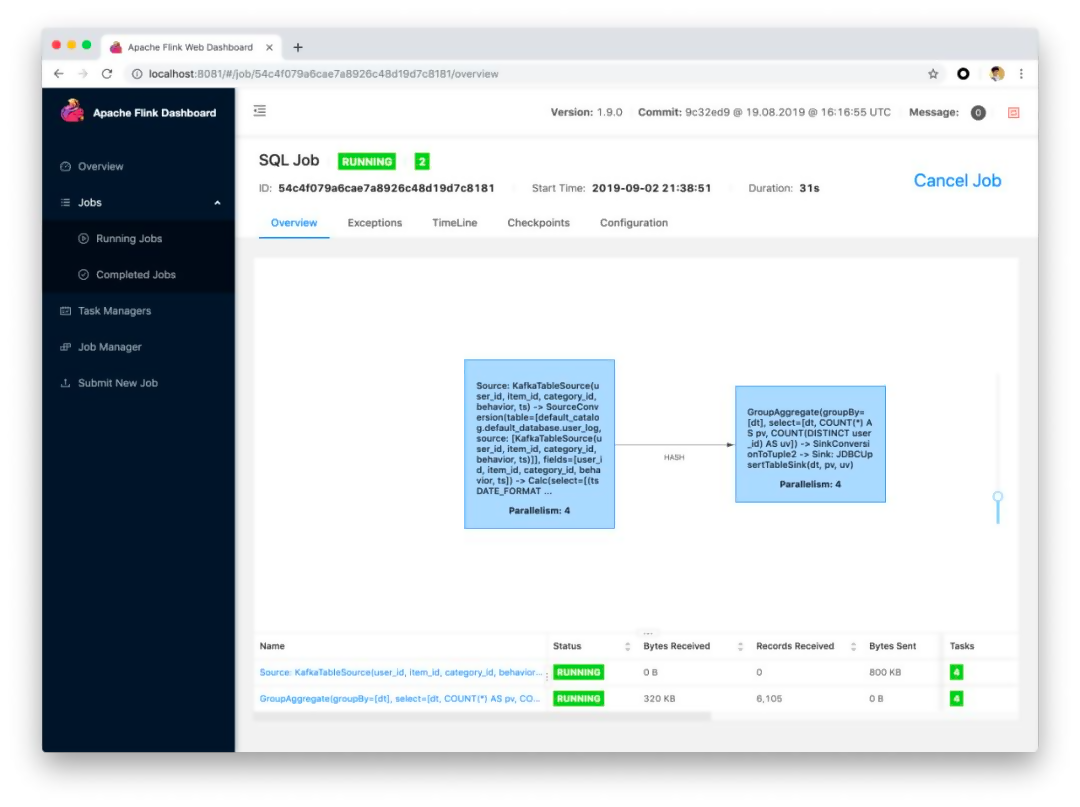
2 Run ./run.sh q1 in the flink-sql-submit directory. After successful submission, you can view the topology in Web UI.

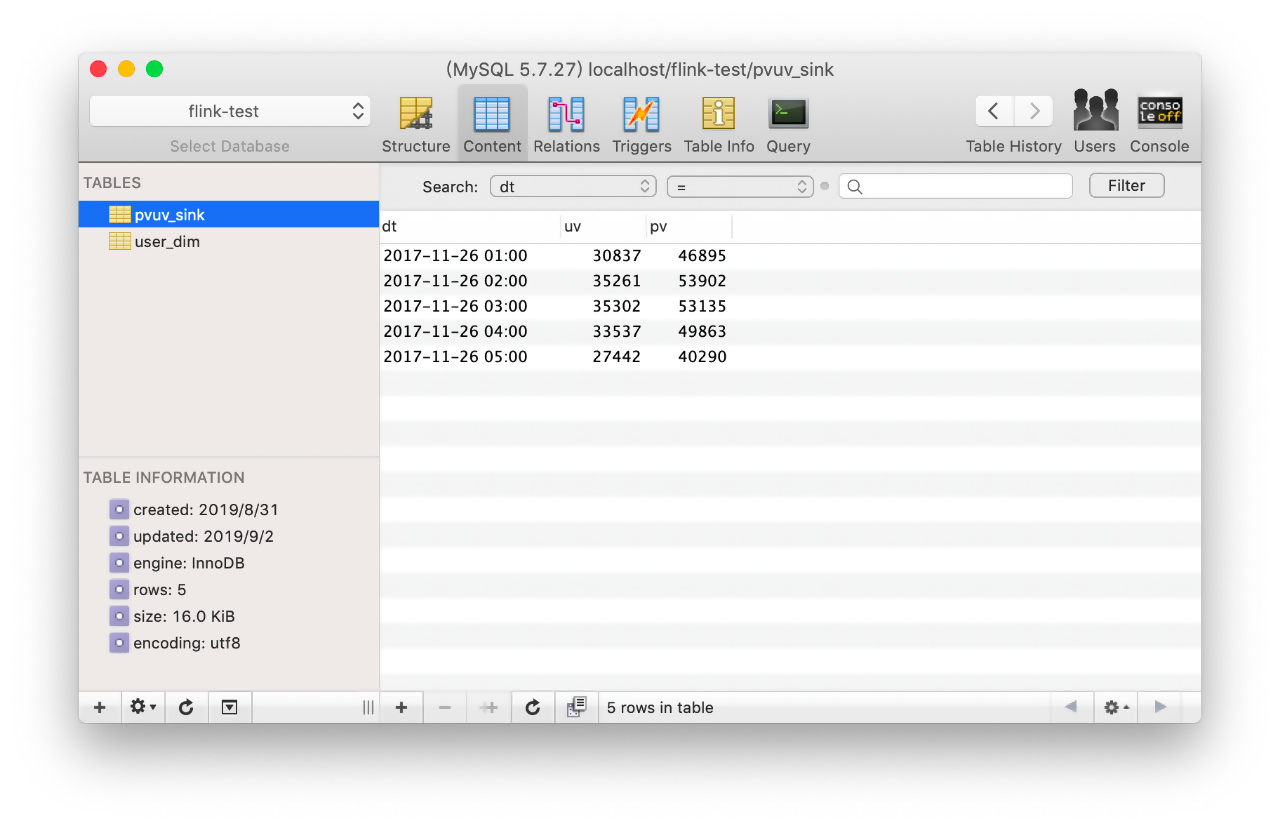
Also, use the MySQL client to view the PV and UV variation in real-time.

This article shows you how to set up a basic cluster environment by using SqlSubmit to submit an SQL task and connect to the external system. To comment parameters for performance optimization, check this:
flink-sql-submit/src/main/resources/q1.sql.
Enable these parameters to view their impact on the job.

206 posts | 54 followers
FollowAlibaba Clouder - April 25, 2021
Apache Flink Community China - April 23, 2020
Apache Flink Community China - September 27, 2019
Apache Flink Community China - September 16, 2020
Apache Flink Community China - July 28, 2020
Apache Flink Community China - December 25, 2019

206 posts | 54 followers
Follow Message Queue for Apache Kafka
A fully-managed Apache Kafka service to help you quickly build data pipelines for your big data analytics.
Learn More Super App Solution for Telcos
Alibaba Cloud (in partnership with Whale Cloud) helps telcos build an all-in-one telecommunication and digital lifestyle platform based on DingTalk.
Learn More ApsaraDB RDS for SQL Server
An on-demand database hosting service for SQL Server with automated monitoring, backup and disaster recovery capabilities
Learn More Realtime Compute for Apache Flink
Realtime Compute for Apache Flink offers a highly integrated platform for real-time data processing, which optimizes the computing of Apache Flink.
Learn MoreMore Posts by Apache Flink Community