In this tutorial, we will explore how to back up and migrate data from third-party vendors or local storages easily to Alibaba Cloud OSS using OSSImport.
By Rodney Shetler, Staff Solution Architect
OSSImport is a free tool created by the Alibaba Cloud product team to assist with data backup and migration into the Alibaba Cloud Object Storage Service (OSS). Using OSSImport data can be migrated from either local storage or from third party cloud platforms. Currently supported data sources include Qiniu, Baidu BOS, AWS S3, Azure Blob, Youpai Cloud, Tencent Cloud COS, Kingsoft KS3, HTTP, and other OSS buckets.
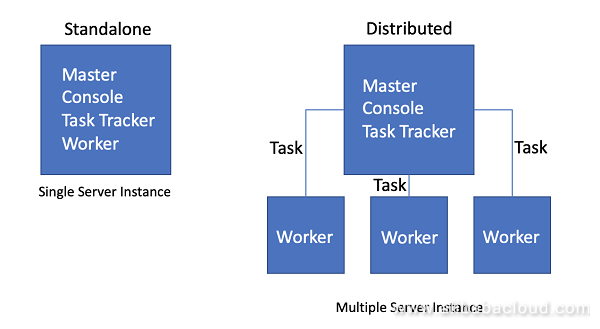
OSSImport can be used in a standalone configuration with a single node performing all operations, or in a distributed mode, allowing for multiple worker nodes to distribute the tasks of copying and syncing data between platforms. Optional settings can be used to enable Incremental mode, which polls for data changes at a given interval and synchronizes new or altered data objects, as well as bandwidth throttling or to specify objects to be migrated based on time or prefix.
Best Practices
While OSSImport can be deployed in a standalone configuration, distributed mode is recommended for data backup or migration jobs that exceed 30 TB.
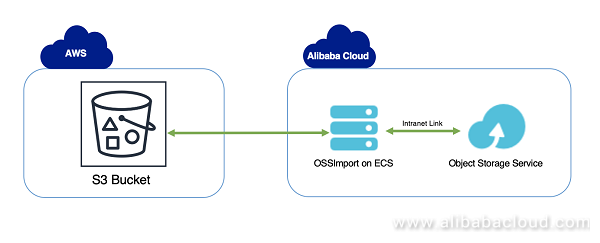
It is recommended to deploy OSSImport on an Alibaba Cloud ECS instance within a VPC, this allows the incoming data to be written to OSS using the "Internal" OSS bucket address which is much faster, within a private network, and free of traffic charges.
Where possible it is recommended to use dedicated network connectivity between the source and destination, this can save on bandwidth costs, and ensure a consistent fast transfer.
Getting Started – Backup/Migration from AWS S3 to Alibaba OSS
The following will outline the process for setting up a data backup/migration using a common scenario – migrating data from an AWS S3 bucket to an Alibaba Cloud OSS Bucket.
High-Level Architecture
Create an Object Storage Service (OSS) Bucket
- Log into the Alibaba Cloud admin console
- Navigate to "Products" -> "Object Storage Service"
- Choose "Create" bucket and follow prompts to create a uniquely named bucket, within the target region and choose desired settings related to storage class and Access Control
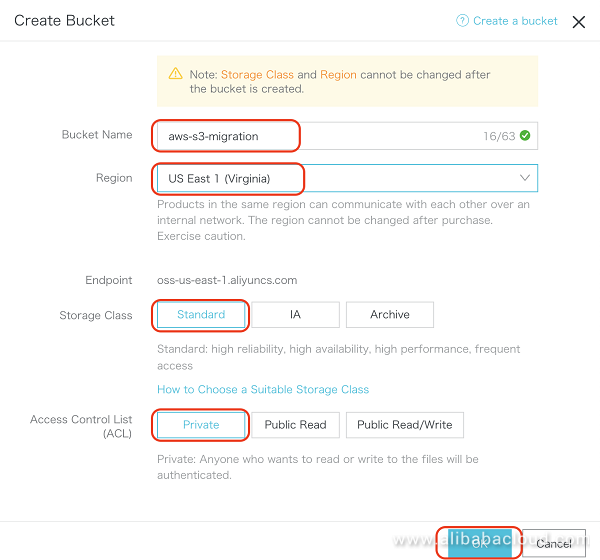
- Choose "Ok"
Create Alibaba ECS Instance
- Log into the Alibaba Cloud admin console and create an Elastic Compute Service (ECS) instance to act as a standalone OSSImport server.
- For the purpose of this guide, assume the following configuration
- Billing Method: Pay-As-You-Go
- Region: Select the same region as you intend on storing the data in OSS
- Instance Type: General Purpose Type (Minimal Specs)
- Image: Public Image – OS – Aliyun Linux – Current Version
- Storage: Default
- Network: VPC
- Network Billing Method: Assign public IP
For detailed assistance creating an ECS instance please refer to the following guide - Elastic Compute Service – Create an Instance
Configure OSSImport Server
- Log into the ECS instance created in the previous section using SSH
- Install Java which is a pre-requisite to using the OSSImport tool using the following "yum" command
yum install java
- Download the OSSImport tool using the following 'curl' command
curl -o ./ossimport.zip http://gosspublic.alicdn.com/ossimport/standalone/ossimport-2.3.1.zip?spm=a2c63.p38356.a3.3.48ce6605cjP9sM&file=ossimport-2.3.1.zip
- When the download finishes – unzip the archive using the following 'unzip' command
unzip ossimport.zip -d ./ossimport
- Change directory to the "ossimport" directory where the files have been unzipped
- Edit the local_job.cfg configuration file located at "./ossimport/conf/local_job.cfg" using an editor of your choice – ensure the following fields are updated:
- srcType=s3
- srcAccessKey=<AWS ACCESS KEY>
- srcSecretKey=<AWS SECRET KEY>
- srcDomain= http://s3.<AWS REGION>.amazonaws.com
- srcBucket=<AWS SOURCE BUCKET NAME>
- srcPrefix=<INSERT FILE PREFIX OTHERWISE LEAVE BLANK>
- destAccessKey=<ALIBABA CLOUD ACCESS KEY>
- destSecretKey=<ALIBABA CLOUD SECRET KEY>
Note: Alibaba Cloud Access and Secret key can be obtained from within the portal "Account Management" -> "Access Keys"
- destDomain=<ALIBABA CLOUD OSS ADDRESS>
Note: The Alibaba Cloud OSS address can be found within the OSS portal, the "Internal" address is used in this field. 
- destBucket=<ALIBABA CLOUD OSS BUCKET>
- Leave the rest of the settings as default, save and close the configuration file keeping the same name "local_job.cfg"
Note: An example AWS S3 configuration file can be found at https://github.com/aliyun/ossimport/tree/master/conf/s3
- To initiate the file synchronization run the "import.sh" scripting using the following command
bash import.sh
- If all setup and configuration steps have been completely correctly the message "Start import service completed" followed by a "job stats" message should be returned to the console as files are migrated/backed up from AWS S3 to OSS
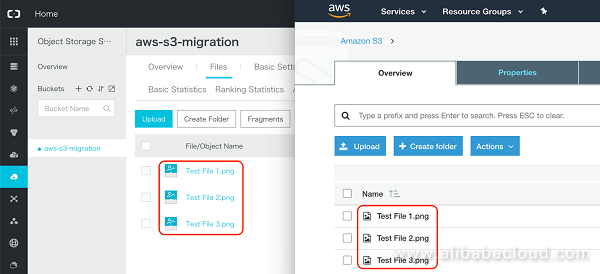
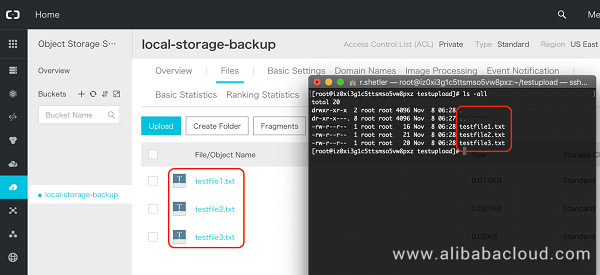
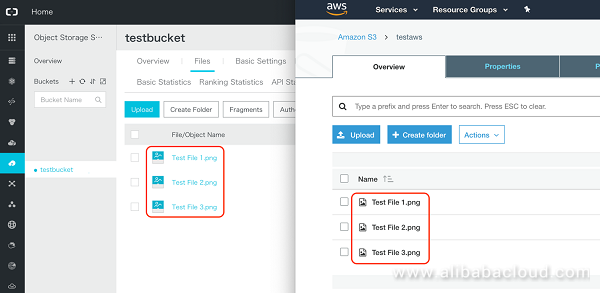
- After the import job completes, validate via the console that all files have been successfully migrated/backed up from AWS S3 to OSS
Getting Started – Backup/Migration from Local Storage to Alibaba OSS
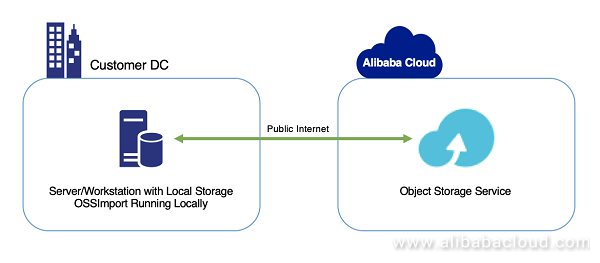
The following will outline another common scenario - data backup/migration from local storage to an Alibaba Cloud OSS Bucket. In this scenario the OSSImport tool will be installed and run directly on the server with access to the local storage to be migrated/backed up.
High-Level Architecture
Create an Object Storage Service (OSS) Bucket
- Log into the Alibaba Cloud admin console
- Navigate to "Products" -> "Object Storage Service"
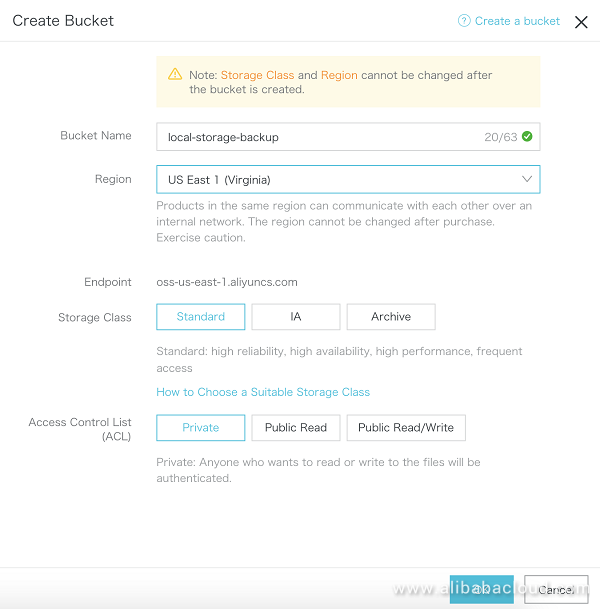
- Create a new bucket following the steps from the previous example
Configure Local Server to Run OSSImport
On the local server where the local files reside perform the following steps to prepare the server to run the OSSImport job to migrate/backup local files to OSS. For this example, we will be assuming the local server is running a Linux/Unix environment. Similar steps can be used on servers running windows with minor substitutions.
- Install Java which is a pre-requisite to using the OSSImport tool using the following "yum" command
yum install java
- Download the OSSImport tool using the following 'curl' command
curl -o ./ossimport.zip http://gosspublic.alicdn.com/ossimport/standalone/ossimport-2.3.1.zip?spm=a2c63.p38356.a3.3.48ce6605cjP9sM&file=ossimport-2.3.1.zip
- When the download finishes – unzip the archive using the following 'unzip' command
unzip ossimport.zip -d ./ossimport
- Change directory to the "ossimport" directory where the files have been unzipped
- Edit the local_job.cfg configuration file located at "./ossimport/conf/local_job.cfg" using an editor of your choice – ensure the following fields are updated:
- srcType=local
- srcPrefix=<LOCAL DIRECTORY FOR FILES>
Note: The srcPrefix setting is where you specific a directory where local files are stored to be migrated to OSS. In a Linux/Unix environment this must end with a "/" (Ex: /Users/username/Documents/)
- destAccessKey=<ALIBABA CLOUD ACCESS KEY>
- destSecretKey=<ALIBABA CLOUD SECRET KEY>
Note: Alibaba Cloud Access and Secret key can be obtained from within the portal "Account Management" -> "Access Keys"
- destDomain=<ALIBABA CLOUD OSS ADDRESS>
Note: The Alibaba Cloud OSS address can be found within the OSS portal, because the source machine is not within the same network the "Internet Access" endpoint address must be used. 
- destBucket=<ALIBABA CLOUD OSS BUCKET>
- Leave the rest of the settings as default, save and close the configuration file keeping the same name "local_job.cfg"
Note: An example Local configuration file can be found at https://github.com/aliyun/ossimport/tree/master/conf/local
- To initiate the file synchronization run the "import.sh" scripting using the following command
bash import.sh
- If all setup and configuration steps have been completed correctly the message "Start import service completed" followed by a "job stats" message should be returned to the console as files are migrated/backed up from Local Storage to OSS
- After the import job completes, validate via the console that all files have been successfully migrated/backed up from Local Storage to OSS
Distributed Deployment for Large Migration/Backup Jobs
As mentioned, OSSImport can be deployed in a distributed mode when dealing with very large-scale migration/back up jobs of greater than 30 TB. This mode allows for the actual tasks to be spread out to multiple "worker" nodes running across multiple servers. When working with a distributed environment a new "console.sh" bash script is used to start, coordinate, and submit migration/backup jobs to the distributed environment. There are also three configuration files that need to be setup prior to running jobs as explained below.
Note: Currently distributed deployment is only supported on servers running Linux.
High-Level Architecture

Create Primary and Worker Alibaba Cloud ECS Instances
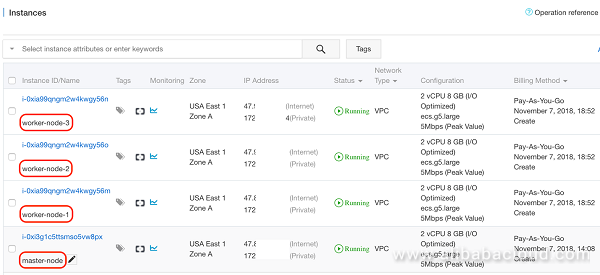
- Log into the Alibaba Cloud admin console and create a set of ECS instances
- Primary – Master instance to run console and task tracking jobs
- Worker – Secondary nodes to perform work, can be 1 or more instances
- For the purpose of this guide, assume the following configuration
- Master Instance
- Billing Method: Pay-As-You-Go
- Region: Select the same region as you intend on storing the data in OSS
- Instance Type: General Purpose Type (Minimal Specs)
- Image: Public Image – OS – Aliyun Linux – Current Version
- Storage: Default
- Network: VPC
- Network Billing Method: Assign public IP
- Worker Instance(s) – 3 worker instances
- Billing Method: Pay-As-You-Go
- Region: Select the same region as you intend on storing the data in OSS, and same as master instance
- Instance Type: General Purpose Type (Minimal Specs)
- Image: Public Image – OS – Aliyun Linux – Current Version
- Storage: Default
- Network: VPC
- Network Billing Method: Assign public IP
For detailed assistance creating ECS instances please refer to the following guide - Elastic Compute Service – Create an Instance
Configure the Master node
The initial configuration for the distributed mode deployment will take place on the server that has been designated as the "master node". All commands and configuration below will take place on the master node, which will distribute the configuration and work tasks to the worker nodes.
- Log into the ECS instance designated as the master node created in the previous section using SSH
- Install Java which is a pre-requisite to using the OSSImport tool using the following "yum" command
yum install java
Note: Java must be installed on the master AND all worker nodes.
- Download the OSSImport tool using the following 'curl' command
curl -o ./ossimport.tar.gz http://gosspublic.alicdn.com/ossimport/international/distributed/ossimport-2.3.2.tar.gz?spm=a2c63.p38356.a3.3.58ea6329FCAh6p&file=ossimport-2.3.2.tar.gz
- When the download finishes – un tar the archive into a new directory using the following 'tar' command
mkdir import && tar -zxvf ossimport.tar.gz -C import
Note: The default working directory for this tool is "/root/import" which is what we are following in this example. If another directory is used it is important to update the "sys.properties" file with the new directory – this directory must match on the master and all worker nodes
- Change directory to the "ossimport" directory where the files have been expanded
- Edit the job.cfg configuration file located at "./ossimport/conf/job.cfg" using an editor of your choice – update the necessary fields based on the type of import similar to the steps above.
- After all configuration settings are updated, save and close the configuration file keeping the same name "job.cfg"
- Edit the "workers" file located at "./ossimport/conf/workers" using an editor of your choice
- Ensure the list contains the correct IP addresses of the worker nodes within your distributed configuration
- Assuming all workers are inside the same VPC as your Master node, ensure the you are using the "private" ip address listed in the Admin console
- Edit the "sys.properties" file located at "./ossimport/conf/sys.properties" using an editor of your choice
- Update the fields "workerUserName" and "workerPassword" fields with the correct username and password to access the worker nodes
- Note: This password can either be chosen when you create the ECS instance or updated after their creation in the admin console
- After the three configuration files are updated and changes saved, "deploy" this configuration to each of the worker nodes using the following command
bash console.sh deploy
- Note: If changes or updates are needed, make changes on the master node, and re-deploy the configuration using the same command as above. This will update all worker nodes with the new configuration
- Start the import service using the following command
bash console.sh start
- Now submit the import job using the following command
bash console.sh submit
- Tasks will be submitted to the worker nodes in your configuration
- Verify that all files have been migrated/backed up from your source to the OSS target bucket
To learn more about OSSImport, visit the
OSS documentation page or the
official GitHub page.


 Data Lake Storage Solution
 Hybrid Cloud Distributed Storage
 Cloud Migration Solution
 Backup and Archive Solution
5075163157658381 September 14, 2022 at 12:31 pm
How can I configure the ossimport tool to exclude some folder from the import?We must migrate data from one bucket to another in OSS, all data except one folder.