By Wang Zhong, Alibaba Cloud Solution Architect
In this blog, we'll discuss in detail on the steps required to build a cross-border acceleration solution with Alibaba Cloud Global Accelerator and Squid caching proxy.

This solution leverages Alibaba Cloud Global Accelerator (GA) service to accelerate the access of services hosted outside China, e.g. salesforce.com.
There are 3 major components in this solution:
In this solution, we set up client browsers in mainland China, which are configured with the GA Accelerated IP Address as proxy via a PAC file hosted in OSS bucket. The GA instance "forwards" client requests of specified domain name to the US squid proxy with guaranteed bandwidth and low latency.
The following sections of this blog will share a step-by-step guide on how to implement this solution and configure these 3 major components.
Go to the VPC console. Create a VPC and a VSwitch in US (Silicon Valley) region, or the region that's close to the service to be accelerated. You can select a Default CIDR block.
Go to the ECS console. Create an ECS instance in the VPC, CentOS or Ubuntu OS is recommended. Assign Public IP Address and set peak bandwidth as needed.

Once the instance is up running, it's also recommended to convert the public IP address to an EIP for more flexibility. See https://www.alibabacloud.com/help/doc-detail/61290.htm for details.
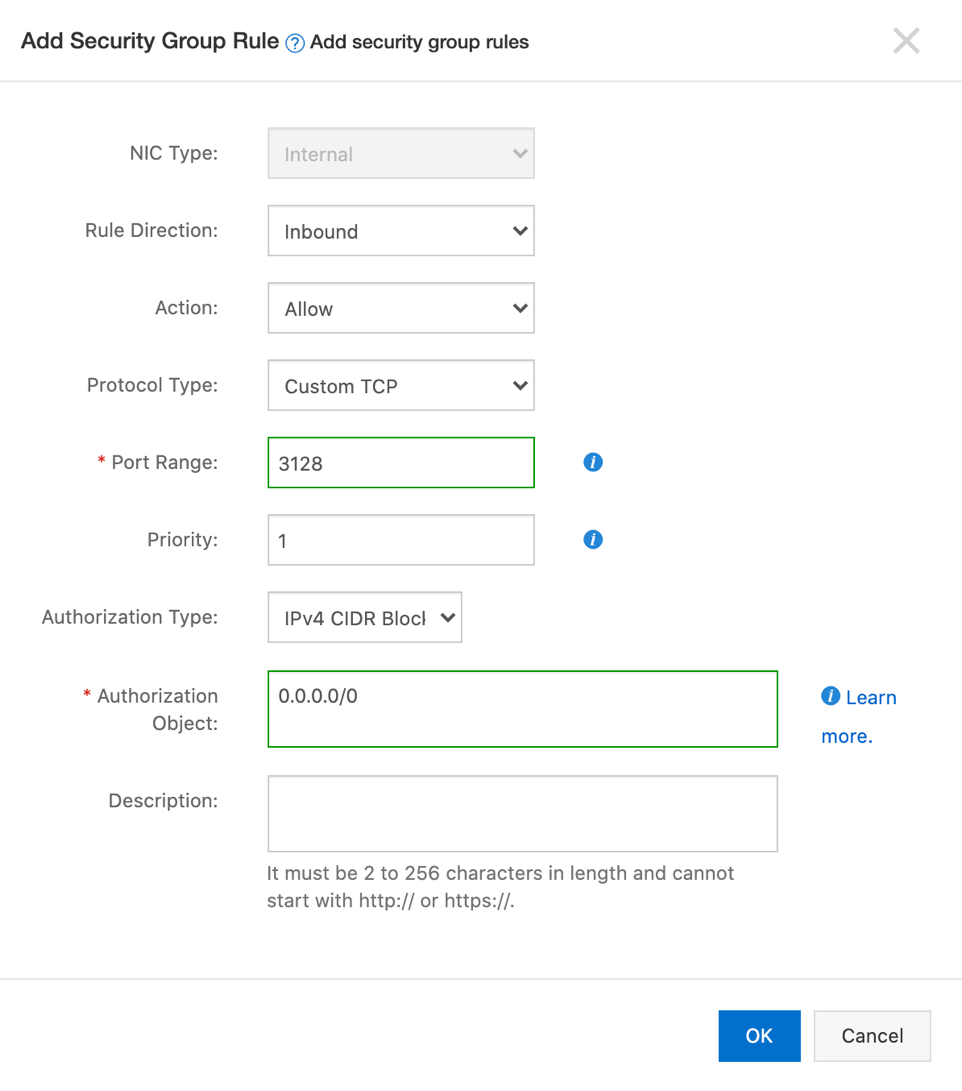
Click instance name and then click on Security Groups in the navigation bar to open the Security Groups page. Click the associated security group, then click Add Security Group Rule, and allow TCP port 3128 (default port for Squid) from 0.0.0.0/0.
Log into the ECS instance
ssh root@47.254.84.24Install squid:
For CentOS, run the following code:
yum install -y squidFor Ubuntu, run the following code:
apt install -y squidYour code will depend on the choice of OS, so please pay extra attention.
CentOS:
yum install -y httpd-tools
touch /etc/squid/passwd
chown squid /etc/squid/passwd
htpasswd /etc/squid/passwd sfuser
Ubuntu:
apt install -y apache2-utils
touch /etc/squid/passwd
chown proxy /etc/squid/passwd
htpasswd /etc/squid/passwd sfuser
Use the following command to verify basic authentication:
CentOS:
/usr/lib64/squid/basic_ncsa_auth /etc/squid/passwdUbuntu:
/usr/lib/squid/basic_ncsa_auth /etc/squid/passwdThe command waits for the username and password pair separated by a space. If "OK" is returned, authentication is working fine. If "ERR" is returned, reset password using htpasswd and try again.
Open /etc/squid/squid.conf in an editor.
Add auth_param to enable basic authentication
Ubuntu: Add the following lines at the end of auth_param section, after the #Default: none line:
auth_param basic program /usr/lib/squid/basic_ncsa_auth /etc/squid/passwd
auth_param basic children 5
auth_param basic realm Squid Basic Authentication
auth_param basic credentialsttl 2 hours
CentOS: Add the following lines at the beginning of the file:
auth_param basic program /usr/lib64/squid/basic_ncsa_auth /etc/squid/passwd
auth_param basic children 5
auth_param basic realm Squid Basic Authentication
auth_param basic credentialsttl 2 hours
Add the following lines in the http_access section, after # INSERT YOUR OWN RULE(S) HERE TO ALLOW ACCESS FROM YOUR CLIENTS:
acl auth_users proxy_auth REQUIRED
acl allowed_domains dstdomain .salesforce.com .force.com .sfdcstatic.com ip.me
http_access allow auth_users allowed_domains
Note: Replace the domain list after acl allowed_domains dstdomain with any domain names to allow access. Use a blank space to separate entries. To match subdomains, add a leading dot.
Also make sure http_access deny all is right after these lines.
However there may be http_access allow localhost and http_access allow localnet in between. http_access allow localhost is fine. But comment out http_access allow localnet because that will override the auth_users and allowed_domains acl for all local network IP ranges, including 10.0.0.0/8, 172.16.0.0/12, 192.168.0.0/16, etc.
Restart squid and check status
systemctl restart squid
systemctl status squidFrom a Linux or macOS system, run the following command:
curl -x 47.254.84.24:3128 -U sfuser:<password> ip.meThe "-x" option specifies the proxy server and port.
The "-U" option specifies username:password for basic authentication. Replace with the actual password set in 1.5.
"ip.me" is an IP address reflector website, which returns the effective public IP address of the request. In this case, it returns the public IP address of the ECS/squid instance, i.e. 47.254.84.24.
To troubleshoot squid issues, run "systemctl status squid" and check /var/log/squid/access.log and /var/log/squid/cache.log.
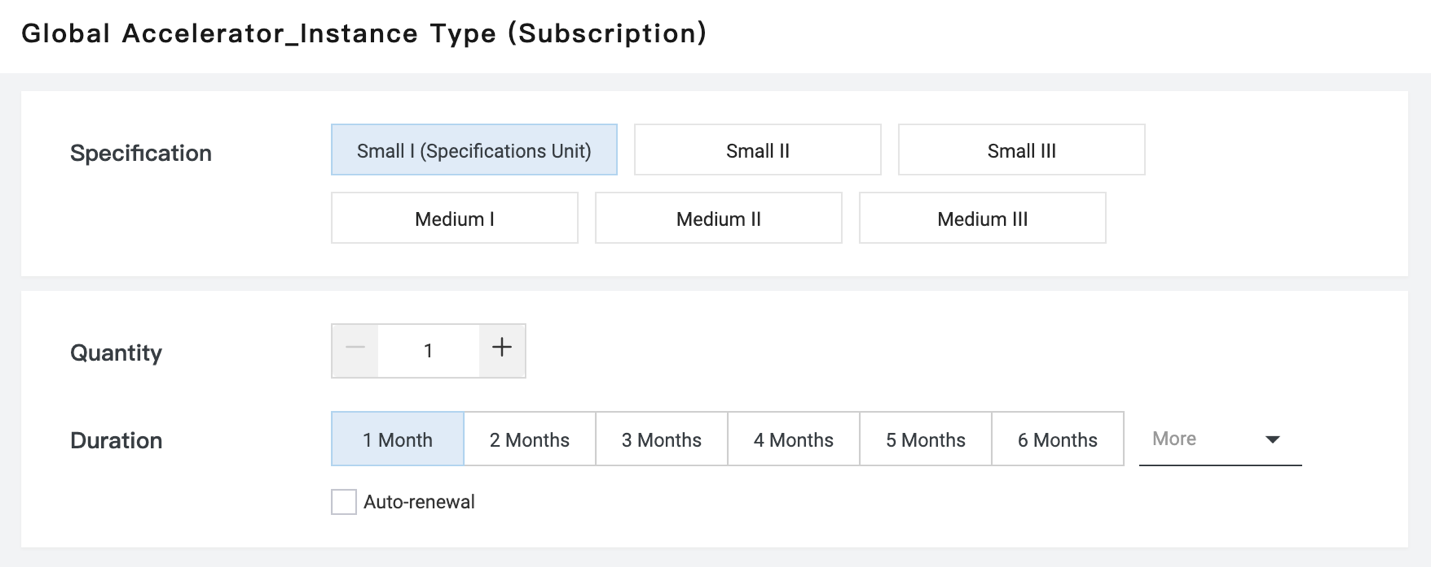
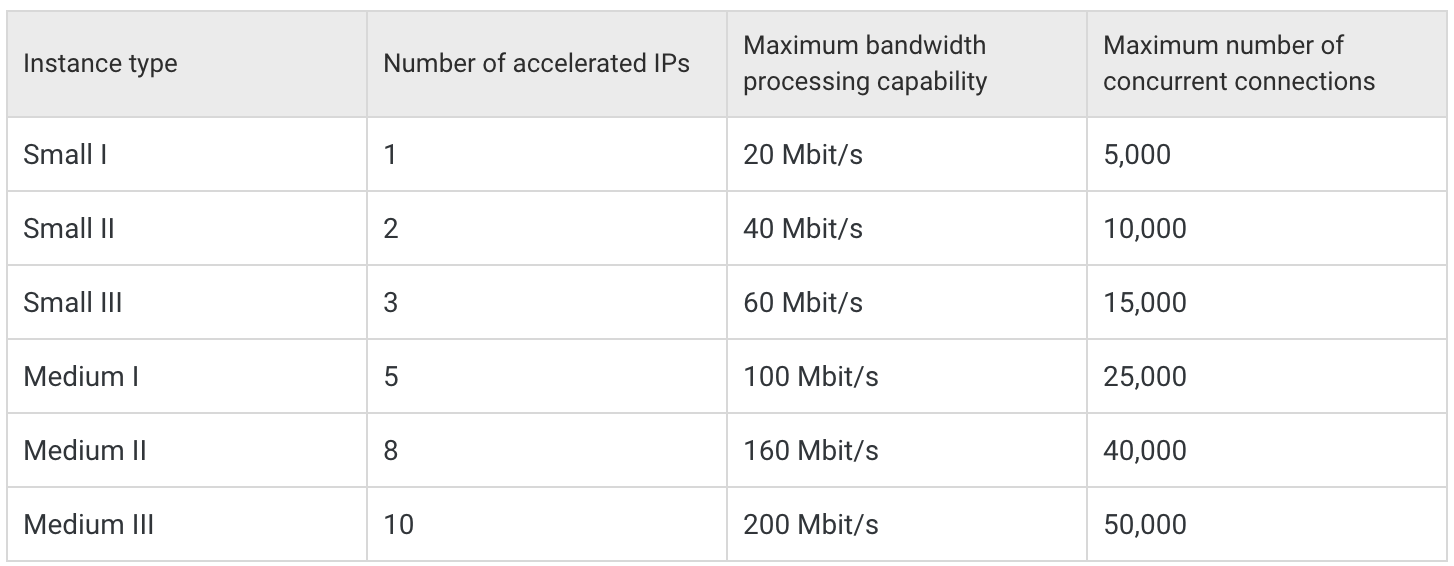
Go to the GA console. Click "Create Instance". Select a spec according to the table following the screenshot.
Here is a list of GA instance types to choose from:
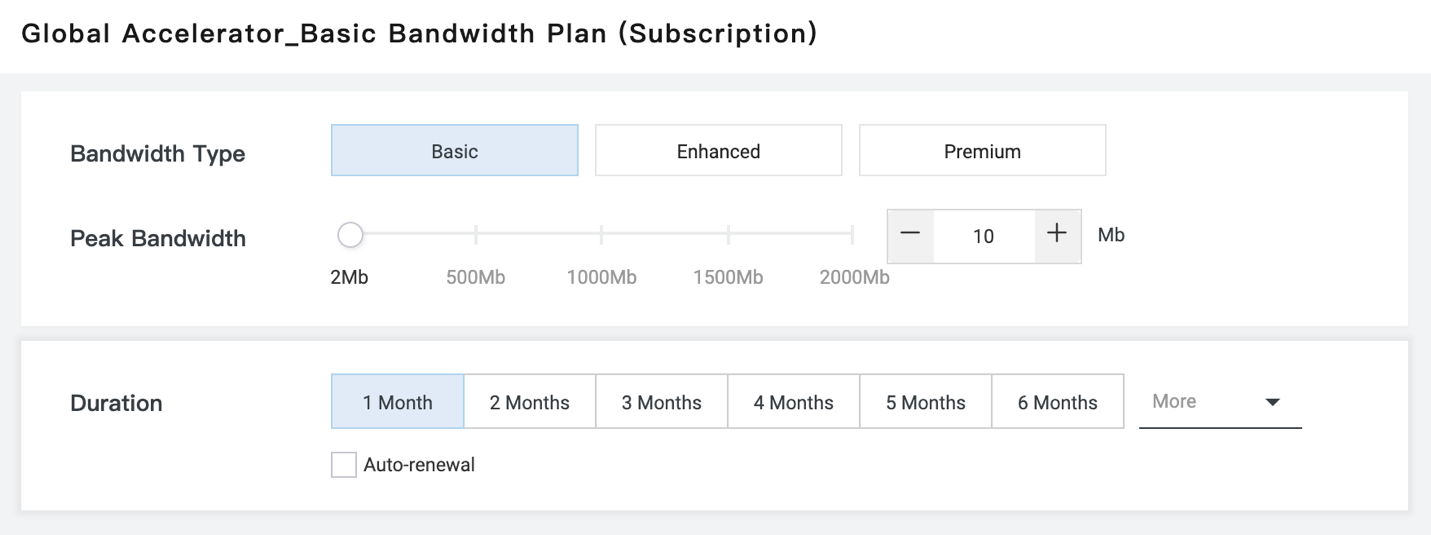
Click the "Purchase Basic Bandwidth Plan" tab, specify the peak bandwidth, e.g. 10Mbps, and complete the order.
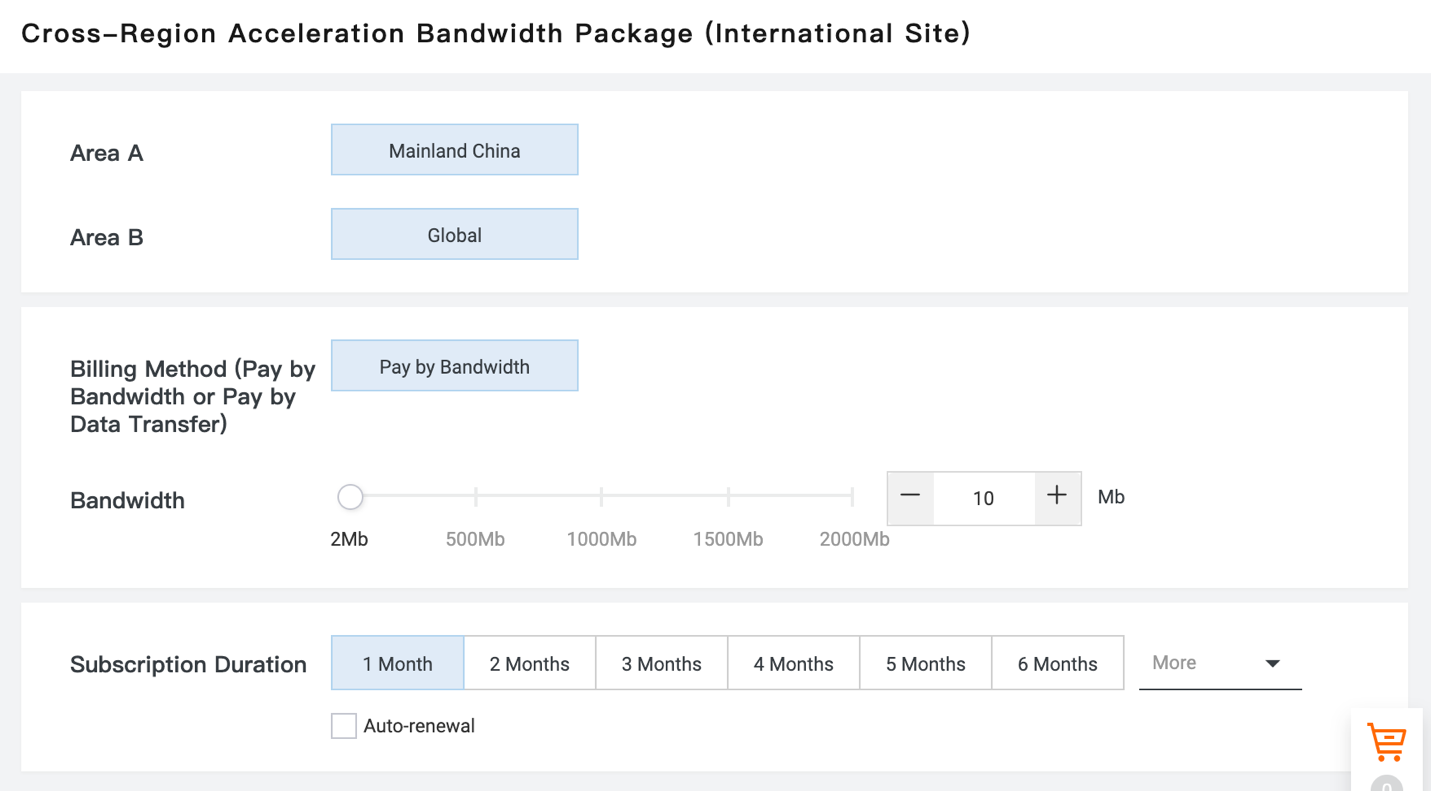
Cross-Region Acceleration Bandwidth Package is required for this solution. The bandwidth should match the basic bandwidth plan.
Click the "Purchase Cross-border Acceleration Bandwidth Plan" tab and complete the order.
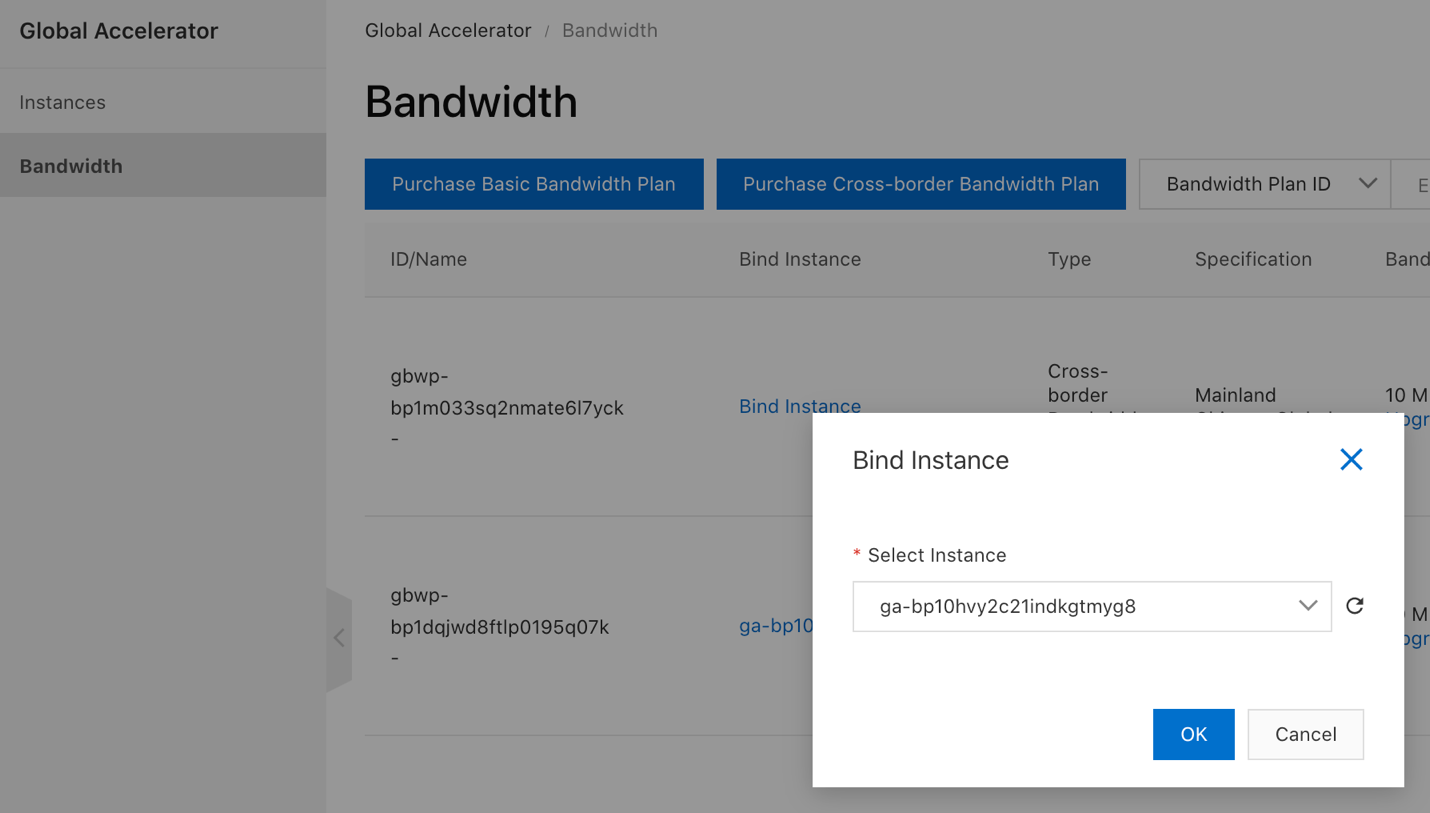
In the Bandwidth page, click "Bind Instance" link of the Cross-border bandwidth package. Select the GA instance to bind to.
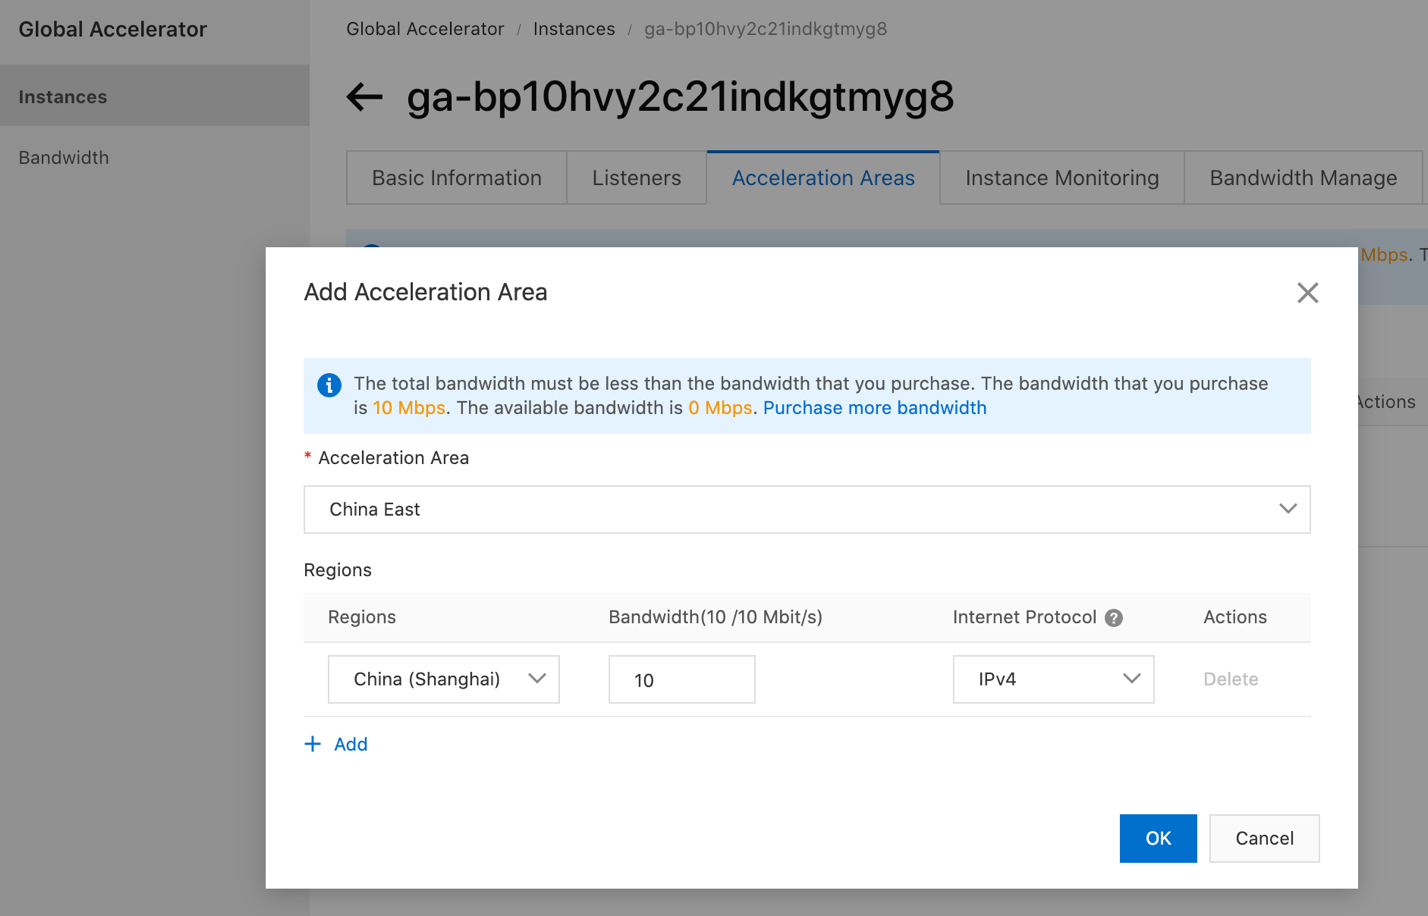
In the Instance page, click "Acceleration Areas" tab, then "Add Acceleration Area". Select "China East" area, Shanghai region. Allocate all 10Mbps to it. Click OK to continue.
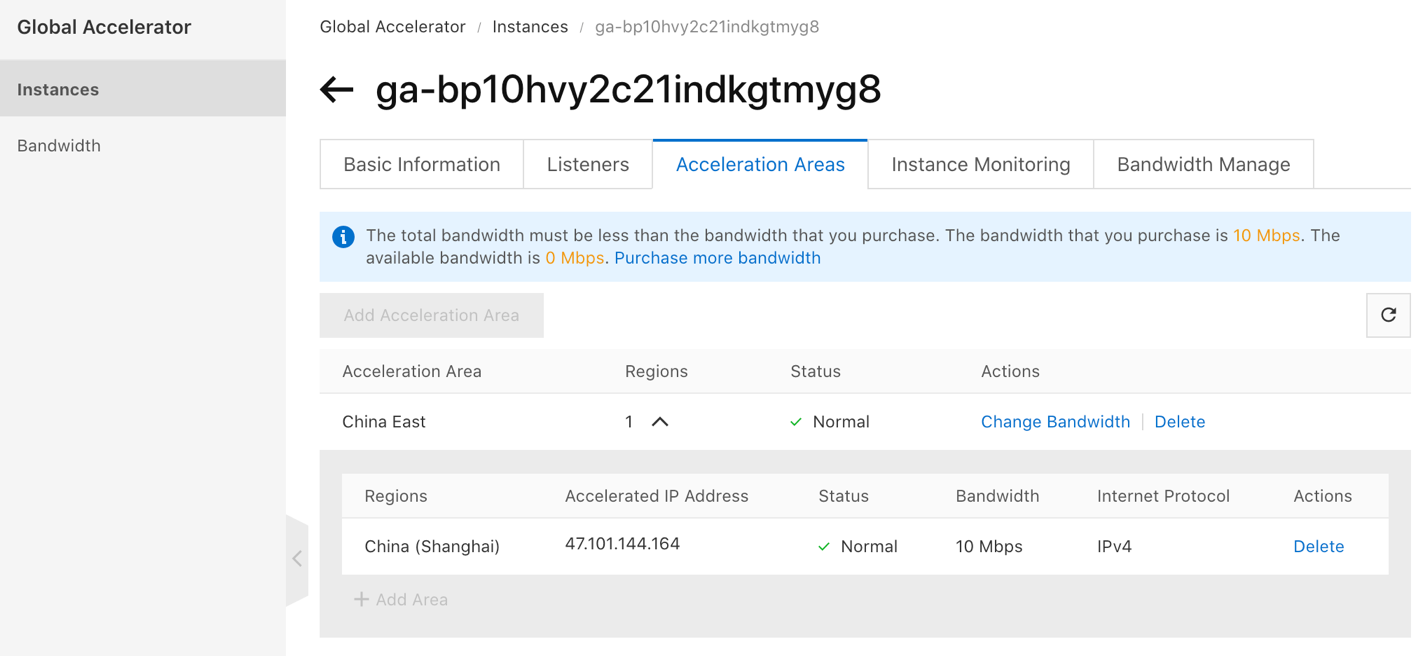
It will take some time for this step to complete. Once completed, an Acceleration IP Address in Shanghai region will be allocated. Take note of it for later verification and PAC file.
In the Instance page, click the "Listeners" tab, then "Add Listener" to configure listener and protocol. Choose TCP protocol and port 3128.
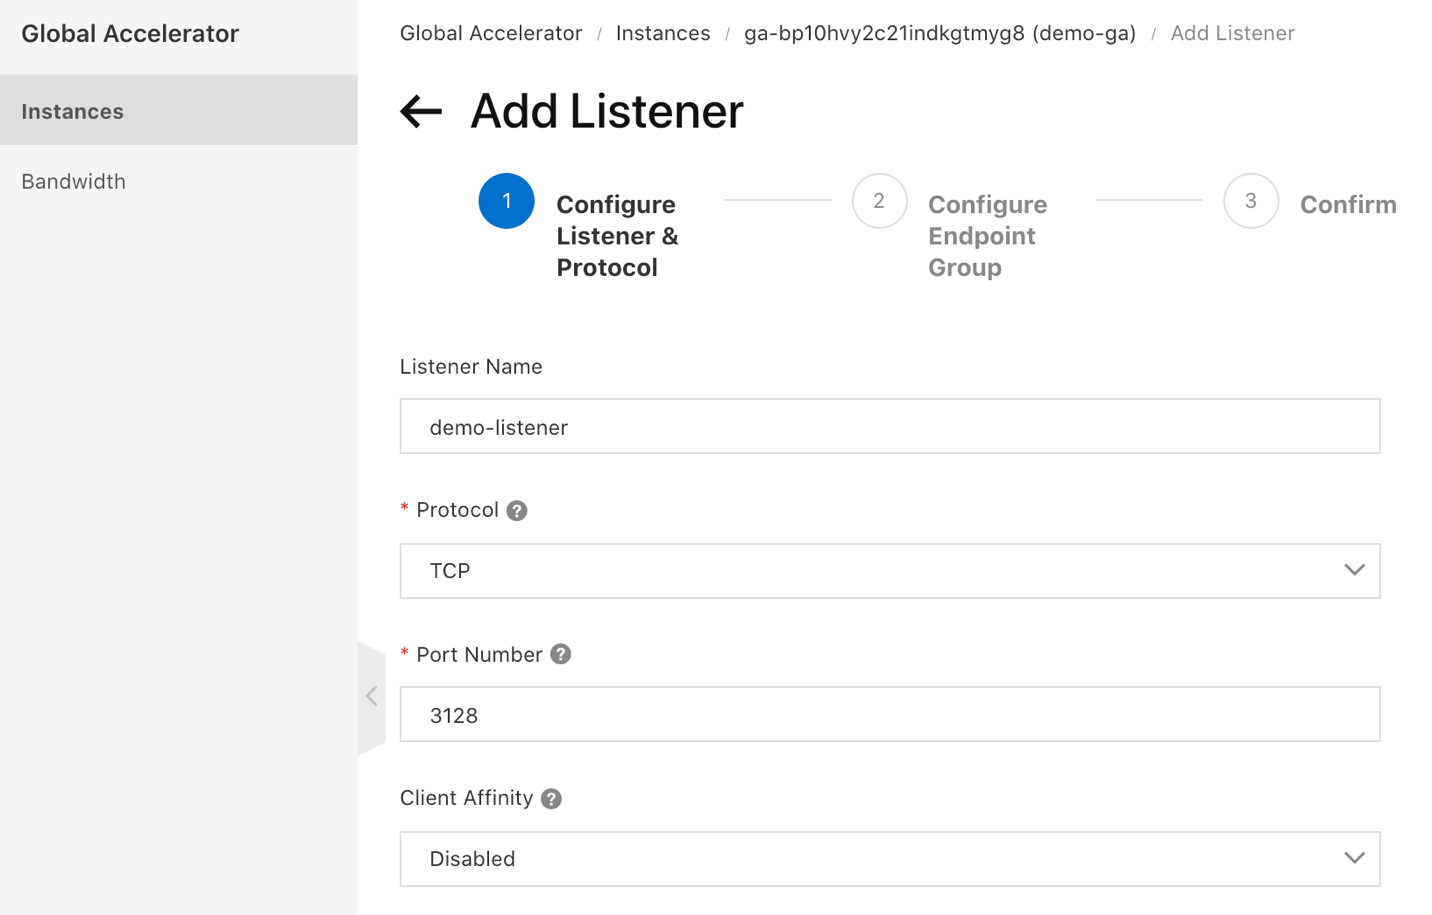
Next, configure Endpoint Group with one Endpoint:
47.254.84.24
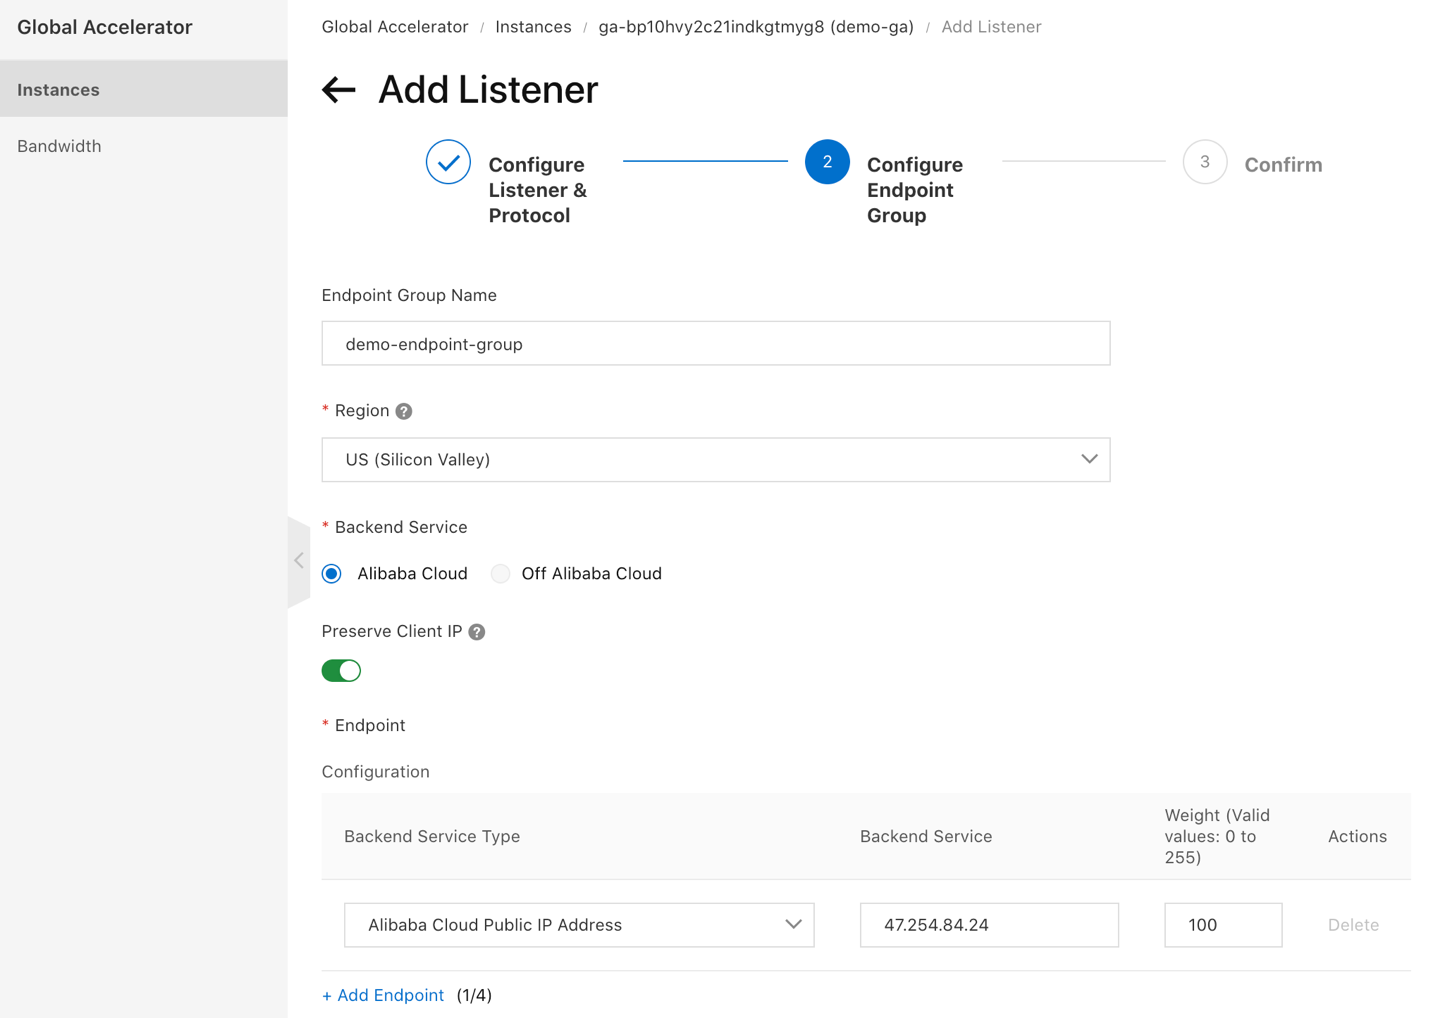
Confirm and wait for the configuration to complete.
Similar to 1.7, use curl but for the "-x" option, replace the public IP address of ECS/squid with the GA Accelerated IP address as configured in 2.5:
curl -x 47.101.144.164:3128 -U sfuser:<password> ip.meReplace <password> with the actual password set in 1.5.
With a correct configuration, the returned IP address will be the public IP address of ECS/squid i.e. 47.254.84.24
Client-side browsers need a PAC file to help determine when to use the proxy and when not to. This is also important to ensure client browsers don't send requests of publicly blocked domain names in China to the GA instance.
Save the following to a file, e.g. "sfproxy.pac".
function FindProxyForURL(url, host) {
    if (dnsDomainIs(host, "ip.me") ||
        dnsDomainIs(host, "salesforce.com") ||
        dnsDomainIs(host, ".salesforce.com") ||
        dnsDomainIs(host, ".force.com") ||
        dnsDomainIs(host, ".sfdcstatic.com"))
        return "PROXY 47.101.144.164:3128";
    else
        return "DIRECT";
}
Please take note of the following:
dnsDomainIs function calls to match the squid dstdomain configuration in 1.6. Add or remove dnsDomainIs calls as needed.PROXY ga-bp10hvy2c21indkgtmyg8.aliyunga0017.com:3128, at the cost of one extra DNS lookup.The PAC file needs to be hosted in a publicly readable location, ideally inside mainland China. We recommend Alibaba Cloud OSS bucket in China regions.
For more information on using OSS, please refer to the OSS Quick Start Guide
Use the OSS URL to configure client proxy settings:
Once configured, visit https://ip.me in the browser. Provide username and password configured in 1.5 when prompted. The returned page should show the public IP address of the ECS/squid instance, same as in 1.7 and 2.6.
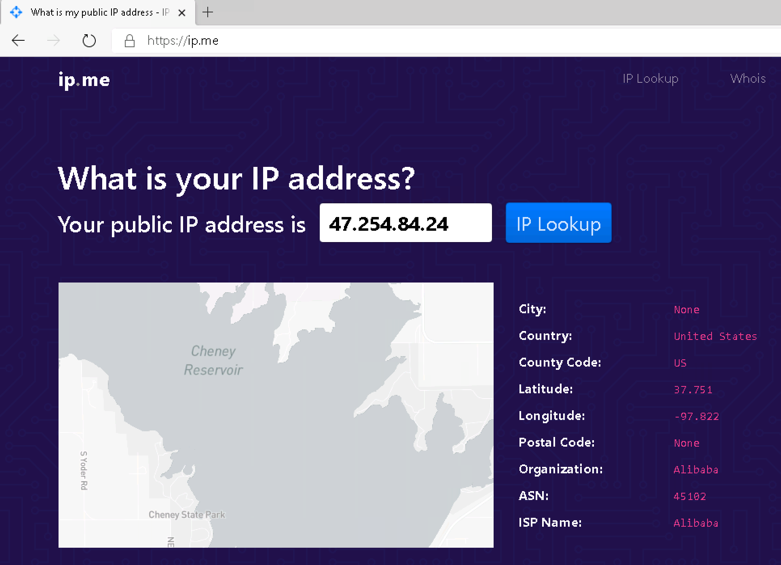
Congratulations! The implementation is now successfully completed.
To learn more about Alibaba Cloud Global Accelerator, please visit https://www.alibabacloud.com/product/ga
Real-World Implementation of Data Analytics with Alibaba Cloud (Part 1)

2,593 posts | 791 followers
FollowCheng - February 7, 2022
JDP - March 17, 2022
Alibaba Clouder - March 2, 2021
Dikky Ryan Pratama - May 11, 2023
Dikky Ryan Pratama - December 23, 2024
Haemi Kim - June 14, 2021

2,593 posts | 791 followers
Follow Hybrid Cloud Distributed Storage
Provides scalable, distributed, and high-performance block storage and object storage services in a software-defined manner.
Learn More OSS(Object Storage Service)
An encrypted and secure cloud storage service which stores, processes and accesses massive amounts of data from anywhere in the world
Learn More Storage Capacity Unit
Plan and optimize your storage budget with flexible storage services
Learn More Accelerated Global Networking Solution for Distance Learning
Alibaba Cloud offers an accelerated global networking solution that makes distance learning just the same as in-class teaching.
Learn MoreMore Posts by Alibaba Clouder