By Jeff Cleverley, Alibaba Cloud Tech Share Author. Tech Share is Alibaba Cloud's incentive program to encourage the sharing of technical knowledge and best practices within the cloud community.
In Part 1 of this tutorial series, I took us through the process of installing WordPress on a highly performant LEMP stack using the EasyEngine automation tool, now we will explore the same process using the newer Webinoly tool to see how they compare.
Webinoly is a relatively new tool for automating the management and creation of LEMP stacks and WordPress sites. It has gained a good reputation in the short period of time it has existed. Their website offers to create an optimized web server in seconds, following modern best practices.
Webinoly includes a LEMP stack including Nginx, MariaDB (a more performant drop-in replacement for MySQL), and PHP7. Their stack also includes both Redis and Memcached servers for object caching, Let's Encrypt Certbot for SSL implementation, Postfix for transactional emails, PhpMyAdmin for database management from your site, and Duply/Duplicity Backup tools.
Again the addition of Postfix for transactional emails is very welcome as many users will require a solutions when migrating away from cPanel or Plesk shared hosting. The inclusion of Database management tools and Backup solutions is also noteworthy. Webinoly also includes commands for the creation of WordPress multisite installations by both sub-directory or subdomain.
In today's tutorial we will use Webinoly to automate the creation of a WordPress site on a LEMP stack that is configured to use FastCGI static caching alongside Redis Object/DB caching. This is often a preferred WordPress server stack.
This guide assumes you already have your Alibaba Cloud Elastic Compute Service (ECS) instance already created and have SSH access. Webinoly is only supposed on Ubuntu 16.04 installations, though it may work on others.
For this article, I created an instance in the US East zone. All commands in this tutorial are issued as a superuser with root permissions using the sudo command. The screenshots were taken whilst operating as a root user directly (not recommended) so have the sudo command omitted.
Webinoly has some port requirements for it to work properly, these are detailed on their installation page and include:
In your Alibaba Cloud ECS Management Console, first click Security Groups from the left horizontal navigation. In your security group, click 'Configure Rules'.
Within your Security Group configuration panel, click Add Security Group Rules
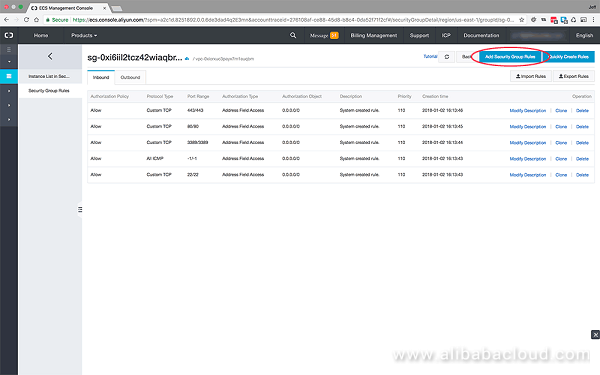
For each port that isn't configured you will need to include the port range and authorization object. For port range the input is in the following format:
from-port-number/to-port-numberSo opening a single port will be 22222/22222.
Authorization object refers to the the IP ranges that are allowed for each port. The following format will allow connections from all IP addresses:
0.0.0.0/0In most cases your security group rules will already include TCP Ports 22, 80 and 443 already configured. You will only need to add the extra Webinoly specific ports.
Open ports 22222/TCP (Inbound), 11371/TCP (Outbound), and 587/TCP (Outbound) in your Security Group Rules.
Go to Alibaba Cloud DNS by clicking on the menu option in the horizontal left navigation bar, and then click the blue button in the top right to add your domain.
Once your domain has been added, you will need to configure its DNS settings. Click on the blue 'configure' link at the right of the row. We will only be adding the DNS settings required for a basic set up to serve a domain both with and without the www prefix. These include:
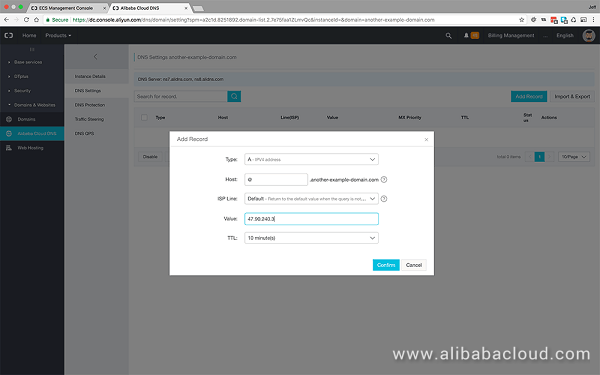
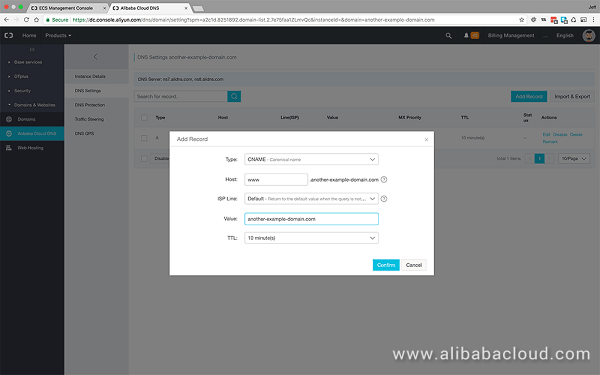
You will also need to configure your nameserver settings at your domain registrar to use the Alibaba Cloud DNS servers.
The Alibaba Cloud DNS server addresses will be provided for you on this page, record them, visit your domain registrar, and replace their nameservers with these nameservers at your domain registrars DNS settings page - usually referred to as 'Custom Nameserver' in the settings.
If you have registered your domain with Alibaba, then this is not required.
First connect to your instance by SSH:
$ ssh your_user@your_server_ipBefore you can install Webinoly you will need to install 2 additional software packages, software-properties-common and python-software-properties with the following commands:
$ sudo apt-get install -y software-properties-common python-software-propertiesOnce this is done, it is best to update your package manager:
$ sudo apt-get updateWhen you install Webinoly, you have several options regarding which parts of their LEMP stack you wish to install. We are interested in the full LEMP stack with all the tools. This is option 3, install it with the following compound command:
$ wget -qO weby qrok.es/wy && sudo bash weby 3Once the installation is complete you will be provided with your MariaDB root and admin passwords, please keep them in a safe place.
Upon successful installation you should verify Webinoly has installed correctly and includes all the necessary components with:
$ webinoly -verifyIn actual fact, you will receive an error message at this point. It is nothing to worry about, you could proceed and create your WordPress sites now, but it is best to fix this process now.
By default Webinoly follows the best security practice of protecting your admin directory with HTTP authorization, as we haven't run the Webinoly command to create your HTTP authorized user and password, there is not yet an .htpasswd file.
We can fix that by issuing the following Webinoly command, and then entering our User and chosen password:
$ sudo httpauth -addYou will need to use this password later on in the tutorial to enter the admin areas of your website. Now if we recheck the Webinoly system integrity we will see the following:
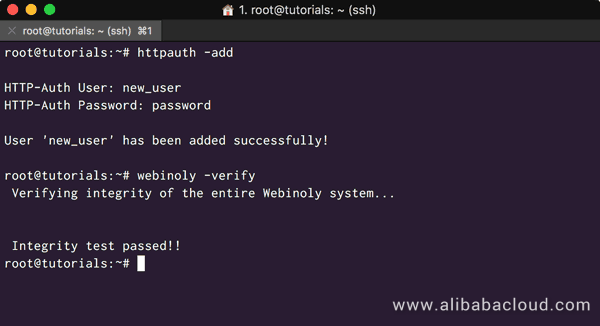
Using the available Webinoly commands makes it easy to create your WordPress sites, links to the full list of commands for site creation here.
We are going to create a WordPress site that uses Nginx FastCGI static caching, alongside Redis for Object and Database caching, and PHP7. To do that is as easy as entering the following command as root:
$ sudo site create an-example-domain.com -wp -cacheYou can create such a site using default settings with the following command:
$ sudo site create an-example-domain.com -wp=default -cacheThis will create your site using your domain name as the database and database user name, with the default prefix. I often like to use my own standard convention or database and database user naming, and often change the wp database prefix though. If you prefer to maintain such control, then the first option is probably better for you.
Once your site has been created your terminal will look like the following:
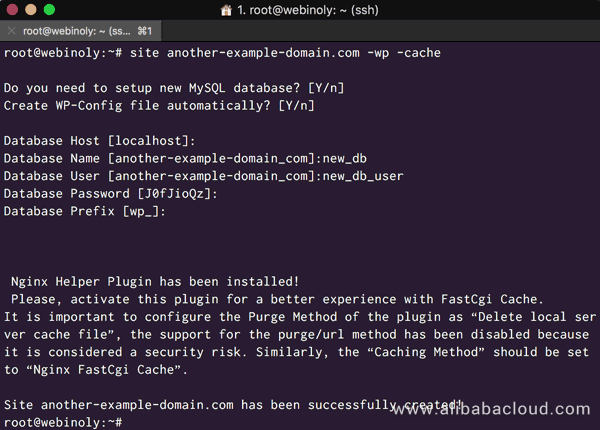
With Webinoly, you can't create a site with SSL already enabled, but instead you must issue the command once the site has already been created. To do that enter the following command:
$ sudo site another-example-domain.com -ssl-onYou will need to enter your email address for the certificate to be issued, and respond to a prompt about sharing your email address with the Electronic Frontier Foundation.
Webinoly's SSL integration comes complete with Strong Diffie-Hellman parameters, which should ensure it gets an A+ grade on the SSL Labs Qualys Test. It also automates the process of creating the Cronjob required to renew your SSL every month.
Once the process is completed and your SSL has been issued, your terminal will look like this:
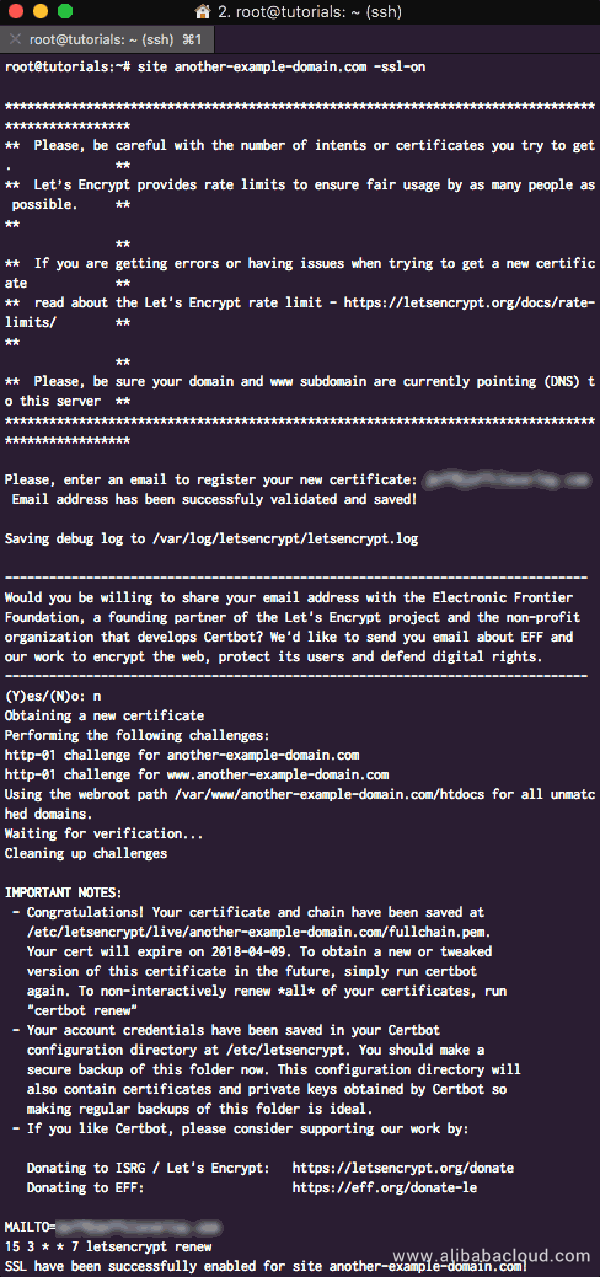
Now you can visit your site, you will be using the HTTPS protocol. You now need to complete WordPress' famous 5 minute installation process using the database information from step 4 previously.
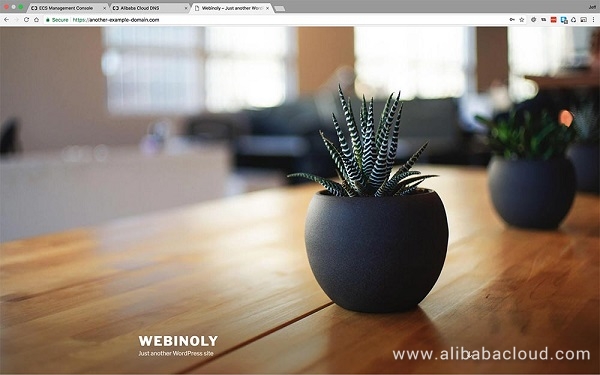
Once this is completed you will have access to your WordPress site by HTTPS:
When you choose to install a site with Webinoly using the -cache option, it automates the configuration of Nginx FastCGI caching and installs Redis server for object caching. It also installs the NGINX Helper plugin to manage FastCGI cache purging. However no plugin to enable Redis Caching with WordPress is installed, so we need to install that, then configure both plugins.
When you attempt to login to your WordPress Admin area, you will need to provide authentication. Webinoly uses the most secure practices, you will need to enter the user and password you created earlier in Step 3 above.
Go to your plugins and search for Redis Object Cache by Till Kruss:
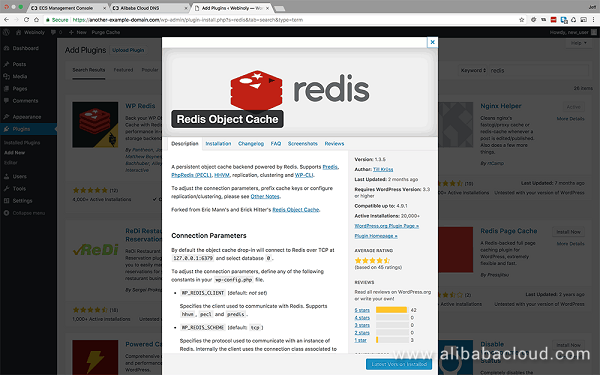
Install and activate it, then go to the plugins settings and enable it. The plugin setting screen should now be displaying the status as connected, and the client extension:
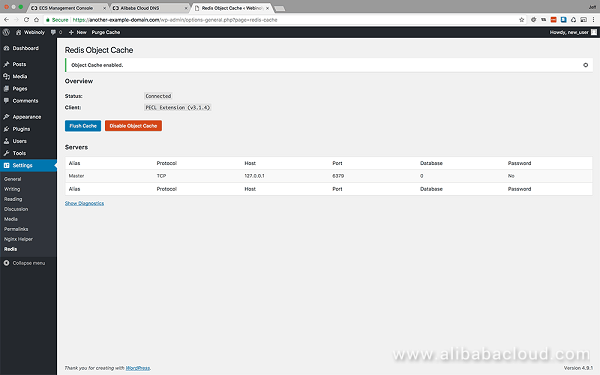
This shows us that the Redis server is running, but we have one more step to configure it to cache our WordPress database queries. Open your sites 'wp-config.php' file in the site root folder:
$ sudo nano /var/www/another-example-domain.com/wp-config.phpUnder your salt keys you will need to add the following code to enable WordPress caching:
define( 'WP_CACHE_KEY_SALT', 'another-example-domain.com' );
define( 'WP_CACHE', true );
Save the configuration changes and exit the file.
Return to the settings for the Redis Object Cache plugin, you should now see the Key Prefix as in the screenshot below:
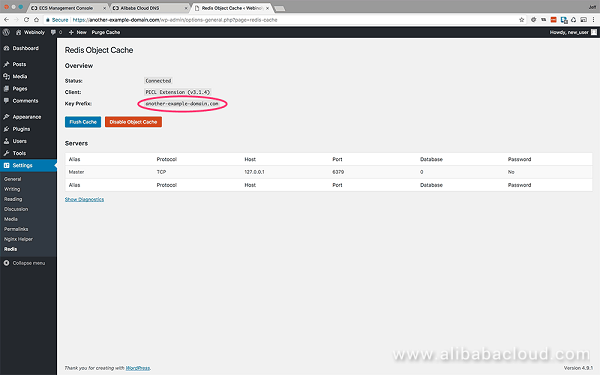
Now visit the Nginx Helper settings, these can be found in the main settings menu:
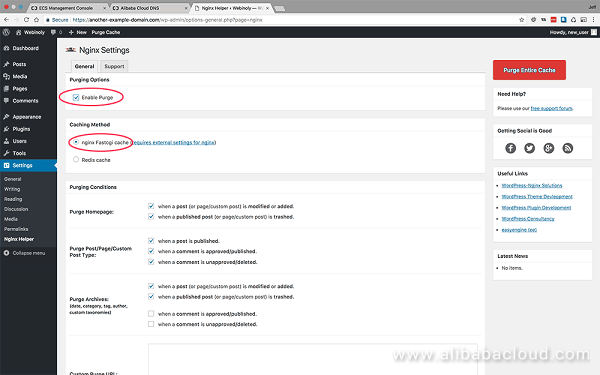
As you can see above, you need to 'enable purge' and select 'Nginx FastCgi cache' as the Caching method. To check that Nginx caching is working you should log out and visit your site. If you inspect the page load using your browsers 'Network' tool, you should see an additional Response Header.
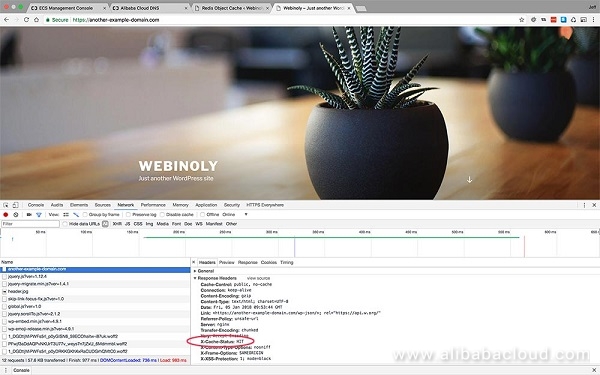
If Nginx caching is working the response will be either:
Webinoly provides an excellent logging tool, which allows you to visualize logs in real time generated as a history of server events, either by visitors accessing the site or by tools that are executed internally. This provides an excellent aid to help debug errors, or if you want to monitor a tool or applications performance, or detect visitors or identify bots. Its applications are invaluable.
The logging tool's syntax is simple:
$ sudo log With the following options:
<no option>    # View access logs
-wp            # View WordPress debug logs
-error        # View PHP Error logs
-mail            # View Mail logs
-php            # View PHP logs
-mysql # View MySQL logsWebinoly offers an excellent set of tools for creating a modern LEMP stack and installing WordPress sites on it. It is fast, and works well. Its SSL integration is excellent and works flawlessly, which can be a problem for these sort of tools.
Being a much newer tool, its community of users is not that large, but it has a highly responsive support forum.
From these tutorials we can see that both of these tools, EasyEngine and Webinoly, are very similar and offer two alternatives to solve the same problem.
EasyEngine is a much older and more established solution, and with that comes a larger user bases and more integrations and a larger feature set. However, its NGINX configuration automatically defaults to using Memcached Object caching and more complicated plugins such as W3TC to manage it. Often nowadays Redis is the more preferred solution, alongside less complicated plugins.
Regarding SSL, Webinoly has a smooth integration that works well. However, I couldn't get EasyEngine's integration of Let's Encrypt to play nicely with my Alibaba Cloud ECS instance, I hope this will change in the near future.
EasyEngine has a more feature rich set of additional tools, including more debugging and logging options, not to mention the power it brings to bear with its WP-CLI integration. On the other hand, the Webinoly developers are more focused on doing one thing and doing it well. Perhaps in future versions they may see fit to match EasyEngines feature set.
One other thing I would be remiss to mention, is that EasyEngine has no way to uninstall itself. Both applications can purge their server stacks, but whereas Webinoly can be uninstalled with a single command, to remove EasyEngine requires a server wipe.
Alibaba Cloud Showcases Cloud-Native PolarDB Database at ICDE

2,605 posts | 747 followers
FollowAlibaba Clouder - August 15, 2018
Alibaba Clouder - February 22, 2018
Alibaba Clouder - May 16, 2018
Alibaba Clouder - April 2, 2019
Alibaba Clouder - May 9, 2018
Alibaba Clouder - June 3, 2020

2,605 posts | 747 followers
Follow ECS(Elastic Compute Service)
Elastic and secure virtual cloud servers to cater all your cloud hosting needs.
Learn More DNS
DNS
Alibaba Cloud DNS is an authoritative high-availability and secure domain name resolution and management service.
Learn More OSS(Object Storage Service)
An encrypted and secure cloud storage service which stores, processes and accesses massive amounts of data from anywhere in the world
Learn MoreMore Posts by Alibaba Clouder