By Jeff Cleverley, Alibaba Cloud Tech Share Author. Tech Share is Alibaba Cloud's incentive program to encourage the sharing of technical knowledge and best practices within the cloud community.
In previous tutorials, I have taken us through the process of installing a highly performant LEMP stack on a new Alibaba Cloud Elastic Compute Service (ECS) instance for the purposes of running a WordPress web application. It is important to have an understanding of the components involved in the stack, and installing each component yourself gives you maximum flexibility and provides the most transparent configurations. There are however several open source, command line based, automation tools that can speed up this process, while still providing excellent configuration options in an easy to use process.
In these articles, I will look at two of the most popular options available for this task in the WordPress ecosystem, EasyEngine and Webinoly. I will create test sites with both as a comparison, and also refer back to the previous step by step guide.
EasyEngine is the most well established of these tools in the WordPress ecosystem, it was created and is maintained by rtCamp solutions, the author of the Nginx Helper Plugin used for FastCGI cache management in my other tutorials. As their website explains, the easy part is installing EasyEngine and WordPress, the hard part is gaining enough traffic to crash their LEMP stack.
EasyEngine installs a complete LEMP stack, including Nginx, MySQL, PHP7, but also Postfix. The addition of Postfix for email is a great benefit, meaning any WordPress site created on your VPS will already have transactional email capability and not require an additional solution.
In total EasyEngine has 15 base configurations to automate the creation of different WordPress websites, in addition to other tools. It can also be used to install just a base LEMP stack if all you are interested in is server stack management. Multisite installations is also another strength of EasyEngine, it can be configured to automate the creation of a multisite WordPress network based on either subdirectories or subdomains.
WPCLI - the WordPress command line interface is also installed and configured as a default component in the EasyEngine stack, which I think is very useful. In total EasyEngine has 15 base configurations to automate the creation of different WordPress website, in addition to other tools. It can also be used to install just a base LEMP stack if all you are interested in is server stack management.
In today's tutorial we will use EasyEngine to automate the creation of a WordPress site on a LEMP stack that is configured to use FastCGI static caching and Memcached Object/DB caching.
This guide assumes you already have your Alibaba Cloud Elastic Compute Service (ECS) instance already created and have SSH access. EasyEngine will work on Ubuntu 12.04, 14.04 and 16.04, and Debian 7 and 8.
For this article, I created an instance in the US East zone. All commands in this tutorial are issued as a superuser with root permissions using the sudo command. The screenshots were taken whilst operating as a root user directly (not recommended) so have the sudo command omitted.
EasyEngine has some port requirements for it to work properly, these are detailed on their installation page and include:
However, if you also want to use transactional emails you will also need to open:
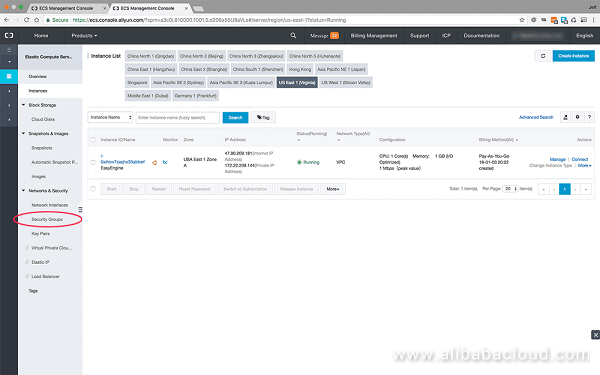
In your Alibaba Cloud ECS Management Console, first click Security Groups from the left horizontal navigation:
From your Security Group Clock to Add Security Group Rules:
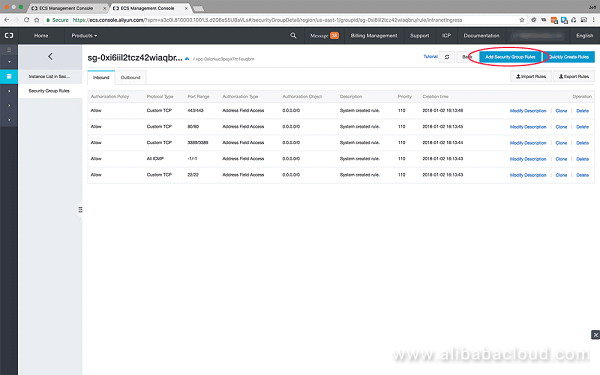
For each port that isn't configured you will need to include the port range and authorization object. For port range the input is in the following format:
from-port-number/to-port-numberSo opening a single port will be 22222/22222.
Authorization object refers to the the IP ranges that are allowed for each port. The following format will allow connections from all IP addresses:
0.0.0.0/0In most cases your security group rules will already include TCP Ports 22, 80 and 443 already configured. You will only need to add the extra EasyEngine specific ports.
Open ports 22222/TCP (Inbound) and 11371/TCP (Outbound) in your Security Group Rules.
Go to Alibaba Cloud DNS by clicking on the menu option in the horizontal left navigation bar, and then click the blue button in the top right to add your domain:
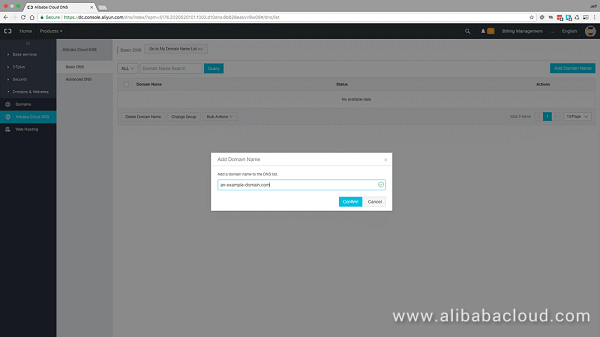
Once your domain has been added, you will need to configure its DNS settings. Click on the blue 'configure' link at the right of the row. We will only be adding the DNS settings required for a basic set up to serve a domain both with and without the www prefix. These include:
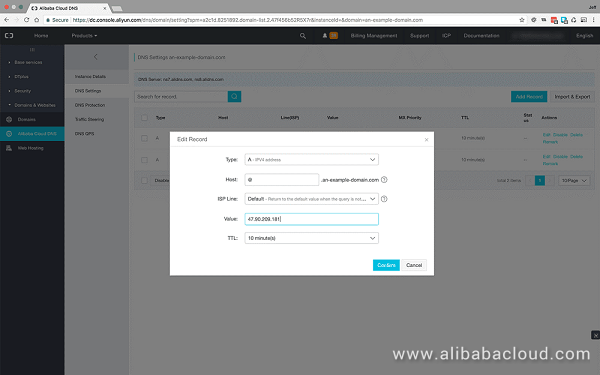
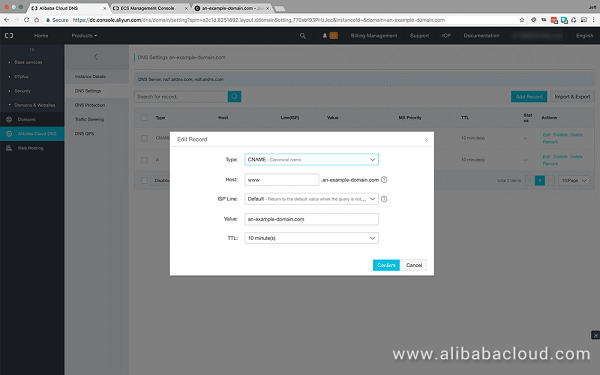
You will also need to configure your nameserver settings at your domain registrar to use the Alibaba Cloud DNS servers.
The Alibaba DNS server addresses will be provided for you on this page, record them. Visit your domain registrar, and replace their nameservers with the Alibaba Cloud provided settings at your domain registrars DNS settings page. You can usually find this referred to as Custom Nameserver in the applicable settings.
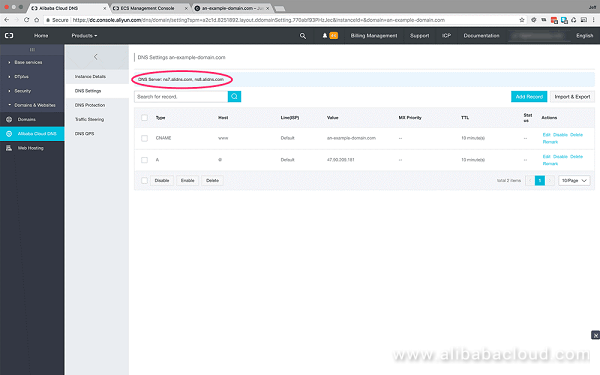
If you have registered your domain with Alibaba, then this is not required.
Installing EasyEngine is…. well… Easy. First connect to your instance by SSH:
$ ssh your_user@your_server_ipThen enter the following command to install EasyEngine:
$ wget -qO ee rt.cx/ee && sudo bash eeDuring the installation procedure you will be asked to enter your name and email address. Once the installation is complete your terminal should look like the following:
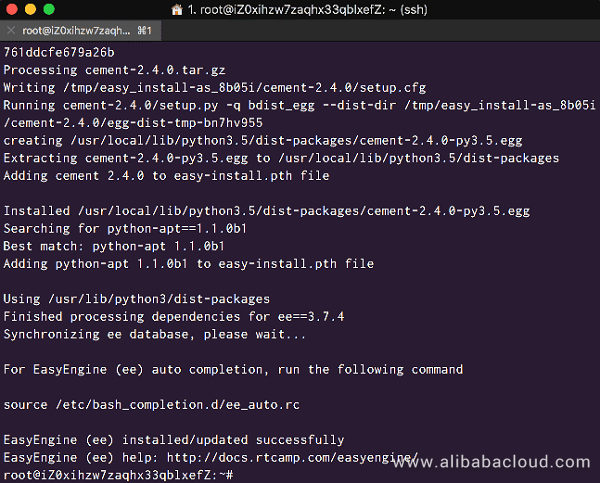
If, during installation, you receive failed installations due to problems with package installations from the Aliyun repositories, then run the installation command again. This usually fixes the issue and EasyEngine installs successfully.
Once this is completed you will have a LEMP stack on your server.
Again, using the available EasyEngine commands it is very easy to create a variety of WordPress sites with different configurations. You can find the full list of commands for site creation here.
We are going to create a WordPress site that uses Nginx FastCGI static caching, alongside Memcached for Object and Database caching, and PHP7. To do that is as easy as entering the following command as root:
$ sudo ee site create an-example-domain.com --wpfc --php7 However, remember earlier I mentioned that EasyEngine also installs WP-CLI? That means we can also use additional WP-CLI commands to automate the creation of the site and speed up the process. These include commands for adding your user, user password and email address.
Let's utilize this method and enter a command as follows:
$ sudo ee site create an-example-domain.com --wpfc --php7 --user=new_user --pass=new_user_password --email=new-user@emailaddress.com You will receive a notification informing you that PHP7 is an experimental feature that requires a positive response, enter yes when prompted. Once the process is completed your terminal will look like this:
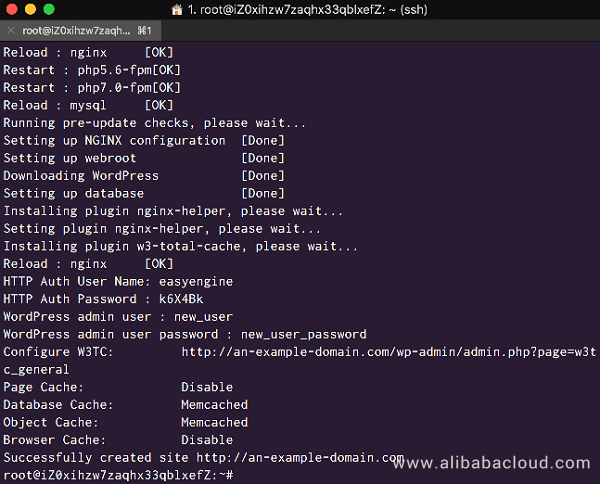
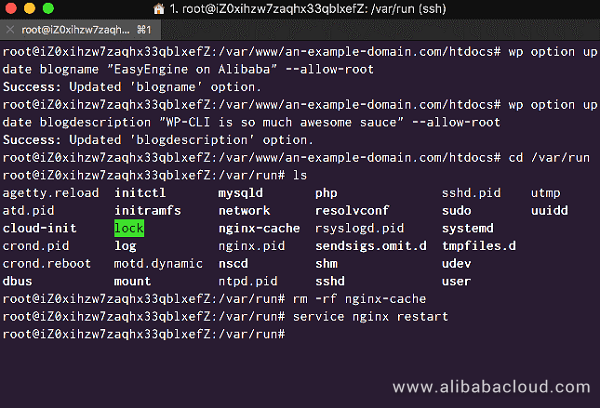
Since WP-CLI is so powerful, we can use it to immediately create alterations on the site. To update your site name and description you can use the following command:
$ sudo wp option update blogname “Your Site Title” --allow-root
$ sudo wp option update blogdescription “Your site description” --allow-root
Since we are using Nginx FastCGI caching, these changes won't be immediately viewable until we flush the cache. To do that cd into your /var/run directory and delete the nginx-cache then restart Nginx with the following commands:
$ cd /var/run
$ sudo rm -rf nginx-cache
$ sudo service nginx restart
If you have followed along, your terminal will now look something like this:
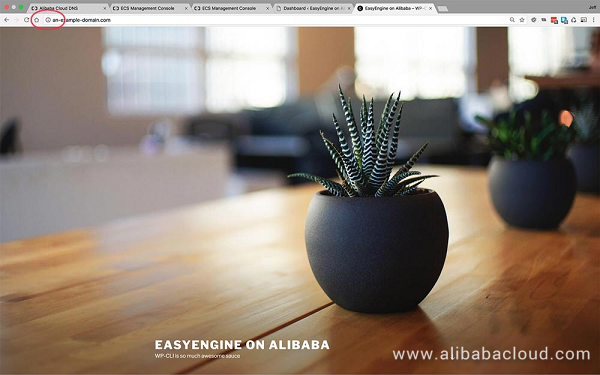
Now you can visit your site at your domain name, which in my cas is an-example-domain.com.
EasyEngine also includes commands for the installation of a Let's Encrypt SSL certificate for HTTPS connections. This command can either be issued during site creation, or with the update command after site creation as follows:
$ sudo ee site update an-example-domain.com --letsencryptHowever, as you can see in the following screenshot, I had problems with their implementation. My site domains are pointed at the server correctly with all the DNS configuration needed, but their implementation of Let's Encrypt certbot repeatedly failed to issue my certificates.
So let's install Certbot ourselves following the same process as in a previous tutorial.
First we need to install the software-properties-common package so that we may then install additional repositories to the package manager. Issue this command:
$ sudo apt-get install -y software-properties-commonOnce that is completed, add the Let's Encrypt package repository:
$ sudo add-apt-repository ppa:certbot/certbotThen update your package list before installing cerbot:
$ sudo apt-get update
$ sudo apt-get install python-certbot-nginx
Since EasyEngine has already configured your Nginx server configuration, all we need to do now is command Certbot to issue your SSL certificate for your domains, including your www domain. Do that with the following command:
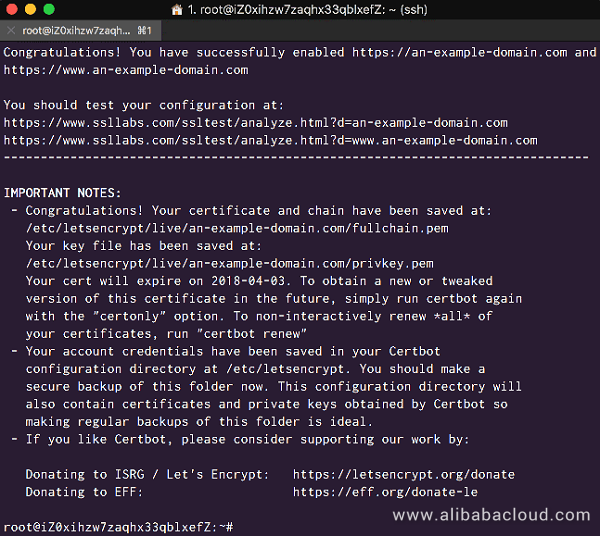
$ sudo certbot --nginx -d an-example-domain.com -d www.an-example-domain.comCertbot will automate the process of issuing your SSL and updating your Nginx configuration with the certificates locations. It will prompt you to accept its Terms of Service, provide your email address, and ask if you would be willing to share said email address with the Electronic Frontier Foundation.
It will finally require you to select whether or not to redirect HTTP traffic to HTTPS. I suggest you choose to do so. Once the certificate has been successfully installed your terminal should look like this:
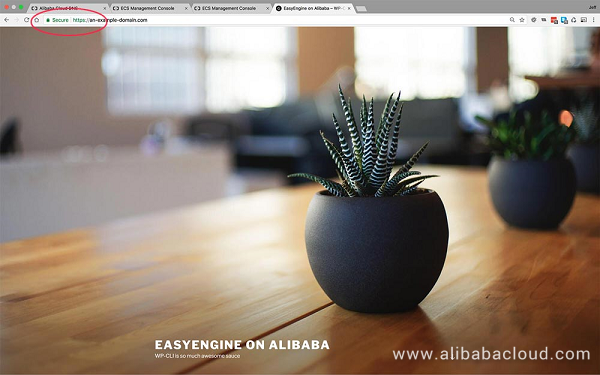
Now you can visit your site via HTTPS and see the "security lock" icon in the URL bar:
The current SSL certificate will not include strong encryption for the initial handshake. To improve this you should strengthen your Diffie-Hellman parameters. You can complete this additional step by completing Step 10 in this tutorial.
You will also need to issue a cron job to ensure the automatic renewal of your SSL certificate, following the instructions in Step 11 of this tutorial to do that.
When you choose to install a site with EasyEngine using the Nginx caching options, it automates the configuration of Nginx FastCGI caching and installs a Memcached server for object caching.
It also installs the plugins required for your WordPress site to utilize these server caching functions. NGINX Helper plugin for Nginx Caching, and W3 Total Cache for Memcached DB, Object caching, and Browser Caching.
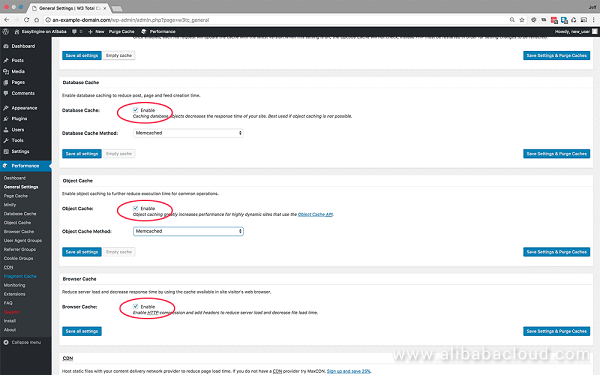
In your WordPress admin, visit the 'Performance' setting panel, and the 'General settings' sub menu from your settings navigation:
As you can see above, you need to enable Database cache, Object cache, and Browser cache. You also need to select 'Memcached' from the Database cache method and Object cache method dropdown selectors.
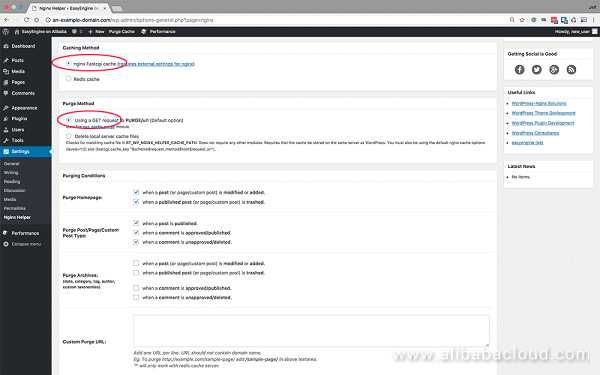
Now visit the Nginx Helper settings, these can be found in the main settings menu:
As you can see above, you need to select Nginx FastCgi cache as the Caching method, and 'Use a Get Request' as the purge method. You may also alter the other purge conditions as best suits your use needs.
To check that Nginx caching is working you should log out and visit your site. If you inspect the page load using your browsers 'Network' tool, you should see an additional Response Header:
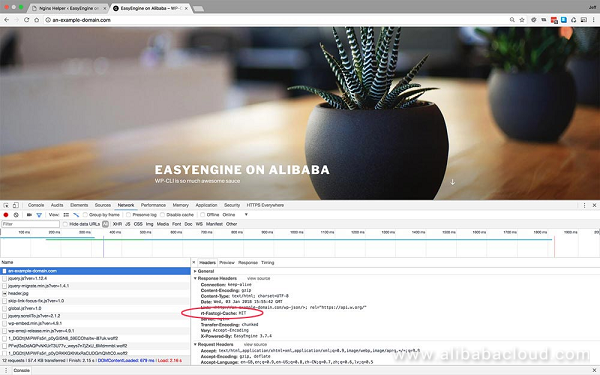
If Nginx caching is working the response will be either:
As previously mentioned, EasyEngine includes a variety of additional tools and commands to help manage your LEMP stack and WordPress site efficiently and effectively. Please refer to their site for the full rundown of commands, but I would like to introduce some of the most useful ones here quickly.
To monitor logs for your site EasyEngine uses the following command:
$ ee log show an-example-domain.comThis command can be implemented with different additional commands for different site specific logs.
To view Nginx logs:
$ ee log show an-example-domain.com --nginxTo view PHP logs:
$ ee log show an-example-domain.com --phpTo view access logs:
$ ee log show an-example-domain.com --accessTo view WordPress debug logs:
$ ee log show an-example-domain.com --wpYou can monitor PHP-FPM and MySQL logs using:
$ ee log show --mysql
$ ee log show --fpm
And may reset logs using the following command:
$ ee log resetAgain this can be combined with previously mentioned commands to target specific logs, for example to reset the Nginx log for a specific site we would use:
$ ee log reset an-example-domain.com --nginxEasyEngine has commands for both server level debugging and site level debugging.
Debugging Server Parameters Globally (for all sites)
Use the following command for server level debugging:
$ ee debug <option>With options including:
-i                     # Interactive debug
--nginx                # Debug Nginx
--rewrite                # Debug Nginx rewrite rules
--fpm                    # Debug FastCGI
--fpm7                # Debug FastCGI PHP 7.0
--php                    # Debug PHP
--php7                # Debug PHP 7.0
--mysql                # Debug MySQL
--import-slow-log-interval    # Import MySQL slow log to Anemometer
--all                    # Debug all server paramenters
Debugging Sites
Use the following command for site level debugging:
$ ee debug an-example-domain.com <option>The options available for site level debugging are:
-i                 # Interactive debug
--nginx            # Debug Nginx
--rewrite            # Debug Nginx rewrite rules
--wp                 # Debug WordPress
--all # Debug all site wide parametersAs we can see, EasyEngine offers a very mature and effective automation solution for setting up and managing your LEMP stack and WordPress sites from the terminal. It provides everything you need from caching to email, and has a large support forum and vibrant community.
Even given the minor issues with installing their SSL solution, it can be seen that EasyEngine can be used to quickly set up and manage your sites. The inclusion of WP-CLI alongside their Logging and Debugging commands provide additional benefits that make up for this in no small part.
In the next article of this tutorial series, we will be looking at Webinoly.
Last Call for Alibaba Cloud MVP Nomination - September 2018 Batch

2,593 posts | 793 followers
FollowAlibaba Clouder - August 15, 2018
Alibaba Clouder - July 4, 2018
Alibaba Clouder - April 2, 2019
Alibaba Clouder - May 6, 2019
Alibaba Clouder - May 9, 2018
Alibaba Clouder - June 3, 2020

2,593 posts | 793 followers
Follow ECS(Elastic Compute Service)
Elastic and secure virtual cloud servers to cater all your cloud hosting needs.
Learn More DNS
DNS
Alibaba Cloud DNS is an authoritative high-availability and secure domain name resolution and management service.
Learn More OSS(Object Storage Service)
An encrypted and secure cloud storage service which stores, processes and accesses massive amounts of data from anywhere in the world
Learn MoreMore Posts by Alibaba Clouder
5081358638073175 May 23, 2019 at 7:02 pm
The problem is that EasyEngine v4 now requires Docker which is another layer to deal with...What is your option about Bash-only scripts like SlickStack?