このトピックでは、AI Search Open Platform でマルチモーダルデータを前処理する方法について説明します。
シナリオ
マルチモーダルデータの前処理は、非構造化ドキュメントと画像を処理するためのソリューションを提供します。完全なプロセスは、ドキュメント解析、画像解析、ドキュメントスライス、テキスト埋め込み、およびテキストスパースで構成されます。完全なデータ処理プロセスを体験します。これらのサービスはすべて、AI Search Open Platform の API サービスを必要とし、実際の使用量に基づいて課金されます。
前提条件
AI Search Open Platform がアクティブ化されていること。詳細については、「AI Search Open Platform をアクティブ化する」をご参照ください。
サービスエンドポイントと身分認証情報が取得されていること。詳細については、「サービスエンドポイントを照会する」および「API キーを管理する」をご参照ください。
AI Search Open Platform では、インターネットまたは VPC (仮想プライベートクラウド)経由でサービスを呼び出すことができ、VPC を介したリージョン間のサービス呼び出しもサポートされています。ドイツ (フランクフルト) リージョンのユーザーは、VPC エンドポイントを使用して AI Search Open Platform コンソールでサービスを使用できます。
マルチモーダルデータ前処理のための開発フレームワーク
ユーザーアクセスを容易にするために、AI Search Open Platform は次の開発フレームワークを提供しています。
Java 用 SDK。
Python 用 SDK。
ビジネスで LangChain を使用している場合は、開発フレームワークとして LangChain を選択します。
ビジネスで LlamaIndex を使用している場合は、開発フレームワークとして LlamaIndex を選択します。
ステップ 1:サービスを選択してコードをダウンロードする
この例では、Python 用 SDK を開発フレームワークとして使用して、マルチモーダルデータ前処理ソリューションを構築します。
AI Search Open Platform コンソール にログオンします。
上部のナビゲーションバーで、ドイツ (フランクフルト) リージョンを選択します。
左側のナビゲーションウィンドウで、[シーンセンター] を選択します。[シーンセンター] ページで、[マルチモーダルデータ処理シナリオ - データ解析とベクトル化] セクションの [入力] をクリックします。
[シーン開発] タブの [基本構成] タブで、[サービス名] 列のドロップダウンリストから使用するサービスを選択します。[サービスの詳細] タブで、サービスの詳細を表示できます。
説明API 操作を呼び出すことによって、RAG ベースのソリューションでアルゴリズムサービスを使用する場合は、service_id パラメーターを使用してサービス ID を指定する必要があります。たとえば、ドキュメントコンテンツ解析サービスの ID は ops-document-analyze-001 です。
サービスを選択すると、生成されたコードの service_id パラメーターがそれに応じて変更されます。コードをローカル環境にダウンロードした後、コード内の service_id パラメーターを変更して他のサービスを呼び出すことができます。
サービス
説明
ドキュメントコンテンツ解析
ドキュメントコンテンツ解析サービス (ops-document-analyze-001): 汎用ドキュメント解析サービスを提供します。このサービスを使用して、テキスト、表、画像などの非構造化ドキュメントからタイトルや段落などの論理構造を抽出し、構造化データを生成できます。
画像コンテンツ解析
画像コンテンツ認識サービス 001 (ops-image-analyze-vlm-001): マルチモーダル LLM に基づいて画像コンテンツを解析および理解し、テキストを識別します。解析されたテキストは、画像検索や会話型リサーチシナリオに使用できます。
画像テキスト認識サービス 001 (ops-image-analyze-ocr-001): 画像テキスト認識に OCR (光学式文字認識) 機能を使用します。解析されたテキストは、画像検索や会話型リサーチシナリオに使用できます。
ドキュメントスライス
共通ドキュメントスライスサービス (ops-document-split-001): 汎用テキストスライスサービスを提供します。このサービスを使用して、段落、セマンティクス、および特定のルールに基づいて、HTML、MARKDOWN、および TXT 形式の構造化データをセグメント化できます。リッチテキストからコード、画像、表を抽出することもできます。
テキストベクトル化
OpenSearch テキスト埋め込みサービス -001 (ops-text-embedding-001): 40 以上の言語をサポートするテキスト埋め込みサービスを提供します。入力テキストの最大長は 300 トークンで、生成されるベクトルのディメンションは 1,536 です。
OpenSearch ユニバーサルテキストベクトル化サービス -002 (ops-text-embedding-002): 100 以上の言語をサポートするテキスト埋め込みサービスを提供します。入力テキストの最大長は 8,192 トークンで、生成されるベクトルのディメンションは 1,024 です。
OpenSearch テキストベクトル化サービス - 中国語 -001 (ops-text-embedding-zh-001): 中国語テキストのテキスト埋め込みサービスを提供します。入力テキストの最大長は 1,024 トークンで、生成されるベクトルのディメンションは 768 です。
OpenSearch テキストベクトル化サービス - 英語 -001 (ops-text-embedding-en-001): 英語テキストのテキスト埋め込みサービスを提供します。入力テキストの最大長は 512 トークンで、生成されるベクトルのディメンションは 768 です。
テキストスパースベクトル化
テキストスパース埋め込みは、テキストデータをストレージ容量の少ないスパースベクトルに変換します。スパースベクトルを使用して、キーワードと頻繁に使用される term に関する情報を表現できます。スパースベクトルとデンスベクトルを使用してハイブリッド検索を実行し、検索パフォーマンスを向上させることができます。
OpenSearch テキストスパースベクトル化サービス - 汎用 (ops-text-sparse-embedding-001): 100 以上の言語をサポートするテキスト埋め込みサービスを提供します。入力テキストの最大長は 8,192 トークンです。
サービスを選択した後、[構成が完了したら、コードクエリを入力します] をクリックして、アプリケーションがデータ前処理ソリューションを呼び出すときの実行フローに基づいてコードを表示およびダウンロードします。
プロセス | 説明 |
このプロセスは、ドキュメント解析、画像抽出、ドキュメントチャンク、およびテキスト埋め込みで構成されます。 | メイン関数 document_pipeline_execute を呼び出して、次の手順を実行できます。ドキュメント URL または Base64 エンコードファイルを使用して、処理するドキュメントを指定できます。
|
[コードクエリ] タブで、[テキスト解析とベクトル化] をクリックします。コードエディタで、[コードをコピー] または [ファイルをダウンロード] をクリックして、コードをデバイスにダウンロードします。
ステップ 2:ローカル環境でコードをテストする
コードファイルをデバイスにダウンロードした後、コード内のパラメーターを指定する必要があります。次の表にパラメーターを示します。
セクション | パラメーター | 説明 |
AI Search Open Platform | api_key | API キー。API キーの取得方法の詳細については、「API キーを管理する」をご参照ください。 |
aisearch_endpoint | API エンドポイント。API エンドポイントの取得方法の詳細については、「サービスエンドポイントを照会する」をご参照ください。 説明 "http://" を削除する必要があります。 インターネットまたは VPC 経由で API 操作を呼び出すことができます。 | |
workspace_name | AI Search Open Platform。 | |
service_id | サービス ID。コード開発を容易にするために、service_id_config パラメーターを使用して、offline.py ファイルと online.py ファイルでサービスを構成し、サービス ID を個別に指定できます。
|

パラメーターの構成が完了したら、Python 3.8.1 以降でコードを実行して、結果が正しいかどうかをテストできます。
コードで AI Search Open Platform データを前処理する場合、実行結果は次のようになります。
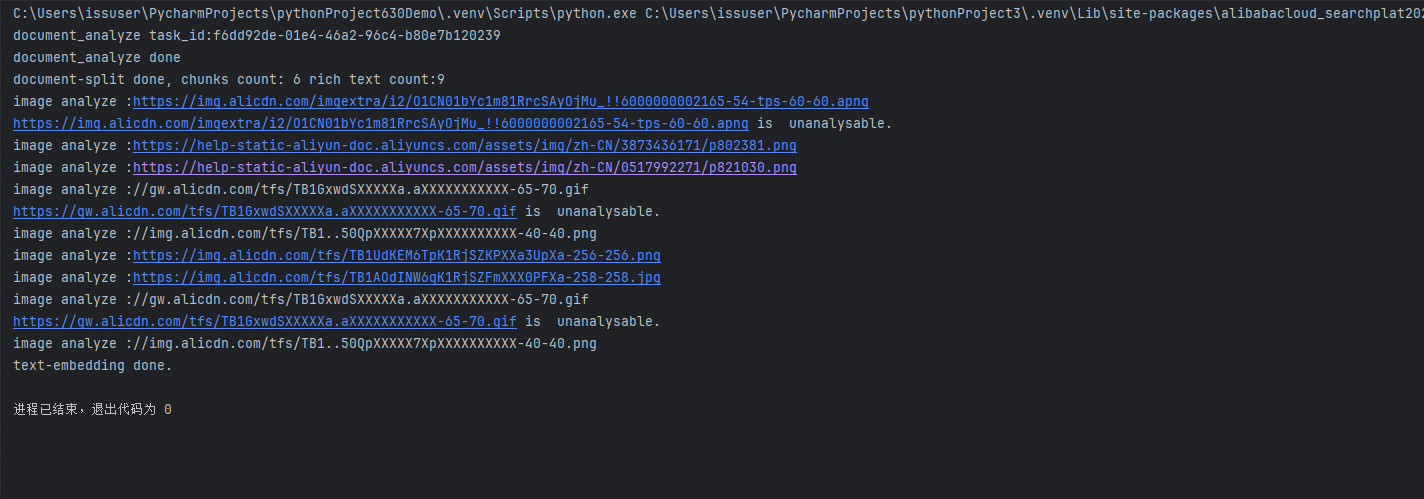
ドキュメント解析および埋め込みファイル:
# マルチモーダルデータ処理ソリューション

# 次の環境要件が満たされていること。
# Python バージョン 3.7 以降がインストールされていること。


# 次の依存関係がインストールされていること。
# pip install alibabacloud_searchplat20240529


# AI Search Open Platform の構成
aisearch_endpoint = "xxx.platform-cn-shanghai.opensearch.aliyuncs.com"
api_key = "OS-xxx"
workspace_name = "default"
service_id_config = {"document_analyze": "ops-document-analyze-001", #ドキュメント解析
                     "split": "ops-document-split-001", #分割
                     "text_embedding": "ops-text-embedding-001", #テキスト埋め込み
                     "text_sparse_embedding": "ops-text-sparse-embedding-001", #テキストスパース埋め込み
                     "image_analyze": "ops-image-analyze-ocr-001"} #画像解析

# ドキュメント URL を指定します。この例では、OpenSearch プロダクト説明ドキュメントを使用します。
document_url = "https://www.alibabacloud.com/help/zh/open-search/search-platform/product-overview/introduction-to-search-platform?spm=a2c4g.11186623.0.0.7ab93526WDzQ8z"

import asyncio
from operator import attrgetter
from typing import List
from Tea.exceptions import TeaException, RetryError
from alibabacloud_tea_openapi.models import Config
from alibabacloud_searchplat20240529.client import Client
from alibabacloud_searchplat20240529.models import GetDocumentSplitRequest, CreateDocumentAnalyzeTaskRequest, \
    CreateDocumentAnalyzeTaskRequestDocument, GetDocumentAnalyzeTaskStatusRequest, \
    GetDocumentSplitRequestDocument, GetTextEmbeddingRequest, GetTextEmbeddingResponseBodyResultEmbeddings, \
    GetTextSparseEmbeddingRequest, GetTextSparseEmbeddingResponseBodyResultSparseEmbeddings, \
    GetImageAnalyzeTaskStatusResponse, CreateImageAnalyzeTaskRequest, GetImageAnalyzeTaskStatusRequest, \
    CreateImageAnalyzeTaskRequestDocument, CreateImageAnalyzeTaskResponse


async def poll_doc_analyze_task_result(ops_client, task_id, service_id, interval=5): #ドキュメント解析タスクの結果をポーリングする
    while True:
        request = GetDocumentAnalyzeTaskStatusRequest(task_id=task_id)
        response = await ops_client.get_document_analyze_task_status_async(workspace_name, service_id, request)
        status = response.body.result.status
        if status == "PENDING": #保留中
            await asyncio.sleep(interval)
        elif status == "SUCCESS": #成功
            return response
        else:
            print("error: " + response.body.result.error)
            raise Exception("document analyze task failed") #ドキュメント解析タスクが失敗しました


def is_analyzable_url(url:str): #解析可能な URL かどうかを確認する
    if not url:
        return False
    image_extensions = {'.jpg', '.jpeg', '.png', '.bmp', '.tiff'}
    return url.lower().endswith(tuple(image_extensions))


async def image_analyze(ops_client, url): #画像解析
    try:
        print("image analyze :" + url)
        if url.startswith("//"):
            url = "https:" + url
        if not is_analyzable_url(url): #解析できない URL の場合
            print(url + " is  unanalysable.")
            return url
        image_analyze_service_id = service_id_config["image_analyze"]
        document = CreateImageAnalyzeTaskRequestDocument(
            url=url,
        )
        request = CreateImageAnalyzeTaskRequest(document=document)
        response: CreateImageAnalyzeTaskResponse = ops_client.create_image_analyze_task(workspace_name, image_analyze_service_id, request)
        task_id = response.body.result.task_id
        while True:
            request = GetImageAnalyzeTaskStatusRequest(task_id=task_id)
            response: GetImageAnalyzeTaskStatusResponse = ops_client.get_image_analyze_task_status(workspace_name, image_analyze_service_id, request)
            status = response.body.result.status
            if status == "PENDING": #保留中
                await asyncio.sleep(5)
            elif status == "SUCCESS": #成功
                return url + response.body.result.data.content
            else:
                print("image analyze error: " + response.body.result.error) #画像解析エラー
                return url
    except Exception as e:
        print(f"image analyze Exception : {e}") #画像解析例外


def chunk_list(lst, chunk_size): #リストをチャンクする
    for i in range(0, len(lst), chunk_size):
        yield lst[i:i + chunk_size]


async def document_pipeline_execute(document_url: str = None, document_base64: str = None, file_name: str = None): #ドキュメントパイプラインを実行する

    # AI Search Open Platform クライアントを生成します。
    config = Config(bearer_token=api_key,endpoint=aisearch_endpoint,protocol="http")
    ops_client = Client(config=config)

    # ステップ 1:ドキュメントまたは画像を解析します。
    document_analyze_request = CreateDocumentAnalyzeTaskRequest(document=CreateDocumentAnalyzeTaskRequestDocument(url=document_url, content=document_base64,file_name=file_name, file_type='html'))
    document_analyze_response = await ops_client.create_document_analyze_task_async(workspace_name=workspace_name,service_id=service_id_config["document_analyze"],request=document_analyze_request)
    print("document_analyze task_id:" + document_analyze_response.body.result.task_id)
    extraction_result = await poll_doc_analyze_task_result(ops_client, document_analyze_response.body.result.task_id, service_id_config["document_analyze"])
    print("document_analyze done") #ドキュメント解析完了
    document_content = extraction_result.body.result.data.content
    content_type = extraction_result.body.result.data.content_type

    # ステップ 2:ドキュメントを分割します。
    document_split_request = GetDocumentSplitRequest(
        GetDocumentSplitRequestDocument(content=document_content, content_type=content_type))
    document_split_result = await ops_client.get_document_split_async(workspace_name, service_id_config["split"],
                                                                      document_split_request)
    print("document-split done, chunks count: " + str(len(document_split_result.body.result.chunks)) #ドキュメント分割完了、チャンク数
          + " rich text count:" + str(len(document_split_result.body.result.rich_texts))) #リッチテキスト数

    # ステップ 3:テキストベクトル化を実行します。
    # 分割結果を抽出します。画像分割では、画像解析サービスを使用してテキストを抽出します。
    doc_list = ([{"id": chunk.meta.get("id"), "content": chunk.content} for chunk in document_split_result.body.result.chunks]
                + [{"id": chunk.meta.get("id"), "content": chunk.content} for chunk in document_split_result.body.result.rich_texts if chunk.meta.get("type") != "image"]
                + [{"id": chunk.meta.get("id"), "content": await image_analyze(ops_client,chunk.content)} for chunk in document_split_result.body.result.rich_texts if chunk.meta.get("type") == "image"]
                )
    chunk_size = 32  # 一度に最大 32 個のベクトルを生成できます。
    all_text_embeddings: List[GetTextEmbeddingResponseBodyResultEmbeddings] = []
    for chunk in chunk_list([text["content"] for text in doc_list], chunk_size):
        response = await ops_client.get_text_embedding_async(workspace_name,service_id_config["text_embedding"],GetTextEmbeddingRequest(chunk))
        all_text_embeddings.extend(response.body.result.embeddings)

    all_text_sparse_embeddings: List[GetTextSparseEmbeddingResponseBodyResultSparseEmbeddings] = []
    for chunk in chunk_list([text["content"] for text in doc_list], chunk_size):
        response = await ops_client.get_text_sparse_embedding_async(workspace_name,service_id_config["text_sparse_embedding"],GetTextSparseEmbeddingRequest(chunk,input_type="document",return_token=True))
        all_text_sparse_embeddings.extend(response.body.result.sparse_embeddings)

    for i in range(len(doc_list)):
        doc_list[i]["embedding"] = all_text_embeddings[i].embedding
        doc_list[i]["sparse_embedding"] = all_text_sparse_embeddings[i].embedding

    print("text-embedding done.") #テキスト埋め込み完了


if __name__ == "__main__":
    # 非同期タスクを実行します。
    #    import nest_asyncio # Jupyter Notebook でコードを実行する場合は、このコード行のコメントを解除します。
    #    nest_asyncio.apply() # Jupyter Notebook でコードを実行する場合は、このコード行のコメントを解除します。
    asyncio.run(document_pipeline_execute(document_url))
    # asyncio.run(document_pipeline_execute(document_base64="eHh4eHh4eHg...", file_name="attention.pdf")) # Base64 エンコードファイルを使用して、処理するドキュメントを指定することもできます。