Jika organisasi Anda memiliki banyak anggota, Anda dapat menggunakan otorisasi berbasis tag untuk memberikan izin kepada semua pengguna sekaligus. Pendekatan ini menghindari pemberian izin secara individual atau per kelompok pengguna, sehingga mengurangi biaya dan kompleksitas serta menyederhanakan manajemen di masa depan. Topik ini menjelaskan cara melakukan otorisasi berbasis tag.
Skenario
Otorisasi manajemen tag pengguna cocok untuk organisasi dengan banyak pengguna yang memiliki kebutuhan izin beragam. Otorisasi ini menggunakan kebijakan kontrol akses tingkat pengguna untuk memberikan manajemen izin yang dipersonalisasi bagi setiap pengguna. Misalnya, pengguna yang bertanggung jawab atas wilayah berbeda hanya dapat melihat data dari wilayah masing-masing.
Prasyarat
Anda telah membuat sebuah dataset. Untuk informasi selengkapnya, lihat Create a dataset.
Catatan
Topik ini hanya berlaku bagi pengguna yang membeli atau memulai uji coba gratis Quick BI pada atau setelah 3 Juni 2021. Jika Anda tidak memenuhi persyaratan ini, lakukan upgrade dari versi izin tingkat baris sebelumnya ke versi terbaru sebelum menjalankan operasi yang dijelaskan dalam topik ini. Untuk informasi selengkapnya, lihat Upgrade row-level permissions.
Batasan
Hanya Edisi Premium dan Edisi Profesional yang mendukung pengaturan izin tingkat baris.
Hanya pemilik dataset dan administrator ruang kerja yang dapat mengatur izin tingkat baris.
CatatanDeveloper ruang kerja hanya dapat mengatur izin tingkat baris untuk dataset yang mereka buat. Administrator ruang kerja dapat mengatur izin tingkat baris untuk semua dataset.
Prosedur
Masuk ke Quick BI console. Anda dapat mengatur izin tingkat baris untuk suatu dataset di workbench atau halaman edit dataset.
Entri fitur
Entri 1
Atur izin tingkat baris untuk dataset di workbench.
Ikuti langkah-langkah pada gambar untuk menuju halaman pengaturan Row-level Permissions.
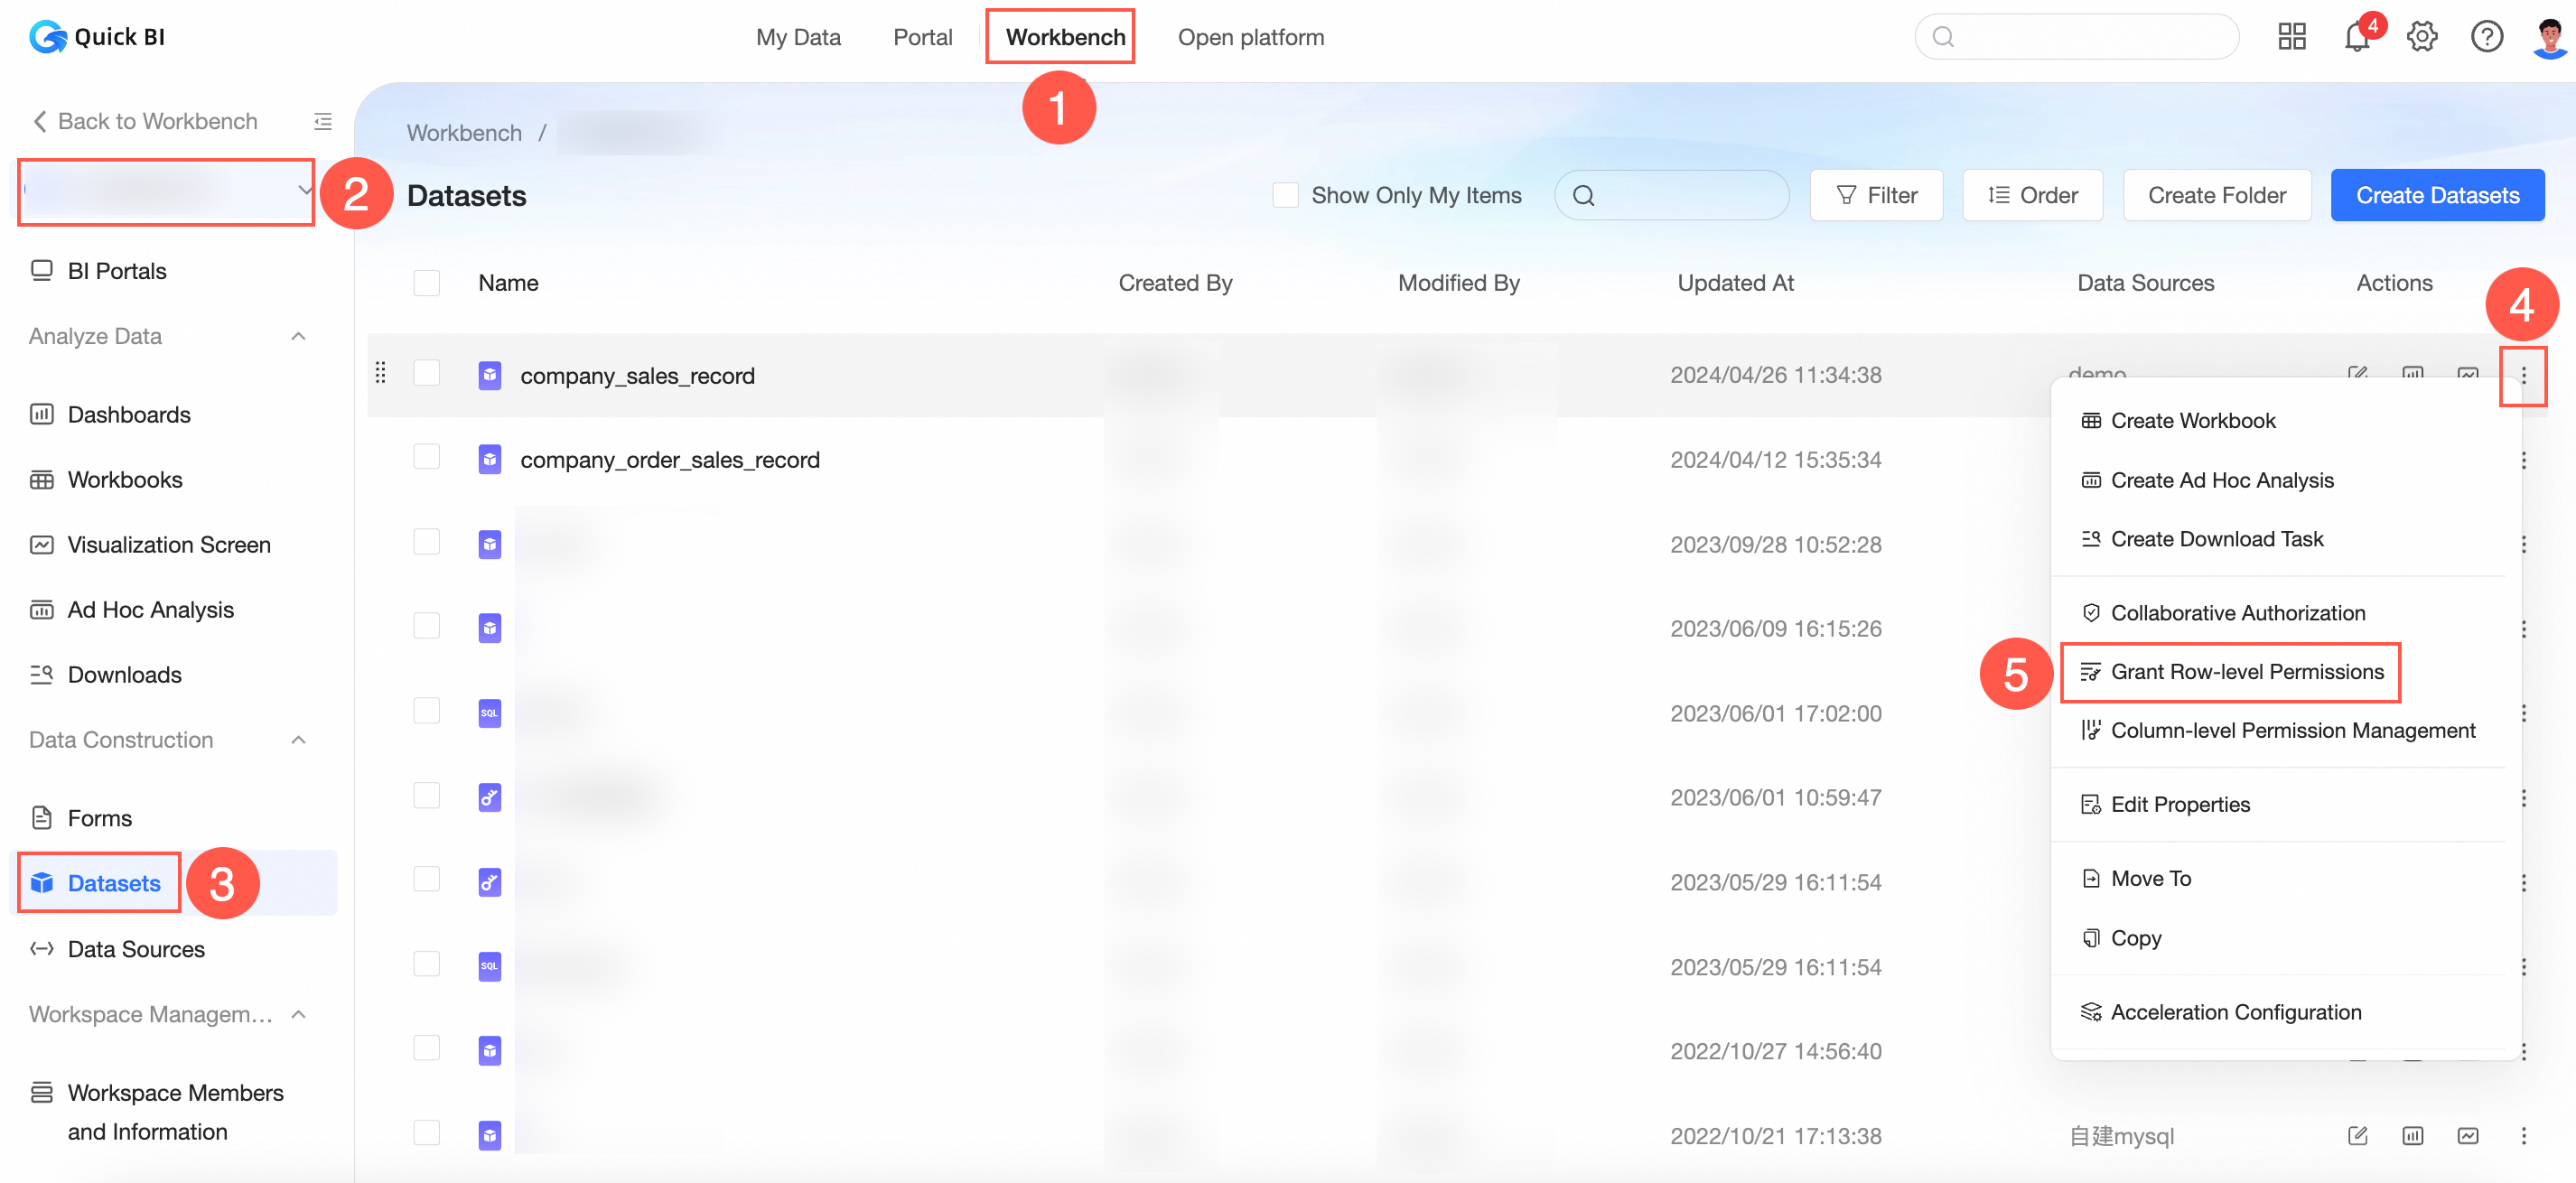
Aktifkan Enable Row-level Permissions.
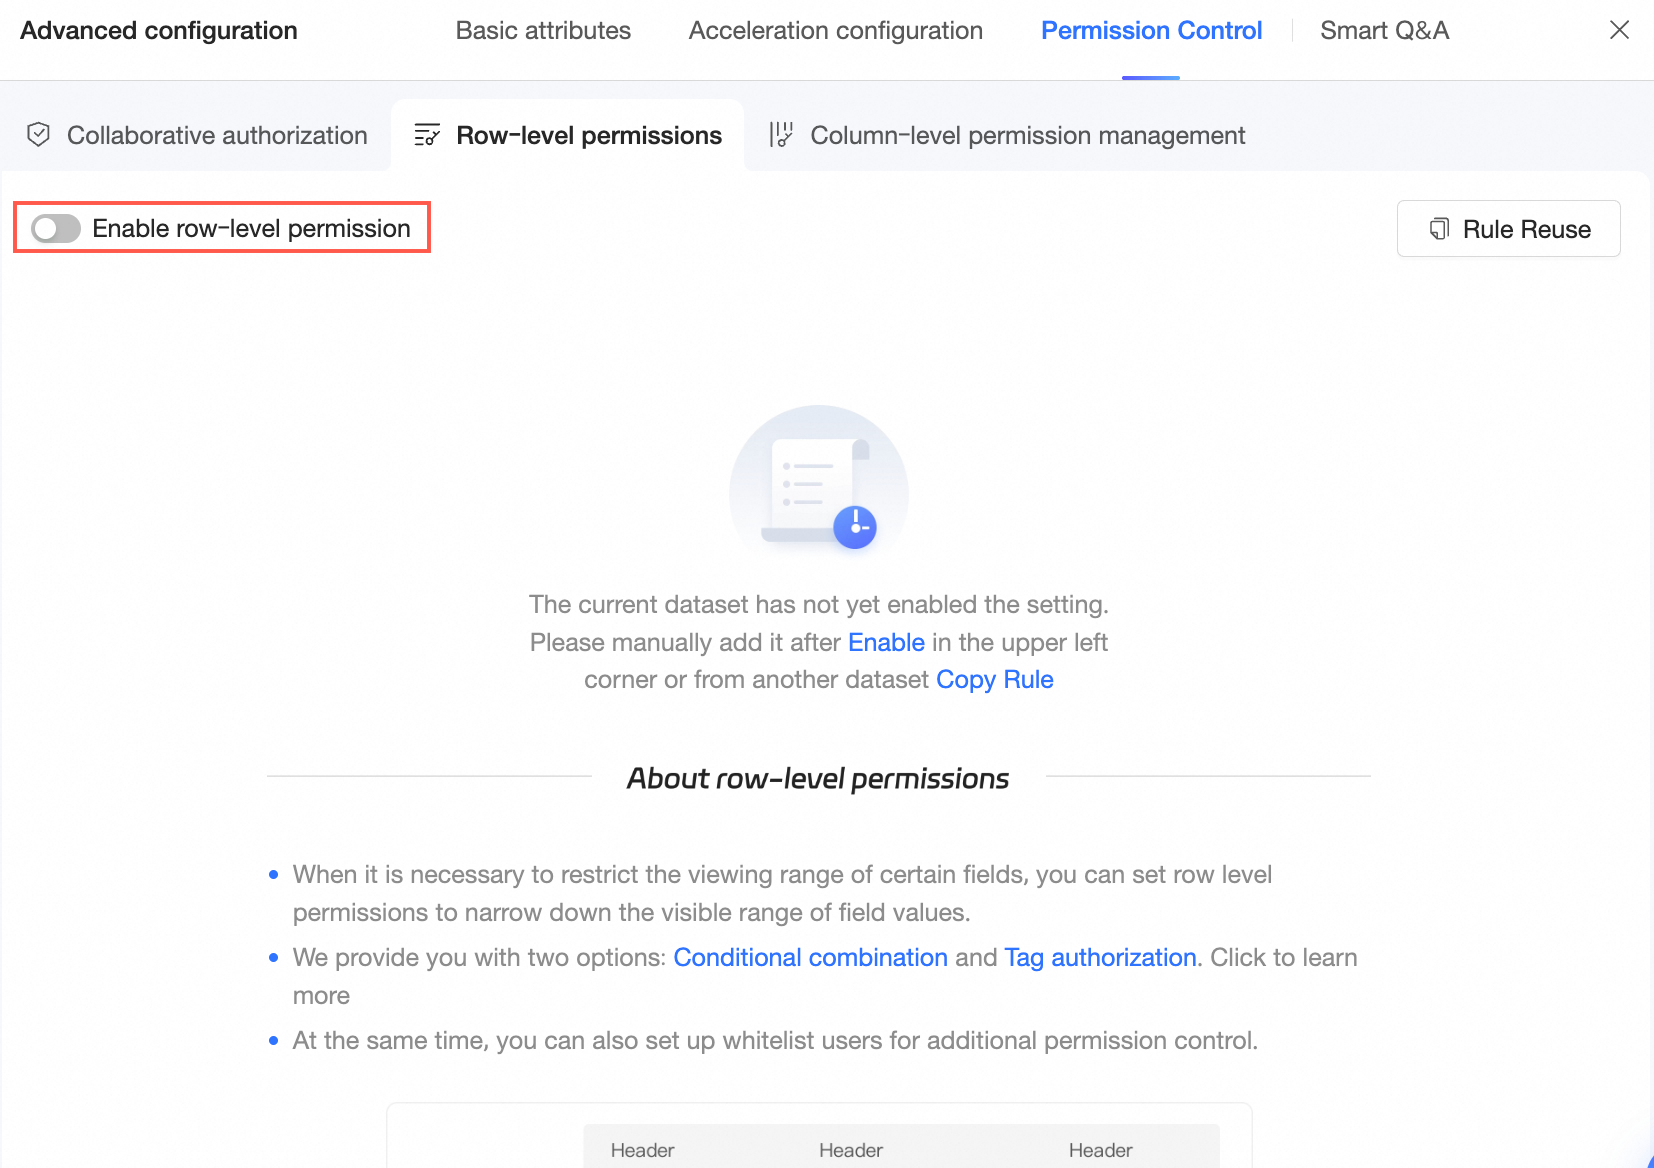
Pada halaman konfigurasi Row-level Permissions, pilih User Tag Management Authorization dan set association conditions.

Klik Save.
Entri 2
Atur izin tingkat baris untuk dataset di halaman edit dataset.
Pada bilah alat atas, klik Advanced Configuration lalu pilih Permission Control → Row-level Permissions.
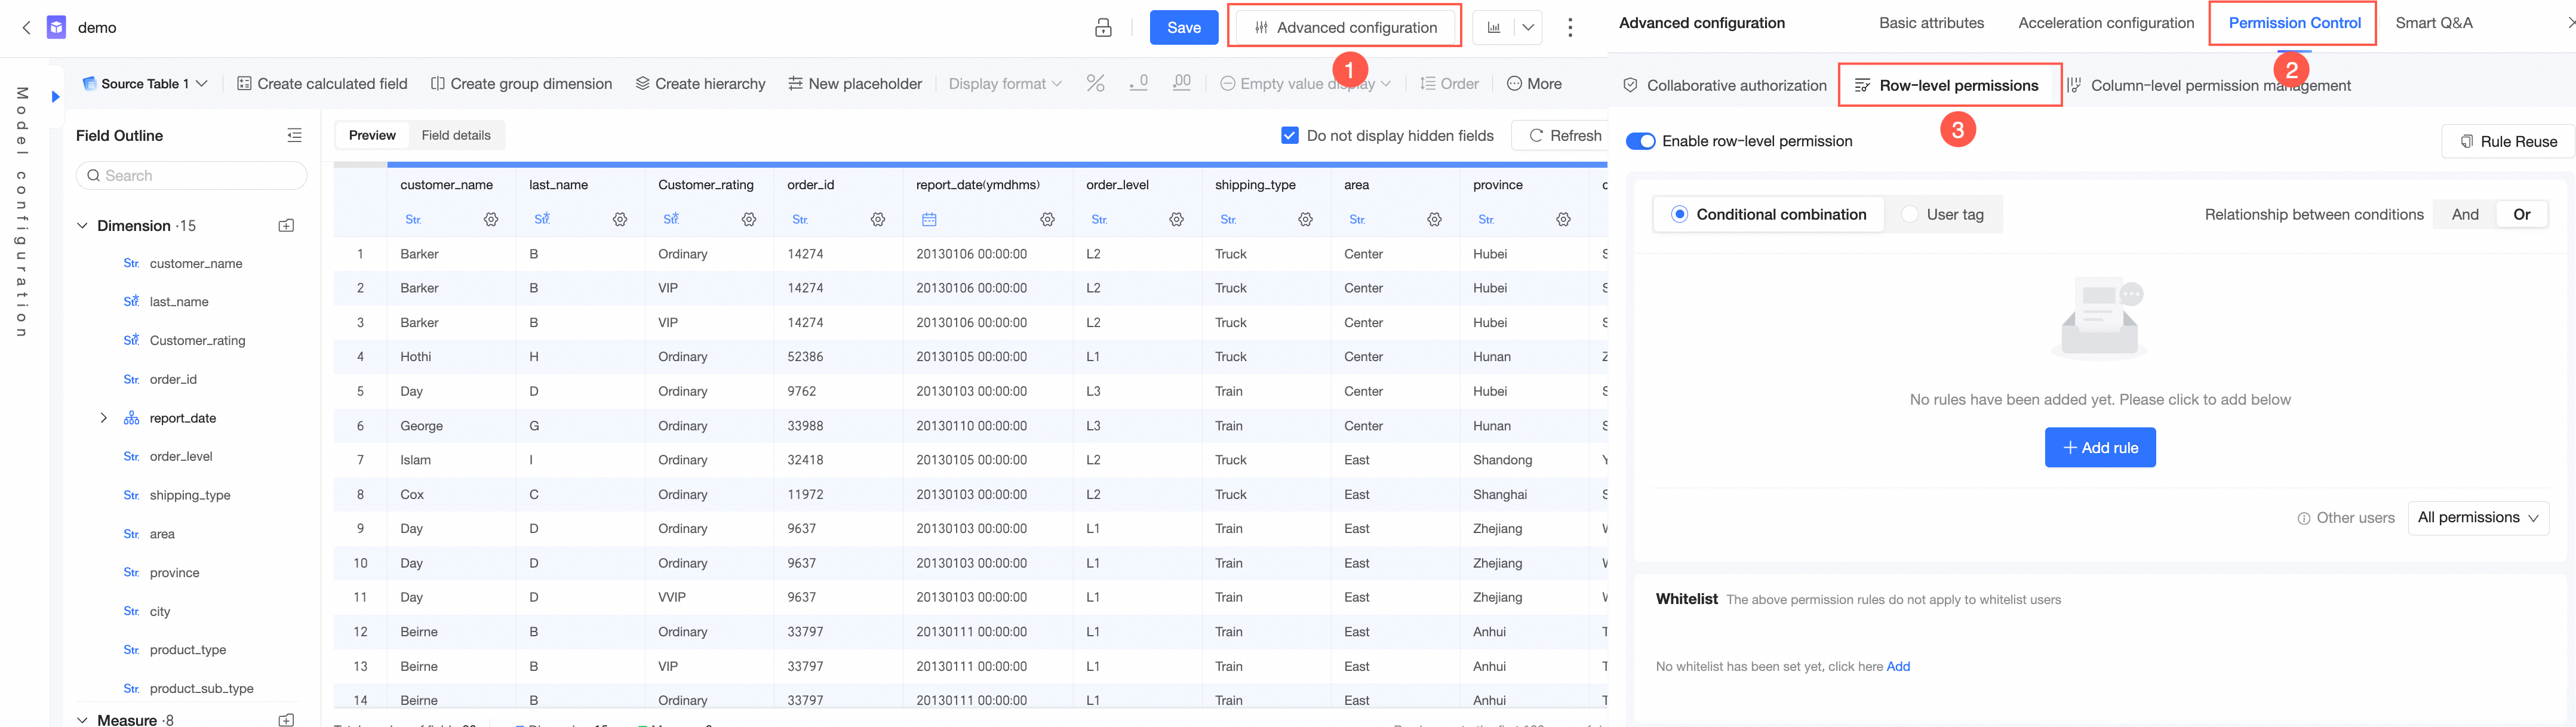
Aktifkan Enable Row-level Permissions.
Pada halaman konfigurasi Row-level Permissions, pilih User Tag Management Authorization dan set association conditions.
Klik Save.
Entri 3
Atur izin tingkat baris saat Anda create a dataset.
Pada halaman pratinjau dataset, klik ikon
 untuk menuju halaman konfigurasi Row-level Permissions.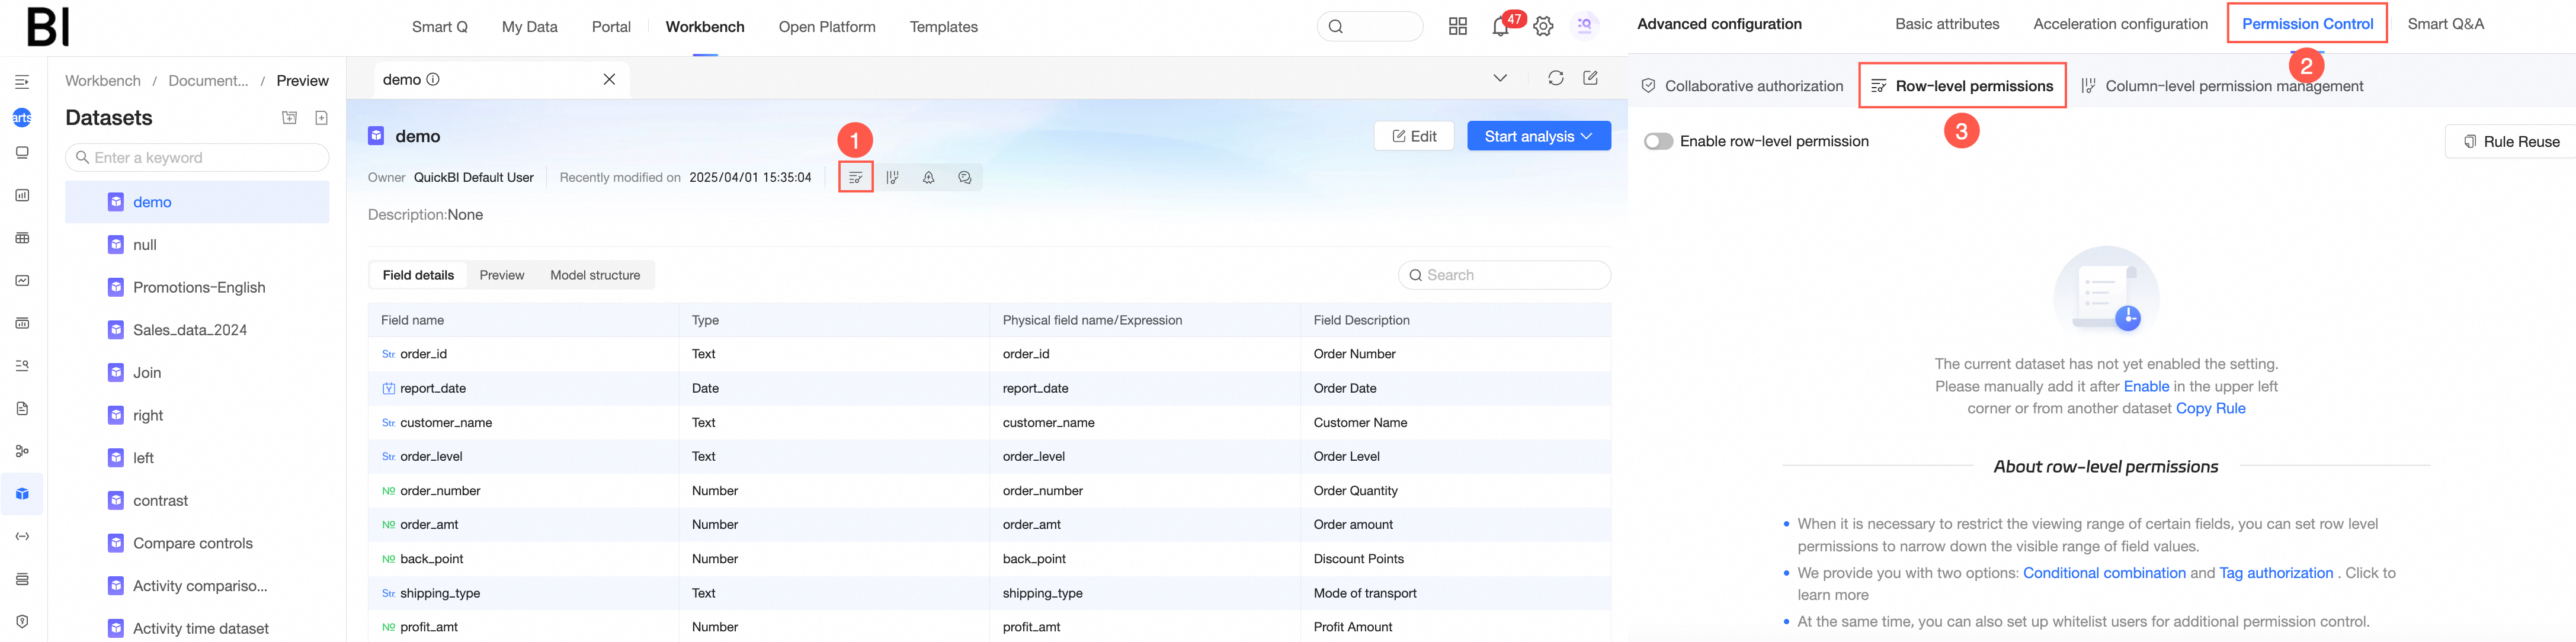
Aktifkan Enable Row-level Permissions.
Pada halaman konfigurasi Row-level Permissions, pilih User Tag Management Authorization dan atur kondisi asosiasi.
Klik Save.
Set association conditions

Klik Add Controlled Field.
Pilih Controlled Field dan User Tag Table Field.
Saat menambahkan beberapa kondisi asosiasi, Anda dapat memilih logika AND atau OR. Jika memilih AND, semua aturan harus terpenuhi agar izin berlaku. Jika memilih OR, izin berlaku jika salah satu aturan terpenuhi.
Jika tabel tag berisi beberapa baris tag untuk pengguna yang sama, pilih Merge into a single row for calculation atau Calculate each row separately.
Merge into a single row for calculation: Union dari beberapa baris diambil untuk setiap tag. Tag tersebut kemudian digabung menjadi satu kolom untuk verifikasi izin.
Contohnya, tabel tag pengguna adalah sebagai berikut:
User
Area
Province
City
user1
Northeast
ALL_VALUES
ALL_VALUES
user1
Southeast
Zhejiang
Hangzhou
Logika perhitungan satu baris adalah:
where Area in {'Northeast', 'Southeast'}
and 'BI' = 'BI'
and 'BI' = 'BI'
Efek izinnya sama dengan berikut ini:
User
Area
Province
City
user1
Northeast,Southeast
ALL_VALUES
ALL_VALUES
Calculate each row separately: Setiap baris nilai tag merepresentasikan satu set izin. Logika OR digunakan antar beberapa baris. Anda hanya dapat menggunakan mode Calculate each row separately ketika semua User Tag Table Fields berasal dari tabel tag pengguna yang sama. Contohnya:
Jika hubungan antar kondisi adalah AND, dan tabel tag pengguna adalah sebagai berikut:
User
Area
Province
City
user1
Northeast
$ALL_VALUES$
$ALL_VALUES$
user1
North China,Southwest
$ALL_MEMBERS$
$ALL_MEMBERS$
user1
Southeast
Zhejiang
Hangzhou
Logika perhitungan tiap baris secara terpisah adalah:
where (Area = 'Northeast' and 'BI' = 'BI' and 'BI' = 'BI')
or (Area in {'North China', 'Southwest'})
or (Area = 'Southeast' and Province = 'Zhejiang' and City = 'Hangzhou')
Jika hubungan antar kondisi adalah OR, dan tabel tag pengguna adalah sebagai berikut:
User
Area
Product Type
user1
Northeast
$ALL_VALUES$
user1
North China,Southwest
$ALL_MEMBERS$
user1
Southeast
Furniture
Logika perhitungan tiap baris secara terpisah adalah:
where (Area = 'Northeast' or 'BI' = 'BI')
or (Area in {'North China', 'Southwest'})
or (Area = 'Southeast' or Product_Type = 'Furniture')
Efek izinnya sama dengan berikut ini:
User
Area
Product Type
user1
Northeast,North China,Southwest,Southeast
$ALL_VALUES$
Klik Save.
Set a whitelist
Jika Anda tidak ingin aturan ini berlaku untuk pengguna tertentu, tambahkan pengguna tersebut ke daftar putih.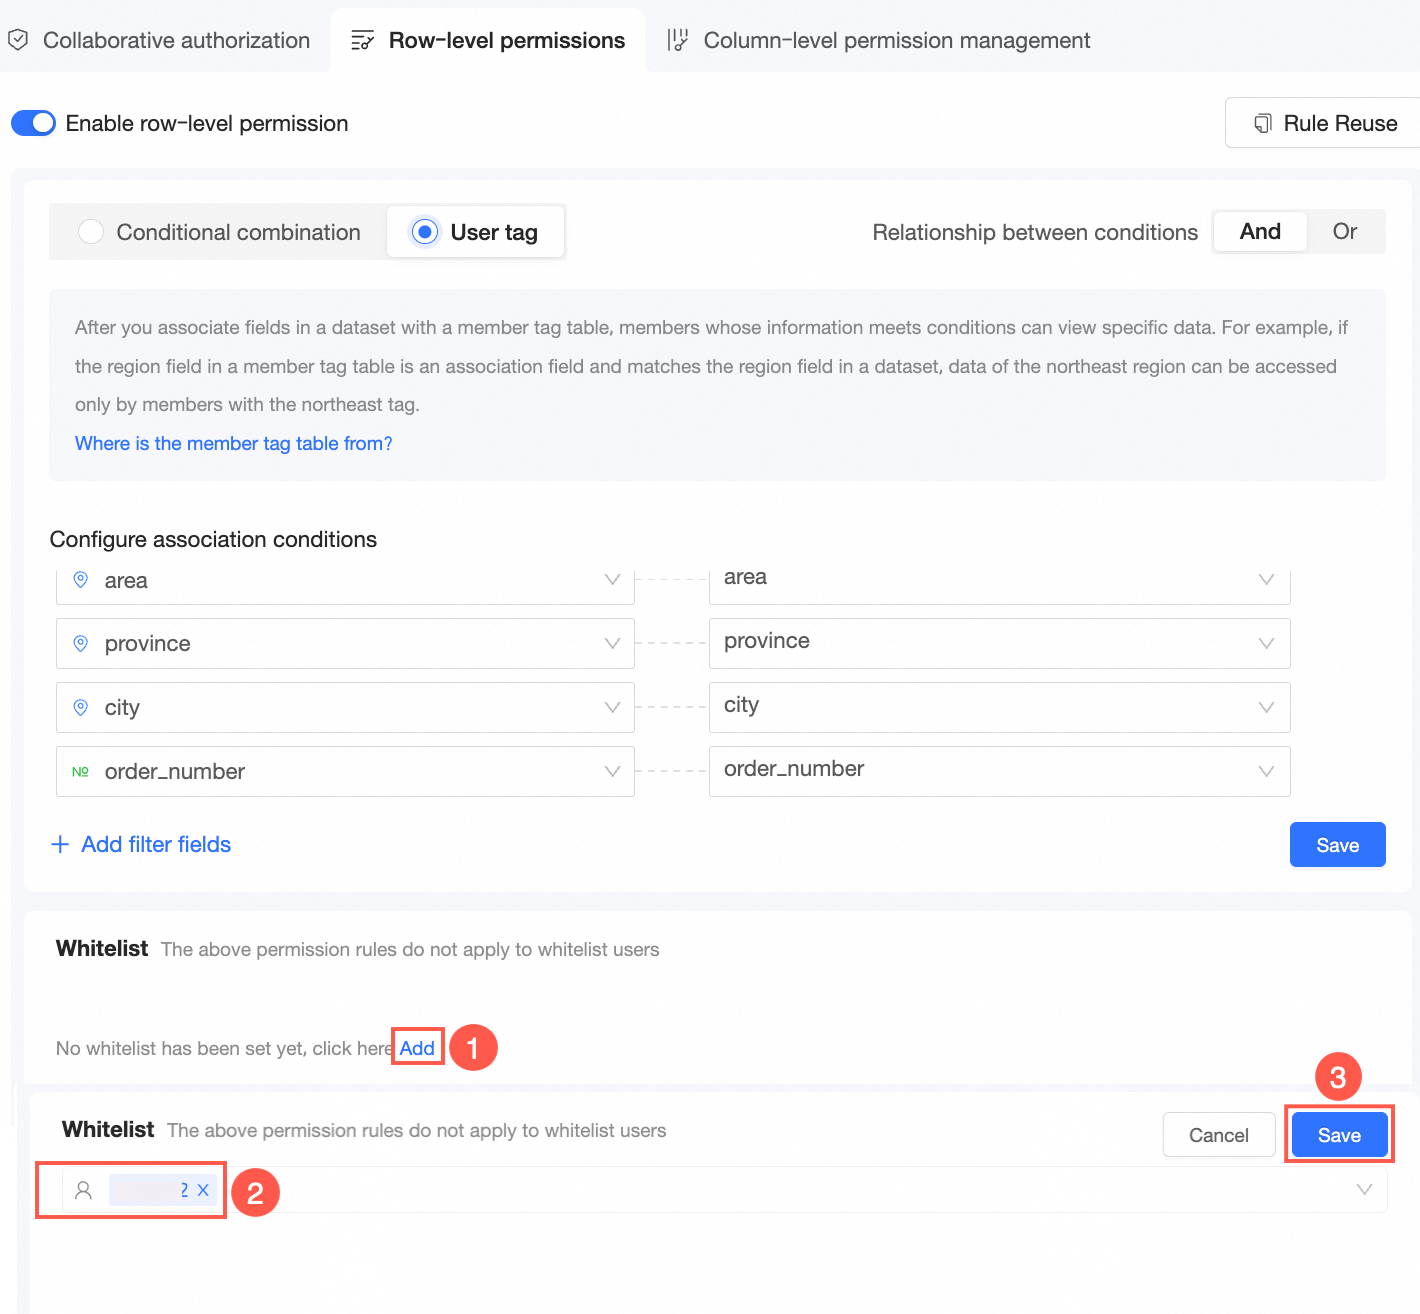
Copy row-level permissions
Anda dapat menyalin izin tingkat baris dari dataset lain. Untuk informasi selengkapnya, lihat Copy row-level permissions.
Skenario
Tabel tag dapat berasal dari tabel tag yang dikelola pengguna (user tag table) atau tag yang dikonfigurasi langsung di Quick BI (manually managed tag table). Bagian berikut menjelaskan kedua skenario tersebut.
Scenario | Implementation steps |
Scenario 1: Perform access control by attaching a user tag table |
|
Scenario 2: Perform access control by manually managing a tag table |
|
Scenario 1: Perform access control by attaching a user tag table
Customize a user tag table.
After you attach a user tag table stored in a data source, Quick BI reads the latest member tag information in real time. No manual maintenance is required.
When you customize a tag table, make sure that the user tag table meets the following requirements:
It contains at least one of the following fields: Alibaba Cloud account ID (account_id), Alibaba Cloud account name (account_name), or nickname in the Quick BI organization (nick_name).
CatatanIf you use an Alibaba Cloud account ID or Alibaba Cloud account name, make sure the user already exists in the Quick BI organization.
It contains at least one tag field, such as area.
If there are multiple tags, you can separate them with a comma (,) or present them in multiple rows.
$ALL_MEMBERS$indicates that all permissions are granted.
Attach the user tag table.
After you attach the table, use the Alibaba Cloud account ID (account_id), Alibaba Cloud account name (account_name), or nickname (nick_name) field in the user tag table as the primary key to associate with members in the Quick BI organization.
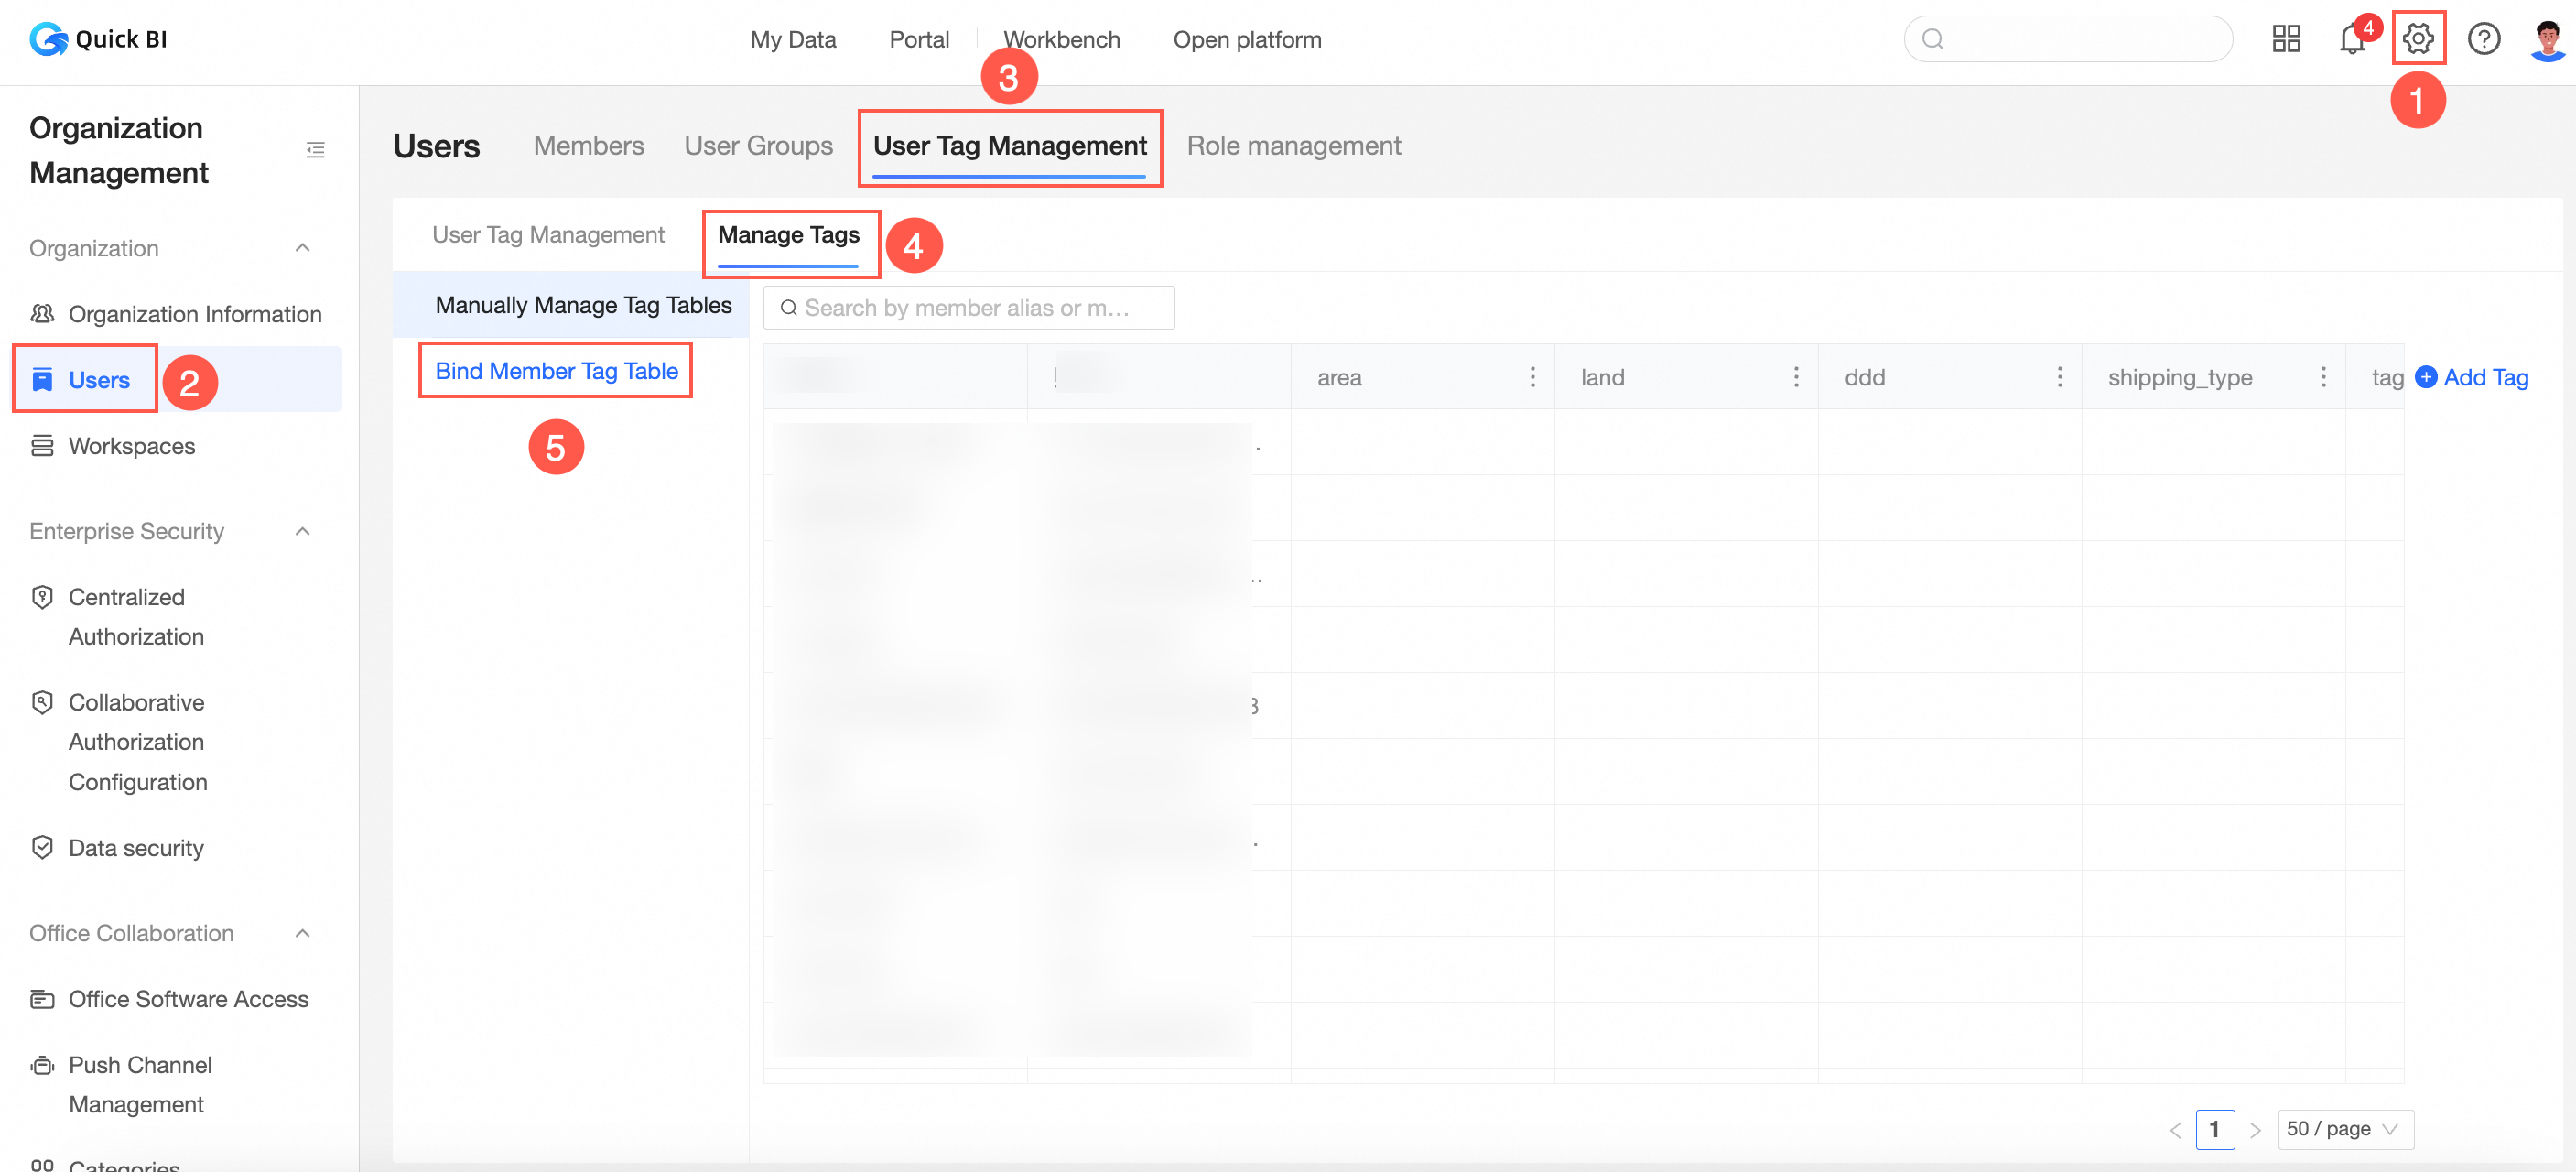
Log on to the Quick BI console.
On the Quick BI home page, follow the steps in the figure to go to the tag table attachment page.
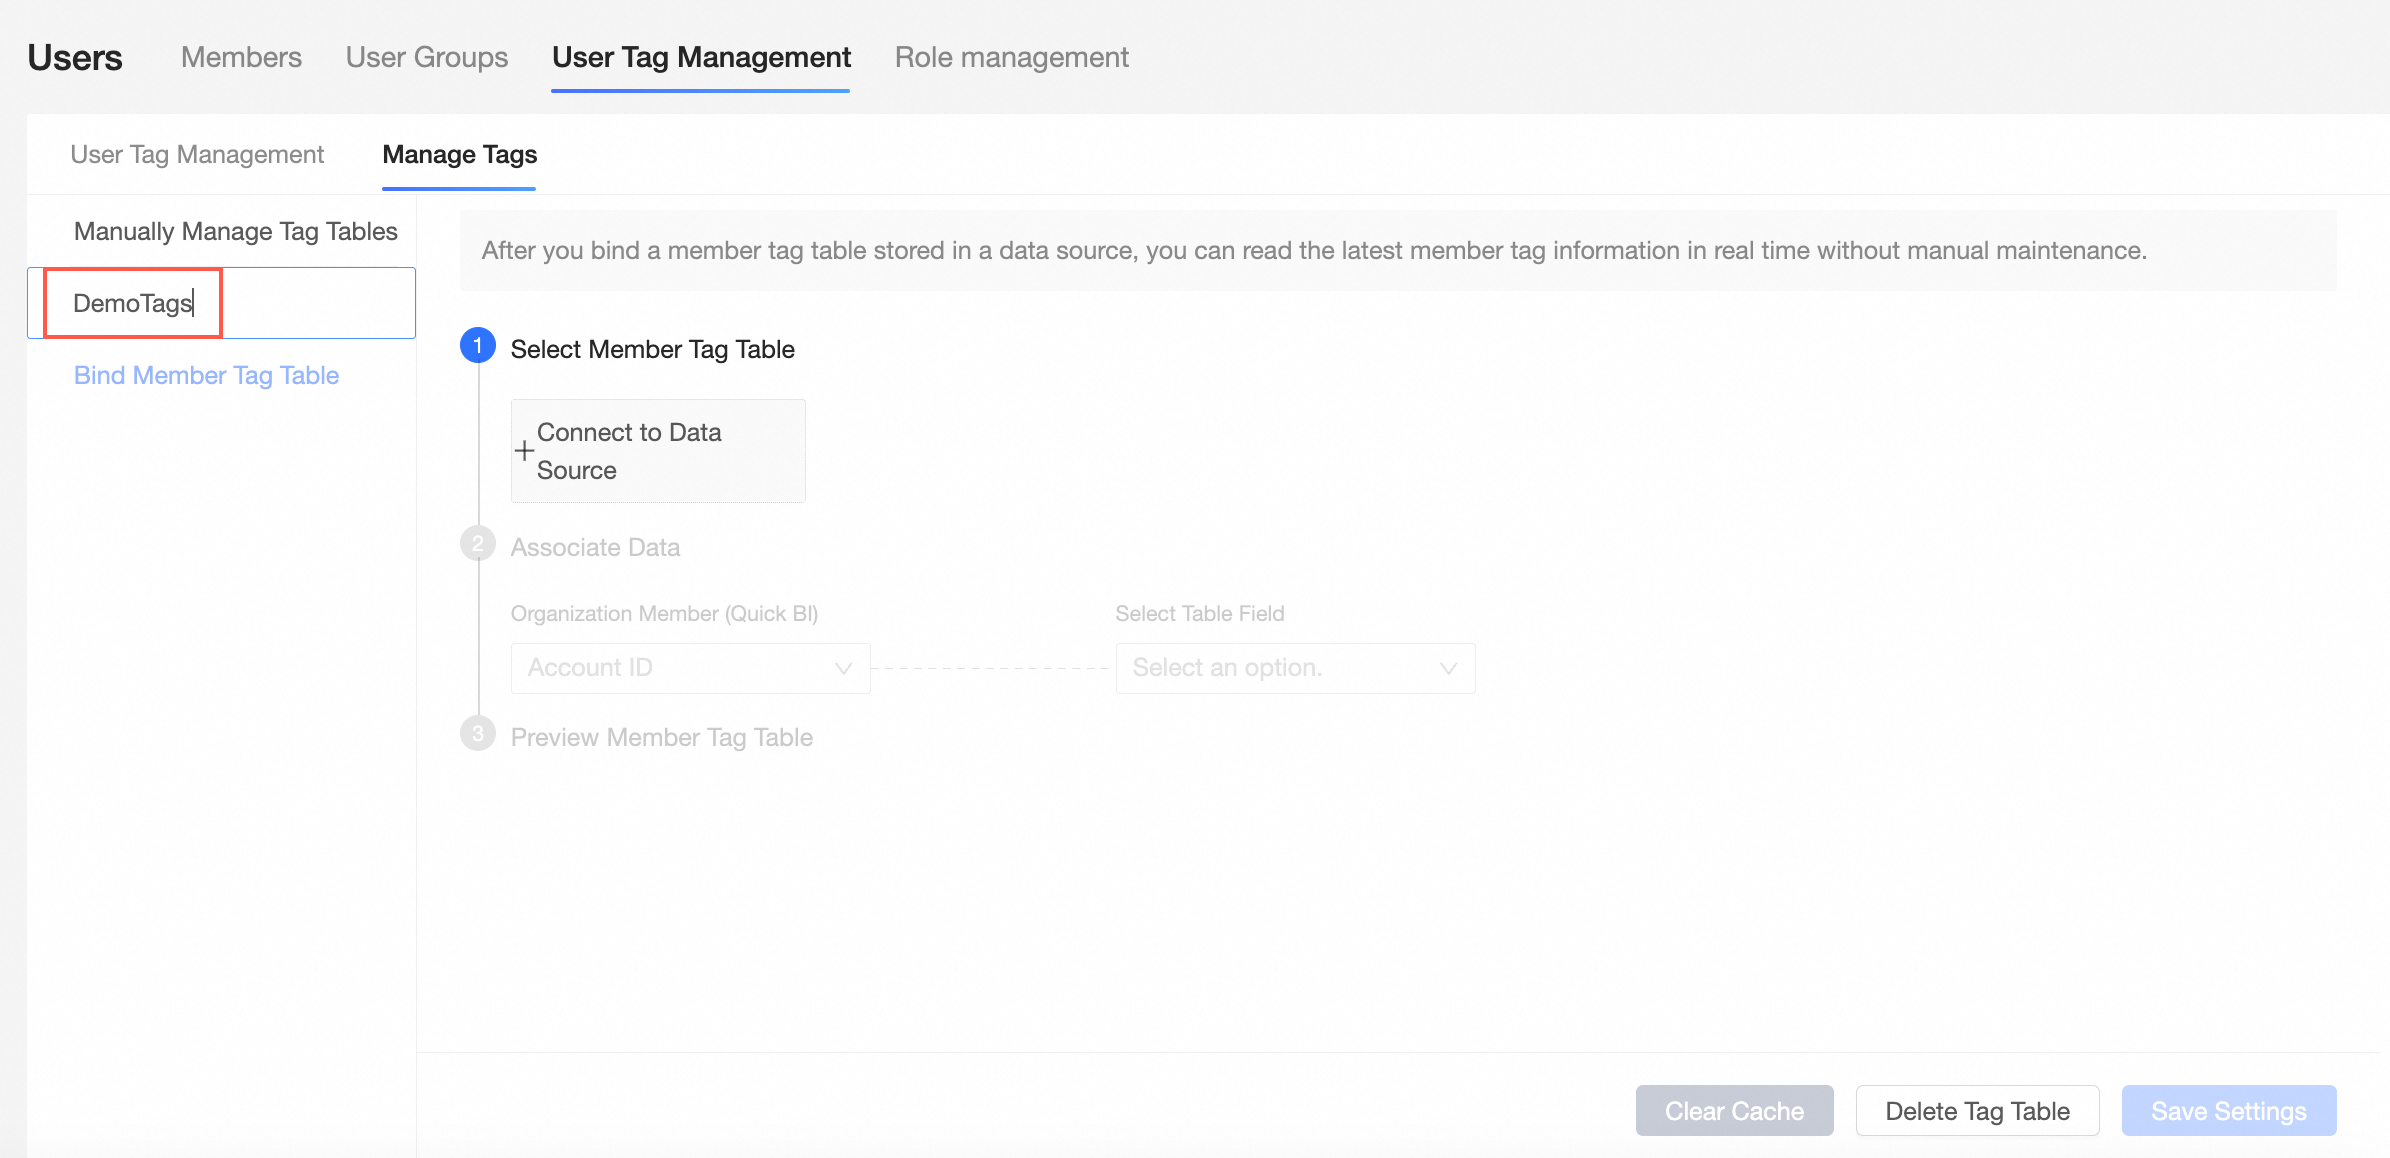
Customize a name for the user tag table to attach.
In this example, the name of the user tag table is Demo Tag Table.
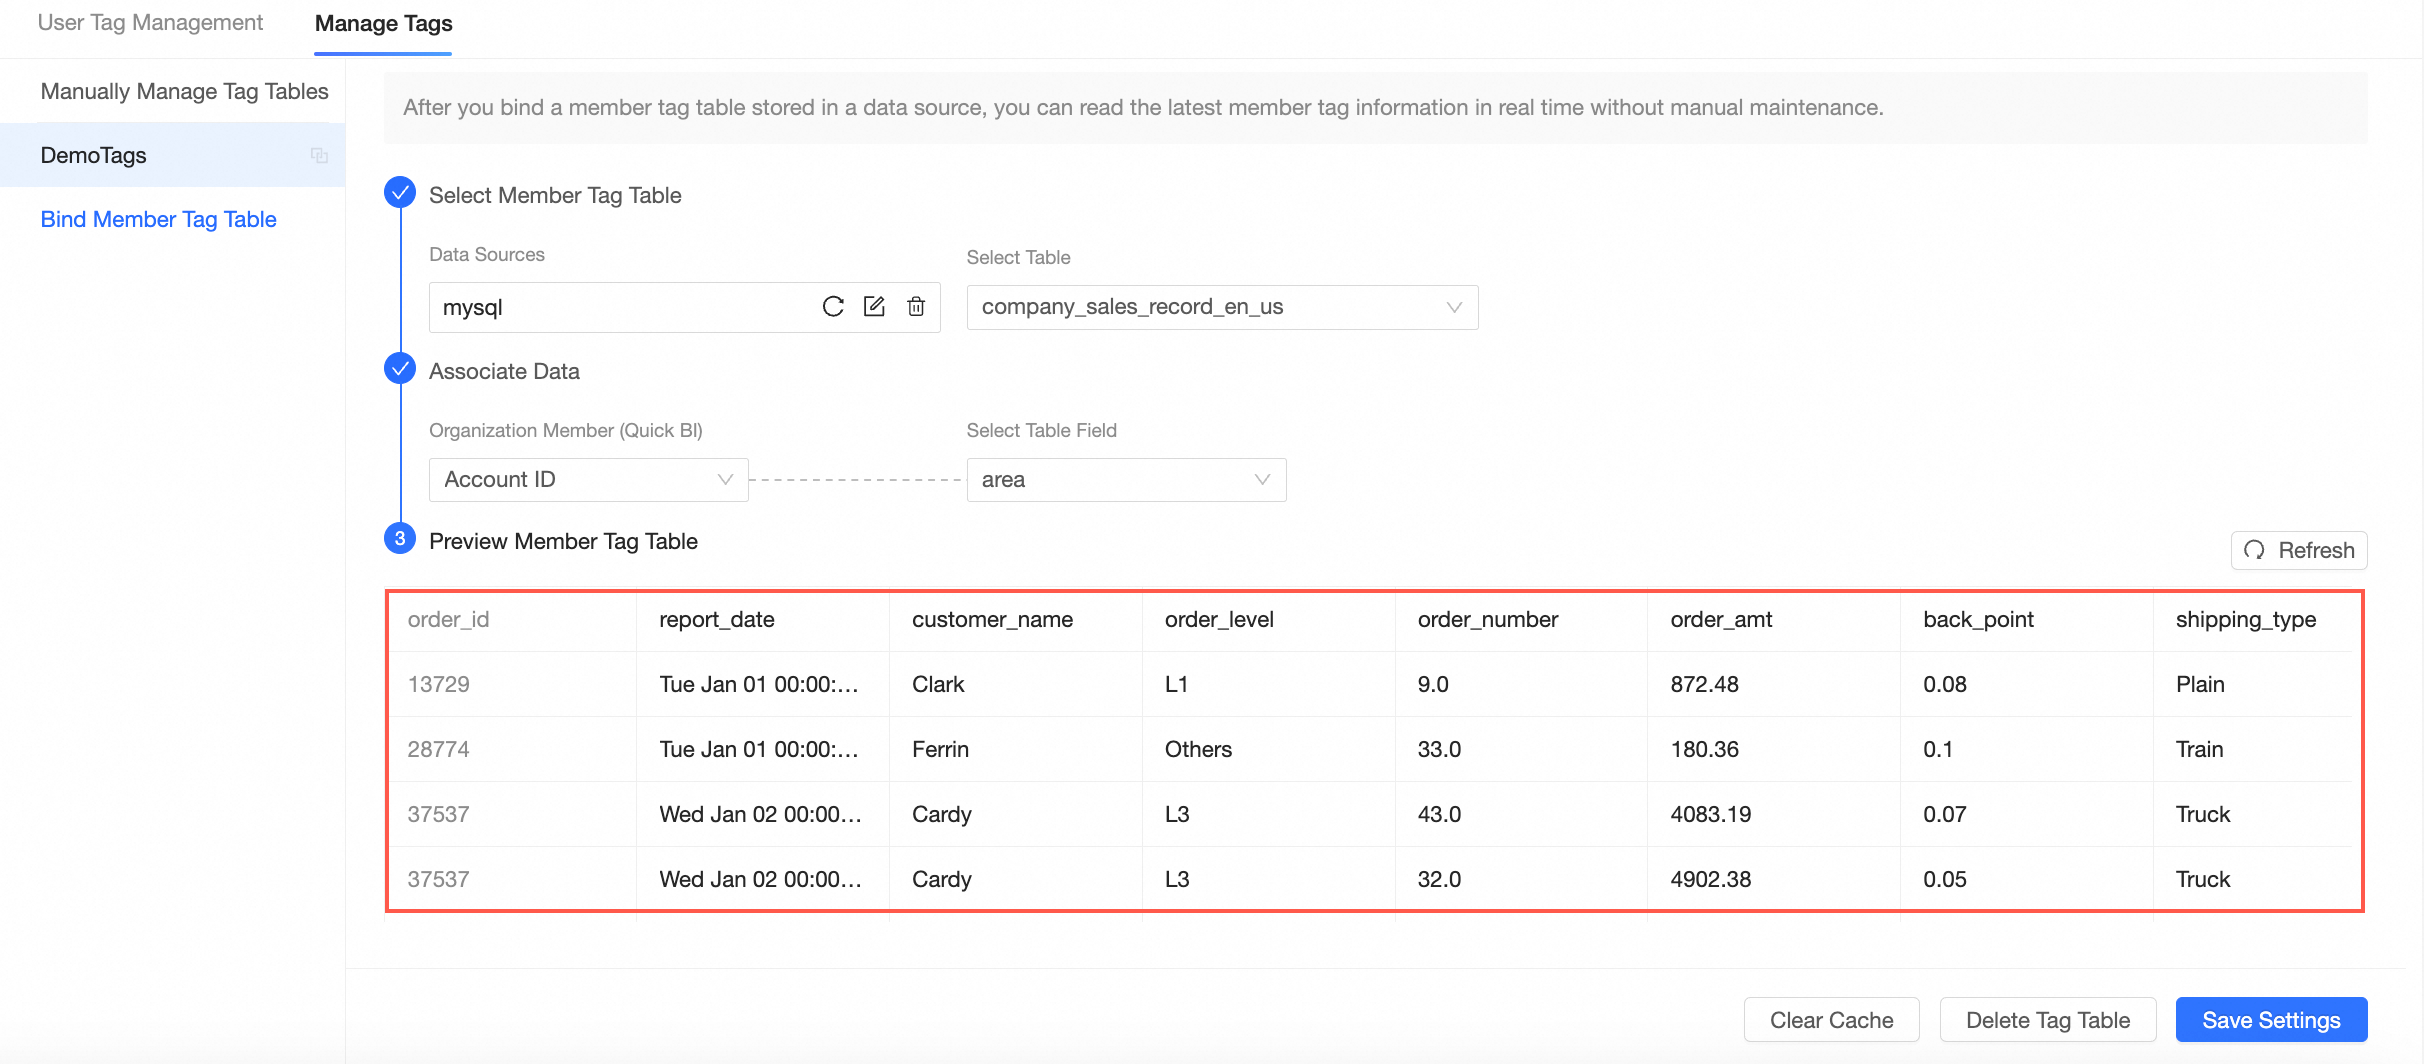
Follow the steps in the figure to configure the user tag table to attach.
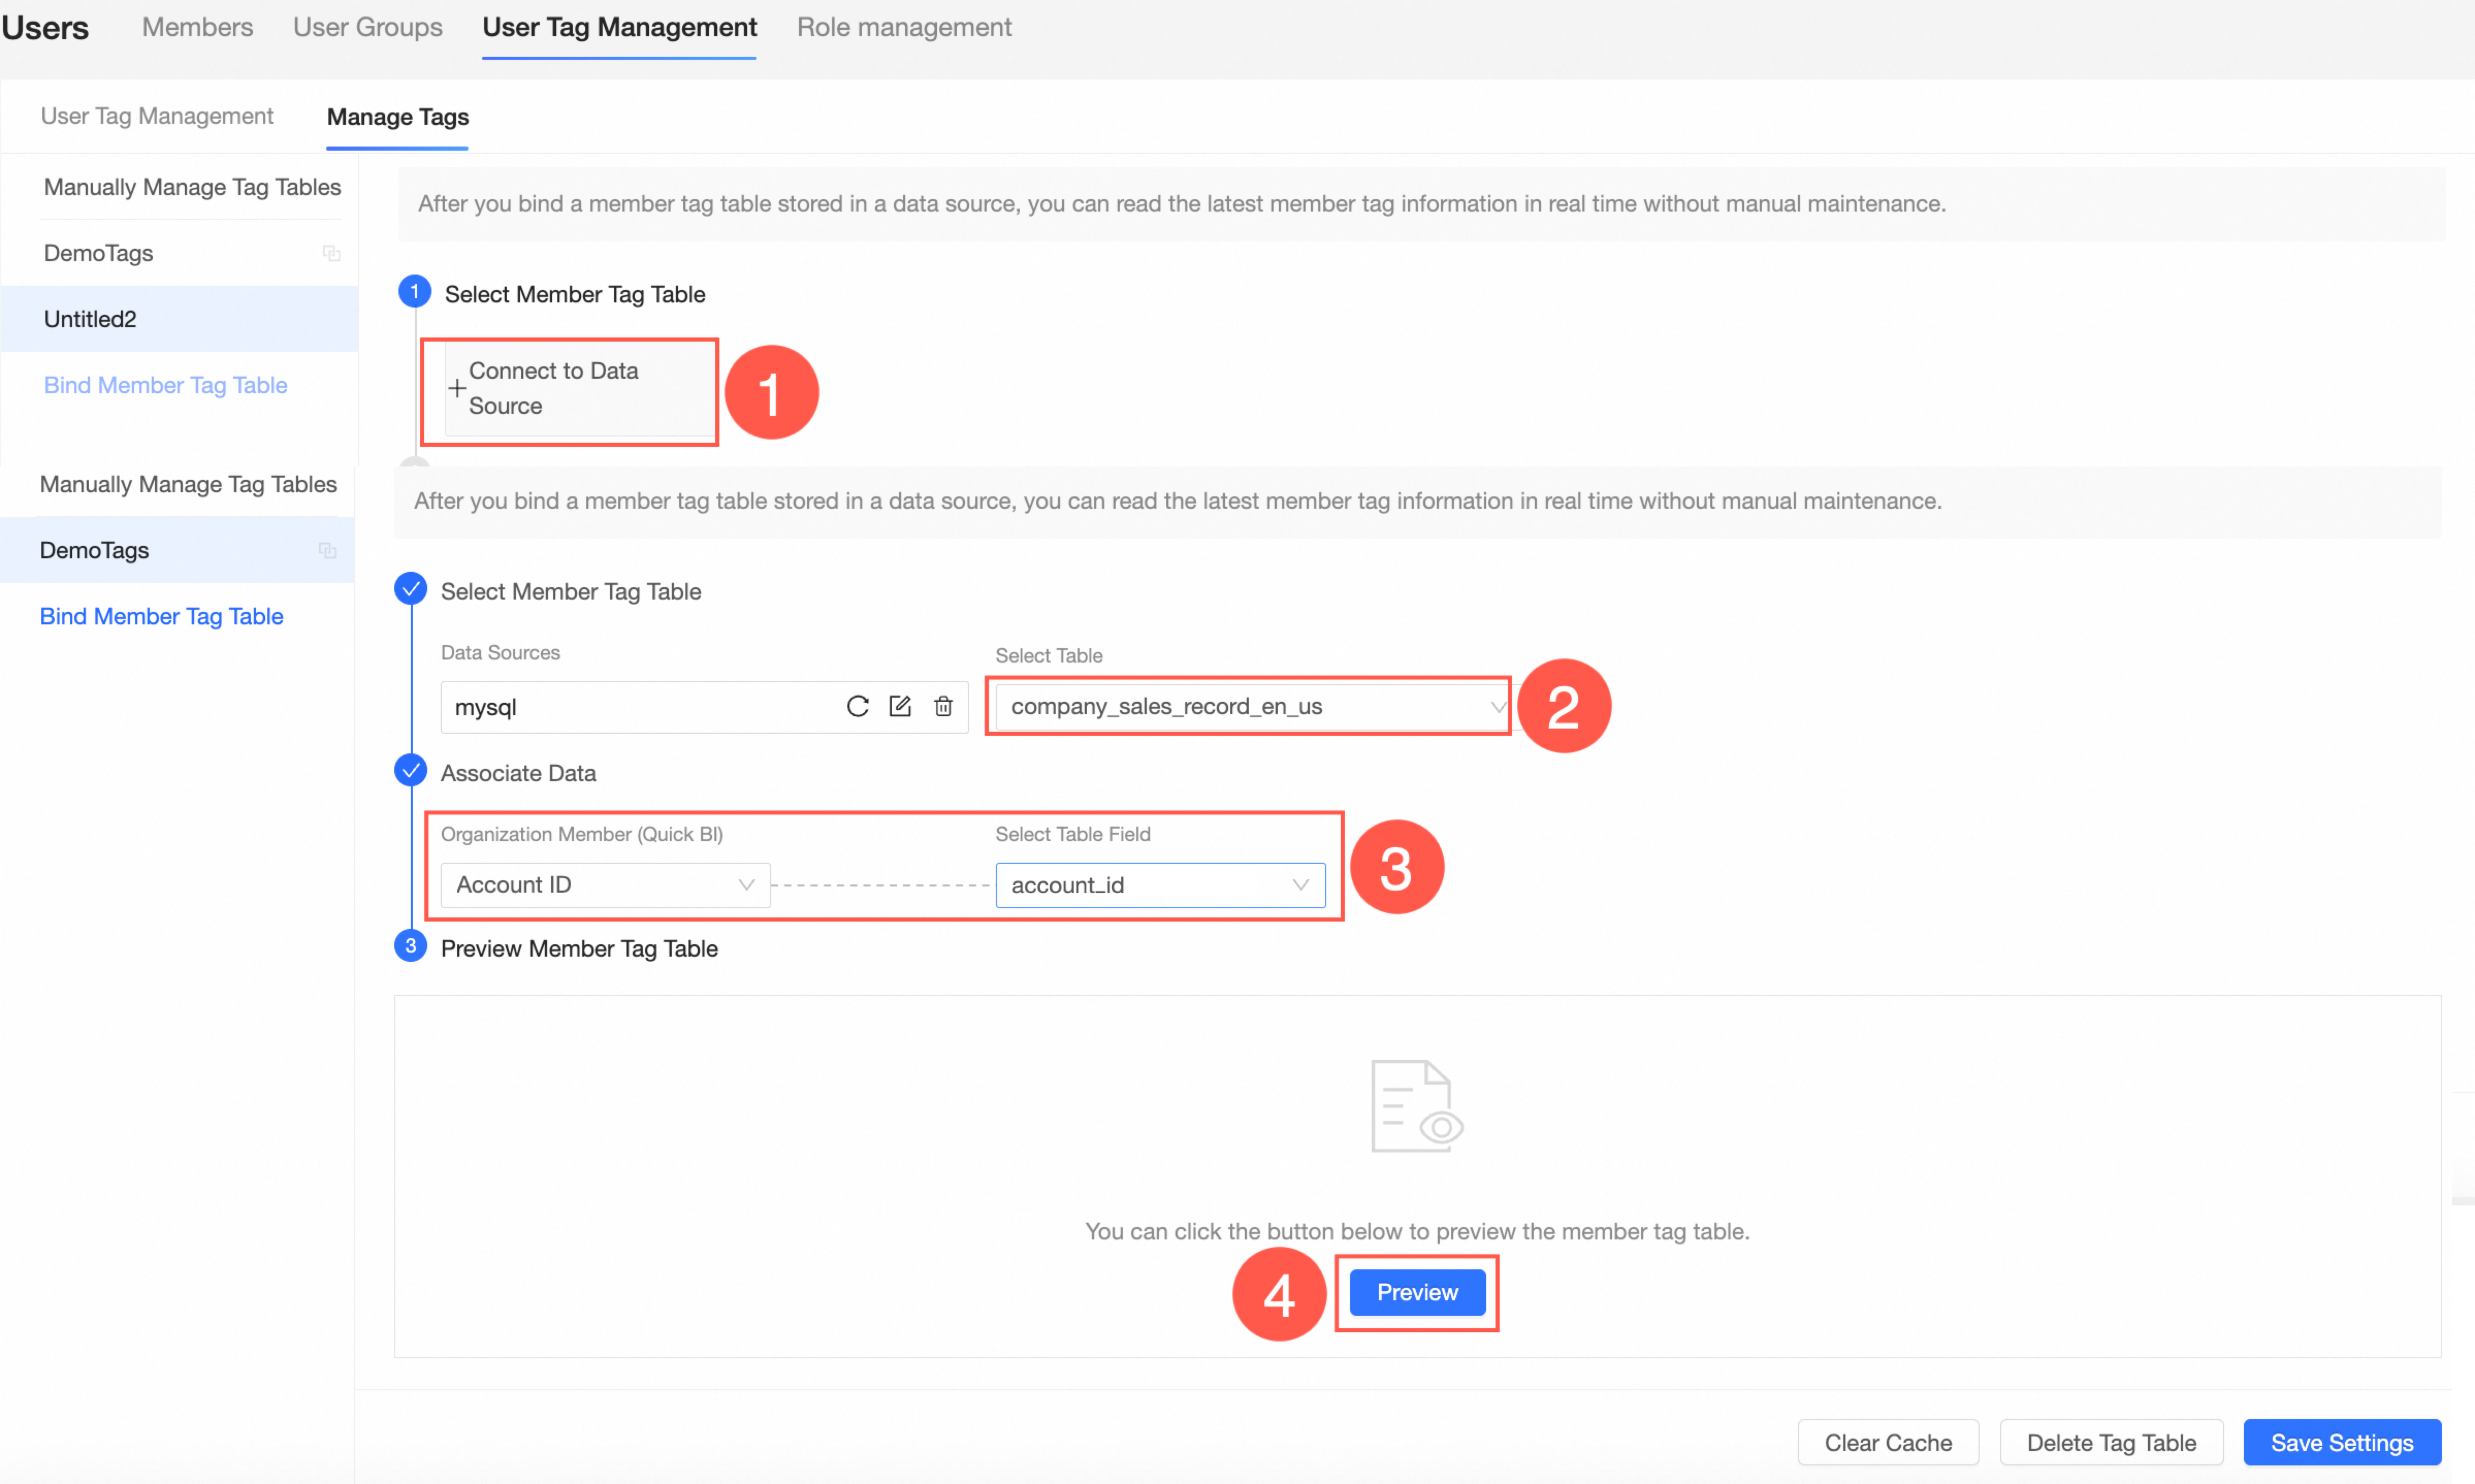
The preview of the user tag table is shown in the following figure.
Add a user tag.
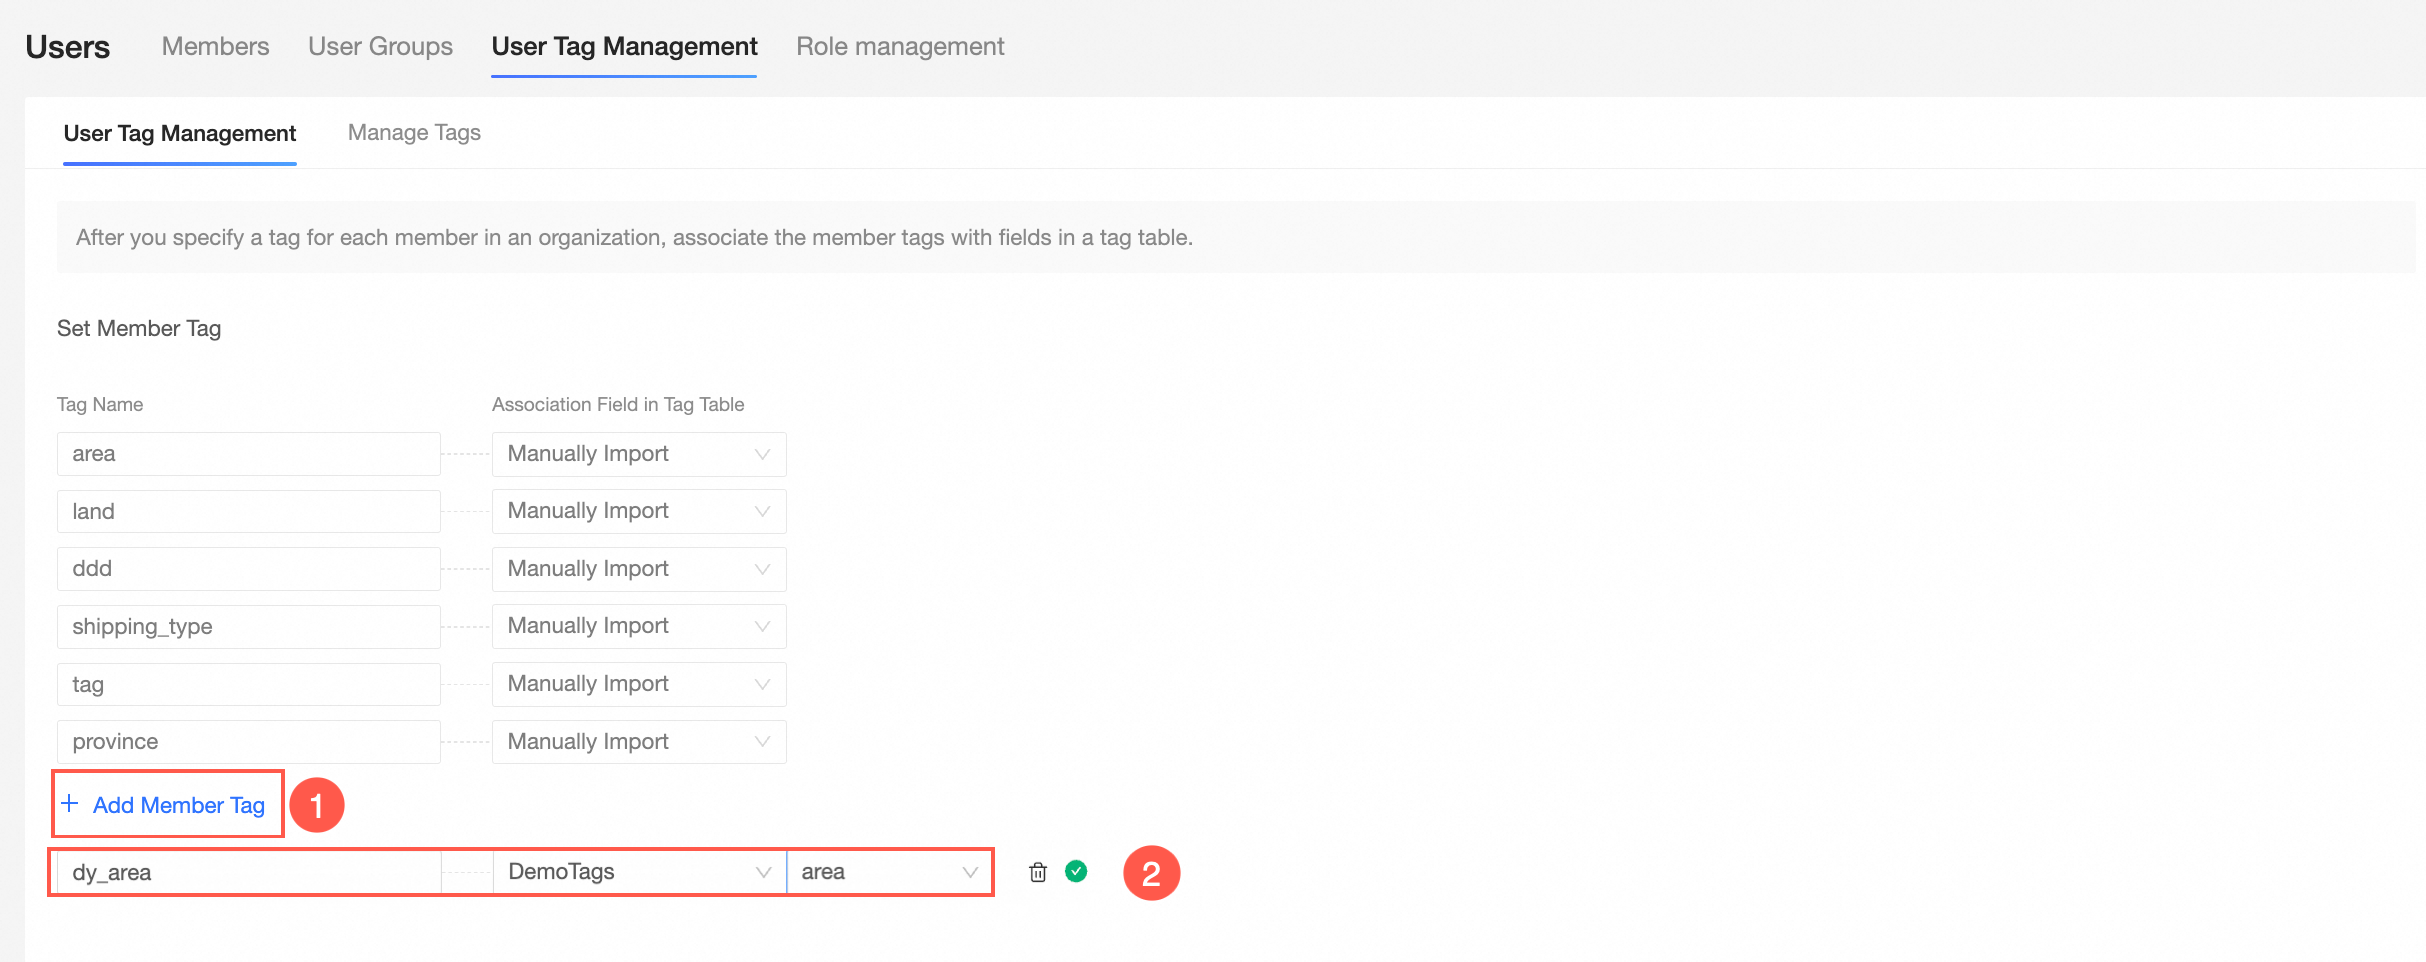
Add a user tag to associate with a field in the user tag table, such as area, province, city, or order_number. After the association, the tag value in the user tag table is passed to the Quick BI user tag.
Click the User Tag Management tab, and click Add User Tag.
Enter a Tag Name and an Associated Tag Table Field, and then save the configuration.
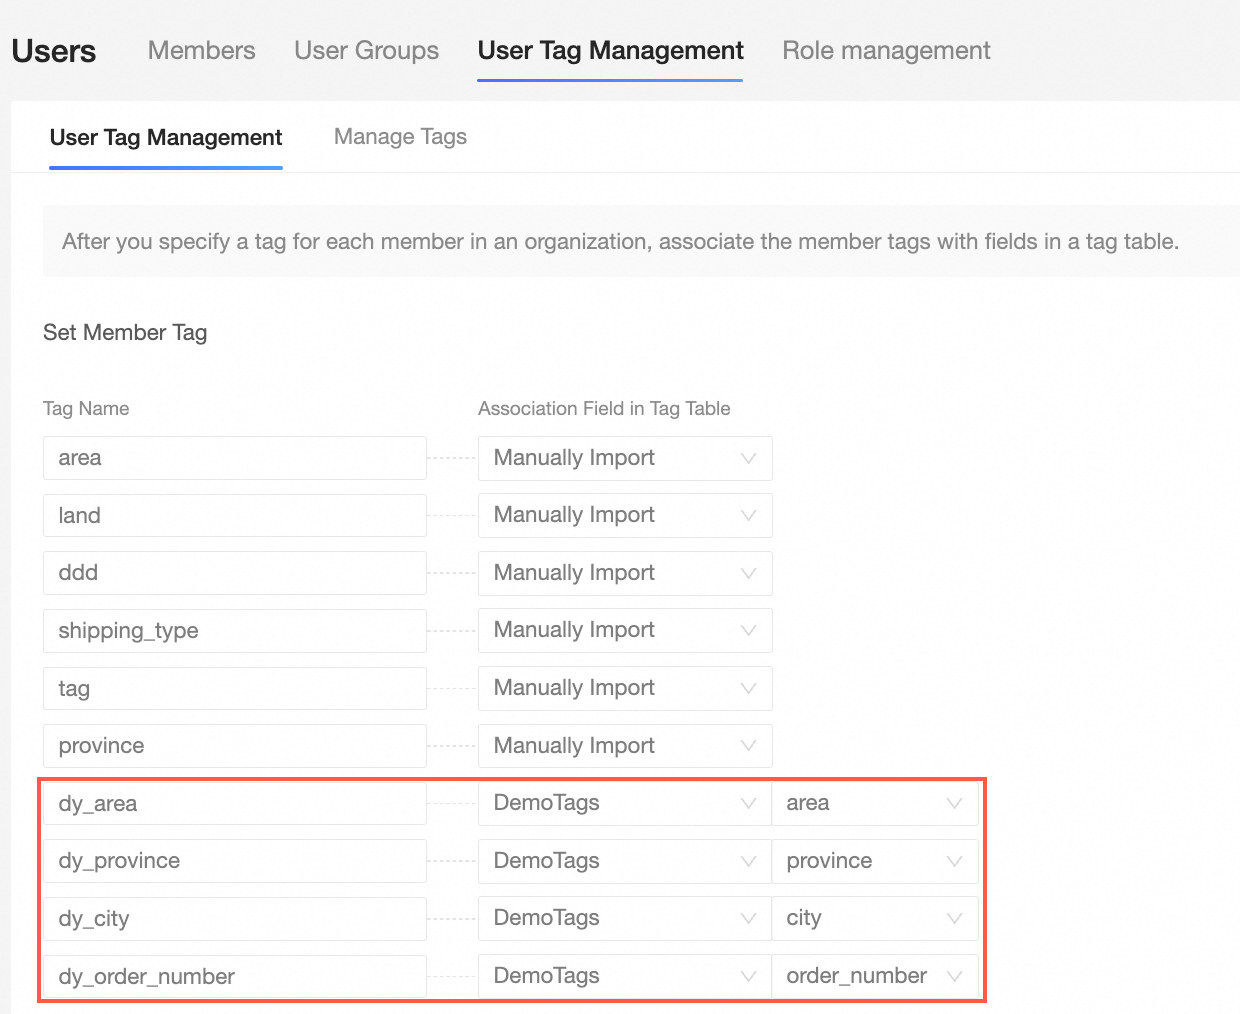
Set the associated tag table to Demo Tag Table. Customize the tag names as dy_area, dy_province, dy_city, and dy_order_number, and attach them to the area, province, city, and order_number fields in the Demo Tag Table.
Use tag-based authorization.
After authorization, the tag values in the user tag table apply to all datasets. Authorized users can view only the data within their permission scope.
On the Quick BI home page, follow the steps in the figure to go to the row-level permissions settings page.
Turn on the Enable Row-level Permissions switch, and set Authorization Method to User Tag Association Authorization.
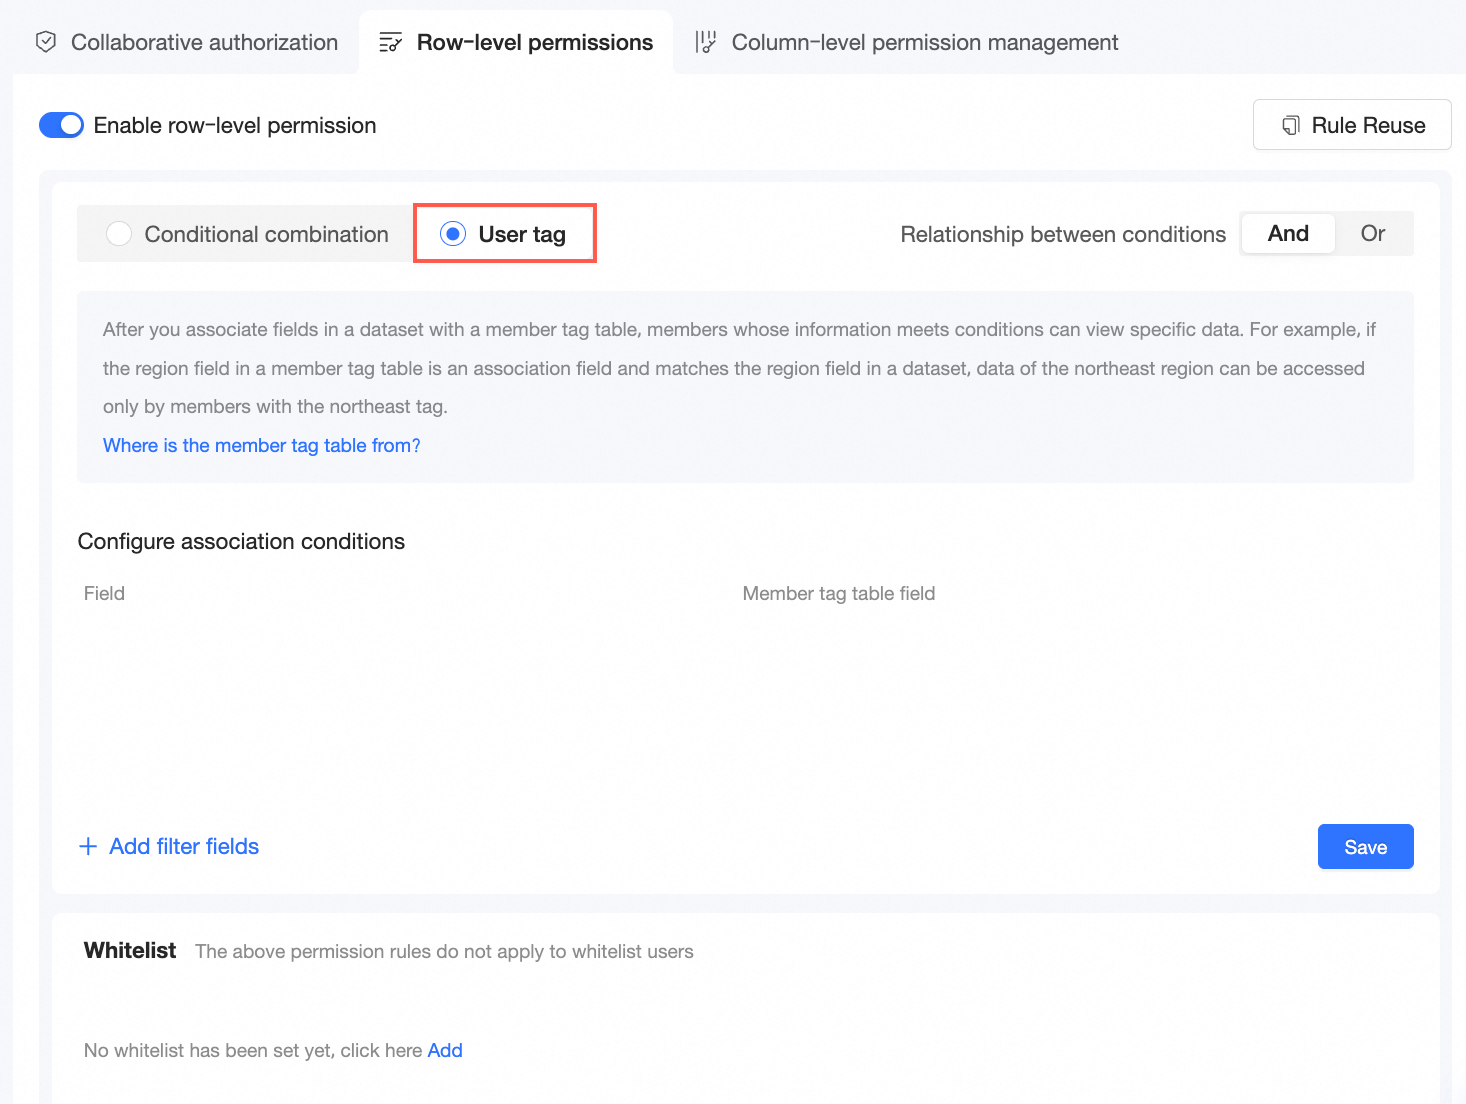
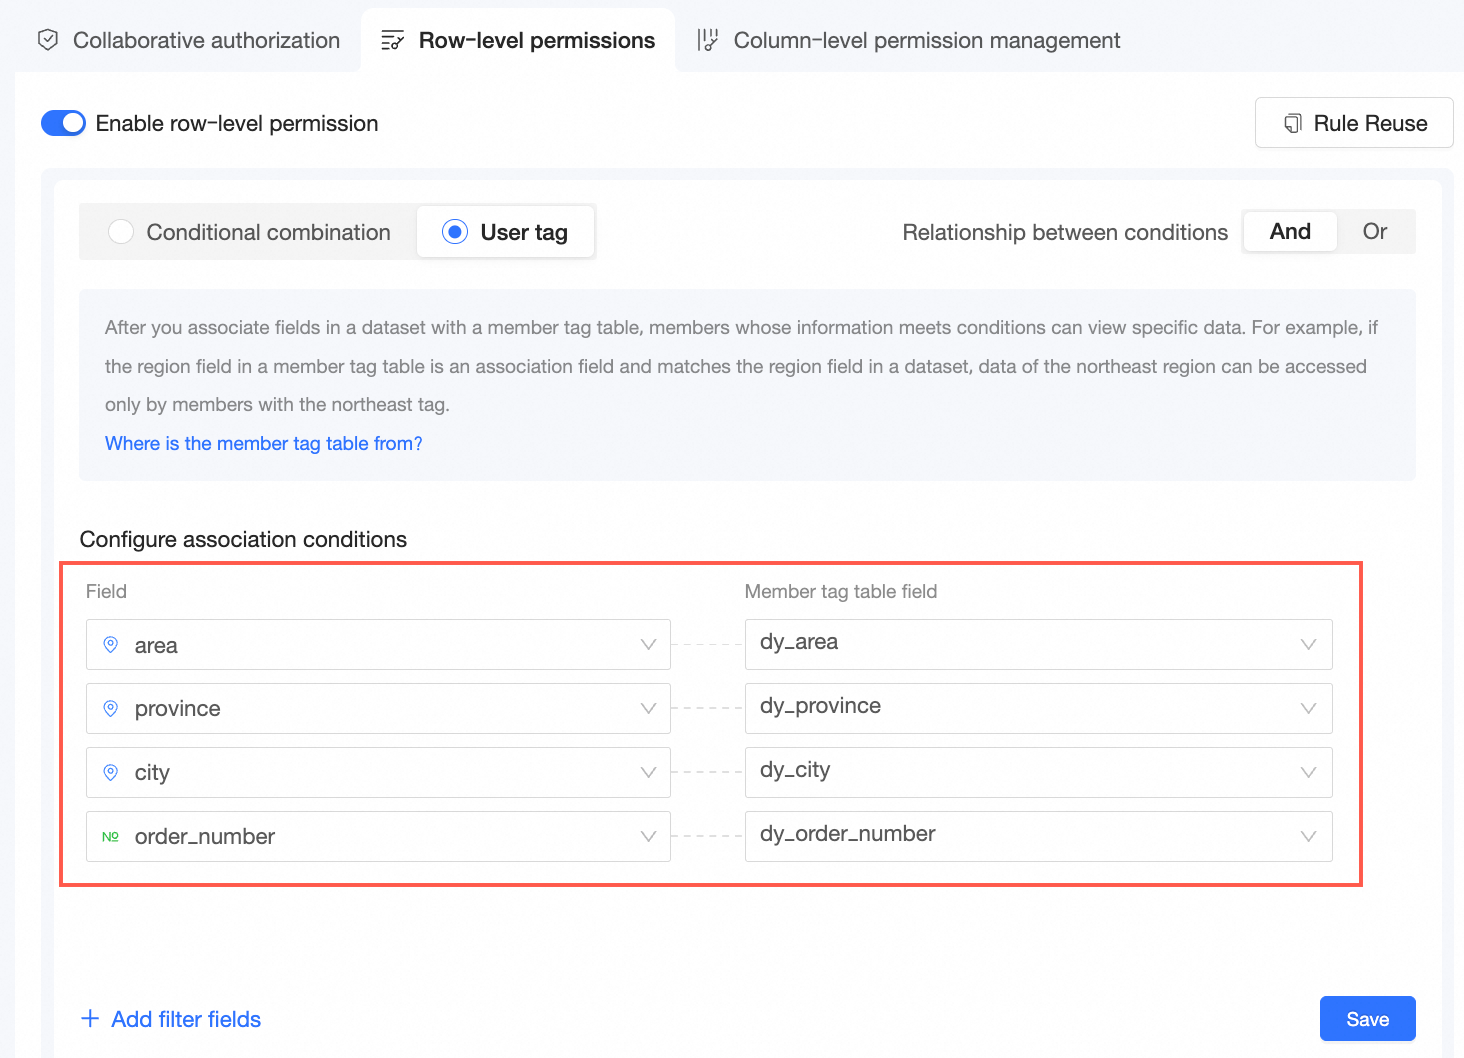
In the Set association conditions area, click Add Controlled Field.
Select a Controlled Field and attach a User Tag Table Field.
The selected controlled fields and user tag table fields are shown in the following figure.
Click Save.
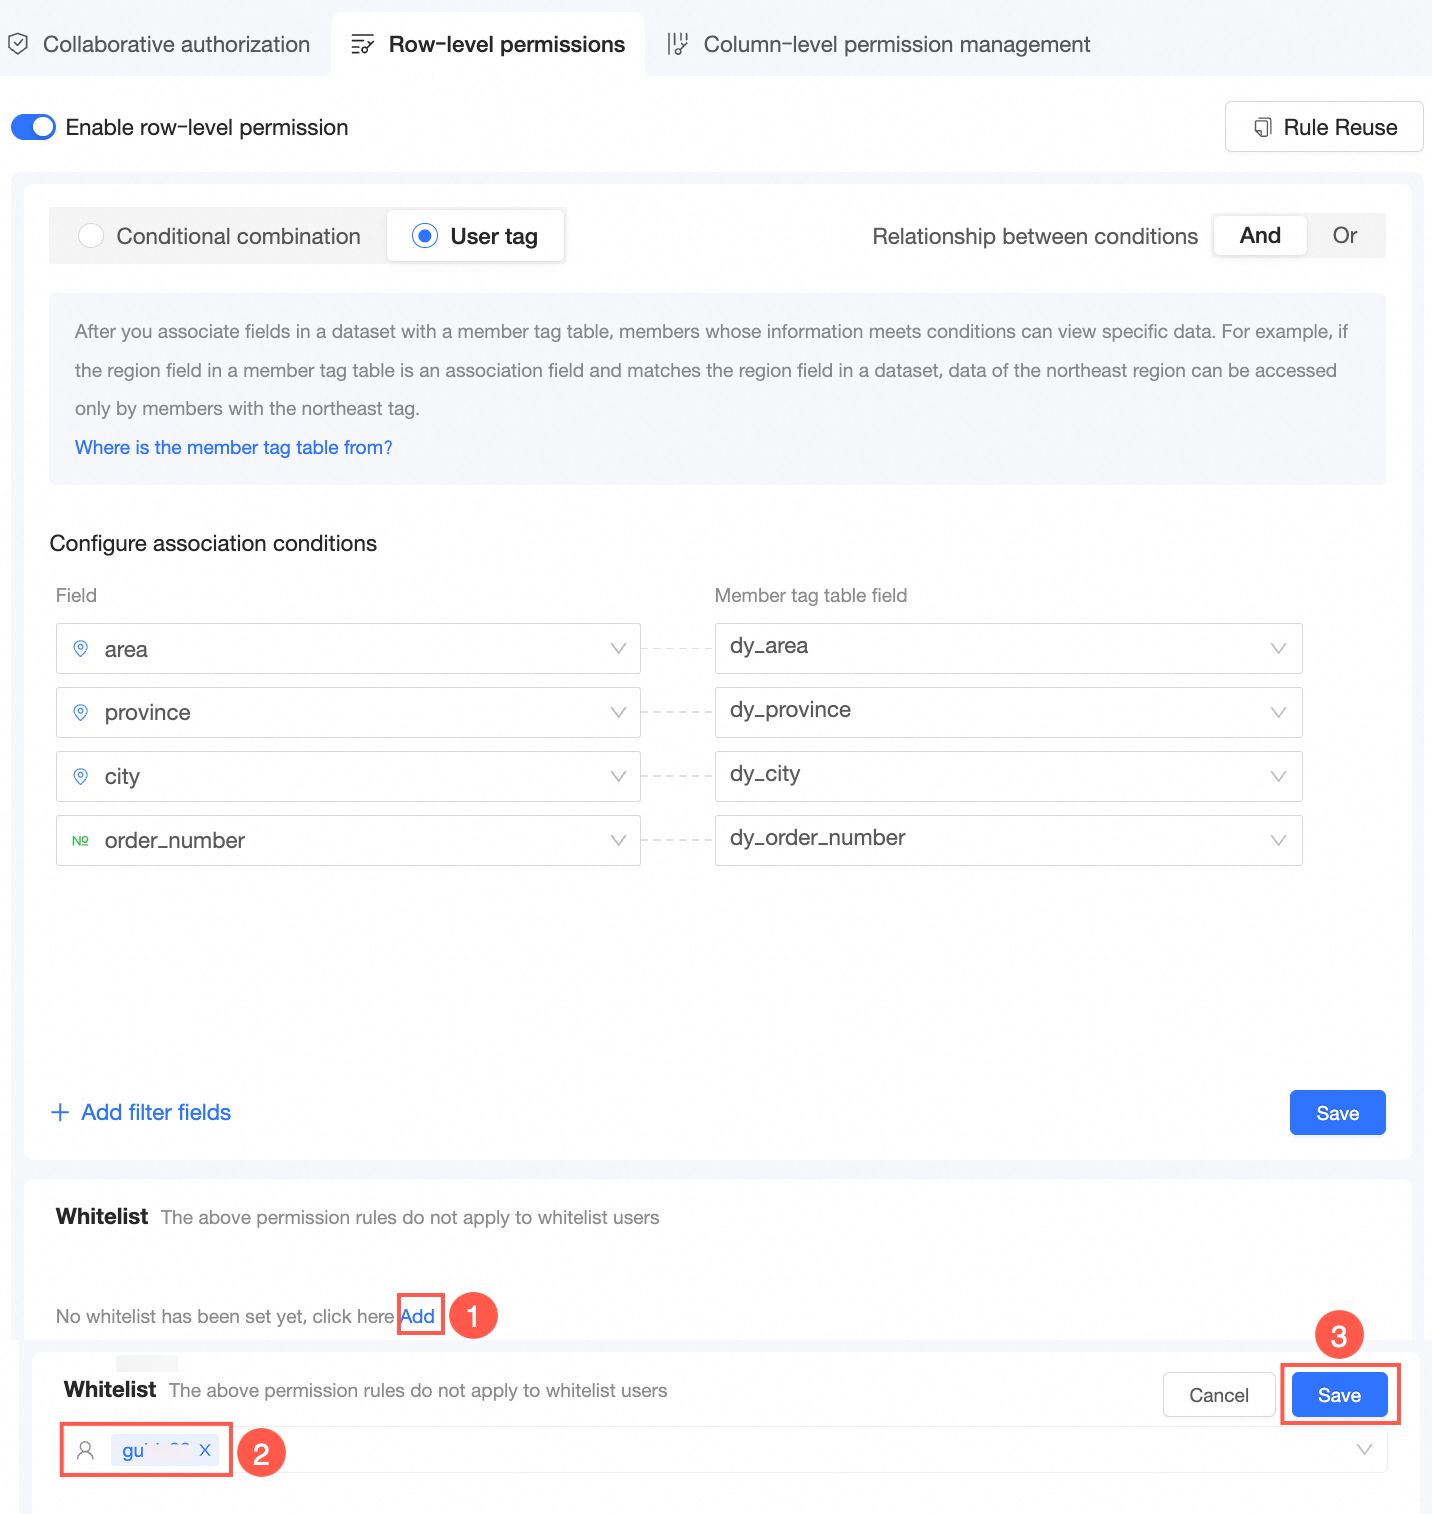
Whitelisted users
If you do not want these rules to apply to certain users, add those users to the whitelist.
View the authorization result in a dashboard.
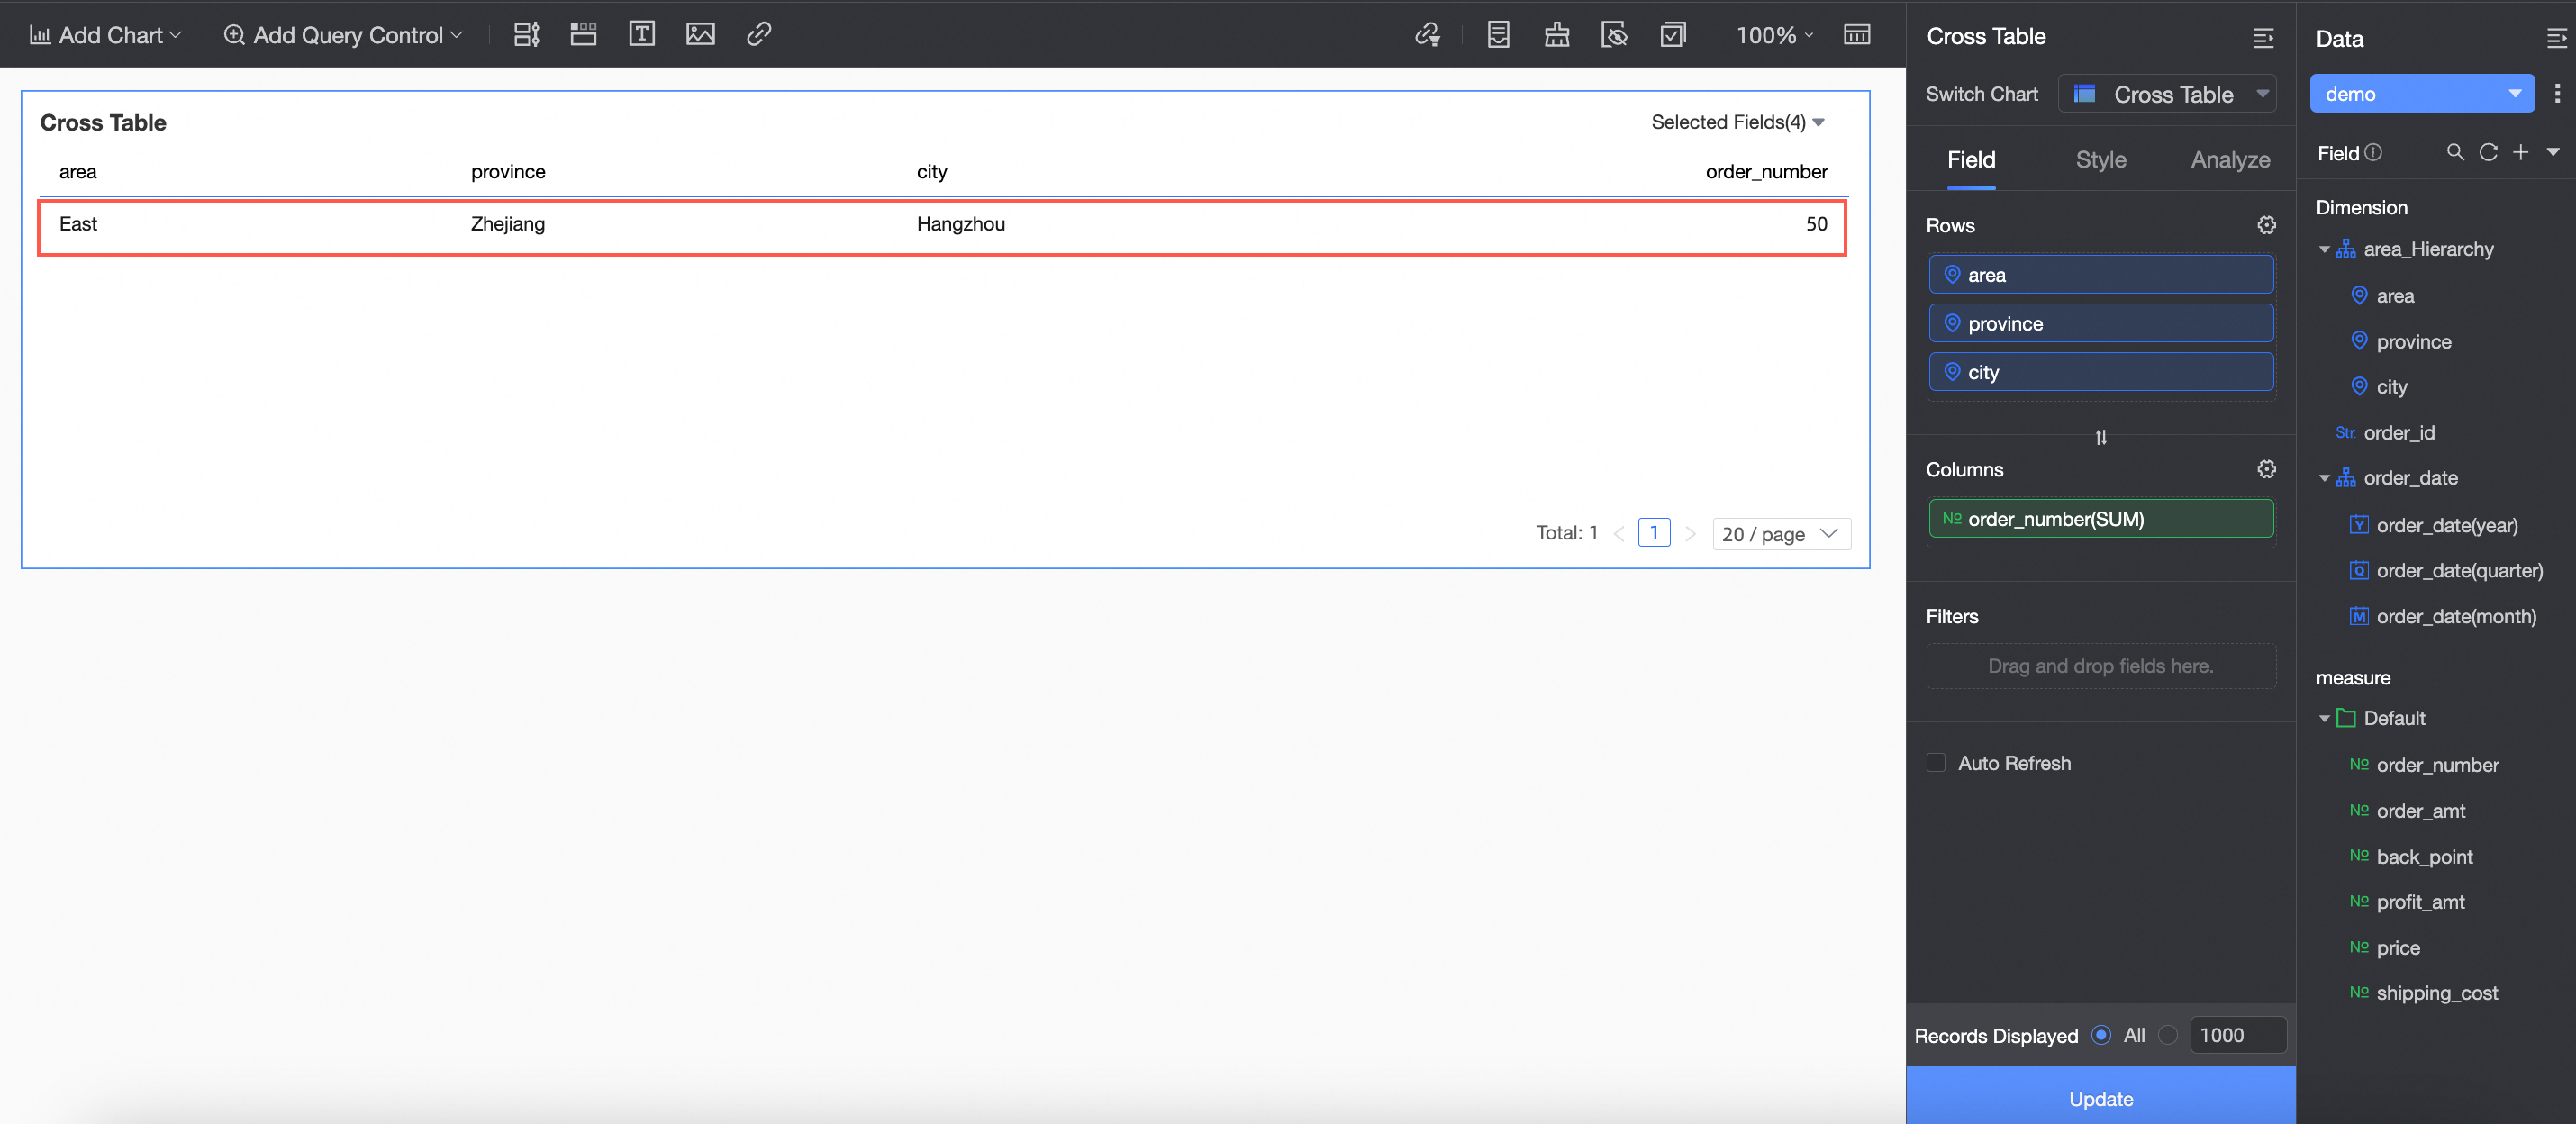
On the dashboard edit page, create a chart and view the authorization result.
For example, create a cross table. You can see the data for Hangzhou where the order quantity is 50.
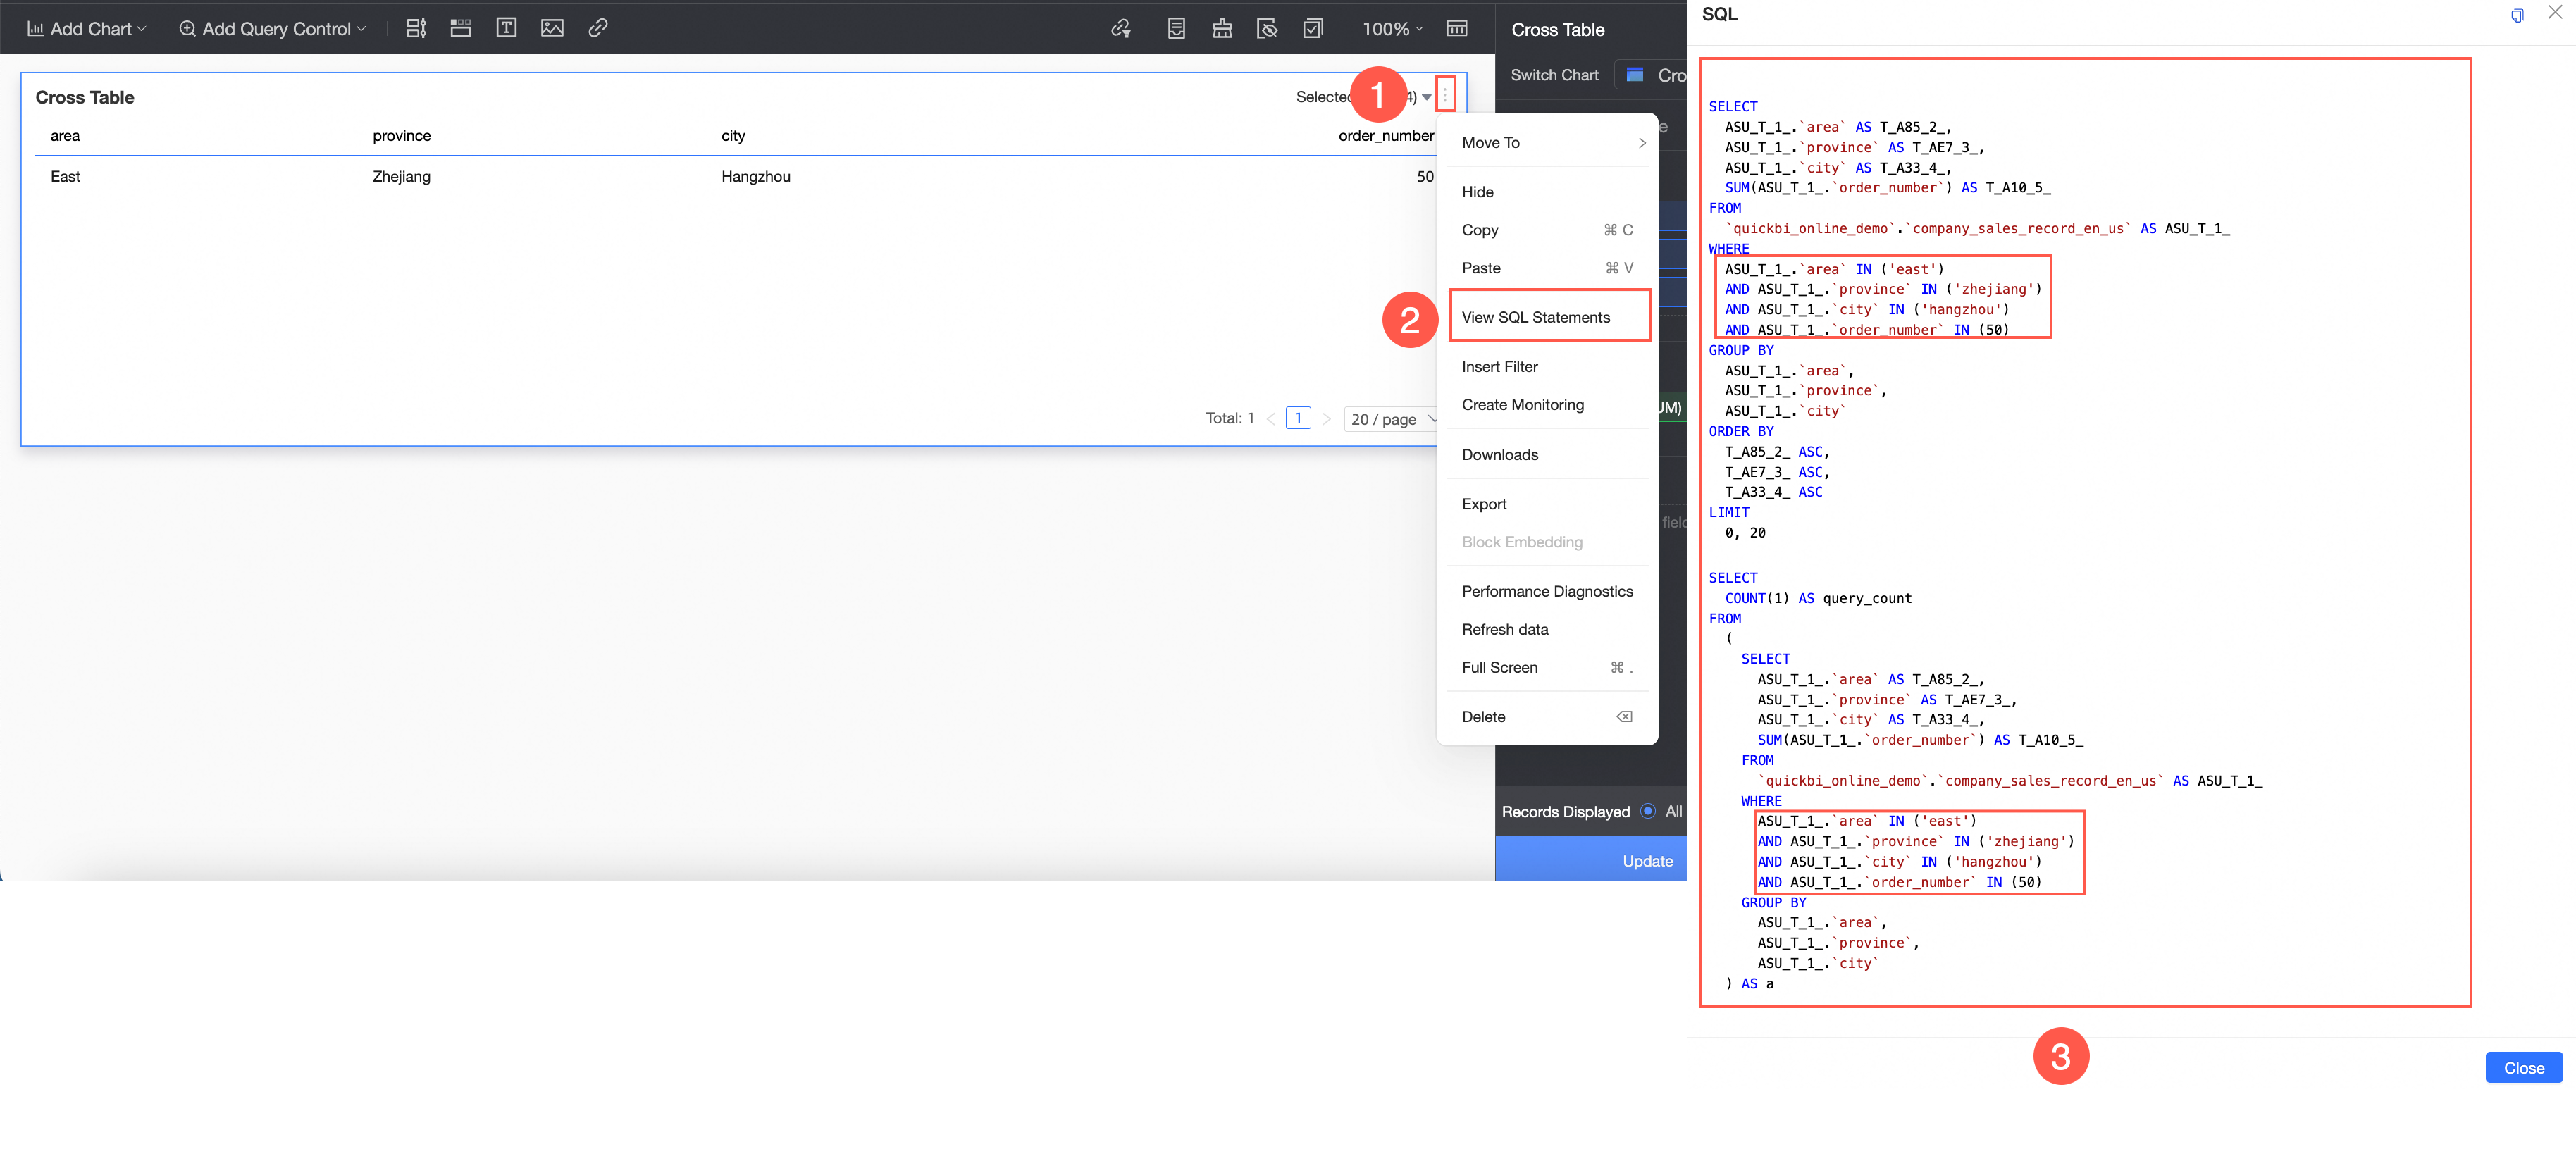
View the data retrieval logic of the SQL statement.
Scenario 2: Perform access control by manually managing a tag table
Log on to the Quick BI console.
Set user tags.
The added user tags are used to control the scope of data that can be viewed after the tags are attached when you set row-level permissions.
Follow the steps in the following figure to add a user tag.
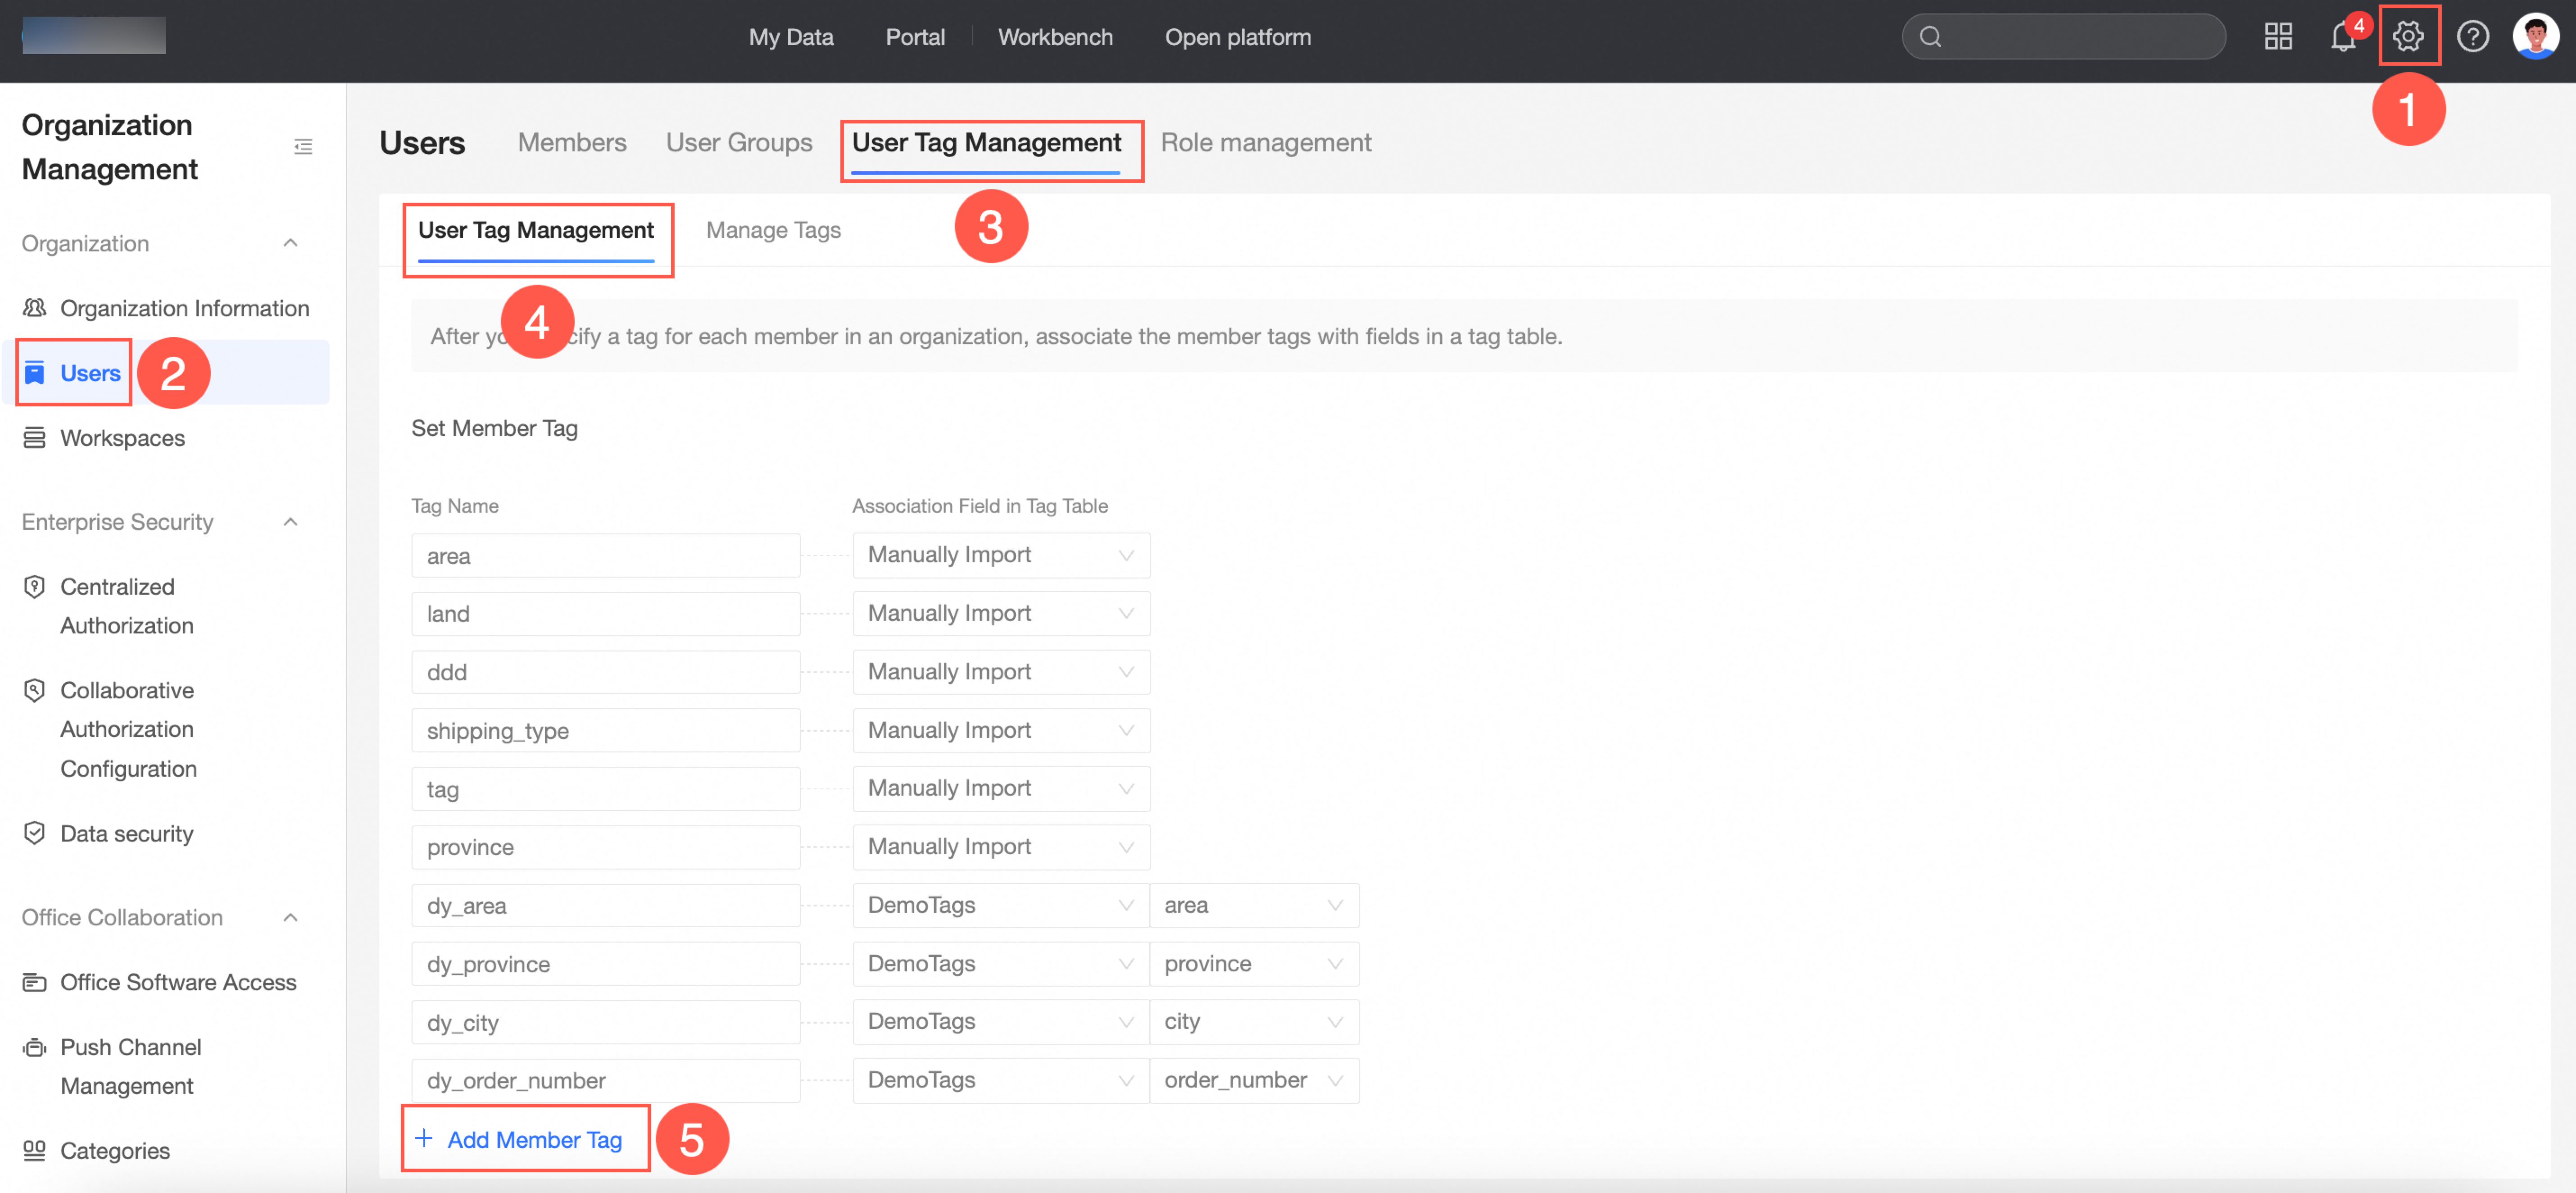
Enter a Tag Name and an Associated Tag Table Field, and then save the configuration.
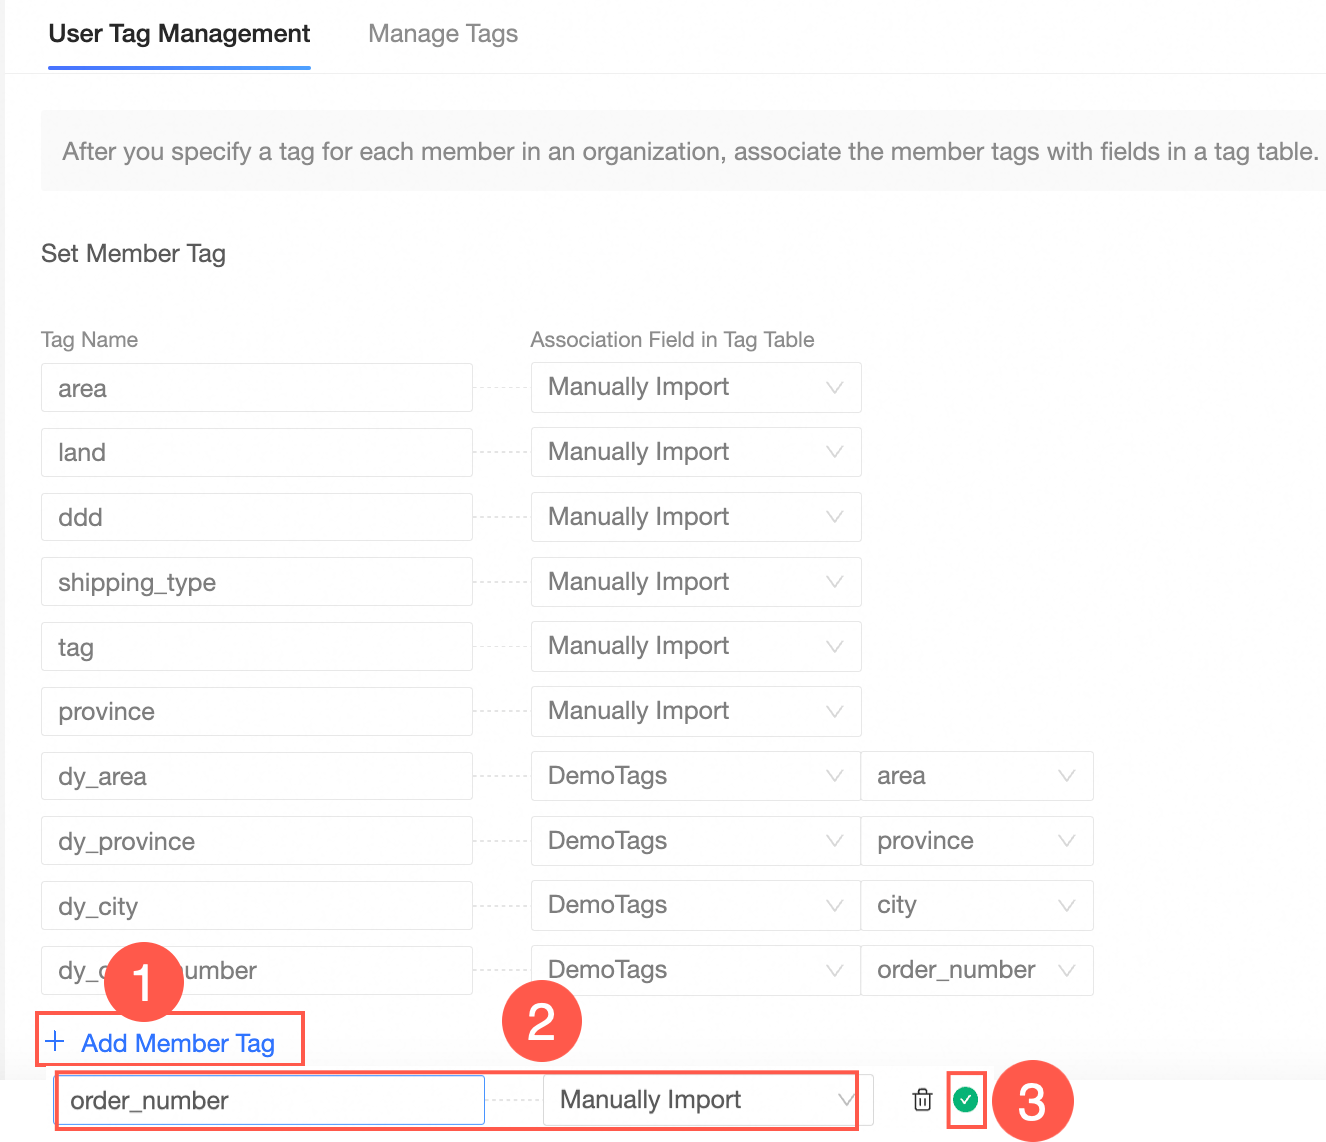
Customize the tag names as area, province, city, and order_number, and set Associated Tag Table Field to Manual Entry for all of them.
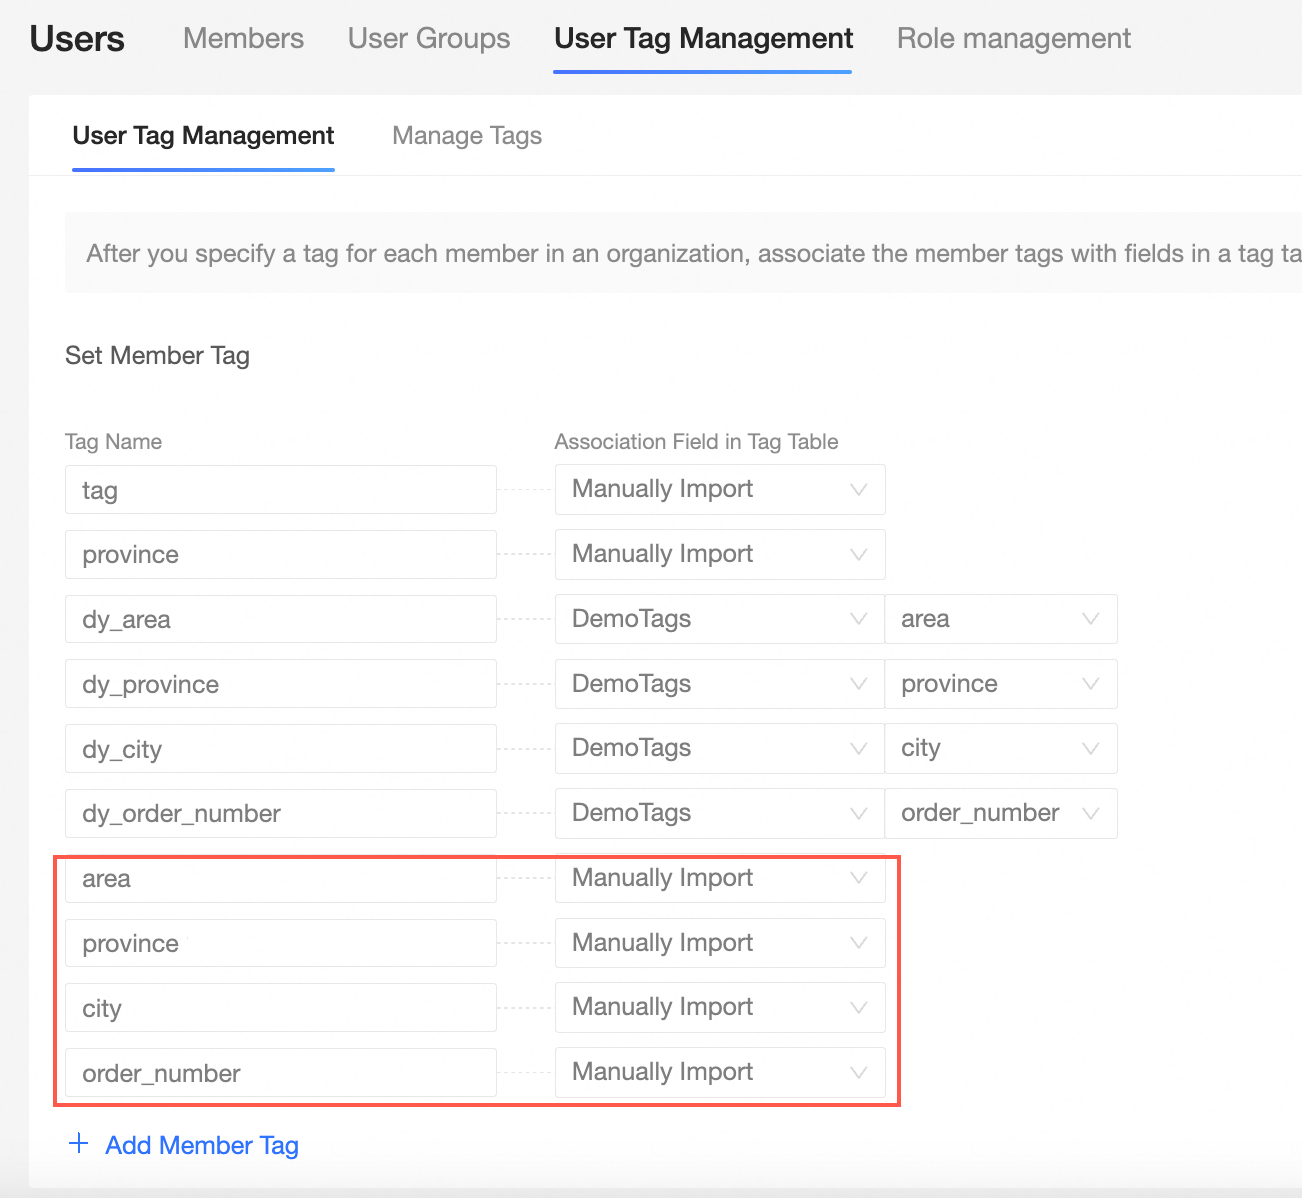
Manually manage the user tag table.
In the manually managed tag table, select one or more users and assign values to the added user tags.
On the Tag Management page, click Manual Management in the navigation pane on the left.
Search for the target user and assign tag values.
The tag assignment in this example is shown in the following figure.

Use tag-based authorization.
After authorization, the tag values in the user tag table apply to all datasets. Authorized users can view only the data within their permission scope.
On the Quick BI home page, follow the steps in the figure to go to the row-level permissions settings page.
Turn on the Enable Row-level Permissions switch, and set Authorization Method to User Tag Association Authorization.
In the Set association conditions area, click Add Controlled Field.
Select a Controlled Field and attach a User Tag Table Field.
The selected controlled fields and user tag table fields are shown in the following figure.
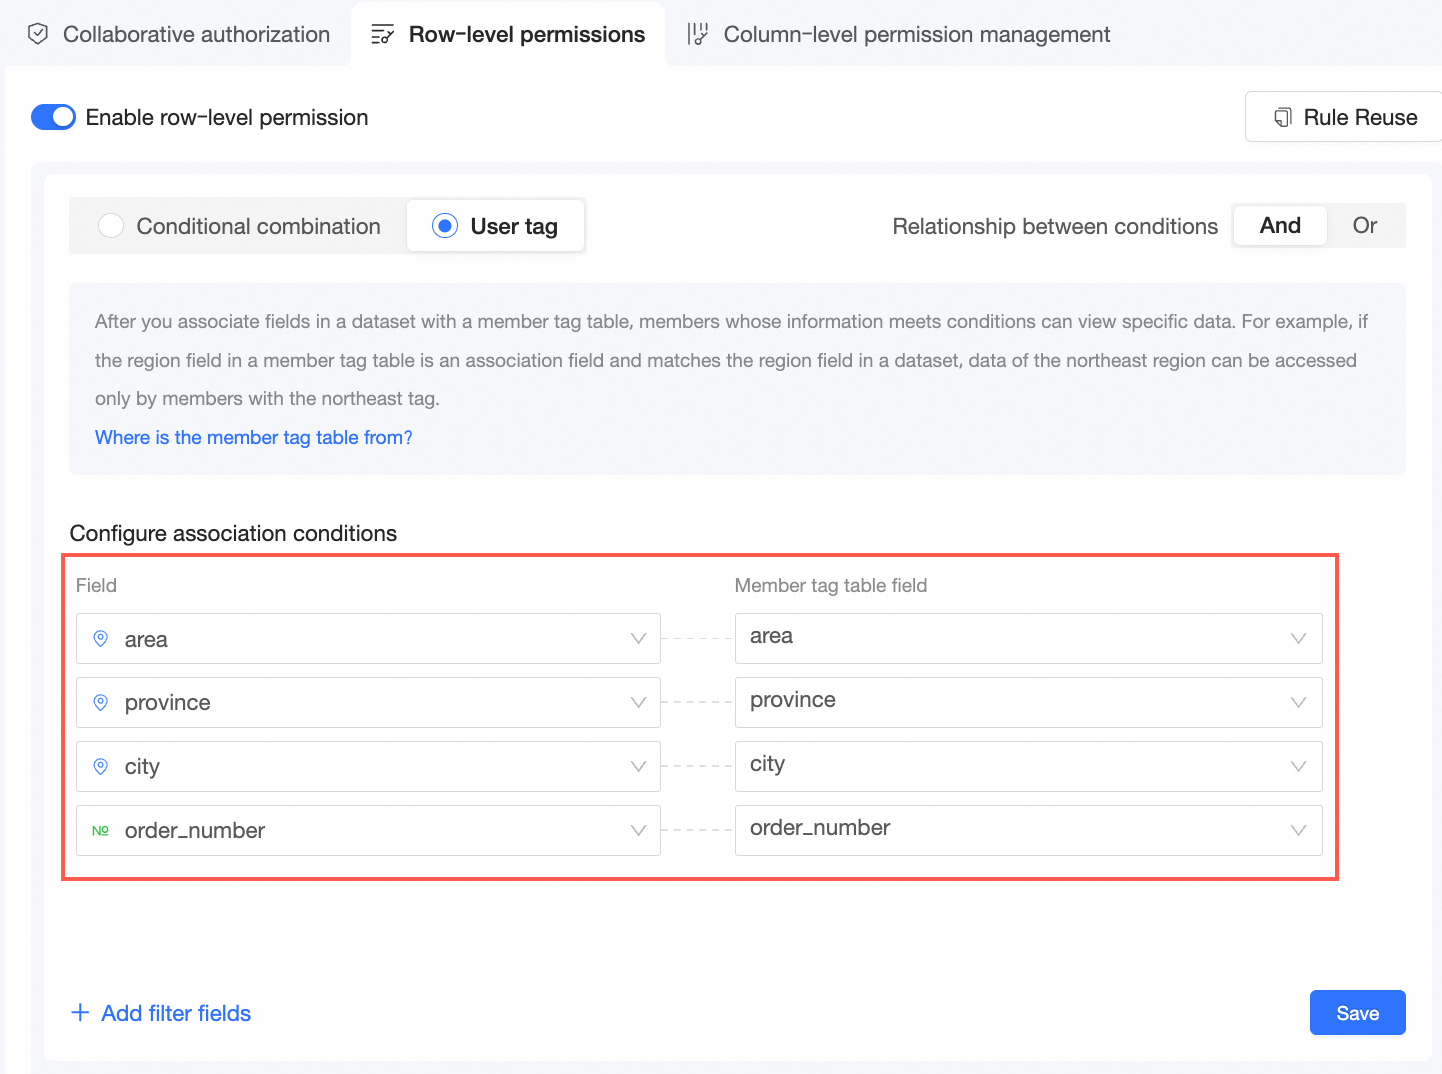
Click Save.
Whitelisted users.
If you do not want these rules to apply to certain users, add those users to the whitelist.
View the authorization result in a dashboard.
On the dashboard edit page, create a chart and view the authorization result.
For example, create a cross table. You can see the data for Hangzhou where the order quantity is 50.
View the data retrieval logic of the SQL statement.
What to do next
After you set up the dataset, you can perform data analytics. For more information, see Create a Dashboard and Create a Chart.