Établissez une communication basée sur le Thing Specification Language (TSL) entre les appareils et la plateforme IoT via le protocole Alink. Les appareils soumettent des propriétés ou des événements à la plateforme IoT, qui envoie des commandes aux appareils pour configurer les propriétés ou appeler des services. Cette rubrique fournit des exemples de code Java expliquant comment établir une communication basée sur le TSL.
Prérequis
IoT Platform est activé.
Un environnement de développement Java est installé.
Créer un produit et un appareil
Créez un produit et un appareil, puis définissez les fonctionnalités TSL pour le produit.
Connectez-vous à la console IoT Platform.
Sur la page Overview, localisez l'instance à gérer et cliquez sur son ID ou son nom.
Dans le volet de navigation de gauche, sélectionnez .
-
Sur la page Products, cliquez sur Create Product. Sur la page Create Product, spécifiez un nom personnalisé pour le produit et sélectionnez Custom Category. Conservez les valeurs par défaut pour les autres paramètres et cliquez sur OK.
-
Sur la page Product Details du produit, cliquez sur Define Feature. Dans l'onglet Define Feature, définissez un modèle TSL.
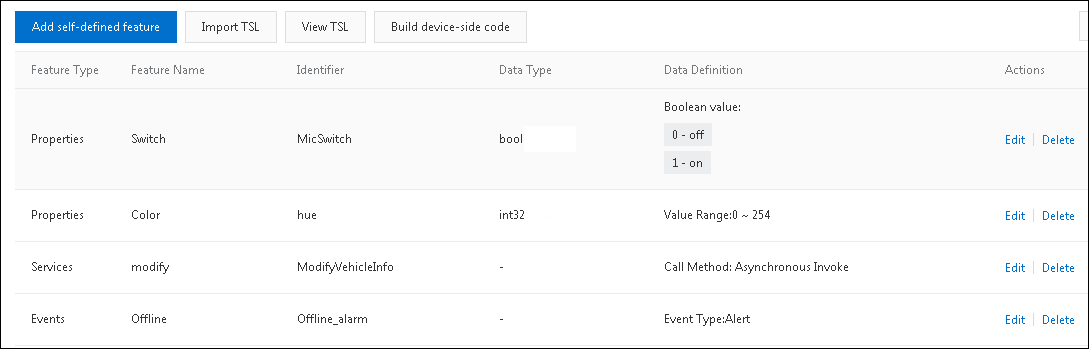
Dans cet exemple, un événement, un service et deux propriétés sont ajoutés à la section Default Module, comme illustré dans la figure suivante.
Cette rubrique propose un exemple de modèle TSL que vous pouvez importer. Pour savoir comment importer un modèle TSL, consultez Importer un modèle TSL.
-
Dans le volet de navigation de gauche, cliquez sur Devices. Sur la page Devices, cliquez sur Add Device pour créer un appareil.
Vous pouvez utiliser l'exemple de code pour configurer par lot les propriétés des appareils et appeler par lot les services des appareils. Vous devez créer au moins deux appareils. Pour plus d'informations, consultez
Créer plusieurs appareils simultanément
.
Télécharger et installer une démo du SDK
La démo du SDK inclut l'exemple de code côté serveur et l'exemple de code côté appareil.
Cliquez sur iotx-api-demo pour télécharger le package iotx-api-demo, puis décompressez-le.
Lancez l'outil de développement Java et importez le dossier iotx-api-demo décompressé.
-
Ajoutez les dépendances Maven suivantes au fichier pom.xml pour importer le SDK IoT Platform et un Link SDK :
<!-- https://mvnrepository.com/artifact/com.aliyun/aliyun-java-sdk-iot --> <dependency> <groupId>com.aliyun</groupId> <artifactId>aliyun-java-sdk-iot</artifactId> <version>7.33.0</version> </dependency> <dependency> <groupId>com.aliyun</groupId> <artifactId>aliyun-java-sdk-core</artifactId> <version>3.5.1</version> </dependency> <dependency> <groupId>com.aliyun.alink.linksdk</groupId> <artifactId>iot-linkkit-java</artifactId> <version>1.2.0</version> <scope>compile</scope> </dependency> -
Dans le répertoire java/src/main/resources/, ouvrez le fichier config et spécifiez les informations requises pour l'initialisation.
user.accessKeyID = <your accessKey ID>
user.accessKeySecret = <your accessKey Secret>
iot.regionId = <regionId>
iot.productCode = Iot
iot.domain = iot.<regionId>.aliyuncs.com
iot.version = 2018-01-20
Paramètre Description accessKeyID L'AccessKey ID de votre compte Alibaba Cloud.
Pour créer ou consulter votre paire de clés AccessKey, procédez comme suit : Connectez-vous à la console Alibaba Cloud Management. Placez le pointeur sur votre photo de profil et cliquez sur AccessKey Management pour accéder à la page AccessKey Pair.
accessKeySecret L'AccessKey secret de votre compte Alibaba Cloud. Vous pouvez obtenir l'AccessKey secret de la même manière que l'AccessKey ID. regionId L'ID de la région où résident vos appareils IoT. Pour plus d'informations sur les ID de région, consultez Régions et zones.
Soumettre des propriétés et des événements à l'aide du Link SDK
Configurez le Link SDK pour vous connecter à la plateforme IoT et soumettre des propriétés et des événements.
Le fichier ThingTemplate situé dans le répertoire java/src/main/com.aliyun.iot.api.common.deviceApi contient l'exemple de code.
-
Spécifiez les informations de connexion.
Remplacez les valeurs des paramètres productKey, deviceName et deviceSecret dans l'exemple de code par les informations relatives au certificat de votre appareil. Remplacez la valeur du paramètre url par votre endpoint MQTT. Pour savoir comment obtenir un endpoint, consultez Gérer les endpoints d'instance. L'endpoint doit inclure le port 1883.
public static void main(String[] args) { /** * The information about the device certificate. */ String productKey = "your productKey"; String deviceName = "your deviceName"; String deviceSecret = "your deviceSecret"; /*TODO: Replace the following endpoint with the endpoint of your instance. */ String url = "iot-6d***ql.mqtt.iothub.aliyuncs.com:1883"; /** * The information about the MQTT connection. */ ThingTemplate manager = new ThingTemplate(); DeviceInfo deviceInfo = new DeviceInfo(); deviceInfo.productKey = productKey; deviceInfo.deviceName = deviceName; deviceInfo.deviceSecret = deviceSecret; /** * The Java HTTP client supports TSLv1.2. */ System.setProperty("https.protocols", "TLSv2"); manager.init(deviceInfo, url); } -
Initialisez les paramètres de connexion.
public void init(final DeviceInfo deviceInfo, String url) { LinkKitInitParams params = new LinkKitInitParams(); /** * Configure the parameters for MQTT initialization. */ IoTMqttClientConfig config = new IoTMqttClientConfig(); config.productKey = deviceInfo.productKey; config.deviceName = deviceInfo.deviceName; config.deviceSecret = deviceInfo.deviceSecret; config.channelHost = url; /** * Specify whether to receive offline messages. * The cleanSession field that corresponds to the MQTT connection. */ config.receiveOfflineMsg = false; params.mqttClientConfig = config; ALog.setLevel(LEVEL_DEBUG); ALog.i(TAG, "mqtt connetcion info=" + params); /** * Configure the initialization parameters and specify the certificate information about the device. */ params.deviceInfo = deviceInfo; /** Establish a connection. **/ LinkKit.getInstance().init(params, new ILinkKitConnectListener() { public void onError(AError aError) { ALog.e(TAG, "Init Error error=" + aError); } public void onInitDone(InitResult initResult) { ALog.i(TAG, "onInitDone result=" + initResult); List<Property> properties = LinkKit.getInstance().getDeviceThing().getProperties(); ALog.i(TAG, "The device properties" + JSON.toJSONString(properties)); List<Event> getEvents = LinkKit.getInstance().getDeviceThing().getEvents(); ALog.i(TAG, "List of device events" + JSON.toJSONString(getEvents)); /* Submit properties. TODO: Make sure that the properties that you want to submit are defined in the TSL model of the product. Example: MicSwitch. Otherwise, an error message is returned. */ handlePropertySet("MicSwitch", new ValueWrapper.IntValueWrapper(1)); /* Submit events. TODO: Make sure that the events that you want to submit are defined in the TSL model of the product. Example: Offline_alarm. Otherwise, an error message is returned. */ Map<String,ValueWrapper> values = new HashMap<>(); values.put("eventValue",new ValueWrapper.IntValueWrapper(0)); OutputParams outputParams = new OutputParams(values); handleEventSet("Offline_alarm",outputParams); } }); }RemarqueLes identifiants de propriété et d'événement dans le code doivent correspondre exactement aux identifiants définis dans le modèle TSL.
-
Configurez le Link SDK pour soumettre des propriétés.
/** * The device submits properties in the Alink JSON format. * @param identifier: the identifier of the property. * @param value: the value of the property. * @return */ private void handlePropertySet(String identifier, ValueWrapper value ) { ALog.i(TAG, "Identifier of the property=" + identifier); Map<String, ValueWrapper> reportData = new HashMap<>(); reportData.put(identifier, value); LinkKit.getInstance().getDeviceThing().thingPropertyPost(reportData, new IPublishResourceListener() { public void onSuccess(String s, Object o) { // The property is submitted. ALog.i(TAG, "Submitted. onSuccess() called with: s = [" + s + "], o = [" + o + "]"); } public void onError(String s, AError aError) { // The property value failed to be submitted. ALog.i(TAG, "Failed to submit. onError() called with: s = [" + s + "], aError = [" + JSON.toJSONString(aError) + "]"); } }); } -
Configurez le Link SDK pour soumettre des événements.
/**
     * The device submits events in the Alink JSON format.
     * @param identifier: the identifier of the event.
     * @param params: the parameters of the event.
     * @return
     */
    private void handleEventSet(String identifyID, OutputParams params ) {
        ALog.i(TAG, "Identifier of the event=" + identifyID + "  params=" + JSON.toJSONString(params));

        LinkKit.getInstance().getDeviceThing().thingEventPost( identifyID,  params, new IPublishResourceListener() {

            public void onSuccess(String s, Object o) {
                // The event is submitted.
                ALog.i(TAG, "Submitted. onSuccess() called with: s = [" + s + "], o = [" + o + "]");
            }

            public void onError(String s, AError aError) {
                // Failed to submit the event.
                ALog.i(TAG, "Failed to submit. onError() called with: s = [" + s + "], aError = [" + JSON.toJSONString(aError) + "]");
            }
        });
    }
Envoyer des commandes pour configurer les propriétés et appeler les services à l'aide d'un SDK IoT Platform
-
Initialisez un client.
Le fichier IotClient situé dans le répertoire java/src/main/com.aliyun.iot.client contient l'exemple de code.
public class IotClient { private static String accessKeyID; private static String accessKeySecret; private static String regionId; private static String domain; private static String version; public static DefaultAcsClient getClient() { DefaultAcsClient client = null; Properties prop = new Properties(); try { prop.load(Object.class.getResourceAsStream("/config.properties")); accessKeyID = prop.getProperty("user.accessKeyID"); accessKeySecret = prop.getProperty("user.accessKeySecret"); regionId = prop.getProperty("iot.regionId"); domain = prop.getProperty("iot.domain"); version = prop.getProperty("iot.version"); IClientProfile profile = DefaultProfile.getProfile(regionId, accessKeyID, accessKeySecret); DefaultProfile.addEndpoint(regionId, regionId, prop.getProperty("iot.productCode"), prop.getProperty("iot.domain")); // Initialize the client. client = new DefaultAcsClient(profile); } catch (Exception e) { LogUtil.print("Failed to initialize the client. exception:" + e.getMessage()); } return client; } public static String getRegionId() { return regionId; } public static void setRegionId(String regionId) { IotClient.regionId = regionId; } public static String getDomain() { return domain; } public static void setDomain(String domain) { IotClient.domain = domain; } public static String getVersion() { return version; } public static void setVersion(String version) { IotClient.version = version; } } -
Initialisez la classe publique CommonRequest.
Le fichier AbstractManager situé dans le répertoire java/src/main/com.aliyun.iot.api.common.openApi encapsule la classe publique CommonRequest.
public class AbstractManager { private static DefaultAcsClient client; static { client = IotClient.getClient(); } /** * Initialize the CommonRequest class. action: the name of the API operation. * domain: the endpoint. * version: the API version. */ public static CommonRequest executeTests(String action) { CommonRequest request = new CommonRequest(); request.setDomain(IotClient.getDomain()); request.setMethod(MethodType.POST); request.setVersion(IotClient.getVersion()); request.setAction(action); return request; } -
Appelez les opérations API de la plateforme IoT pour configurer les propriétés et appeler les services.
Le fichier ThingManagerForPopSDk situé dans le répertoire java/src/main/com.aliyun.iot.api.common.openApi contient l'exemple de code.
-
Appelez l'opération SetDeviceProperty pour configurer une propriété d'appareil.
public static void SetDeviceProperty(String InstanceId, String IotId, String ProductKey, String DeviceName , String Items) { SetDevicePropertyResponse response =null; SetDevicePropertyRequest request=new SetDevicePropertyRequest(); request.setDeviceName(DeviceName); request.setIotId(IotId); request.setItems(Items); request.setProductKey(ProductKey); request.setIotInstanceId(InstanceId); try { response = client.getAcsResponse(request); if (response.getSuccess() != null && response.getSuccess()) { LogUtil.print("The device property is configured."); LogUtil.print(JSON.toJSONString(response)); } else { LogUtil.print("Failed to configure the device property."); LogUtil.error(JSON.toJSONString(response)); } } catch (ClientException e) { e.printStackTrace(); LogUtil.error("Failed to configure the device property." + JSON.toJSONString(response)); } } -
Appelez l'opération SetDevicesProperty pour configurer par lot les propriétés des appareils.
/** * Batch configure device properties. * * @param ProductKey: the ProductKey of the product to which the devices whose properties you want to configure belong. * @param DeviceNames: the DeviceNames of the devices whose properties you want to configure. * @param Items: the property information that consists of multiple pairs of key-value JSON strings. This parameter is required. * * @Des: the description. */ public static void SetDevicesProperty(String InstanceId, String ProductKey, List<String> DeviceNames, String Items) { SetDevicesPropertyResponse response = new SetDevicesPropertyResponse(); SetDevicesPropertyRequest request = new SetDevicesPropertyRequest(); request.setDeviceNames(DeviceNames); request.setItems(Items); request.setProductKey(ProductKey); request.setIotInstanceId(InstanceId); try { response = client.getAcsResponse(request); if (response.getSuccess() != null && response.getSuccess()) { LogUtil.print("The properties are batch configured."); LogUtil.print(JSON.toJSONString(response)); } else { LogUtil.print("Failed to batch configure the device properties."); LogUtil.error(JSON.toJSONString(response)); } } catch (ClientException e) { e.printStackTrace(); LogUtil.error("Failed to batch configure the device properties." + JSON.toJSONString(response)); } } -
Appelez l'opération InvokeThingService pour appeler un service d'appareil.
/** * @param Identifier: the identifier of the service. This parameter is required. * @param Args: the input parameters that are required to start the service. This parameter is required. */ public static InvokeThingServiceResponse.Data InvokeThingService(String InstanceId, String IotId, String ProductKey, String DeviceName, String Identifier, String Args) { InvokeThingServiceResponse response =null; InvokeThingServiceRequest request = new InvokeThingServiceRequest(); request.setArgs(Args); request.setDeviceName(DeviceName); request.setIotId(IotId); request.setIdentifier(Identifier); request.setProductKey(ProductKey); request.setIotInstanceId(InstanceId); try { response = client.getAcsResponse(request); if (response.getSuccess() != null && response.getSuccess()) { LogUtil.print("The service is executed."); LogUtil.print(JSON.toJSONString(response)); } else { LogUtil.print("Failed to execute the service."); LogUtil.error(JSON.toJSONString(response)); } return response.getData(); } catch (ClientException e) { e.printStackTrace(); LogUtil.error("Failed to execute the service." + JSON.toJSONString(response)); } return null; }RemarqueSi vous souhaitez appeler des services de manière synchrone, définissez le paramètre
Invoking Method
sur
Synchronization
lorsque vous définissez les modèles TSL. Lors du développement des appareils, vous devez écrire le code permettant de traiter les appels de service synchrones.
-
Appelez l'opération InvokeThingsService pour appeler par lot les services des appareils.
     /**
     * @param Identifier: the identifier of the service. This parameter is required.
     * @param Args: the input parameters that are required to start the service. This parameter is required.
     */
    public static void InvokeThingsService(String InstanceId, String IotId, String ProductKey, List<String> DeviceNames,
                                           String Identifier, String Args) {
        InvokeThingsServiceResponse response =null;
        InvokeThingsServiceRequest request = new InvokeThingsServiceRequest();
        request.setArgs(Args);
        request.setIdentifier(Identifier);
        request.setDeviceNames(DeviceNames);
        request.setProductKey(ProductKey);
        request.setIotInstanceId(InstanceId);

        try {
            response = client.getAcsResponse(request);

            if (response.getSuccess() != null && response.getSuccess()) {
                LogUtil.print("The services are called.");
                LogUtil.print(JSON.toJSONString(response));
            } else {
                LogUtil.print("Failed to batch call the services.");
                LogUtil.error(JSON.toJSONString(response));
            }

        } catch (ClientException e) {
            e.printStackTrace();
            LogUtil.error("Failed to batch call the services." + JSON.toJSONString(response));
        }
    }
-
Exemple de requête :
public static void main(String[] args) {
        /** The DeviceName of the online device and the Productkey of the product to which the online device belongs. */
        String deviceName = "2pxuAQB2I7wGPmqq***";
        String deviceProductkey = "a1QbjI2***";

        /** If you use an Enterprise Edition instance or a public instance of the new version, specify the instance ID for the InstanceId parameter. To obtain the instance ID, log on to the IoT Platform console and view the instance ID on the Overview page.
         * If you use a public instance of the old version, leave the InstanceId parameter empty"".
         */
        String InstanceId = "iot-***tl02";

        //1. Configure a device property.
        SetDeviceProperty(InstanceId, null, deviceProductkey, deviceName,"{\"hue\":0}");
        //2. Batch configure device properties.
        List<String>  deviceNames = new ArrayList<>();
        deviceNames.add(deviceName);
        SetDevicesProperty(InstanceId, deviceProductkey, deviceNames, "{\"hue\":0}");
        //3. Call a device service.
        InvokeThingService(InstanceId, null, deviceProductkey, deviceName, "ModifyVehicleInfo", "{}");
        //4. Batch call device services.
        List<String>  deviceNamesService = new ArrayList<>();
        deviceNamesService.add(deviceName);
        InvokeThingsService(null, deviceProductkey, deviceNamesService, "ModifyVehicleInfo", "{}");
    }
Déboguer les SDK
Après avoir configuré le Link SDK et le SDK IoT Platform, exécutez les SDK.
Vérifiez les résultats :
-
Consultez les journaux locaux.
2022-04-08 05:29:41.165 - [ThingManagerForPopSDk.java] - SetDeviceProperty(35):The device property is configured. 2022-04-08 05:29:41.250 - [ThingManagerForPopSDk.java] - SetDeviceProperty(36):{"code":"","data":{"messageId":"1703383434"},"requestId":"049ED108-B2BB-50F5-8D70-FD3158AF794E","success":true} 2022-04-08 05:29:41.671 - [ThingManagerForPopSDk.java] - SetDevicesProperty(69):The properties are batch configured. 2022-04-08 05:29:41.675 - [ThingManagerForPopSDk.java] - SetDevicesProperty(70):{"code":"","requestId":"31B3D707-71E8-5F18-A8E8-349CB92C013F","success":true} 2022-04-08 05:29:41.777 - [ThingManagerForPopSDk.java] - InvokeThingService(107):The service is executed. 2022-04-08 05:29:41.784 - [ThingManagerForPopSDk.java] - InvokeThingService(108):{"code":"","data":{"messageId":"1708568778"},"requestId":"63995E46-FE04-5F84-AF40-8F11873B253B","success":true} 2022-04-08 05:29:41.851 - [ThingManagerForPopSDk.java] - InvokeThingsService(148):The services are called. 2022-04-08 05:29:41.854 - [ThingManagerForPopSDk.java] - InvokeThingsService(149):{"code":"","requestId":"A9BE6716-B1F5-5916-8DBA-1D17CB651659","success":true} -
Sur la page Device Details de l'appareil, sous l'instance, cliquez sur Default Module.
L'onglet Status affiche les valeurs de propriété que l'appareil a soumises le plus récemment.
L'onglet Events affiche les événements que l'appareil a soumis le plus récemment.
L'onglet Invoke Service affiche les historiques des appels de service.