When you use SSL-VPN to enable clients to access a VPC, multiple connected clients can not only communicate with the VPC but also communicate with each other by default.
Scenario
A company needs to expand its server resources due to business development. The company plans to deploy servers on Alibaba Cloud to save physical equipment costs. After deploying the servers on Alibaba Cloud, the company needs a solution that meets the following network connectivity requirements:
Local servers (Client 2 and Client 3) can communicate with servers in the VPC over private networks to complete business interactions
Employees on business trips (Client 1) can remotely access all server resources in the company's internal network (private network)
SSL-VPN can meet the company's network connectivity requirements. By creating a VPN gateway in the VPC and installing VPN software on Client 1, Client 2, and Client 3, you can establish SSL-VPN connections between the clients and the VPC after configuration. This quickly enables encrypted private network communication between Client 1, Client 2, Client 3, and ECS instances, allowing any two nodes to communicate with each other, thus meeting the company's network connectivity requirements.

Prerequisites
You have created a VPC and deployed related services using ECS in the VPC.
Client 1, Client 2, and Client 3 can access the Internet.
Procedure
Step 1: Create a VPN gateway
- Log on to the VPN gateway console.
On the VPN Gateways page, click Create VPN Gateway.
On the VPN Gateway page, configure the VPN gateway based on the following information, click Buy Now, and complete the payment.
Region: Select the region of the VPN gateway. In this example, China (Hangzhou) is selected.
NoteMake sure that the VPN gateway and the VPC are deployed in the same region.
Gateway Type: Select Standard.
Network Type: Select Public.
VPC: Select the VPC.
VSwitch 1: Select a vSwitch from the VPC.
VSwitch 2: Select a second vSwitch from the VPC.
In regions that support multiple zones, you need to specify two vSwitches that are deployed in different zones of the VPC. Each vSwitch must have an idle IP address. If the vSwitches do not meet the requirements, you need to create a vSwitch.
IPsec-VPN: Disable the IPsec-VPN feature.
SSL-VPN: Enable the SSL-VPN feature.
SSL Connections: Select the number of clients that need to be connected.
Only the configurations related to this topic are listed above. Keep other parameters at their default values or leave them empty. For more information, see Create and manage a VPN gateway.
Return to the VPN Gateway page to view the created VPN gateway.
The status of the newly created VPN gateway is Preparing, which changes to Normal after about 1 to 5 minutes. The Normal status indicates that the VPN gateway is initialized and ready for use.
Step 2: Create an SSL server
In the left-side navigation pane, choose .
In the top navigation bar, select the region of the SSL server.
NoteMake sure that the SSL server and the VPN gateway are deployed in the same region.
On the SSL Server page, click Create SSL Server.
In the Create SSL Server panel, configure the SSL server based on the following information, and then click OK.
VPN Gateway: Select the created VPN gateway.
Local Network: Enter the CIDR block of the VPC that you want to access. In this example, 192.168.0.0/16 is used.
Client CIDR Block: Enter the CIDR block that the clients use to access the VPC. In this example, 10.0.99.0/24 is used.
ImportantThe subnet mask of the client CIDR block must be 16 to 29 bits in length.
Make sure that the client CIDR block does not overlap with the local CIDR block, the VPC CIDR block, or route CIDR blocks associated with the client.
We recommend that you use 10.0.0.0/8, 172.16.0.0/12, 192.168.0.0/16, or one of their subnets as the client CIDR block. If you want to specify a public CIDR block as the client CIDR block, you must specify the public CIDR block as the user CIDR block of a VPC. This way, the VPC can access the public CIDR block. For more information, see the VPC FAQ and VPC FAQ sections of the "FAQ" topic.
After you create an SSL server, the system automatically adds routes that point to the client CIDR block to the VPC route table. Do not add routes that point to the client CIDR block to the VPC route table again. Otherwise, SSL-VPN connections cannot work as expected.
Only the configurations related to this topic are listed above. Keep other parameters at their default values or leave them empty. For more information, see Create and manage an SSL server.
Step 3: Create SSL clients and download certificates
Perform the following operations to create SSL clients and download certificates for Client 1, Client 2, and Client 3.
In the left-side navigation pane, choose .
On the SSL Client page, click Create SSL Client.
In the Create SSL Client panel, enter a name for the SSL client, select the created SSL server, and then click OK.
On the SSL Client page, find the created SSL client, and then click Download Certificate in the Actions column.
Save the downloaded SSL client certificate to your local computer for later client configuration.

Step 4: Configure the clients
Perform the following operations to install VPN software and SSL client certificates on Client 1, Client 2, and Client 3, and then establish SSL-VPN connections with the VPC.
In this example, Client 1 and Client 2 use Windows Server 2025 Datacenter Edition 64-bit, and Client 3 uses Ubuntu 24.04 64-bit. If your clients use macOS or Android, see Configure clients for instructions.
Configure Client 1 and Client 2
Log on to the client and download and install the OpenVPN client (Windows version).If you cannot access the webpage, contact your account manager or Alibaba Cloud engineer.
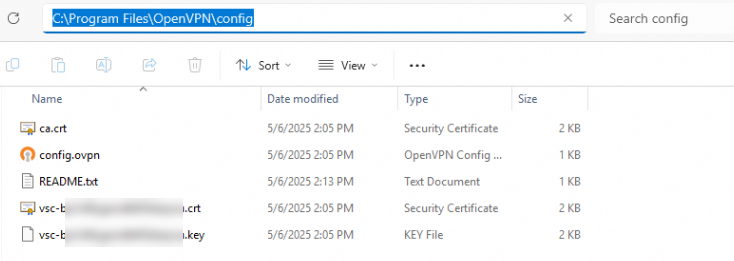
Extract the downloaded SSL client certificate and copy it to the OpenVPN\config directory.
In this example, the certificate is extracted and copied to the C:\Program Files\OpenVPN\config directory. Extract and copy the certificate to your actual directory based on your installation path.
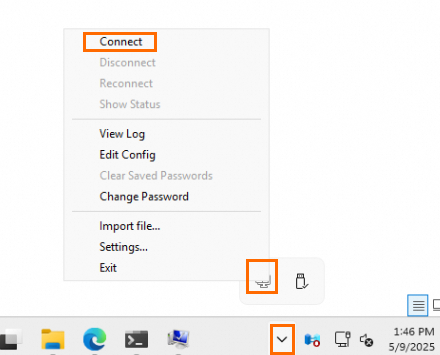
Start the OpenVPN client and click Connect to establish an SSL-VPN connection with the VPC.
Configure Client 3
Log on to the client and open a command line window.
Run the following commands to install the OpenVPN client and create a
confdirectory.apt-get update apt-get install -y openvpn mkdir -p /etc/openvpn/confExtract the downloaded SSL client certificate and copy it to the /etc/openvpn/conf/ directory.
Go to the /etc/openvpn/conf/ directory and run the following command to establish an SSL-VPN connection with the VPC.
openvpn --config /etc/openvpn/conf/config.ovpn --daemon
After you complete the preceding configurations, log on to the VPN Gateway console and check the virtual IP addresses assigned to the clients on the SSL server details page. The clients will use these virtual IP addresses to communicate with the VPC and with other clients.

Step 5: Test connectivity
After the SSL-VPN connections are established, if security group rules or server access control rules allow, any two nodes among Client 1, Client 2, Client 3, and the ECS instance can communicate with each other. This example verifies the connectivity between Client 1 and Client 2, Client 3, and the ECS instance to test connectivity between clients and between clients and the VPC. Other connectivity test scenarios are not described in this document.
Before testing connectivity, make sure that the access control rules of Client 1, Client 2, and Client 3, along with the security group rules of the ECS instance, allow ICMP protocol and access from nodes in the Client CIDR Block.
Client 1 accesses Client 2, Client 3, and the ECS instance.
Log on to Client 1 and open a Command Prompt window.
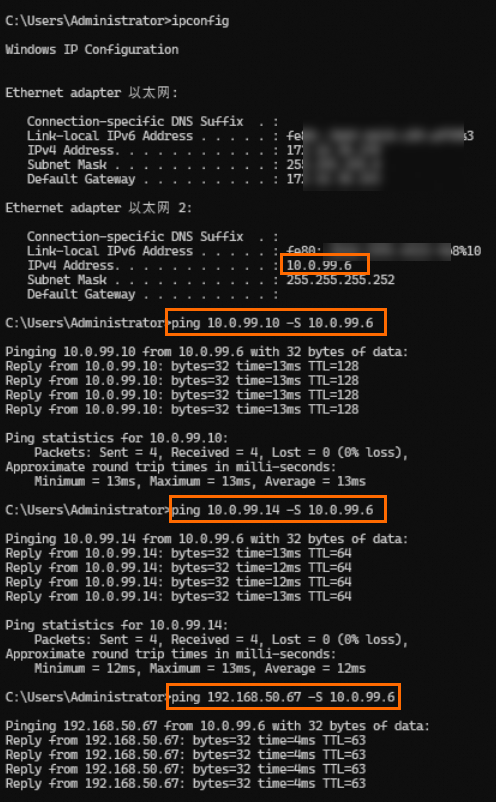
In the Command Prompt window, run the
ping <Client virtual IP address or ECS IP address> -S <Client 1 virtual IP address>command to specify using the Client 1 virtual IP address to access Client 2, Client 3, and the ECS instance.If Client 1 receives reply messages as shown below, it indicates that Client 1 can access Client 2, Client 3, and the ECS instance normally.
Log on to Client 2, Client 3, and the ECS instance respectively, and run commands to test if they can access Client 1 normally. If they can receive reply messages, it indicates that the ECS instance, Client 2, and Client 3 can communicate with Client 1.
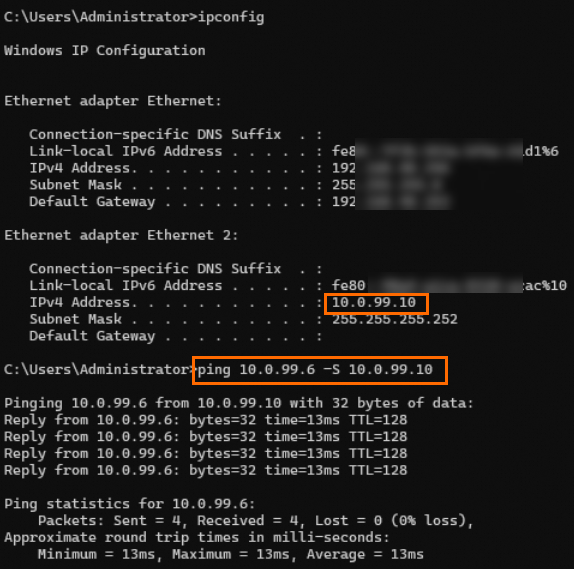
Client 2 accesses Client 1
ipconfig: View the client's virtual IP address
ping <Client 1 virtual IP address> -S <Client 2 virtual IP address>: Use the Client 2 virtual IP address to access Client 1
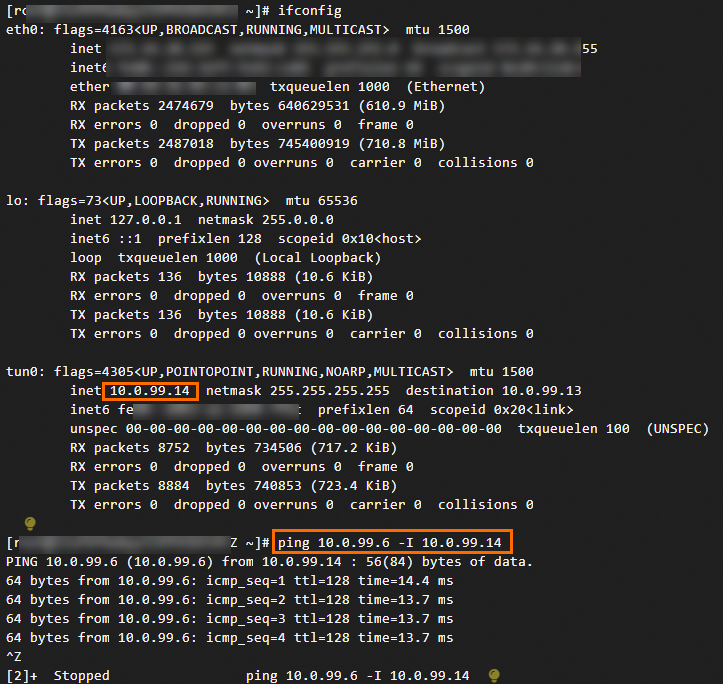
Client 3 accesses Client 1
ifconfig: View the client's virtual IP address
ping <Client 1 virtual IP address> -I <Client 3 virtual IP address>: Use the Client 3 virtual IP address to access Client 1
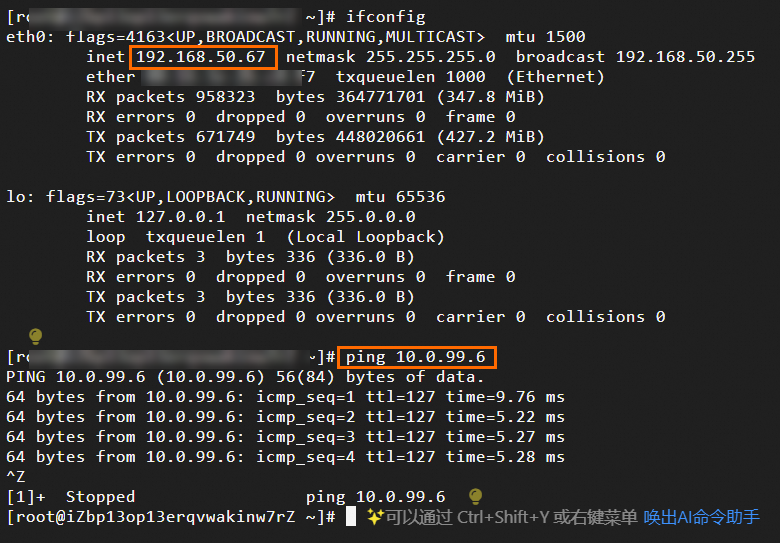
ECS instance accesses Client 1
ifconfig: View the client's virtual IP address
ping <Client 1 virtual IP address>
FAQ
If a VPN gateway has both IPsec-VPN connections and SSL-VPN connections, can the data center and clients communicate with each other?
Yes, they can communicate with each other.
You need to add routes to the Client CIDR Block in the data center, and add the data center's CIDR block to the Local Network of the SSL server.