The hub feature of VPN Gateway enables large enterprises to establish private communication among multiple sites and between these sites and a VPC.
How it works
After you create a VPN Gateway instance, its hub feature is automatically enabled. You only need to configure customer gateways for each site and IPsec-VPN connections from each site to the cloud to enable communication among the sites, and between the sites and your VPC.
By default, each VPN Gateway instance supports up to 10 IPsec-VPN connections. This means that a single VPN Gateway instance can connect to 10 sites that are located in different regions.
You can increase the quota using one of the following methods:
Go to the Quota Management page to increase the quota. For more information, see Increase a quota.
Go to Quota Center to increase the quota. For more information, see Increase a quota.
Scenario
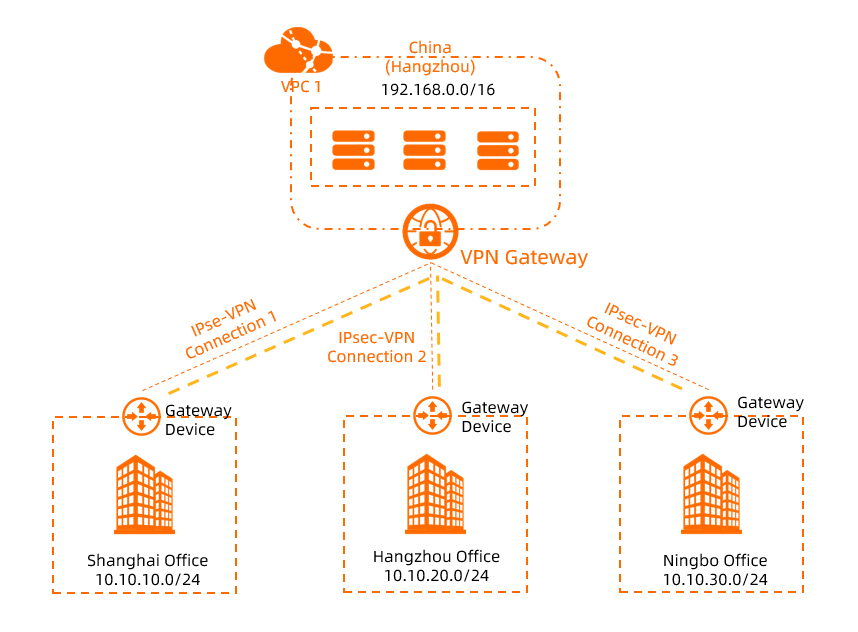
In this scenario, a large enterprise has a VPC named VPC1 in the China (Hangzhou) region with services deployed on ECS instances. The enterprise also has sites in Shanghai, Hangzhou, and Ningbo that cannot communicate with each other or with VPC1. The enterprise uses the hub feature of VPN Gateway to connect all three sites to each other and to VPC1.
Prerequisites
-
You have obtained the public IP address of the on-premises gateway device for each site.
-
You have created a VPC named VPC1 in the China (Hangzhou) region and deployed services on ECS instances in VPC1. For more information, see Create an IPv4 VPC.
The following table describes the CIDR blocks planned for VPC1 and each site in this example.
NoteYou can plan CIDR blocks based on your business requirements. Make sure that the CIDR blocks of VPC1 and the sites that need to communicate with each other do not overlap.
Site
VPC1
Shanghai site
Hangzhou site
Ningbo site
CIDR block
192.168.0.0/16
10.10.10.0/24
10.10.20.0/24
10.10.30.0/24
ECS instance IP address
192.168.20.121
N/A
N/A
N/A
Public IP address of the on-premises gateway device
N/A
1.XX.XX.1
2.XX.XX.2
3.XX.XX.3
-
Make sure that the security group rules applied to the ECS instances in VPC1 and the access control rules of each site allow communication among the sites, and between the sites and VPC1. For more information, see View security group rules and Add a security group rule.
Procedure

Step 1: Create a VPN Gateway
Create a VPN Gateway instance in the same region as VPC1, which the Shanghai, Hangzhou, and Ningbo sites will use to communicate with each other and with VPC1.
Log on to the VPN Gateway console.
-
In the top navigation bar, select the region where you want to create the VPN Gateway instance.
In this example, China (Hangzhou) is selected.
On the VPN Gateways page, click Create VPN Gateway.
-
On the buy page, configure the VPN Gateway instance based on the following information, and then click Buy Now to complete the payment.
Parameter
Description
Instance Name
Enter a name for the VPN Gateway instance. In this example, enter VPN Gateway 1.
Region
Select the region where the VPN Gateway instance is located. In this example, select China (Hangzhou).
Gateway Type
Select the type of the VPN Gateway instance. In this example, select Standard.
Network Type
Select the network type of the VPN Gateway instance. In this example, select Internet.
Tunnel
The system displays the tunnel modes supported by IPsec-VPN connections in the current region.
VPC
Select the VPC instance to associate with the VPN Gateway instance. In this example, select VPC1.
vSwitch 1
Select a vSwitch from the VPC.
If you select Single-tunnel, you need to specify only one vSwitch.
If you select Dual-tunnel, you need to specify two vSwitches.
After the IPsec-VPN feature is enabled, the system creates an elastic network interface (ENI) for each of the two vSwitches as an interface to communicate with the VPC over an IPsec-VPN connection. Each ENI occupies one IP address in the vSwitch.
NoteThe system selects a vSwitch by default. You can change or use the default vSwitch.
After a VPN gateway is created, you cannot modify the vSwitch associated with the VPN gateway. You can view the vSwitch associated with the VPN gateway, the zone to which the vSwitch belongs, and the ENI in the vSwitch on the details page of the VPN gateway.
vSwitch 2
Select a second vSwitch from the VPC.
You do not need to configure this parameter if the tunnel mode is single-tunnel.
Peak bandwidth
Select the maximum public bandwidth for the VPN Gateway instance. Unit: Mbit/s.
Traffic
The billing method of the VPN Gateway instance. The default value is Pay By Traffic.
For more information, see Billing.
IPsec-VPN
Specify whether to enable the IPsec-VPN feature. In this example, select Enable.
SSL-VPN
Specify whether to enable the SSL-VPN feature. In this example, select Disable.
Duration
The billing cycle of the VPN Gateway instance. The default value is By Hour.
Service-linked role
Click Create Service-Linked Role. The system automatically creates the AliyunServiceRoleForVpn service-linked role.
A VPN Gateway uses this role to access resources in other Alibaba Cloud services. For more information, see AliyunServiceRoleForVpn.
If Created. is displayed for this parameter, it indicates that the role has been created for your account. You do not need to create it again.
For more information about the parameters, see Create a VPN Gateway.
Return to the VPN Gateway page to view the new VPN Gateway instance.
A new VPN Gateway instance has an initial status of Preparing. After about 1 to 5 minutes, the status changes to Normal. A VPN Gateway instance with a Normal status is ready to use.
Step 2: Create customer gateways
After creating the VPN Gateway instance, you must create a customer gateway for each site to enable communication through the single VPN Gateway instance.
In the navigation pane on the left, choose .
-
In the top navigation bar, select the region where you want to create the customer gateways.
NoteThe customer gateways must be in the same region as the VPN Gateway instance to which you want to connect.
-
On the Customer Gateway page, click Create Customer Gateway.
-
In the Create Customer Gateway panel, configure the customer gateway based on the following information, and then click OK.
You must create a customer gateway for each site. The following table describes the configurations of the customer gateways.
Parameter
Description
Shanghai site
Hangzhou site
Ningbo site
Name
Enter a name for the customer gateway.
Shanghai-customer1
Hangzhou-customer2
Ningbo-customer3
IP Address
Enter the public IP address of the customer gateway.
In this example, enter the public IP address of the on-premises gateway device at the Shanghai site: 1.XX.XX.1.
In this example, enter the public IP address of the on-premises gateway device at the Hangzhou site: 2.XX.XX.2.
In this example, enter the public IP address of the on-premises gateway device at the Ningbo site: 3.XX.XX.3.
For more information about the parameters, see Create a customer gateway.
Step 3: Create IPsec-VPN connections
Create an IPsec-VPN connection for each site. Each connection associates a customer gateway with the VPN Gateway instance, connecting the site to Alibaba Cloud.
In the left navigation pane, choose .
On the IPsec Connections page, click Bind VPN Gateway.
-
Configure the IPsec-VPN connection based on the following information, and then click OK.
The following table describes the configurations of the IPsec-VPN connections for the Shanghai, Hangzhou, and Ningbo sites.
Parameter
Description
Shanghai site
Hangzhou site
Ningbo site
Name
Enter a name for the IPsec-VPN connection.
IPsec-connection-1
IPsec-connection-2
IPsec-connection-3
Region
Select the region where the VPN Gateway instance to be bound to the IPsec-VPN connection is located.
Select China (Hangzhou).
VPN Gateway
Select the created VPN Gateway instance.
Select VPN Gateway 1.
Routing Mode
Select a routing mode.
Select Destination Routing Mode.
Select Destination Routing Mode.
Select Protected Data Flows.
Local Network
Enter the CIDR block of the VPC that you want to connect to the sites. This parameter is used for Phase 2 negotiations.
N/A
N/A
192.168.0.0/16
Remote Network
Enter the CIDR block of the site that you want to connect to the VPC. This parameter is used for Phase 2 negotiations.
10.10.30.0/24
Effective Immediately
Specifies whether to immediately start negotiations.
-
Yes: Negotiations start immediately after the configuration is complete.
-
No: Negotiations start when inbound traffic is detected.
In this example, select Yes.
In this example, select Yes.
In this example, select Yes.
Customer Gateways
Select the created customer gateway instance.
Select Shanghai-customer1.
Select Hangzhou-customer2.
Select Ningbo-customer3.
Pre-Shared Key
Enter a pre-shared key.
If you do not enter a value, the system generates a random 16-character string.
ImportantThe pre-shared key of the on-premises gateway device must be the same as the pre-shared key of the IPsec-VPN connection.
fddsFF123****
TTTddd321****
PPPttt456****
Encryption Configuration
Add IKE configurations, IPsec configurations, DPD, and NAT traversal.
In this example, IKEv1 is used. The default values are used for other parameters.
In this example, IKEv1 is used. The default values are used for other parameters.
In this example, IKEv1 is used. The default values are used for other parameters.
The default values are used for other parameters. For more information, see Create and manage an IPsec-VPN connection in single-tunnel mode.
-
To configure VPN gateway routes later, click Cancel in the dialog box that appears.
Step 4: Configure VPN Gateway routes
After the IPsec-VPN connections are created, add the CIDR blocks of the Shanghai and Hangzhou sites to the destination-based route table of the VPN Gateway instance, and advertise the CIDR blocks of all three sites to VPC1.
The IPsec-VPN connection for the Ningbo site uses the policy-based routing mode. After the IPsec-VPN connection is created, the system automatically adds the local and remote routes to the policy-based route table of the VPN Gateway instance. Therefore, you only need to advertise the CIDR block of the Ningbo site to VPC1 in the policy-based route table. You do not need to manually add routes.
In the left navigation pane, choose .
In the top navigation bar, select the region where the VPN gateway instance resides.
-
On the VPN Gateway page, find the destination VPN Gateway instance and click the instance ID.
-
Add and advertise the CIDR blocks of the Shanghai and Hangzhou sites in the Destination-based Route Table tab of the VPN Gateway instance.
-
On the Destination-based Route Table tab, click Add Route Entry.
-
In the Add Route Entry panel, configure the destination-based route entry based on the following information, and then click OK.
Parameter
Description
Route entry 1
Route entry 2
Destination CIDR Block
Enter the destination CIDR block with which you want to communicate.
Enter the private CIDR block of the Shanghai site: 10.10.10.0/24.
Enter the private CIDR block of the Hangzhou site: 10.10.20.0/24.
Next Hop Type
Select the type of the next hop.
Select IPsec Connections.
Select IPsec Connections.
Next Hop
Select the next hop.
Select IPsec-connection-1.
Select IPsec-connection-2.
Advertise to VPC
Specifies whether to advertise the new route entry to the VPC that is associated with the VPN Gateway.
In this example, select Yes.
In this example, select Yes.
Weight
Select a weight for the route entry.
-
100: high priority.
-
0: low priority.
In this example, use the default value 100.
In this example, use the default value 100.
For more information about the parameters, see Add a destination-based route.
-
-
-
Advertise the CIDR block of the Ningbo site in the Policy-based Route Table tab of the VPN Gateway instance.
-
In the Policy-based Route Table tab, find the route entry whose Destination CIDR Block is the CIDR block of the Ningbo site and click Advertise in the Actions column.
-
In the Advertise Route dialog box, click OK.
-
Step 5: Configure on-premises gateways
Download the peer configuration from the IPsec Connections page for each site and apply it to the on-premises gateway device.
In the left navigation pane, choose .
-
On the IPsec Connections page, find the destination IPsec-VPN connection and click Generate Peer Configuration in the Actions column.
Find IPsec-connection-1, IPsec-connection-2, and IPsec-connection-3, and download their peer configurations.
-
Based on the requirements of your on-premises gateway device, apply the downloaded configuration to the device. For more information, see Configure an on-premises gateway device.
-
Apply the peer configuration downloaded for IPsec-connection-1 to the on-premises gateway device at the Shanghai site.
-
Apply the peer configuration downloaded for IPsec-connection-2 to the on-premises gateway device at the Hangzhou site.
-
Apply the peer configuration downloaded for IPsec-connection-3 to the on-premises gateway device at the Ningbo site.
-
Step 6: Test the connectivity
After completing the preceding configurations, verify that the Shanghai, Hangzhou, and Ningbo sites can communicate with each other and with VPC1.
-
Test the connectivity between the sites and VPC1.
-
Log on to an ECS instance in VPC1.
For more information about how to log on to an ECS instance, see Connection methods.
-
Run the ping command to ping a client at the Shanghai, Hangzhou, and Ningbo sites.
ping <Client IP address>Receiving echo reply messages from all clients indicates that the sites and VPC1 are connected.
-
-
Test the connectivity between the sites.
-
Open the command-line window on a client at the Shanghai site.
-
Run the ping command to ping a client at the Hangzhou and Ningbo sites.
ping <Client IP address>Receiving echo reply messages indicates that the sites are connected.
-
Open the command-line window on a client at the Hangzhou site.
-
Run the ping command to ping a client at the Ningbo site.
ping <Client IP address>Receiving an echo reply message indicates that the Hangzhou and Ningbo sites are connected.
-