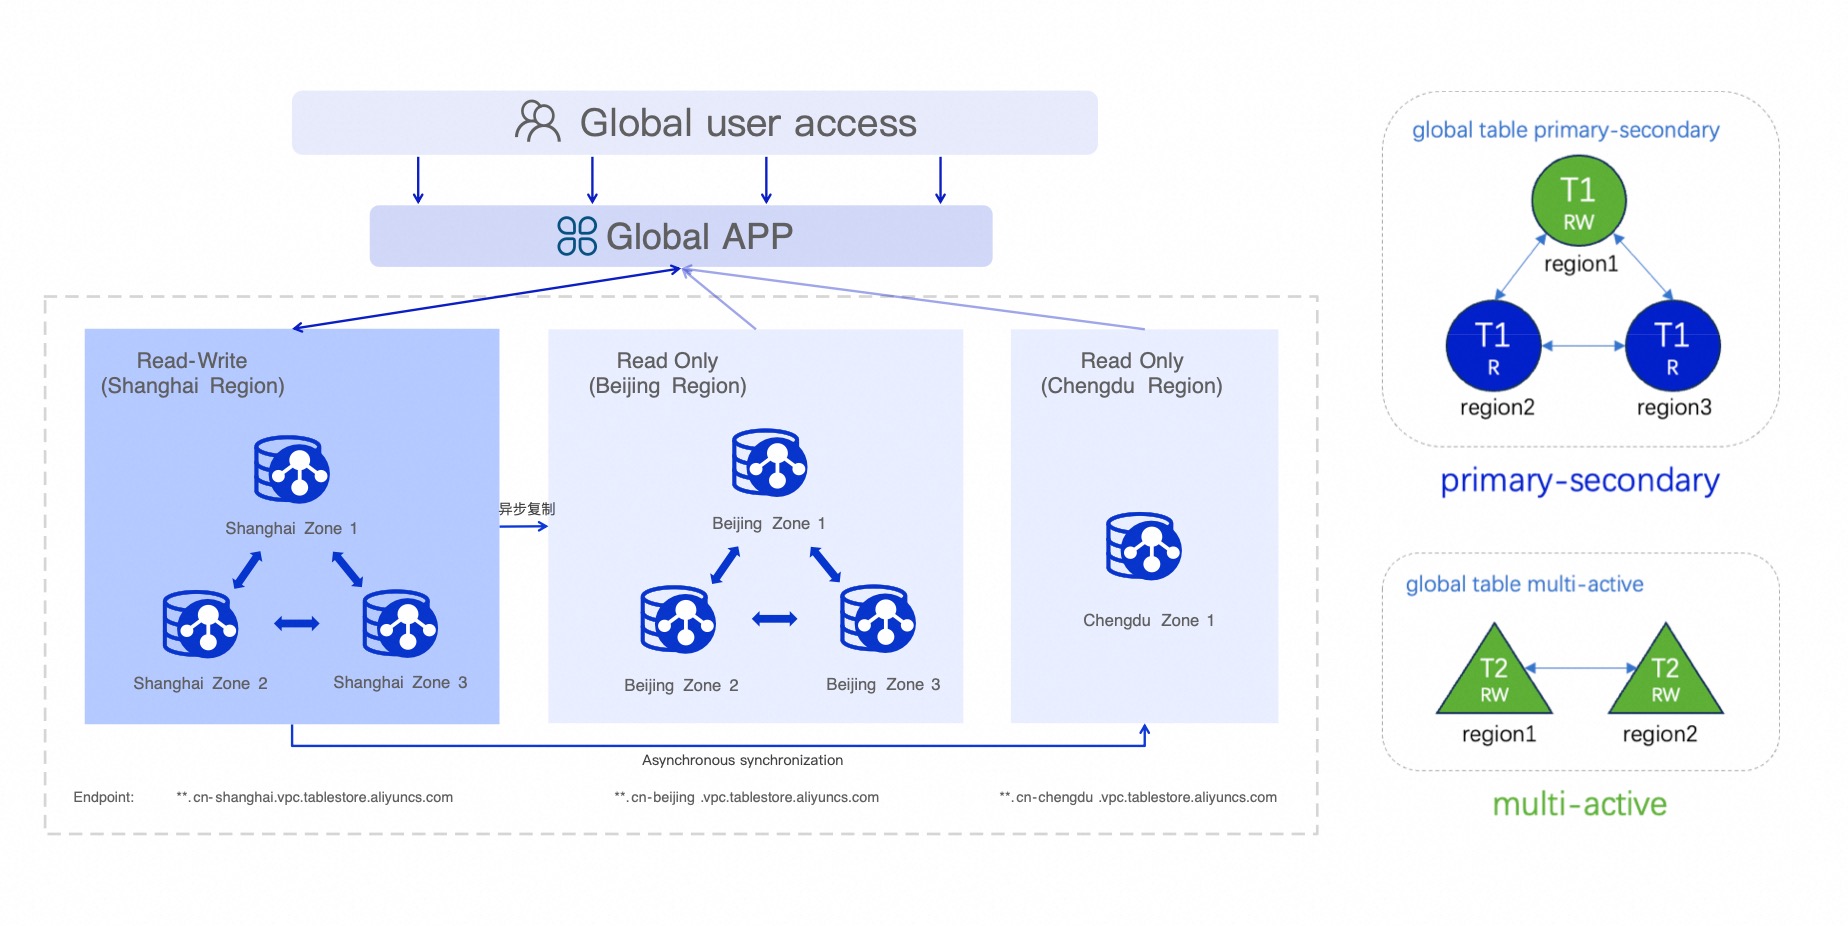
For services that span multiple regions and require low-latency access and high availability, use the Global Table feature. This feature automatically synchronizes data across regions to enable cross-region disaster recovery, support reads and writes from the nearest region, and facilitate disaster recovery switchovers.
How it works
A Global Table uses the multi-region replication technology of Tablestore to create data synchronization channels between instances in different regions. When data in a table in one region changes, Tablestore automatically synchronizes the change to the replica tables in other regions. This ensures cross-region data consistency. You can dynamically add or remove table replicas across different instances and regions.
The entire replication process runs automatically in the background. This mechanism achieves an acceptable recovery point objective (RPO) while ensuring data consistency. It effectively meets the disaster recovery and business continuity requirements of most business systems.
For daily use, users or applications can access the nearest replica for read and write operations. This significantly reduces access latency. In the event of a regional failure or a major disaster, such as a data center outage or natural disaster, the multiple replicas enable you to quickly initiate a disaster recovery switchover. This helps you rebuild critical applications and data, ensuring business continuity.
Features
|
|
Cross-region disaster recovery Table replicas span regions. If a regional failure occurs, replicas in other regions can continue to provide services. |
|
Low-latency access Users or applications can read and write data on the nearest replica. This greatly reduces operation latency. |
||
|
|
Eventual data consistency A Global Table uses an eventual consistency model. Data is synchronized asynchronously, ensuring eventual consistency across all replicas. |
|
Automatic conflict resolution The system automatically handles concurrent write conflicts across regions by using the Last Write Wins (LWW) algorithm. |


Use cases
A Global Table is suitable for workloads that require high availability, low-latency cross-region reads and writes, and cross-region disaster recovery. Typical use cases include:
-
Cross-region backup: If the primary region fails, you can switch to a secondary region to continue providing read services and ensure business continuity. For example, an e-commerce system stores its primary user table in a Tablestore instance in the China (Hangzhou) region and a replica table in the China (Beijing) region. If the China (Hangzhou) region fails, the instance in the China (Beijing) region continues to provide query services.
-
Write in one region, read in multiple regions: Write data to the nearest region and read it from other nearby regions. This is suitable for scenarios that require accelerated remote access. For example, the primary write operations for a workload are directed to the China (Hangzhou) region. Read-only replicas are deployed in the China (Beijing) and China (Shanghai) regions to meet the demand for low-latency cross-region reads.
-
Write in multiple regions, read globally: When data is written to multiple regions, a global dataset is generated and provides eventually consistent reads. This is suitable for scenarios that require access to a global dataset, such as cross-region deployments of game user profiles and social messaging systems.
Supported regions for Global Table: This feature is currently supported in the China (Hangzhou), China (Shanghai), China (Qingdao), China (Beijing), China (Zhangjiakou), China (Hohhot), China (Ulanqab), China (Shenzhen), China (Guangzhou), and China (Chengdu) regions.
Create a Global Table
Before you begin, activate Tablestore and create an instance. You must create instances in both the primary region and the target replica regions.
Step 1: Prepare a base table
In the primary region, create a data table to serve as the base for the Global Table.
-
If you want to use an existing data table as the base table for a Global Table, make sure the table meets the following requirements: time to live (TTL) is set to -1, max versions is set to 1, max version offset is set to MaxInt32 (2147483647), and the table is a row mode table.
-
Existing tables that are not in row mode cannot be converted into a Global Table. To use such a table, contact technical support to enable this feature.
-
Go to the Instance Management page.
-
Log on to the Tablestore console.
-
At the top of the page, select a resource group and a region.
-
On the Overview page, click an instance alias, or click Manage Instance in the Actions column of the instance.
-
-
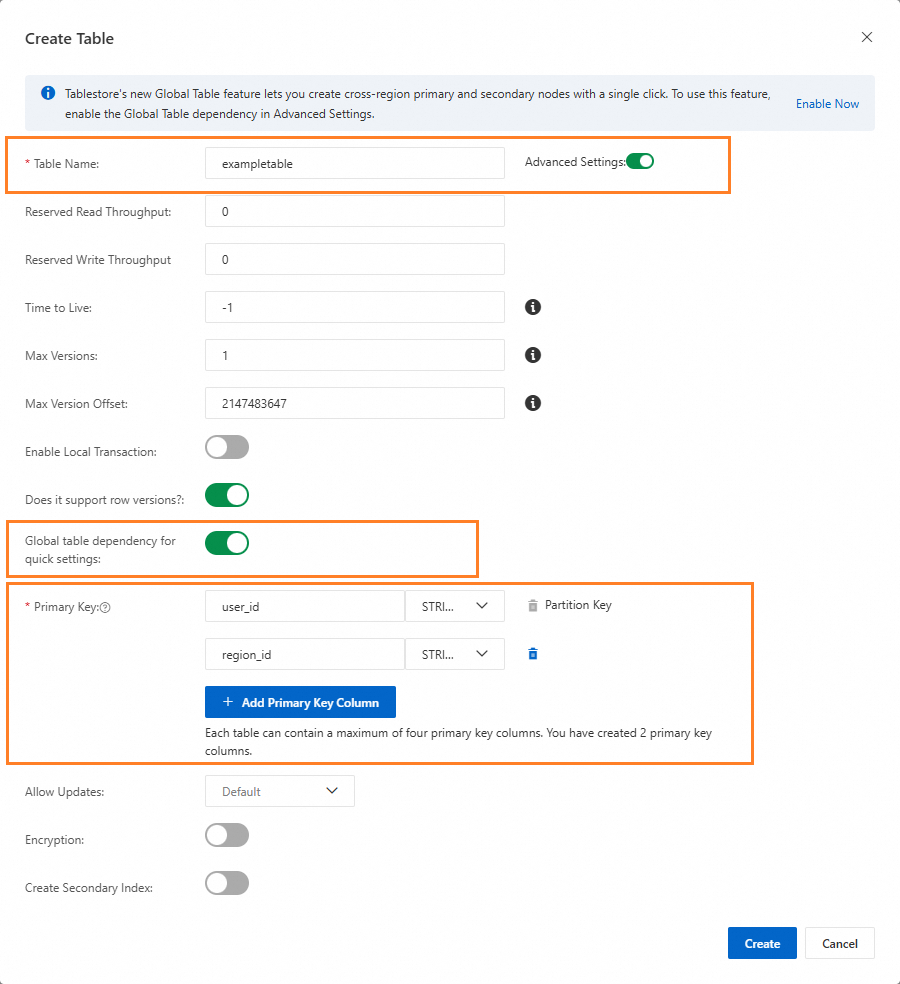
On the Instance Details tab, click Create Table.
-
In the Create Table dialog box, set Table Name and Primary key.
-
Turn on the Advanced Settings switch, and then turn on the Quick Set Global Table Dependency switch. The system automatically configures the required table properties for the Global Table.
Parameter
Required value
Description
Time to live (TTL)
-1
Data never expires.
Max versions
1
The maximum number of versions is 1.
Row versioning support
Enabled
Set the table to a row mode table.
NoteYou cannot disable Enable Row Versioning after you enable it. After you enable row versioning, the following limits apply:
-
A single row can have a maximum of 256 columns.
-
You cannot manually specify a version number when you write data. The system must generate it automatically.
-
When you update a row, the system must first read the current row version. This adds a small amount of read overhead.
Max version offset
MaxInt32 (2147483647)
The version offset is set to the maximum Int32 value. This means there is no limit.
-
-
Click Create.
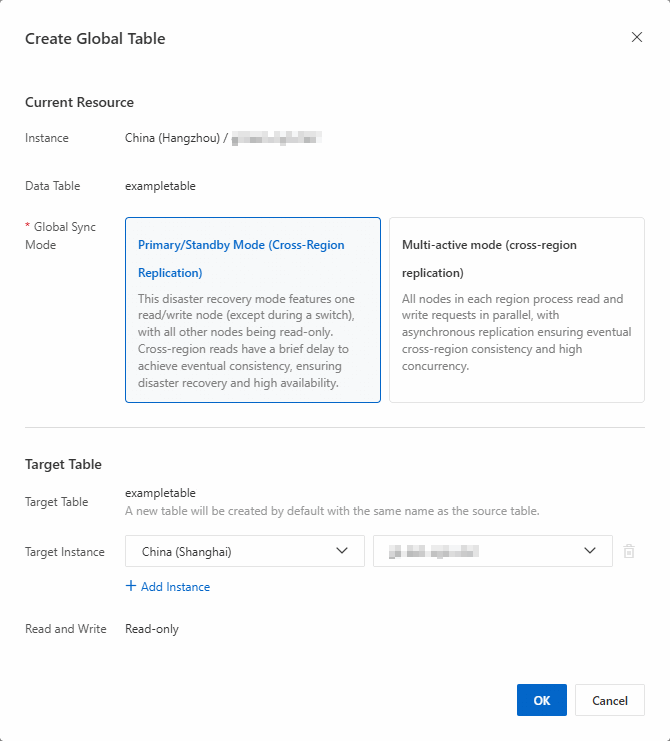
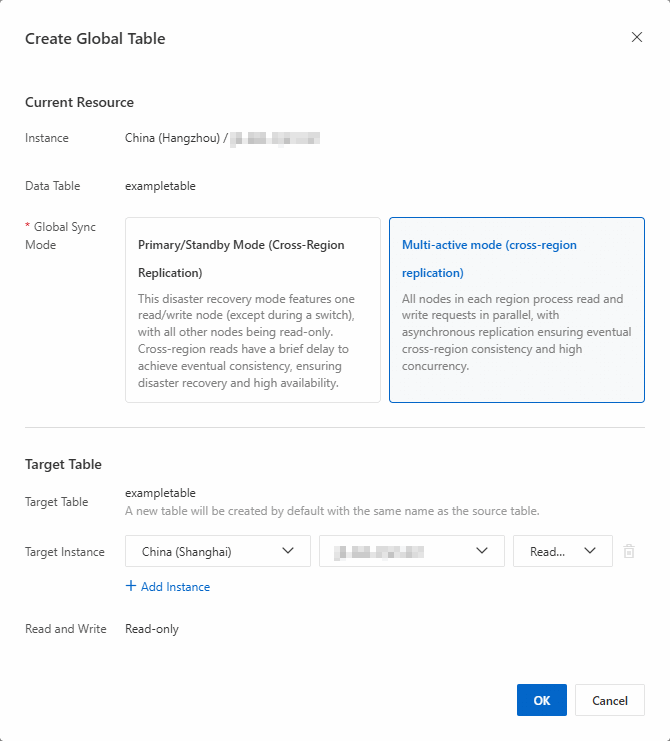
Step 2: Create the Global Table
Convert the base table into a Global Table and add replica regions. After you add the replicas, the system automatically creates corresponding data tables in the selected replica regions and establishes data synchronization channels.
-
In the primary region, on the Tables tab, click Create Global Table in the Actions column of the base table.
NoteAlternatively, click the data table name, go to the Global Table tab, and click Create Sync Relationship to proceed.
-
In the Create Global Table dialog box, set the parameters for the Global Table.
NoteIf a data table with the same name as the Global Table already exists in the destination instance, the creation of the Global Table fails.
Active-passive mode
-
In the Current Resource area, set Global Sync Mode to Primary/Standby Mode (Cross-Region Replication).
-
In the Target Table area, select the region and instance name of the destination instance.
You can add multiple destination instances at a time. After you create the Global Table, the system automatically creates target tables in the instances of the selected regions. The target table names are the same as the base table name.
Multi-active mode
-
In the Current Resource area, set Global Sync Mode to Multi-Read Multi-Write (Cross-Region Replication).
-
In the Target Table area, select the region, instance name, and read/write mode of the destination instance.
You can add multiple destination instances at a time. After you create the Global Table, the system automatically creates target tables in the instances of the selected regions. The target table names are the same as the base table name.
-
-
Click OK.
In the Create Global Table dialog box, click View List. You can view the Global Table on the Global Table tab.
Step 3: Verify and use the Global Table
After the Global Table is created, verify the data synchronization feature and perform basic read and write tests.
-
Write test data: Write test data to the data table in the primary region.
-
In the primary region, on the Tables tab, click Query in the Actions column of the base table.
-
On the Query Data tab, click Insert.
-
In the Insert dialog box, set the primary key, click Add Column to add an attribute, and then click OK.
-
-
Verify data synchronization: Wait for 1 to 3 seconds, and then query the data in a replica region to verify the synchronization.
-
In the primary region, on the Tables tab, click Query in the Actions column of the base table.
-
On the Global Table tab of the base table, click the name of the replica table in the replica region.
-
On the Query Data tab of the replica table, you can view the data synchronized from the base table in the primary region.
-
Read from and write to a Global Table
Reading data from and writing data to the replica tables of a Global Table is the same as reading data from and writing data to a standard data table.
-
To read data, you must obtain the endpoint of the instance where the corresponding replica table is located.
-
In active-passive mode, only the primary replica allows writes through its instance's endpoint. Other replicas are read-only, except during an active-passive switchover. In multi-active mode, all writable replicas allow writes through their respective instances' endpoints.
ImportantIn daily write scenarios in multi-active mode, a sync write and an application write may occur at the same time. If both modify the same data row, the row with the larger version overwrites the row with the smaller version. This may cause the data with the smaller version to be overwritten or discarded.
Manage active-passive mode
Modify the active-passive relationship
-
This feature is available only for a Global Table in active-passive mode.
-
During an active-passive switchover, a sync write and an application write may occur at the same time. If both modify the same data row, the row with the larger version overwrites the row with the smaller version. This may cause the data with the smaller version to be overwritten or discarded.
In active-passive mode, if the primary replica fails or your application needs to switch its write region, you can promote another replica to become the new primary and ensure service continuity.
-
On the Global Table tab, click Switch to Primary Table in the Actions column of the passive table.
-
In the Modify Primary/Standby Relationship dialog box, submit the primary table switchover task and start data synchronization.
ImportantData synchronization continues. The duration depends on the data volume and system resources. During data synchronization, both the current primary replica and the replica being promoted are readable and writable, which poses a risk of data inconsistency.
-
In the Data Synchronization step, click Start Data Synchronization .
-
In the Primary/Standby Table Switch dialog box, click View Details to check the RPO status of the data synchronization.
-
-
Switch the application layer write path.
Confirm that the data in the primary and passive tables is consistent before switching the application layer write path.
-
Click Confirm Write Endpoint Switch in the Sync Mode column of any table.
-
In the Application Layer Write Path Switch step, confirm that data synchronization is complete and that you have changed all write endpoints in your application to the new primary's endpoint. Then, click Complete Switch.
-
-
Confirm the switch to the primary table.
After you switch the write path, confirm the primary table switch as soon as possible.
ImportantAfter this operation, the write capability of the original primary table is disabled.
-
Click View in the Sync Mode column of any table.
-
In the Confirm Switch step, click Switch Primary Table.
NoteTo cancel the active-passive table switchover, click Cancel Primary Table Switch and then confirm the cancellation.
-
In the confirmation dialog box, click OK.
After the modification is successful, the original primary replica becomes read-only, and the new primary replica provides read and write capabilities.
-
Add a global region
Add one or more global regions to a Global Table.
-
On the Global Table tab, click Add Global Region in the Actions column of the replica table.
-
In the Add Global Region dialog box, select the region and instance name of the destination instance.
To add multiple global regions, click Add Instance and continue.
NoteIf a data table with the same name as the Global Table already exists in the destination instance, adding the global region fails.
-
Click OK.
Remove synchronization relationship
Remove a synchronization relationship for a Global Table.
To stop all synchronization for a Global Table, you must remove each replica's synchronization relationship individually, starting with passive tables and finishing with the primary. To remove only a specific region, perform the operation on that replica table.
-
On the Global Table tab, choose one of the following methods to start removing the synchronization relationship.
-
Remove a single replica: Click Remove Sync in the Actions column of the replica table.
-
Remove multiple replicas in a batch: Select the replica tables that you want to remove and click Remove Sync below the list.
-
-
In the confirmation dialog box, click OK.
The system starts to remove the synchronization relationship. Wait for the process to complete.
Manage multi-active mode
Edit target instances
-
On the Global Table tab, click Edit in the Actions column of the replica table.
-
In the Edit Global Table dialog box, perform the required operations.
-
Add a target instance: Select the region, instance name, and read/write mode of the destination instance.
To add multiple global regions, click Add Instance and continue.
NoteIf a data table with the same name as the Global Table already exists in the destination instance, adding the global region fails.
-
Modify the read/write mode of an instance: Select a read/write mode for an existing instance.
-
-
Click OK.
Remove synchronization relationship
Remove a synchronization relationship for a Global Table.
To stop synchronization for all regions of a Global Table, you must remove the synchronization relationship for each replica table separately. To remove the synchronization relationship for a specific region, perform the operation only on the replica table that you want to remove.
-
On the Global Table tab, click Unsync in the Actions column of the replica table.
-
In the confirmation dialog box, click OK.
The system starts to remove the synchronization relationship. Wait for the process to complete.
Developer integration
You can use a Global Table with the Java SDK.
Going live
-
Recommendations for Global Table operations
-
Create a Global Table for an existing table: The original read and write APIs remain unchanged. Data is automatically synchronized to the new replica. The new replica can share the read load.
-
Create a new Global Table from scratch: Determine the table schema and create the base table. Because you cannot modify a Global Table's schema, you must finalize and test the base table's schema thoroughly before creating the Global Table.
-
Dynamically attach a new replica: While you use a Global Table, you can dynamically add new replicas without affecting the read and write operations of existing replicas. The new replica will have the latest data from the Global Table.
-
Detach existing replicas: If a replica table is no longer needed, you can detach it. After detaching, the replica no longer synchronizes data from other replicas, but the table and its data are retained. To delete the replica, you must manually delete it after you detach it.
-
-
Choose a reasonable region combination: Select appropriate primary and secondary regions based on user distribution and business needs.
-
Primary region failover: In active-passive mode, if the primary region becomes unavailable, fail over by selecting a new primary replica in the console. Switch your application's write path to the new primary, wait for data to synchronize, and then promote the replica to be the new primary. The switchover may cause a brief write interruption. We recommend that your application implements retries.
ImportantYour business application should manage the order and timing of application and service switchovers to prevent data loss.
Quotas and limits
For more information, see Global Table limits.
-
Table type restrictions: Only data tables are supported. Cross-region synchronization is not supported for a time series table, Search Index, or secondary index.
-
Number of replicas: A single Global Table supports a maximum of 10 regions.
-
Synchronization latency: The synchronization RPO is typically within a few seconds. The actual latency depends on the regions, network conditions, and data volume.
-
Data overwrite risk : During an active-passive switchover or in the daily write operations of a multi-active mode, a synchronization write operation may occur concurrently with a user write operation. If both operations modify the same data row, the write with the higher version number overwrites the one with the lower version number.
-
Unsupported features:
-
Reliability guarantees for data transmission latency are not provided. Real-time Communication (RTC) is not supported.
-
You cannot modify the properties of a Global Table, such as the TTL configuration or add predefined columns.
-
Existing data tables are created in column mode by default and cannot be directly converted into a Global Table.
-
You cannot re-associate a synchronization relationship for a data table that was previously part of a Global Table. To use this table in a new Global Table, you must first delete its associated Search Index and secondary index, delete the table itself, and then create a new Global Table.
NoteThis scenario applies when a data table that was once part of a Global Table has its synchronization relationship removed and you want to use it to create a Global Table again.
-
Billing
Global tables incur fees for data storage, data reads, data writes, and cross-region replication traffic.
The billing method for data storage and read/write operations on each replica table is the same as that of a standard data table. For more information, see Billing overview.
The following fees apply:
-
Data storage fee: Each replica table stores data independently. You are billed separately for the actual amount of data stored in each table's region.
-
Data read fee: Covers local read operations on all replica tables.
-
Data write fee: Write operations can be performed only on writable replicas. Write fees are incurred only on the table to which data is directly written. Replica tables that synchronize data through asynchronous replication do not incur write fees.
-
Cross-region replication traffic fee: Charged for the cross-region data transfer traffic generated when data is asynchronously replicated to each replica table.
ImportantThe cross-region replication traffic fee for each replica is calculated separately. The fee is charged to the instance from which the data is pulled.
FAQ
How do I modify the configuration of a Global Table, such as setting the TTL or adding a custom column?
You cannot directly modify the configuration of a Global Table. To modify a Global Table's configuration, you must remove synchronization for all replicas, modify the original base table, and then re-create the Global Table. To avoid service disruption during this process, first direct all read and write traffic to the primary replica before deleting the others.
How do I delete a replica table?
First, remove the replica's synchronization relationship. Once removed, you can delete the table from the instance's table list in the console.
In active-passive mode, how do I read data from a replica table in a non-primary instance?
In the primary instance, go to the Global Table tab of the base table to find the instance name of the associated replica table. Then, use the endpoint of that instance to read the data.
In row mode, if I use the UpdateRow API to update different columns of the same row in different regions sequentially (for example, 'a' is updated first, then 'b'), what will the row data look like?
The row's data is eventually consistent. The final state will be the entire row from the replica where the last write ('b') occurred. The result depends on whether that replica had already received update 'a' when update 'b' was written:
-
If the replica had not yet synchronized update 'a' when update 'b' was written, the final row contains the data from update 'b' but not from update 'a'.
-
If the replica had already synchronized update 'a' when update 'b' was written, the final row contains the data from both update 'a' and update 'b'.
Can I create a Global Table between regions in different countries?
Due to data compliance requirements, creating a Global Table across different countries is not currently supported. For a list of supported regions for a Global Table, see Features and supported regions.