After you submit an SSL certificate application, the certification authority (CA) verifies that you own the domain specified in the application. This verification is required before certificate issuance to prevent unauthorized certificates from being issued.
Verify certificates purchased on the page. For certificates not purchased through SSL Certificate Management V2.0, use the SSL Certificate Management (V1.0 - Discontinued) page instead.
Since February 24, 2026, DigiCert performs DNSSEC validation on query results during domain control validation (DCV) and DNS CAA record checks for domains that have DNSSEC enabled. For details, see Announcement: DigiCert to Enable DNSSEC Validation for DCV and DNS CAA Checks.
Scope
Commercial Certificates.
Certificate Status: Validating Application.
The domain name you specify when applying for an SSL certificate must be a registered domain. Unregistered or expired domain names cannot be used.
You do not need to deploy your website or configure DNS resolution for the domain before applying for an SSL certificate. You can apply for the certificate and complete domain validation after registering your domain name, even before deploying your website. The domain registrant and the Alibaba Cloud account owner do not need to be the same entity — you can use any Alibaba Cloud account to apply for a certificate for any domain name.
Verify domain ownership
The verification process depends on your certificate type. For DV certificates, see DV certificate verification. For OV and EV certificates, see OV and EV certificate verification.
DV certificate verification
Step 1: Obtain the verification information
If the Verify Information panel for the current certificate is closed, go to the SSL Certificate Management, find the target certificate in the certificate list on the right ( Commercial Certificates tab), and click Verify in the Actions column to open the verification information panel.
Step 2: Complete domain ownership verification
When applying for a DV certificate, you set the domain verification method to Automatic DNS Verification, File Verification or Manual DNS Verification. Follow the instructions for the method you selected.
After domain ownership verification is complete for a DV certificate, the CA automatically reviews and issues the certificate, typically within 1 to 15 minutes.
Passing domain ownership verification does not mean the CA has completed its review. For the final review result, see CA Review Results.
Automatic DNS verification
If the domain for your DV certificate application is hosted on Alibaba Cloud DNS, the system automatically uses Automatic DNS Verification. This option cannot be changed.
If the message "Domain verification successful" appears below the Verify button, verification is complete. Otherwise, follow the on-screen instructions and refer to the FAQ for troubleshooting. Then click Verify again until verification succeeds.
After you submit the application, Alibaba Cloud automatically adds a DNS record for the domain in the Alibaba Cloud DNS console to verify domain ownership.
The console may take a few minutes to verify the DNS record. If your DNS record has already propagated but the console still displays "DNS record not found" after you click Verify, wait a few minutes and try again.
To ensure automatic DNS verification works correctly, the system deletes any conflicting TXT records in your DNS settings when adding the verification record. Check whether this affects third-party services that rely on those TXT records for authentication.
Manual DNS verification
If your domain is not hosted on Alibaba Cloud DNS, you must manually add a TXT record through your DNS provider to verify domain ownership.
How to change the domain verification method
To change the verification method after submitting an application, find the certificate in the certificate list, withdraw the application, and submit a new one with the desired method.
DNS record propagation times
Adding a new record: Takes effect immediately.
Deleting or modifying a record: Depends on the DNS cache TTL, which is typically 10 minutes by default.
Changing DNS servers: Takes up to 48 hours by default. If you recently changed your DNS server, allow 24 to 48 hours for global propagation. Verification failures during this period are expected.
Procedure
Before the certificate is issued, do not delete the DNS verification record. Deleting it will cause certificate issuance to fail.
After the certificate is issued, we recommend deleting the TXT record to prevent conflicts when adding other records. Removing the verification record does not affect the issued certificate.
Adding a TXT record with the host record
@to a root domain does not affect subdomain services. The@symbol represents the root domain itself and does not conflict with_dnsauthsubdomain verification records.If the console displays "The current operation is not authorized. Contact an administrator for authorization," ask your RAM account administrator to grant the
AliyunDNSFullAccesspermission (or the specific permissions shown in the prompt) to your account. See Manage RAM user permissions for details. Follow the principle of least privilege and grant only the required permissions.
Obtain the verification information.
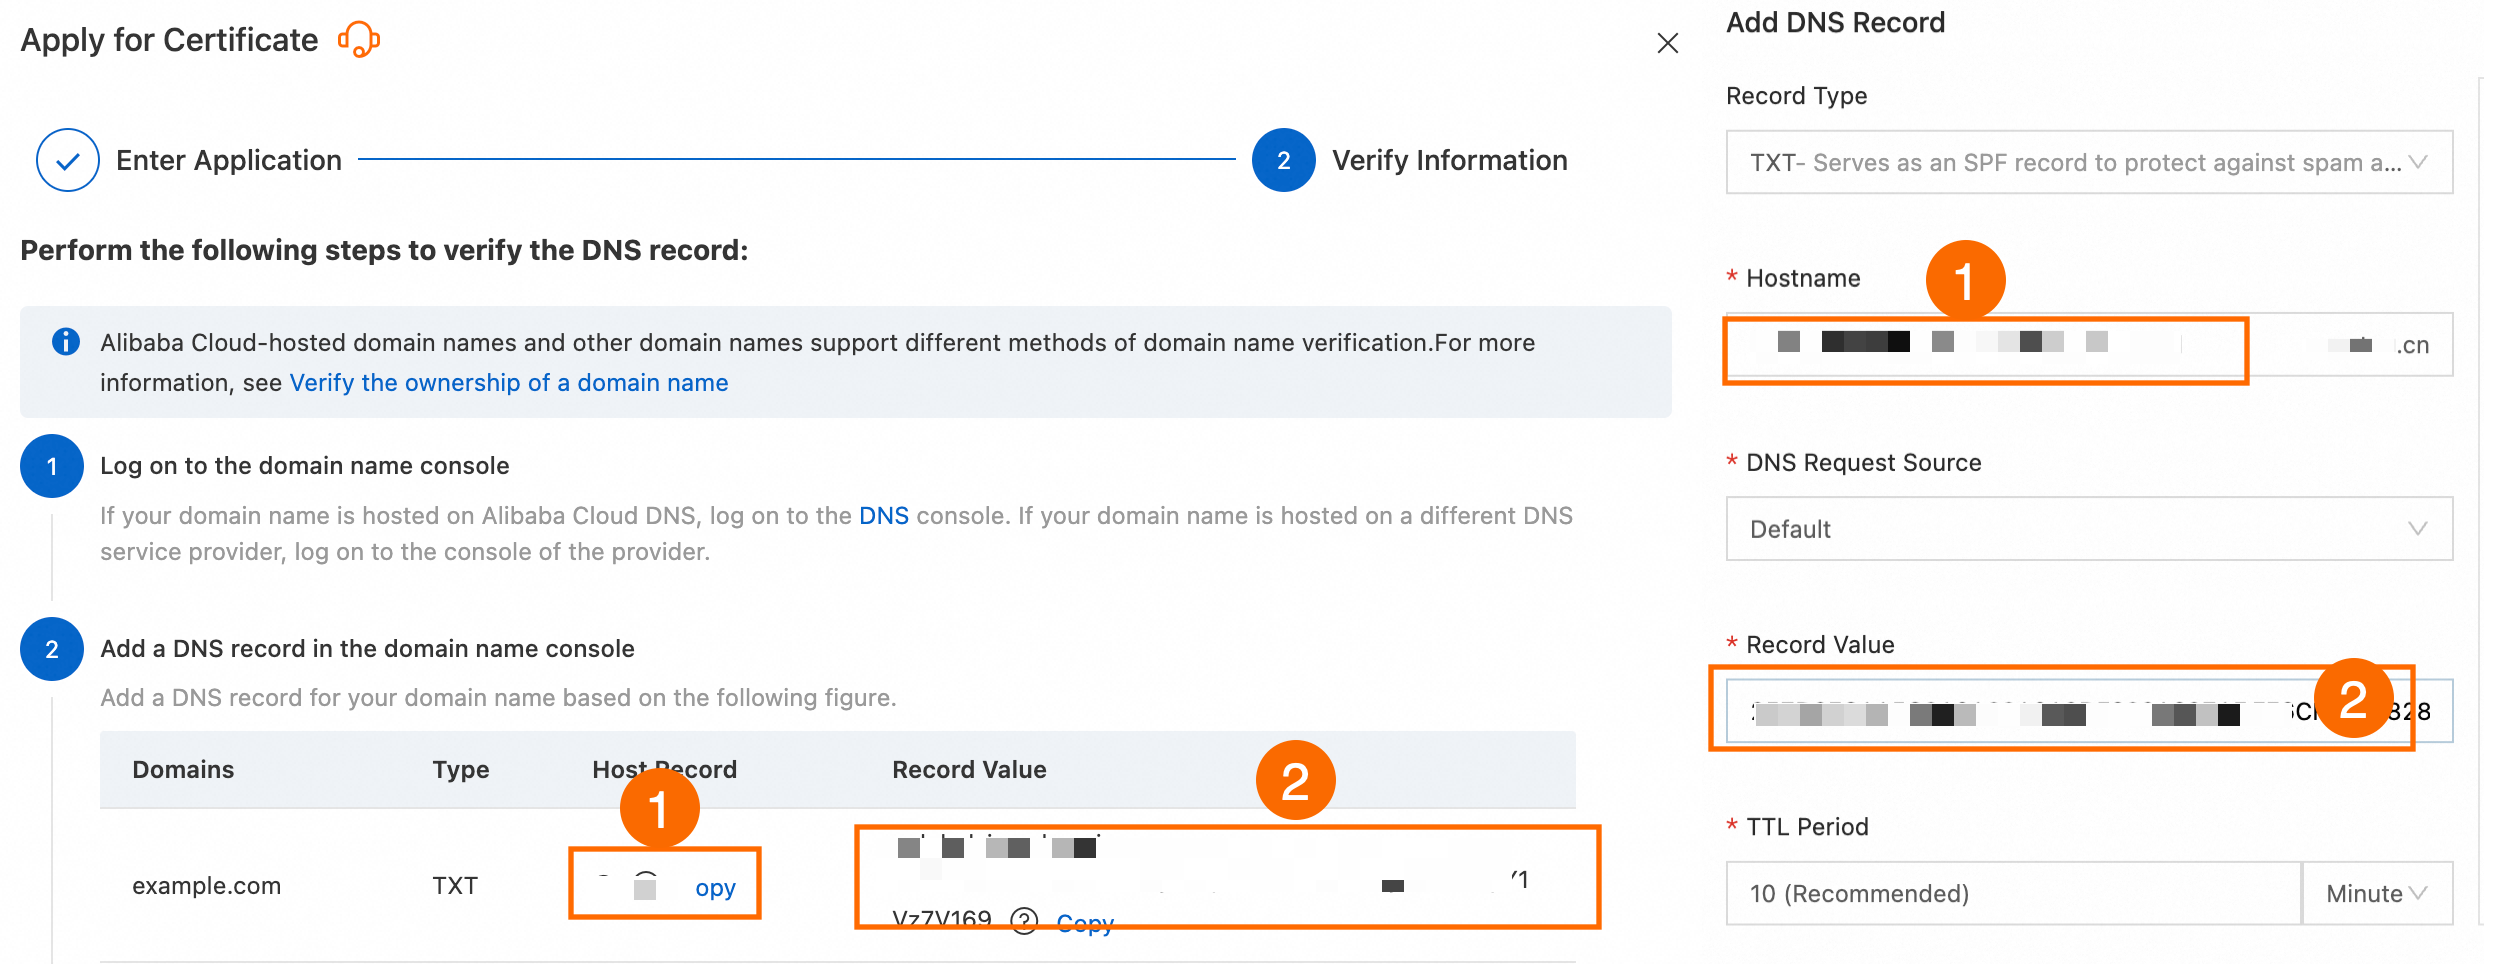
In the Verify Information panel, under Add a DNS record in the DNS console, copy the Type, Host Record, and Record Value, and add them to your DNS service provider's DNS settings.
Add a DNS record.
Add a DNS record at your domain's DNS provider. The following example uses Alibaba Cloud DNS to add a TXT record.
NoteIf your domain does not use Alibaba Cloud DNS, perform this operation with your DNS provider.
Log on to the Alibaba Cloud DNS console with the Alibaba Cloud account that owns the domain. Find the target domain and click Settings in Settings column.
Click Add Record, enter the verification information from the previous step (Type, Host Record, and Record Value), and then click OK.
NoteThe following figure shows the comparison: the left side is the record information in the Certificate Management Service console, and the right side is the corresponding settings in the Alibaba Cloud DNS console.
Leave Resolution Request Source set to Default and TTL set to the default value of 10 minutes.
Verify the domain.
After configuring the DNS record, click Verify button in Verify Information panel. If the message "Domain verification successful" appears below the Verify button, verification is complete. Otherwise, follow the on-screen instructions and refer to the FAQ for troubleshooting. Then click Verify again until verification succeeds.
ImportantThe console may take a few minutes to verify the DNS record. If the DNS record has already propagated but the console still displays "DNS record not found" after you click , wait a few minutes and try again.
File verification
Verification instructions
Open the required server ports: The CA retrieves the verification file only over port 80 (HTTP) and port 443 (HTTPS). Ensure both ports are open on your server. If HTTPS is temporarily unavailable, disable the HTTPS service (stop listening on port 443) until verification is complete.
Ensure both the root domain and www subdomain are accessible: Whether you are applying for a certificate for a root domain (such as aliyundoc.com) or its www subdomain, both must be publicly accessible.
Do not use URL redirection: The CA verification process does not support HTTP redirects, including 301 (permanent) and 302 (temporary) redirects.
Verification IP addresses for Individual Test Certificates: Individual Test Certificates (free edition) are typically verified from IP addresses outside the Chinese mainland. Ensure your server is accessible from those addresses.
DNS verification and file verification are independent methods. You can choose either one based on your situation. If you cannot complete DNS verification (for example, you cannot add records at your DNS provider), switch to file verification.
If you do not have domain management permissions (for example, the Alibaba Cloud account owning the domain is inaccessible, or the domain has been transferred out), withdraw the application in the Certificate Management Service console, then resubmit it with file verification selected.
Procedure
Download the verification file.
After submitting the certificate application, go to the Download Verification File, click Download Verification File to download the verification file package to your local computer. Decompress the package to obtain the verification file.
ImportantAfter downloading and decompressing the verification file, do not open, edit, or rename it.
The file is valid for only three days after download. If you do not complete file verification within this period, download the file again.
Upload the extracted validation file to the
.well-known/pki-validationdirectory on your server, and ensure that the file is accessible at the validation URL, for example,https://example.com/.well-known/pki-validation/gsdv.txt. After the upload is complete, click Verify. If the message "Verification timed out. Please try again." is displayed, verify that the file was uploaded correctly, and click View Failure Cause to troubleshoot the issue.
Upload the verification file.
The following example shows how to configure file verification on an Nginx server running Linux on an Alibaba Cloud ECS instance. A server administrator should perform these steps.
a. Connect to the ECS instance. For details, see Connect to an ECS instance.
b. Run the following commands to create the file verification directory (
.well-known/pki-validation/) under the web root directory. The default Nginx web root is/var/www/html/.cd /var/www/html mkdir -p .well-known/pki-validationYou can use the local file upload feature of a remote logon tool to upload files. Examples of such tools include PuTTY, Xshell, or WinSCP. If you use an Alibaba Cloud Elastic Compute Service instance, see Upload or download files for more information.
Upload the validation file to the validation directory
/var/www/html/.well-known/pki-validation/.WarningDo not delete the verification file before the certificate is issued. Deleting it will cause certificate issuance to fail.
Verify the domain.
After uploading the verification file, return to the SSL Certificate Management console. In the certificate list, find the target certificate and click Verify in the Actions column. File verification may experience a brief delay. If the File not found message appears, wait about one minute and try again. If verification fails after multiple retries, re-upload the correct file.
NoteThe system automatically verifies the file content at
http://<your_domain>/.well-known/pki-validation/<verification_file_name>orhttps://<your_domain>/.well-known/pki-validation/<verification_file_name>.
OV and EV certificate verification
After you submit an OV or EV certificate application, the CA will contact you within approximately one business day (based on the CA's local time zone, excluding holidays). The CA uses the phone number or email address from your company's official registration records — not the contact information you entered during the application.
If the information you provided is correct and you cooperate with the CA's verification process, OV and EV certificates are typically issued within 5 calendar days. If a certificate is not issued within 30 calendar days, the application automatically fails.
If you do not receive a phone call or email within 5 business days, contact your business manager for assistance.
To check the application status, go to SSL Certificate Management. In the certificate list on the right (Commercial Certificatesor Uploaded tab) click icon in Status column to view its status.
Phone verification
The CA will call the phone number listed in your company's official registration records (not the contact phone number you entered in the system) to verify your certificate application. Keep your phone line available to receive the verification call.
Email verification
The CA will send a domain verification email to the address listed in your company's registration records (not the contact email you entered in the system). Monitor your email and follow the instructions in the message to complete the required actions.
The content of the verification email varies by certificate brand.
CA review results
After completing domain ownership verification, the CA reviews your application. For the review outcome and next steps, see Processing CA Review Results.
FAQ
DNS verification
Can I change the automatic verification method?
No. If you need to use a different verification method, purchase the certificate or manage the DNS records through a different Alibaba Cloud account.
How do I check whether my DNS record has propagated?
Follow these steps:
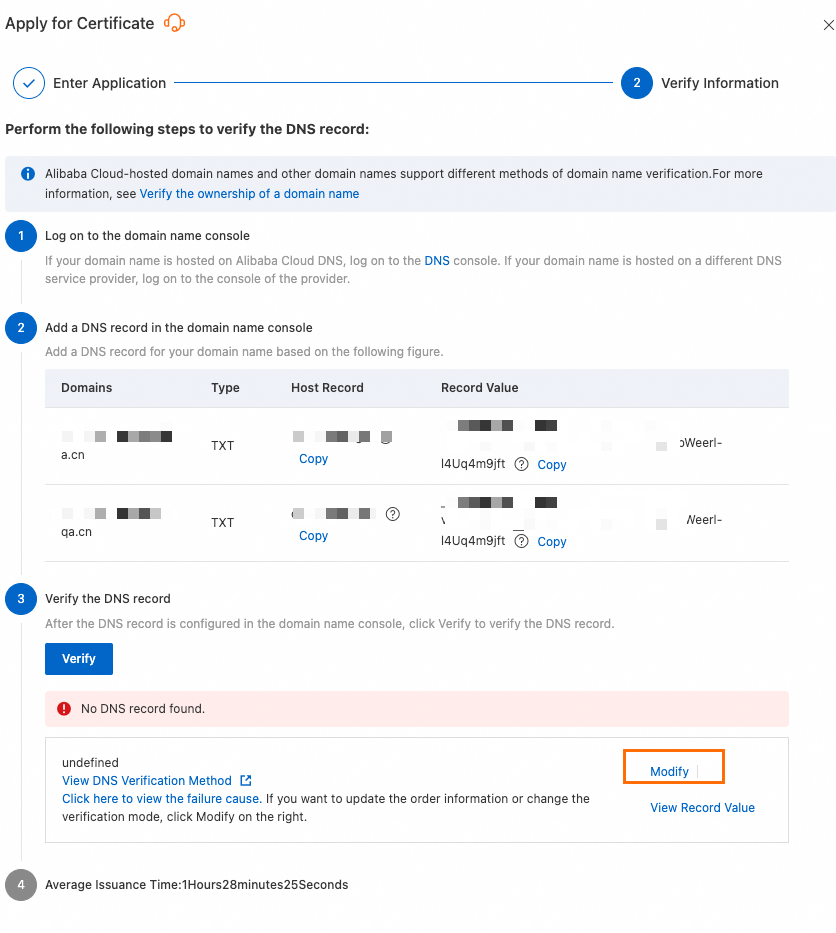
In the certificate list, find the certificate with the status Verifying.
Click Verify in Actions column.
Click Verify, if appears No DNS record found., click View Record Value. The system will redirect you to a DNS lookup tool.
Use the DNS lookup tool to check whether the record has propagated.
The console displays "No DNS record found.". What should I do?
Common causes and solutions:
-
The DNS record has not been added.
See Domain ownership verification and add the required TXT record in your DNS provider's settings.
-
Console verification delay.
If you have correctly added the DNS record but the console still reports No DNS record found., this might be due to a verification delay in the console. No action is required. Wait and try again later.
-
The domain bound to the SSL certificate does not match the domain configured in DNS.
NoteIf you do not use Alibaba Cloud DNS, go to your DNS provider's console to confirm the domain name.
-
Confirm that the domain names match.

-
On the SSL certificate verification page, click Modify, re-enter the domain name, and resubmit your application.
-
-
The console displays "Mismatch found in the DNS record.". What should I do?
Common causes and solutions:
-
The DNS record value is configured incorrectly.
Re-copy host record and value

-
You are using DNSPod or another DNS provider.
You can ignore the error in the console. After you configure the DNS record correctly at your provider, wait for the CA to complete the verification.
-
The record value for a DigiCert DV certificate is more than 24 hours old.
-
Delete the TXT record that is more than 24 hours old.
-
Go to the Certificate Management Service console, reapply for the certificate, and obtain the latest TXT record value.
-
Go to your DNS provider's platform and add the new TXT record.
NoteThe timestamp for GeoTrust DV certificates does not expire.
-
-
The record value has not propagated to overseas DNS servers.
A propagation delay prevents overseas authoritative DNS servers from retrieving the latest TXT record. Check if your dynamic DNS service is running correctly and wait for propagation to complete.
-
The console displays "Verification timed out. Try again.". What should I do?
This indicates a network issue on the site server. Contact your domain service provider to check and resolve any network problems.
Why does verification fail even though the DNS record has propagated?
The console verification process may lag behind actual DNS propagation. Wait approximately one minute and try again.
Verification fails due to a CAA record on the domain.
NoteA Certification Authority Authorization (CAA) record is a DNS record type that allows domain owners to specify which CAs are authorized to issue SSL/TLS certificates for their domains. This helps prevent unauthorized certificate issuance.
Solution 1: Go to your DNS provider's console (such as the Alibaba Cloud DNS console), find the domain's DNS settings, and delete the CAA record. After the change takes effect, reapply for the certificate.
Solution 2: Add the certificate's CA to the CAA record. After the change takes effect, reapply for the certificate.
NoteIf your domain has a CNAME record pointing to a
github.iodomain, it inherits thegithub.ioCAA policy, which may interfere with certificate issuance. To resolve this, either temporarily pause the CNAME record before issuing the certificate, or addtrust-provider.com,globalsign.com, andsectigo.comto your CAA record.My domain's DNS provider is not Alibaba Cloud. How do I configure the DNS verification record?
Method
Procedure
Benefits
Configure DNS at your current provider
Log on to your current domain provider's platform and add the TXT verification record that you obtained for the SSL certificate from Alibaba Cloud.
NoteIf you have questions, contact your DNS provider.
Fast and direct. No domain transfer needed.
Transfer your domain to Alibaba Cloud
Refer to Transfer a domain name to Alibaba Cloud to complete the transfer. Then, configure DNS resolution in the Alibaba Cloud DNS console.
ImportantWhen you transfer a domain, you must pay for a one-year renewal. The price of the domain transfer is the same as the price of a one-year renewal.
Simplifies future certificate renewals and centralized domain management.
File verification
The console displays "No file found.". What should I do?
Common causes and solutions:
The verification file was not uploaded to the specified directory. Upload the verification file to the
.well-known/pki-validation/directory on your server. See File verification for detailed steps.Console file verification delay. If you have uploaded the verification file to the correct directory and can access its content at both the HTTPS Address and HTTP Address URLs, but the console still displays The configuration failed. Try again later., this is likely due to a verification delay. No action is needed — wait a few moments and try again.
The console displays "Verification timed out. Try again.". What should I do?
Common causes and solutions:
Port 80 or 443 is not open on your server.
The CA verifies file content only through HTTPS Address and HTTP Address(ports 443 and 80).
Solution 1: Open port 80 or 443.
Solution 2: In the Apply for Certificate, click Cancel Application and change the verification method to Manual DNS Verification.
A 301 or 302 redirect is configured.
Use the
wget -S <URL>command to check whether the verification URL is being redirected. If the response includesHTTP/1.1 301 Moved PermanentlyorHTTP/1.1 302 Found, a redirect is in place.wget -S http://<your_domain>/.well-known/pki-validation/<verification_file_name>Remove the redirect configuration. The following examples show 301 and 302 redirect settings in the Nginx configuration file
nginx.conf.301 redirect configuration
server {
    listen 80;
    server_name <your_root_domain> <your_www_subdomain>;
    return 301 <redirect_target>$request_uri;
}
302 redirect configuration
location /.well-known/ {
    return 302 <redirect_target>
}
The server's network security device is using an IP whitelist.
If your server firewall or security groups restrict access by IP, temporarily add the CA's IP address ranges to the whitelist so the CA can reach your server.
CA
IP address
DigiCert
-
216.168.247.9
-
64.78.193.238
-
216.168.249.9
GlobalSign
-
211.123.204.251
-
180.222.177.99
-
114.179.250.1
-
114.179.250.2
-
27.115.18.218
-
The console displays "File content is invalid.". What should I do?
Common causes and solutions:
The root domain and www subdomain do not both support access to the .
Whether you are applying for the root domain (such as
aliyundoc.com) or its www subdomain (such aswww.aliyundoc.com), the CA checks both hostnames. Ensure the verification file is publicly accessible from both.For example, both
http://www.aliyundoc.com/.well-known/pki-validation/fileauth.txtandhttp://aliyundoc.com/.well-known/pki-validation/fileauth.txtmust be reachable.The on the web server does not match the latest version.
In the Verify Information panel, click View Detected File and verify that its content matches the latest . If there is a mismatch, re-download and re-upload the verification file, then verify again. Click View Detected File and compare the Required File with the Detected File in the dialog box.
The site has HTTPS enabled, but the verification file is only accessible over HTTP.
Solution 1: Deploy the verification file under both the HTTP and HTTPS service paths and ensure the HTTPS endpoint is accessible.
Solution 2: Temporarily disable HTTPS on the relevant pages.
The site uses a CDN service, but the verification file has not been synced to overseas CDN nodes.
Solution 1: Sync the verification file to the overseas CDN nodes, or temporarily disable overseas CDN acceleration.
Solution 2: If you cannot modify the CDN nodes, click Cancel Application in Apply for Certificate panel and change the verification method to Manual DNS Verification.
The timestamp has expired.
Download the latest verification file and re-upload it to the web server.