This topic describes how to deploy two Smart Access Gateway (SAG) devices in inline mode and enable Dynamic Host Configuration Protocol (DHCP) on the LAN ports. This way, you can connect private networks to Alibaba Cloud and improve the availability of your networks.
Prerequisites
A Virtual Private Cloud (VPC) network is created. For more information, see Create and manage a VPC.
A Cloud Enterprise Network (CEN) instance is created and associated with the VPC network. For more information, see Create a CEN instance.
Background information
In this example, an enterprise has created a VPC network in China (Beijing) and has deployed services in the VPC network. The enterprise wants to connect private networks to Alibaba Cloud through SAG devices. The enterprise wants to deploy two SAG-1000 devices in inline mode. The enterprise also wants to enable DHCP on the LAN ports of the SAG devices. This way, the enterprise can manage and dynamically assign IP addresses to the client side, and operations and maintenance (O&M) workloads are reduced. The enterprise also wants to enable the DHCP failover and high availability (HA) features of the SAG devices. This allows the enterprise to switch over to the standby device when the active device is faulty, which improves the network availability.

Subnetting
The following table describes the IP addresses and CIDR blocks used in this example. When you allocate IP addresses and CIDR blocks, make sure that the IP addresses or CIDR blocks do not overlap with each other.
Item | Subnetting |
VPC network in China (Beijing) | Private CIDR block: 10.0.0.0/16 |
Internet-facing router | Port G1: 192.168.100.2/30 |
Port G2: 192.168.200.2/30 | |
Active SAG device |
|
Standby SAG device |
|
Layer 2 switch |
|
Private networks | Private CIDR block: 192.168.50.0/24 |
Configuration procedure

Step 1: Purchase an SAG device
After you purchase SAG devices in the SAG console, Alibaba Cloud delivers the devices to the specified address and creates SAG instances to help you facilitate network management.
To use SAG devices outside the Chinese mainland, you must purchase SAG devices from third-party vendors. For more information, see Purchase SAG devices.
Log on to the SAG console.
On the Smart Access Gateway page, click Purchase SAG.
Select SAG (CPE).
Set the following parameters and click Buy Now:
Area: Select the area where the SAG device will be deployed. Mainland China is selected in this example.
Device Spec: Select the model of the SAG device. SAG-1000 is selected in this example.
Have SAG Devices Already: Select whether you already have an SAG device. In this example, No is selected.
Edition: Select the edition of the SAG device. Standard is selected in this example.
Quantity: Select the number of SAG devices that you want to purchase. 2 is selected in this example.
Area: Select the area where the SAG bandwidth will be used. This area is the same as that of the SAG device and cannot be modified.
Instance Name: Enter a name for the SAG instance.
Peak Bandwidth: Select a maximum bandwidth value for network connections. 50 Mbps is selected in this example.
Subscription Duration: Select a subscription duration.
Confirm the order information and click Confirm Purchase.
In the Shipping Address dialog box, enter a recipient address and click Buy Now.
On the Pay page, select a payment method and complete the payment.
- You can check whether the order has been placed on the Smart Access Gateway page. SAG devices will be shipped within two business days after you place the order. To check the shipping updates, perform the following steps:
- On the Smart Access Gateway page, find the SAG instance.
- Choose
 View Shipping Update in the Actions column.
 - In the Order Updates panel, view the shipping updates.

Step 2: Activate the SAG devices
After you receive the SAG devices, check whether you have received all the accessories. For more information, see SAG-1000 device specifications.
Log on to the SAG console.
In the top navigation bar, select the region where the SAG instance is deployed.
On the Smart Access Gateway page, find the SAG instance.
In the Actions column, click Activate.
In the Activate dialog box, click OK.
Click the instance ID to go to the details page where you can view the serial number of the SAG device.
NoteThe SAG device with a larger serial number is the active device and the other is the standby device. For more information, log on to the SAG console.
If you purchase the SAG devices from a third-party vendor, you must manually associate the SAG devices with the SAG instances. For more information, see Add a device. When you manually associate the SAG devices with the SAG instances, the first associated SAG device is the active device by default.
After you activate the SAG devices, you must connect them to your private network based on the following topology:
For the active SAG device:
Use a network cable to connect WAN port 5 of the SAG device to port G1 of the Internet-facing router.
Use a network cable to connect LAN port 4 of the SAG device to port G11 of the Layer 2 switch.
For the standby SAG device:
Use a network cable to connect WAN port 5 of the SAG device to port G2 of the Internet-facing router.
Use a network cable to connect LAN port 4 of the SAG device to port G12 of the Layer 2 switch.
Step 3: Configure the SAG devices
You must log on to the web console to configure the SAG devices. Before you begin, make sure that the devices are started, the 4G networks work as expected, and the devices are connected to Alibaba Cloud.
You can use a network cable to connect port 2 of the active SAG device to your computer and log on to the web console. For more information, see Step 1: Configure the SAG client on an on-premises terminal and Step 2: Set a logon password.
Assign port roles
NoteBy default, port 5 is the WAN port and port 4 is the LAN port. If your system uses the default settings, you can skip this step. If the settings are modified, you must perform the following steps to reassign the roles.
In the web console, click Settings.
In the left-side navigation pane, click Port Alloc.
On the Port Alloc page, find the port and select a role.

Port 5: Select WAN.
Port 4: Select LAN.
Click OK.
Configure the WAN port.
In the left-side navigation pane, click WAN.
On the WAN page, click Port 5 (WAN).
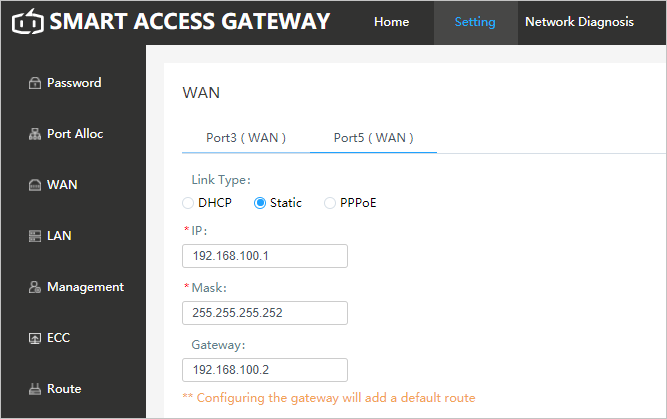
Link Type: Select Static.
IP: Enter the IP address of the WAN port. 192.168.100.1 is used in this example.
Mask: Enter the subnet mask of the WAN port IP address. 255.255.255.252 is used in this example.
Gateway: Enter the IP address of the gateway. 192.168.100.2 is used in this example.
NoteAfter the parameter is set, a default route is added to the SAG device.
Click OK.
Configure the LAN port.
In the left-side navigation pane, click LAN.
On the LAN page, click Port 4 (LAN).
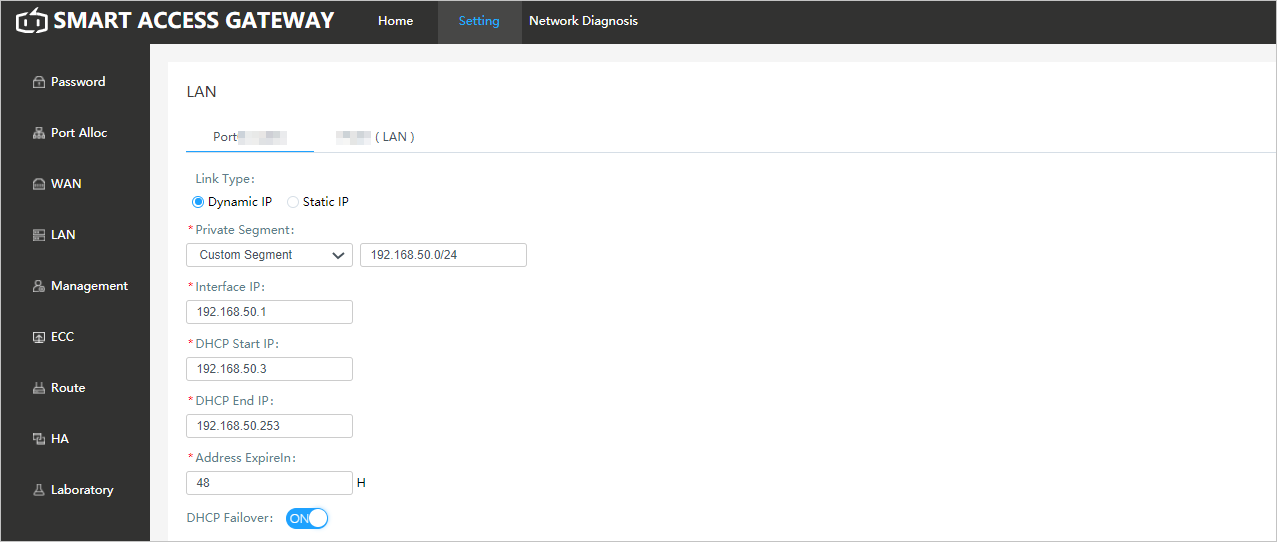
Link Type: Select Dynamic IP.
Custom Segment: Select Custom Segment and enter 192.168.50.0/24.
Interface IP: Enter the IP address of the LAN port. 192.168.50.1 is used in this example.
DHCP Start IP: 192.168.50.3 is used in this example.
DHCP End IP: 192.168.50.253 is used in this example.
Address ExpireIn: Enter 48 hours.
DHCP Failover: Turn on DHCP Failover.
NoteTo use the DHCP failover feature, you must also enable the HA feature. The HA virtual IP address functions as the IP address of the gateway and is automatically advertised to the client side. After you enable the DHCP failover and HA features for both the active and standby devices, network traffic can switch to the standby device if the active device is faulty. This improves the availability of your networks.
Click OK.
Enable the HA feature.
In the left-side navigation pane, click HA.
On the HA page, select Static HA.
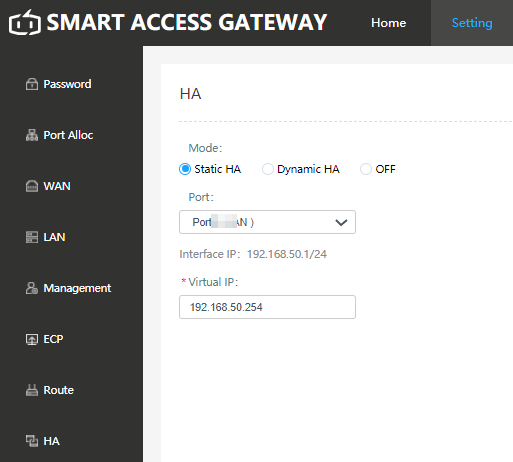
Port: Port 4 (LAN) is used in this example.
Virtual IP: the virtual IP address. 192.168.50.254 is used in this example.
Click OK.
Configure the standby SAG device.
Refer to the logon configurations of the active SAG device and configure the standby SAG device based on the following information:
Configure WAN port 5:
Link Type: Select Static.
IP: The IP address of the WAN port. 192.168.200.1 is used in this example.
Subnet Mask: Enter the subnet mask of the WAN port IP address. 255.255.255.252 is used in this example.
Gateway: Enter the IP address of the gateway. 192.168.200.2 is used in this example.
NoteAfter the parameter is set, a default route is added to the SAG device.
Configure LAN port 4:
Connection Type: Select Static IP.
Private Segment: Select Custom Segment and enter 192.168.50.0/24.
Interface IP: the IP address of the LAN port. 192.168.50.2 is used in this example.
DHCP Start IP: 192.168.50.3 is used in this example.
DHCP End IP: 192.168.50.253 is used in this example.
Address ExpireIn: 48 hours.
DHCP Failover: enabled.
Configure HA: Select Static HA.
Port: Port 4 (LAN) is used in this example.
Virtual IP: the virtual IP address. 192.168.50.254 is used in this example.
Step 4: Advertise routes to Alibaba Cloud
To connect private networks to Alibaba Cloud, you must advertise routes to Alibaba Cloud.
Log on to the SAG console.
In the top navigation bar, select the region.
On the Smart Access Gateway page, click the ID of the SAG instance.
On the page that appears, click the Network Configuration tab.
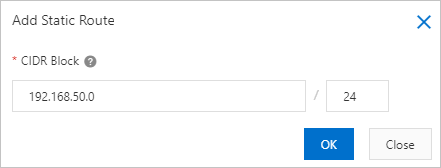
In the left-side navigation tree, click Methods to Synchronize with On-premises Routes.
Select Static Routing, click Add Static Route to add a CIDR block, and then click OK.
192.168.50.0/24 is used in this example.
Step 5: Set up network connections in the console
After you complete the preceding steps, you must set up network connections in the cloud.
Create a Cloud Connect Network (CCN) instance.
Log on to the SAG console.
In the top navigation bar, select Mainland China.
The CCN instance and SAG instance must be deployed in the same area.
In the left-side navigation pane, click CCN.
On the CCN page, click Create CCN Instance.
In the Create CCN Instance panel, specify a name for the CCN instance and click OK.

Associate the SAG instance with a CCN instance.
In the left-side navigation pane, click Smart Access Gateway.
On the Smart Access Gateway page, find the SAG instance and click Network Configuration in the Actions column.
In the left-side navigation tree, click Network Instance Details.
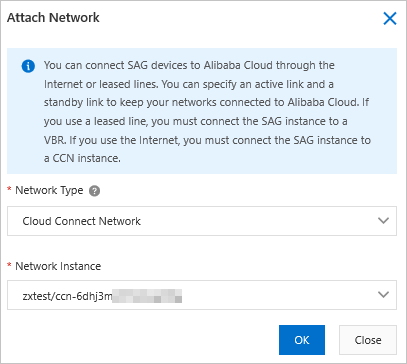
On the Network Instance Details tab, click Attach Network, select the CCN instance you created, and then click OK.
Associate the CCN instance with a CEN instance.
After the CCN instance is associated with the CEN instance, SAG devices associated with the CCN instance can communicate with VPC networks associated with the CEN instance.
In the left-side navigation pane, click CCN.
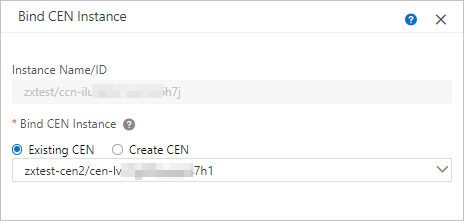
Find the CCN instance and click Bind CEN Instance in the Actions column.
In the Bind CEN Instance pane, select Existing CEN, select the CCN instance from the drop-down list, and then click OK.
Create a security group rule.
You must create a security group rule for the Elastic Compute Service (ECS) instance to allow the private CIDR block 192.168.50.0/24 to access resources on the CES instance. For more information, see Add a security group rule.
Step 6: Test the connectivity
After you complete the preceding steps, you can test the connectivity between the VPC network and your private networks.
Before you test the connectivity, you must configure the network interface controller (NIC) of your on-premises computer to automatically obtain an IP address. For more information, see the system manuals of your on-premises computer. The Windows operating system is used in the following example.
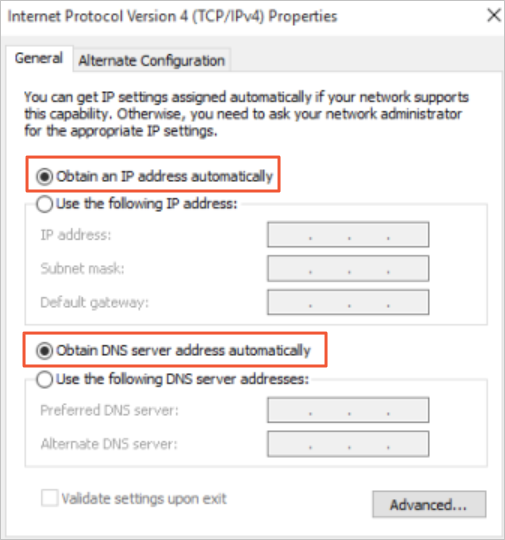
Select Automatically obtain an IP address. Then, the SAG device automatically assigns an IP address to your on-premises computer. After the SAG device assigns an IP address to your on-premises computer, you can test the connectivity between the VPC network and your private networks.