This topic describes how to perform cross-account log collection from Elastic Compute Service (ECS) instances. The solution involves authorizing Logtail in a destination account to collect logs from ECS instances in a source account for centralized management and analysis.
Quick start
Use cases
In a multi-account cloud environment, you may need to centralize logs for the following common reasons:
Unified service monitoring: Store application logs and system logs from different business accounts in a central location. This simplifies unified monitoring, alerting, and troubleshooting.
Security and compliance auditing: Aggregate all operation logs and security logs into a dedicated security or audit account to meet compliance requirements.
Business migration: Transition log collection tasks to a new account during a business migration from one Alibaba Cloud account to another.
This topic uses the migration of log collection tasks from a source account to a destination account as an example.
How it works
This solution uses a trust model based on file authorization. You can create specific authorization and identifier files on the ECS instances in the source account. This grants the destination account permission to collect logs from these instances using Logtail.
The workflow is as follows:
On each ECS instance in the source account (Account B), create an authorization file. The file is named after the UID of the destination account (Account A).
On the same ECS instances, create a file that contains a custom identifier. This identifier is used to group the servers in the destination account.
After the Logtail client on an ECS instance recognizes the authorization file, it sends heartbeats to Simple Log Service (SLS) in the destination account (Account A) and reports its custom identifier.
In the SLS console of the destination account (Account A), create a machine group that uses this custom identifier. ECS instances that have normal heartbeats are automatically added to this machine group.
Apply a Logtail collection configuration to the machine group. Logtail then collects logs based on the configuration and sends them to the logstore in the destination account (Account A).
When you process data across accounts, you must use a custom role for authorization:
The first Role ARN grants the data transformation job permissions to assume this role to read data from the source logstore. For more information, see Grant the RAM role the read-only permissions on a source logstore.
The second Role ARN grants the data transformation job permissions to assume this role to write the transformed data to the destination logstore. For more information, see Grant the RAM role the write permissions on a destination logstore across Alibaba Cloud accounts.
Procedure
Step 1: Configure authorization and an identifier on the source ECS instance
Create an authorization file and an identifier file on the ECS instances in the source account. This allows the destination account to collect logs and provides a unique identifier for creating a machine group.
Log on to the ECS instances in the source account.
Run the following script to complete the authorization and identifier configuration. Replace
{TARGET_ACCOUNT_ID}and{YOUR_MACHINE_GROUP_ID}in the script with your actual values.
#!/bin/bash

# Replace with the 16-digit Alibaba Cloud account ID of the destination account (Account A).
TARGET_ACCOUNT_ID="{TARGET_ACCOUNT_ID}"

# Define a unique identifier for this group of machines.
# Use a combination of the business and environment names, such as "my-app-prod-servers".
MACHINE_GROUP_ID="{YOUR_MACHINE_GROUP_ID}"

# 1. Create the authorization file directory.
sudo mkdir -p /etc/ilogtail/users

# 2. Create the authorization file. The file name is the destination account ID. This grants collection permissions to that account.
sudo touch "/etc/ilogtail/users/${TARGET_ACCOUNT_ID}"

# 3. Create the custom identifier file. This file is used to identify and group the machines in the destination account.
echo "${MACHINE_GROUP_ID}" | sudo tee /etc/ilogtail/user_defined_id > /dev/null

# 4. Restart the Logtail service to apply the configuration.
# If your system does not use systemd, run 'sudo /etc/init.d/ilogtaild restart'.
sudo systemctl restart ilogtail

echo "Configuration complete. Check the heartbeat status of the machine group in the SLS console of the destination account."
(Optional) Verify the configuration
Check whether the files are created:
sudo ls -l /etc/ilogtail/users/andsudo cat /etc/ilogtail/user_defined_id.Check the Logtail service status:
sudo systemctl status ilogtail.View the Logtail logs to confirm that heartbeats are sent:
sudo tail -n 100 /var/log/ilogtail/ilogtail.LOG | grep Heartbeat.
Step 2: Create a machine group in the destination account
In the SLS console of the destination account, create a machine group to identify and manage the ECS instances from the source account using the custom identifier that you set in the previous step.
Log on to the Simple Log Service console using the destination account (Account A).
On the Projects page, click the destination project.
In the navigation pane, choose Resources > Machine Groups.
Click Create Machine Group.
In the Create Machine Group dialog box, configure the following parameters:
Machine Group Name: Enter a custom name, such as
cross-account-app-servers.Machine Group Type: Select Custom Identifier.
Custom Identifier: Enter the value of
MACHINE_GROUP_IDthat you set in the script in Step 1. Make sure that the content is identical and does not contain extra spaces or line feeds.
Click OK.
In the Machine Group list, find the new machine group and click its name to go to the details page. Wait for 1 to 3 minutes and then refresh the page. The Heartbeat status should be OK.
Step 3: Create and apply a Logtail collection configuration
Create a log collection rule and apply it to the machine group to start collecting logs.
In the SLS console of the destination account, go to the destination project and logstore.
Choose Quick Integration > Import Data, and then select Regular Expression - Text Log or another log type as needed.
In the Select Machine Group step of the Import Data wizard, move the machine group that you created in the previous step from the Source Machine Groups list to the Applied Machine Groups list, and then click Next.
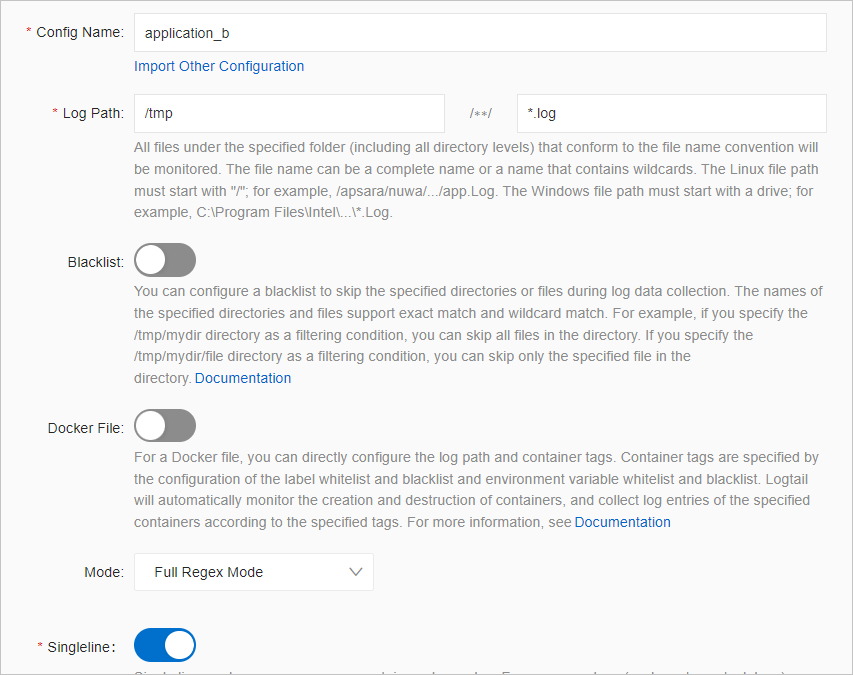
Configure the Logtail collection rule, including the log path and collection pattern.
ImportantFor a smooth migration and to avoid extra costs, confirm that data collection is stable in the destination account. Then, immediately log on to the SLS console of the source account (Account B) to delete or disable the original Logtail collection configuration.
Complete the Preview Data and Set Index step and click Next. SLS enables full-text indexing by default. You can also configure field indexes as needed.
Background information
To authorize Logtail to collect logs, its user identity must be configured with the ID of the Alibaba Cloud account that owns the target SLS project. If this identity is not set, Logtail cannot establish a connection, resulting in heartbeat failures in the machine group and a halt to all log collection.
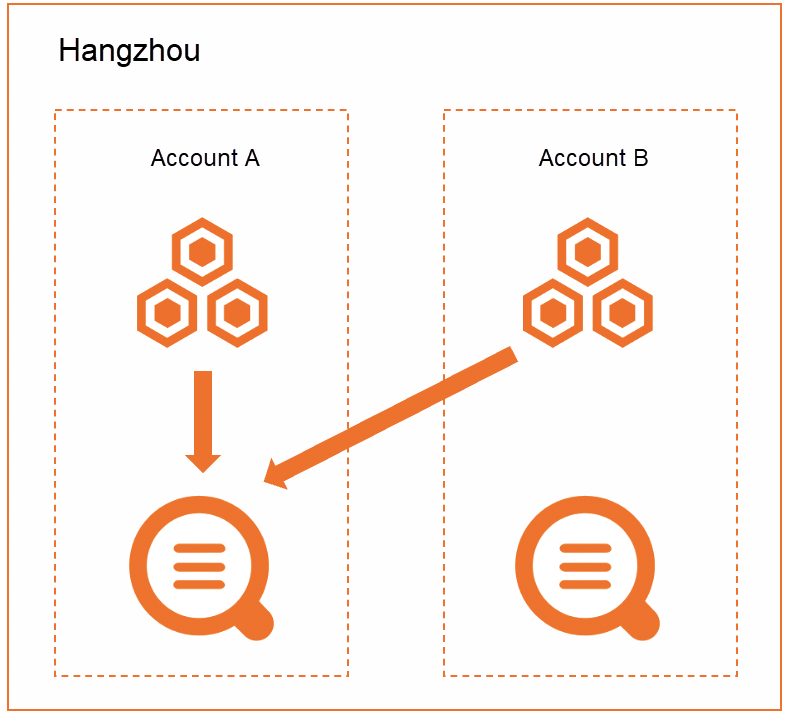
For example, an e-commerce company runs two applications on an ECS cluster in the Alibaba Cloud China (Hangzhou) region. The company uses SLS in the same region to manage logs.
Application A is deployed on a Linux ECS cluster under Alibaba Cloud account A (UID: 12****456) and uses SLS from that account for log management.
Application B is deployed on a Linux ECS cluster under Alibaba Cloud account B (UID: 17****397) and uses SLS from that account for log management.
The company changes its business strategy to centralize log collection. All logs from both applications will be collected into SLS under Alibaba Cloud account A (UID: 12****456). The logs from each application are collected into a separate logstore within the same SLS project. To do this, you must create a new Logtail collection configuration, machine group, and logstore to collect and store logs for Application B. The log collection for Application A remains unchanged and continues to use the original Logtail collection configuration, machine group, and logstore.
Step 1: Create a user identity file
Log on to the ECS server that belongs to Alibaba Cloud account B.
ImportantYou must create the user identity file on each ECS server in ECS cluster B.
Run the following command to create the user identity file.
Set the user identity to Alibaba Cloud account A. This creates a file named after the ID of Alibaba Cloud account A. For more information, see Configure a user identity.
touch /etc/ilogtail/users/12****456
Step 2: Create a custom identifier-based machine group
Create a custom identifier file for the machine group on the ECS server.
ImportantYou must create the custom identifier file for the machine group on each ECS server in ECS cluster B.
Log on to the ECS server that belongs to Alibaba Cloud account B.
In the specified directory, create the /etc/ilogtail/user_defined_id file and add a custom identifier.
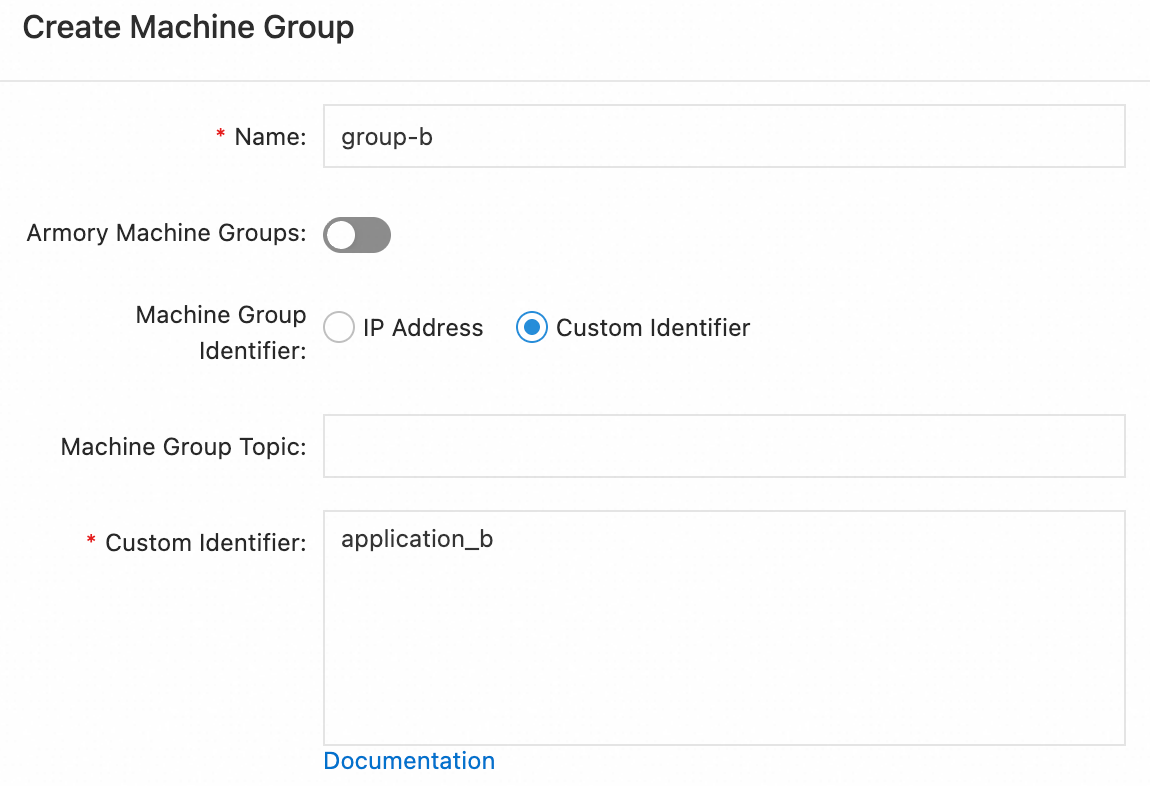
For example, to set the custom identifier to
application_b, enterapplication_bin the file and save it. For more information about the file path, see Create a custom identifier-based machine group.
Create a machine group in the SLS console.
Using Alibaba Cloud account A, log on to the Simple Log Service console.
In the Project List area, click the destination project.
In the navigation pane, choose .
To the right of Machine Group, click
 > Create Machine Group.
In the Create Machine Group dialog box, configure the following parameters and click OK.
Set Custom Identifier to the custom identifier that you configured in step 1. For more information about the other parameters, see Create a custom identifier-based machine group.
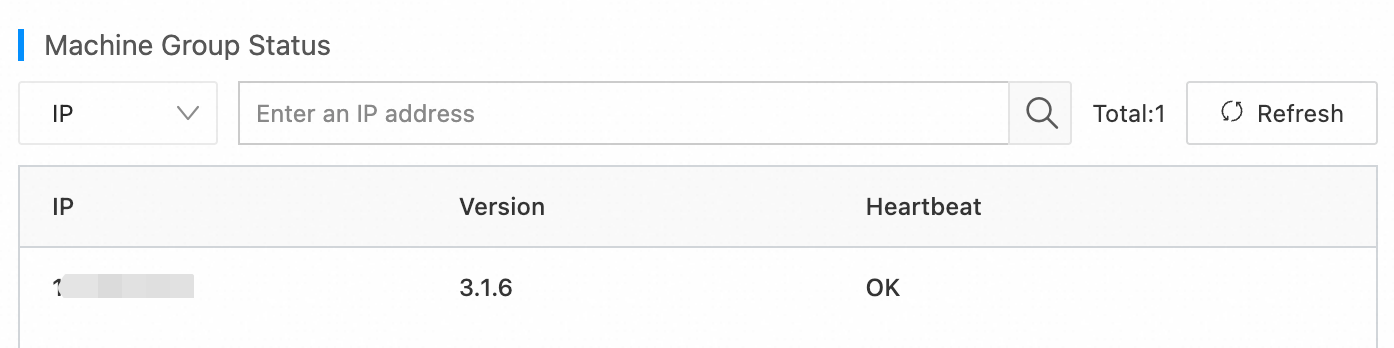
Verify that the heartbeat status of the servers in the machine group is OK.
In the machine group list, click the destination machine group.
On the Machine Group Configuration page, view the ECS servers that use the same custom identifier and their heartbeat status.
A Heartbeat status of OK indicates that the ECS server is connected to SLS. If the status is FAIL, see A Logtail machine group has no heartbeat.
Step 3: Collect logs
Log on to the Simple Log Service console with Alibaba Cloud account A.
Click Quick Integration.
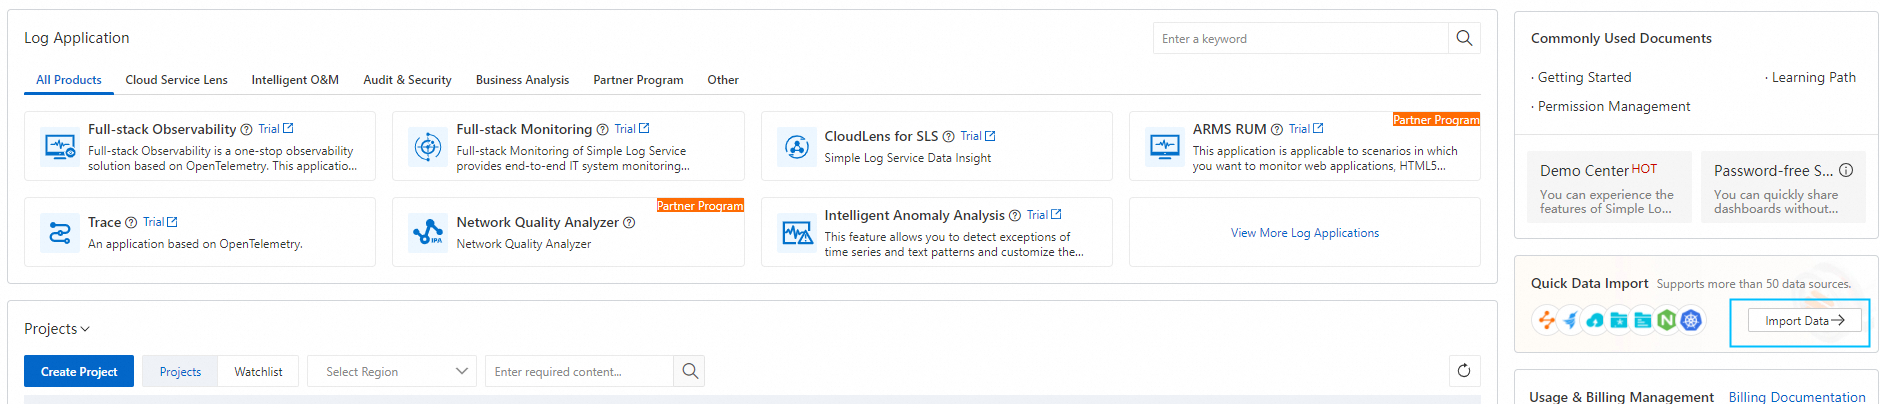
In the Integrate Data dialog box, select Regex - Text Log.
In the Integrate Data wizard, select the destination project and logstore, and then click Next.
Configure Machine Group Settings.
Set Scenario to Host Scenario.
Set Installation Environment to ECS.
Select the machine group that you created in Step 2. Move the machine group from Source Machine Groups to Applied Machine Groups, and then click Next.
Create a Logtail collection configuration and click Next.
For more information about the parameters, see Collect logs in full regex mode.
ImportantBy default, only one Logtail collection configuration can match a file. Because the collection configuration for account B is still active, the new configuration for account A cannot take effect. You can use one of the following methods to activate the configuration for account A:
Stop the log collection for account B. To do this, log on to the SLS console with account B and remove the Logtail collection configuration from the destination machine group. For more information, see Apply a Logtail configuration to a specified machine group.
Add a forced collection configuration for account A. For more information, see How to collect logs from a file multiple times.
After you create the Logtail collection configuration, delete the original configuration for Alibaba Cloud account B to prevent duplicate log collection. For more information, see Delete a Logtail configuration.
Preview the data, configure indexes, and then click Next.
SLS enables the full-text index feature by default. You can also manually or automatically configure field indexes based on the collected logs. For more information, see Create an index.
Related operations
To migrate historical data from the logstore in Alibaba Cloud Account B to the current logstore, you can create a data transformation job in the source logstore to copy the data. For more information, see Replicate data from a logstore.
When you process data across accounts, you must use a custom role for authorization. This example uses a custom role.
The first Role ARN grants the data transformation job the permissions to assume this role and read data from the source logstore. For more information about how to configure role permissions, see Grant the RAM role the read-only permissions on a source logstore.
The second Role ARN grants the data transformation job the permissions to assume this role and write the transformed data to the destination logstore. For more information about how to configure role permissions, see Grant the RAM role the write permissions on a destination logstore across Alibaba Cloud accounts.