Collect logs from Elastic Compute Service (ECS) instances across Alibaba Cloud accounts by authorizing Logtail in a destination account to access ECS instances in a source account for centralized log management.
Background information
Logtail requires its user identity to be configured with the Alibaba Cloud account ID that owns the target SLS project. Without this configuration, Logtail cannot connect, which causes machine group heartbeat failures and stops all log collection.
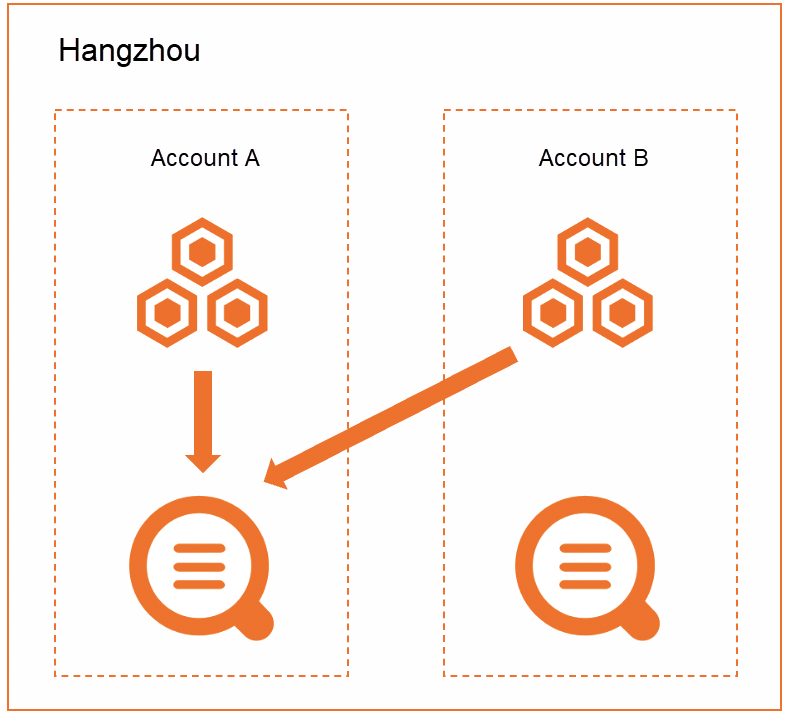
For example, an e-commerce company runs two applications on an ECS cluster in the Alibaba Cloud China (Hangzhou) region. The company uses SLS in the same region to manage logs.
-
Application A is deployed on a Linux ECS cluster under Alibaba Cloud account A (UID: 12****456) and uses SLS from that account for log management.
-
Application B is deployed on a Linux ECS cluster under Alibaba Cloud account B (UID: 17****397) and uses SLS from that account for log management.
The company now needs to centralize logs from both applications in the Simple Log Service project under Alibaba Cloud account A (12****456), with each application's logs collected into a separate logstore. To achieve this, you create a new Logtail collection configuration, machine group, and logstore for Application B. The log collection for Application A remains unchanged.
Step 1: Create a user identity file
-
Log on to the ECS server that belongs to Alibaba Cloud account B.
ImportantYou must create the user identity file on each ECS server in ECS cluster B.
-
Run the following command to create the user identity file.
Set the user identity to Alibaba Cloud account A. This creates a file named after the ID of Alibaba Cloud account A. For more information, see Configure a user identity.
touch /etc/ilogtail/users/12****456
Step 2: Create a custom identifier-based machine group
-
Create a custom identifier file for the machine group on the ECS server.
ImportantYou must create the custom identifier file for the machine group on each ECS server in ECS cluster B.
-
Log on to the ECS server that belongs to Alibaba Cloud account B.
-
In the specified directory, create the /etc/ilogtail/user_defined_id file and add a custom identifier.
For example, to set the custom identifier to
application_b, enterapplication_bin the file and save it. For more information about the file path, see Create a custom identifier-based machine group.
-
-
Create a machine group in the SLS console.
-
Log on to the Simple Log Service console with Alibaba Cloud account A.
-
In the Project List area, click the destination project.
-
In the left-side navigation pane, choose .
-
To the right of Machine Groups, click
 > Create Machine Group.
 -
In the Create Machine Group dialog box, configure the parameters and then click OK.
Set Custom Identifier to the value that you configured in Step 1. For more information about other parameters, see Create a machine group with a custom identifier. Set Name to
group-b, select Custom Identifier for Machine Group Identifier, and enterapplication_bfor Custom Identifier.
-
-
Verify that the heartbeat status of the servers in the machine group is OK.
-
In the machine group list, click the destination machine group.
-
On the Machine Group Configurations page, view the ECS instances that use the same custom identifier and check their heartbeat status.
A Heartbeat status of OK indicates that the ECS instance is connected to Simple Log Service. If the status is FAIL, see Troubleshoot Logtail machine group heartbeats. Confirm that all four machines in the machine group show an OK heartbeat status.
-
Step 3: Collect logs
-
Log on to the Simple Log Service console with Alibaba Cloud account A.
-
Click Quick Start.
The Integrate Data section is in the lower-right corner of the console homepage.
-
In the Quick Data Import dialog box, select Regex - Text Log.
-
In the Import Data wizard, select the destination project and logstore, and then click Next.
-
Configure the Machine Group Configurations.
-
Set Scenario to Servers.
-
Set Installation Environment to ECS.
-
Select the machine group that you created in Step 2. Move the machine group from Source Machine Group to Applied Machine Group, and then click Next.
-
-
Create a Logtail collection configuration and click Next.
For more information about the parameters, see Collect logs in full regex mode.
Important-
By default, only one Logtail collection configuration can match a file. Because the collection configuration for account B is still active, the new configuration for account A cannot take effect. You can use one of the following methods to activate the configuration for account A:
-
Stop the log collection for account B. To do this, log on to the SLS console with account B and remove the Logtail collection configuration from the destination machine group. For more information, see Apply a Logtail configuration to a specified machine group.
-
Add a forced collection configuration for account A. For more information, see How to collect logs from a file multiple times.
-
-
After you create the Logtail collection configuration, delete the original configuration for Alibaba Cloud account B to prevent duplicate log collection. For more information, see Delete a Logtail configuration.
In the Logtail collection configuration form, set Config Name to
application_b, set Log Path to/tmp/**/*.log, select Full Regex Mode for Mode, and turn on Single Line. -
-
Preview the data, configure indexes, and then click Next.
SLS enables full-text indexing by default. You can also configure field indexes manually or automatically based on the collected logs. For more information, see Create indexes.
Related operations
To migrate historical data from Alibaba Cloud account B, create a data transformation job in the original logstore to copy data to the current logstore. For more information, see Copy logstore data.
When you process data across accounts, you must use a custom role for authorization. This example uses a custom role.
-
The first Role ARN allows the data transformation job to assume this role and read data from the source logstore. For more information about how to configure role permissions, see Grant a RAM role read-only access to a source logstore.
-
The second Role ARN allows the data transformation job to assume this role and write the transformed data to the destination logstore. For more information about how to configure role permissions, see Grant a RAM role permissions to write data to a destination logstore (cross-account).