Associate your Application Load Balancer (ALB) instance with an Anti-DDoS Pro/Premium elastic IP address (EIP) to expose it to the internet with terabit-per-second (Tbps) DDoS protection — without changing your service IP address or managing separate protection configurations.
In this tutorial, you will:
Create an Anti-DDoS Pro/Premium EIP
Associate the EIP with a new or existing ALB instance
(Optional) Add the EIP to an Internet Shared Bandwidth instance for higher bandwidth
Map a custom domain to the ALB instance using a CNAME record
Verify that traffic is load-balanced across backend servers
Associating an Anti-DDoS Pro/Premium EIP activates the Anti-DDoS Origin (pay-as-you-go) service, which requires a minimum commitment of 30 days and cannot be disabled during this initial period. Review the Billing section before proceeding.
Limitations
The ALB instance and the Anti-DDoS Pro/Premium EIP must be in the same region.EIP console
EIP limitations
Only pay-as-you-go EIPs of the BGP (Multi-ISP) line type support Anti-DDoS Pro/Premium.
If you create an Anti-DDoS Pro/Premium EIP from an IP address pool, the pool must also be an Anti-DDoS Pro/Premium pool.
Anti-DDoS Pro/Premium EIPs are available in the following regions:
EIPs
| Area | Region |
|---|---|
| China | China (Beijing), China (Zhangjiakou), China (Hangzhou), China (Shanghai), China (Hong Kong) |
| Asia Pacific | Philippines (Manila), Japan (Tokyo), Singapore, Malaysia (Kuala Lumpur), Indonesia (Jakarta) |
| Europe and Americas | US (Virginia), US (Silicon Valley), Germany (Frankfurt), UK (London) |
IP address pools
| Area | Region |
|---|---|
| China | China (Hong Kong) |
| Asia Pacific | Philippines (Manila), Japan (Tokyo), Singapore, Malaysia (Kuala Lumpur), Indonesia (Jakarta) |
| Europe and Americas | US (Virginia), US (Silicon Valley), Germany (Frankfurt), UK (London) |
ALB association limitations
Assign an Anti-DDoS Pro/Premium EIP to each zone of the ALB instance.
Do not add the EIP to an Internet Shared Bandwidth instance before association. If you need shared bandwidth, first associate the ALB instance with the EIP, then add the EIP to a BGP (Multi-ISP) Internet Shared Bandwidth instance from the ALB console.
Billing
After association, the following charges apply:
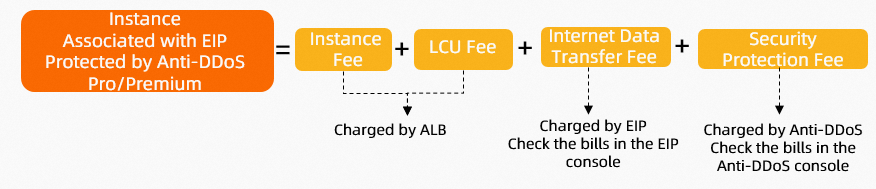
| Billable item | Calculation | Reference |
|---|---|---|
| Instance fee | Instance fee = Unit price per instance (USD/hour) × Billing duration (hours) | Instance fee |
| LCU fee | LCU fee = max{LCUs for new connections, LCUs for concurrent connections, LCUs for data transfer, LCUs for rule evaluations} × Unit price of an LCU × Billing duration (hours) | Load balancer capacity unit (LCU) fee |
| Internet data transfer fee | Internet-facing ALB instances incur data transfer fees. After associating an Anti-DDoS Pro/Premium EIP, you are also charged instance and data transfer fees for the EIP. | Pay-as-you-go |
| Security protection fee | Charged by the Anti-DDoS Origin service upon association. Minimum 30-day commitment; cannot be disabled during this period. | Anti-DDoS Origin 2.0 (pay-as-you-go) |
Prerequisites
Before you begin, make sure you have:
A virtual private cloud (VPC) named VPC1
Two ECS instances (ECS01 and ECS02) running in VPC1, each serving a different application Deploy a test application on each instance: ECS01
yum install -y nginx
systemctl start nginx.service
cd /usr/share/nginx/html/
echo "Hello World ! This is ECS01." > index.html
ECS02
yum install -y nginx
systemctl start nginx.service
cd /usr/share/nginx/html/
echo "Hello World ! This is ECS02." > index.html
An ALB server group named RS01 with ECS01 and ECS02 as backend servers. See Create and manage a server group.
(Optional) A BGP (Multi-ISP) Internet Shared Bandwidth instance, if you need shared bandwidth. See Create and manage an Internet Shared Bandwidth instance.
Step 1: Create an Anti-DDoS Pro/Premium EIP

Log on to the Elastic IP Addresses console.
On the Elastic IP Addresses page, click Create EIP.
If this is your first Anti-DDoS Pro/Premium EIP, follow the on-screen instructions or click Anti-DDoS Origin (pay-as-you-go) to activate the service. After activation, view your Anti-DDoS Origin instance in the Traffic Security console under Network Security > Anti-DDoS Native > Billing Management or Instance Management.
WarningThis service requires a minimum commitment of 30 days upon activation and cannot be disabled during this initial period.
Configure the EIP parameters and click Buy Now to complete the purchase. The following table describes the key parameters. For all parameters, see Create an EIP.
Parameter Description Billing Method Select Pay-as-you-go. Region Select the same region as your ALB instance. This tutorial uses China (Hangzhou). Line type Select BGP (Multi-ISP). Security protection Select Anti-DDoS (Enhanced) to enable Tbps-level protection. The Default option provides basic protection up to 5 Gbps only. Data transfer Select Pay-By-Data-Transfer. Quantity Set to the number of zones in your ALB instance — one EIP per zone is required.
Step 2: Associate the ALB instance with the Anti-DDoS Pro/Premium EIP
Choose the procedure that matches your scenario.
For a new ALB instance
Log on to the ALB console.
Log on to the ALB console.
On the Instances page, click Create ALB.
On the buy page, set the following parameters and click Buy Now. For all parameters, see Create an ALB instance.
Instance network type: Select Public.
VPC: Select VPC1.
Zone: Select zones and vSwitches, then assign the Anti-DDoS Pro/Premium EIP you created to each zone.
For high availability, select at least two zones if available. ALB does not charge extra for multi-zone deployments. If no vSwitch exists in a zone, create one from the console.
Configure an HTTP listener for the ALB instance:
On the Instances page, click Create Listener in the Actions column of the target instance.
In the Configure Listener step, set the following parameters and click Next. For all parameters, see Add an HTTP listener.
Listener Protocol: Select HTTP.
Listener Port: Enter
80.
In the Server Group step, select the RS01 server group and click Next.
In the Configuration Review step, confirm the settings and click Submit.
For an existing internal-facing ALB instance
Log on to the ALB console.
Log on to the ALB console.
In the top navigation bar, select the region where the instance is deployed (for example, China (Hangzhou)).
On the Instances page, click the ID of the target internal-facing ALB instance.
On the Instance Details tab, go to Basic Information. In the Network Type row, click Change Network Type next to IPv4.
In the Change Network Type dialog box, select the Anti-DDoS Pro/Premium EIP from the Assign EIP drop-down list for each zone, then click OK.
For an existing Internet-facing ALB instance
By default, a new Internet-facing ALB instance is associated with a pay-as-you-go EIP of the BGP (Multi-ISP) line type with default security protection. To replace it with an Anti-DDoS Pro/Premium EIP, you must change the network type twice.

Step A: Change the network type from Internet-facing to internal-facing
On the Instances page, click the ID of the target Internet-facing ALB instance.
On the Instance Details tab, go to Basic Information. In the Network Type row, click Change Network Type next to IPv4.
In the Change Network Type dialog box, confirm the impact of the change and click OK. The change takes about one minute. It is complete when Network Type on the Instance Details tab shows Private.
Step B: Change the network type from internal-facing to Internet-facing
On the Instances page, click the ID of the now internal-facing ALB instance.
On the Instance Details tab, go to Basic Information. In the Network Type row, click Change Network Type next to IPv4.
In the Change Network Type dialog box, select the Anti-DDoS Pro/Premium EIP from the Assign EIP drop-down list for each zone, then click OK.
(Optional) Step 3: Add the EIP to an Internet Shared Bandwidth instance
If you need more bandwidth, add the EIP to an Internet Shared Bandwidth instance.
On the ALB Instances page, find the target instance and use one of these methods:
In the Actions column, choose Associate with Internet Shared Bandwidth.
In the Internet Shared Bandwidth column, click Associate.
Click the instance ID, go to the Instance Details tab, and in the Billing Information section click Associate with EIP Bandwidth Plan.
In the Associate with EIP Bandwidth Plan dialog box, select the Internet Shared Bandwidth instance and click OK.
Step 4: Configure a DNS record
Add a CNAME record in Alibaba Cloud DNS to map a custom domain to the ALB instance's DNS name.
In the ALB console, go to ALB > Instances and copy the DNS name of your ALB instance.
Log on to the Alibaba Cloud DNS console.
On the Public Zone page, click Add Zone, enter your domain name, and click OK.
ImportantYour domain name must be verified using a TXT record.
In the Operations column of the target domain name, click Settings.
On the Settings page, click Add Record.
In the Add Record panel, configure the CNAME record and click OK.
A new CNAME record takes effect immediately. An updated record takes effect after the TTL of the cached record expires — the default TTL is 10 minutes. If a conflict occurs, use a different domain name. See Rules for record conflicts.
Parameter Description Record Type Select CNAME. Hostname Enter the prefix for your domain name. DNS Query Source Select Default. Record Value Enter the ALB instance's DNS name that you copied. TTL Use the default value.
Step 5: Verify the configuration
Enter the custom domain name from Step 4 in a browser. If the ALB instance is correctly configured, the page loads and shows a response from one of the backend servers.
Refresh the browser several times. Requests alternate between ECS01 and ECS02, confirming that the ALB instance is distributing traffic across backend servers through the Anti-DDoS Pro/Premium EIP.


If the page does not load, check the following:
| Symptom | Check |
|---|---|
| Page not loading after DNS change | Confirm the CNAME record has propagated (allow up to 10 minutes for TTL expiry). |
| Network type shows Private | Verify that the ALB instance's Network Type shows Public on the Instance Details tab. |
| No EIP assigned | Check that an Anti-DDoS Pro/Premium EIP is assigned to each zone of the ALB instance. |