An automated migration tool converts your NGINX Ingress configurations to ALB Ingress format, eliminating manual work. Shift traffic gradually through DNS-based weight adjustment for zero downtime.
Migration process
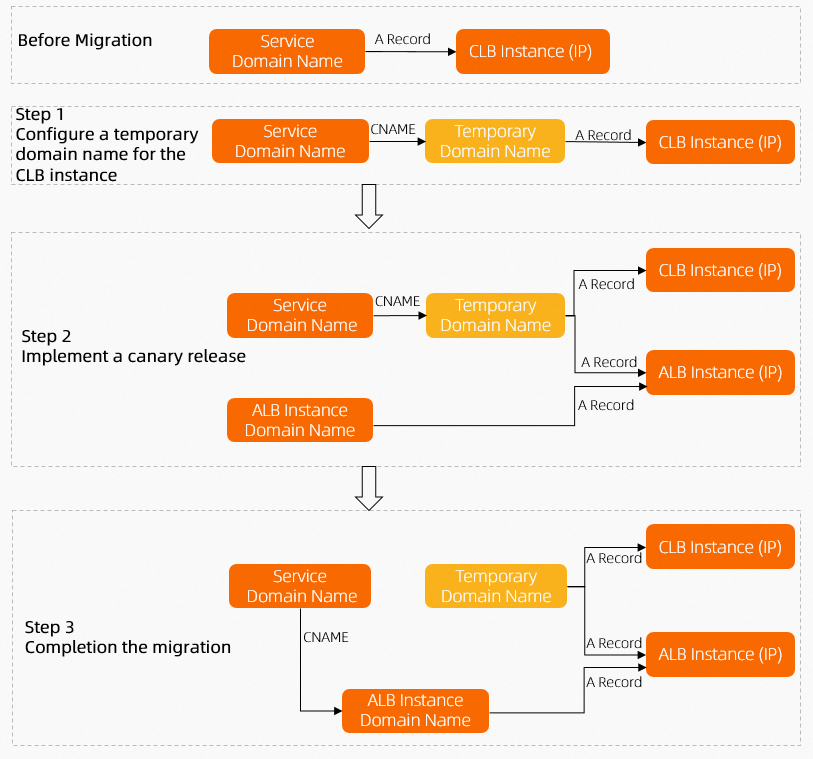
Resolve a domain name to both the NGINX Ingress and ALB Ingress, then gradually adjust DNS weights to shift traffic seamlessly. The following diagram shows the process. The Migration example below provides detailed steps.
DNS-based traffic shifting is one approach to zero-downtime migration. This process is for reference only.

Migration example
The following example walks through the migration with specific operations.
A company runs an NGINX Ingress controller in its cluster. The controller's Internet-facing LoadBalancer-type Service automatically provisions an Internet-facing CLB instance. DNS resolves www.example.net to the CLB, which forwards requests to backend pods.

Step 1: Configure the ALB Ingress
The NGINX Ingress can no longer meet performance requirements and incurs high O&M costs. The company uses the migration tool to convert the NGINX Ingress configuration to ALB Ingress and adds the ALB Ingress to DNS with a lower weight.
DNS does not allow a domain name to resolve to both an A record and a CNAME record simultaneously. CLB instances receive requests via IP addresses, while ALB instances expose a default domain name (What is Application Load Balancer?). You must configure a temporary domain name for the CLB instance to enable weight-based traffic distribution.

Step 2: Gradually shift traffic to ALB Ingress
After verifying the ALB Ingress works as expected, increase the DNS weight for the ALB Ingress to route more traffic through it.

Step 3: Delete NGINX Ingress resources
After all traffic is migrated to ALB Ingress, delete the NGINX Ingress DNS entries, remove the NGINX Ingress resources, and uninstall the NGINX Ingress controller add-on.

Prerequisites
A kubectl client is connected to the ACK cluster. For more information, see Connect to an ACK cluster using kubectl.
Step 1: Configure the ALB Ingress
ACK: Log on to the Container Service for Kubernetes (ACK) console and install the ALB Ingress controller add-on in the cluster where you want to perform the migration.
ACS: Log on to the Container Compute Service console and install the ALB Ingress controller add-on in the cluster where you want to perform the migration.
The migration tool automatically converts
AlbConfig,IngressClass, andIngressresources. Therefore, when you install the add-on, select None for ALB Instance.ImportantTo access services through an ALB Ingress in an ACK dedicated cluster, grant permissions to the ALB Ingress controller before deploying services. Grant permissions to the ALB Ingress controller in an ACK dedicated cluster.
Create a file named ingress2albconfig.yaml with the following content.
apiVersion: batch/v1
kind: Job
metadata:
  name: ingress2albconfig
  namespace: default
spec:
  template:
    spec:
      containers:
      - name: ingress2albconfig
        image: registry-cn-hangzhou.ack.aliyuncs.com/acs/ingress2albconfig:0.0.2
        command: ["/bin/ingress2albconfig", "print", "-A"]
      restartPolicy: Never
      serviceAccount: ingress2albconfig
      serviceAccountName: ingress2albconfig
  backoffLimit: 4
---
apiVersion: rbac.authorization.k8s.io/v1
kind: ClusterRole
metadata:
  name: system:ingress2albconfig
rules:
- apiGroups:
  - networking.k8s.io
  resources:
  - ingresses
  - ingressclasses
  verbs:
  - get
  - list
  - watch
  - update
  - create
  - patch
---
apiVersion: v1
kind: ServiceAccount
metadata:
  name: ingress2albconfig
  namespace: default
---
kind: ClusterRoleBinding
apiVersion: rbac.authorization.k8s.io/v1
metadata:
  name: system:ingress2albconfig
roleRef:
  apiGroup: rbac.authorization.k8s.io
  kind: ClusterRole
  name: system:ingress2albconfig
subjects:
  - kind: ServiceAccount
    name: ingress2albconfig
    namespace: default
Run the following command to start the Job. The Job converts existing NGINX Ingress configurations into
AlbConfig,IngressClass,Ingress, and other resources and outputs the results to the pod logs.kubectl apply -f ingress2albconfig.yamlExpected output:
job.batch/ingress2albconfig created
clusterrole.rbac.authorization.k8s.io/system:ingress2albconfig created
serviceaccount/ingress2albconfig created
clusterrolebinding.rbac.authorization.k8s.io/system:ingress2albconfig created
View the pod that belongs to the Job.
kubectl get pod -l job-name=ingress2albconfigExpected output:
NAME                READY   STATUS      RESTARTS   AGE
ingress2albconfig-vw***   0/1     Completed   0          16m
View the pod logs.
kubectl logs ingress2albconfig-vw*** # Replace this with the pod name from the previous step.Expected output. Deploy these resources to the cluster to configure the ALB Ingress.
apiVersion: alibabacloud.com/v1
kind: AlbConfig
metadata:
  name: from-nginx
spec:
  config:
    accessLogConfig: {}
    edition: Standard
    name: from-nginx
    tags:
    - key: converted/ingress2albconfig
      value: "true"
    zoneMappings:
    - vSwitchId: vsw-xxx # Replace this with the ID of a vSwitch in your VPC.
    - vSwitchId: vsw-xxx # Replace this with the ID of a vSwitch in your VPC.
  listeners:
  - port: 80
    protocol: HTTP
---
apiVersion: networking.k8s.io/v1
kind: IngressClass
metadata:
  name: from-nginx
spec:
  controller: ingress.k8s.alibabacloud/alb
  parameters:
    apiGroup: alibabacloud.com
    kind: AlbConfig
    name: from-nginx
---
apiVersion: networking.k8s.io/v1
kind: Ingress
metadata:
  annotations:
    alb.ingress.kubernetes.io/listen-ports: '[{"HTTP":80}]'
  name: from-ingress1
  namespace: default
spec:
  ingressClassName: from-nginx
  rules:
  - http:
      paths:
      - backend:
          service:
            name: nginx-svc-g1msr
            port:
              number: 80
        path: /
        pathType: Prefix
status:
  loadBalancer: {}
Automatically converted annotations
The migration tool converts the following NGINX Ingress annotations to ALB Ingress annotations.
Annotations not in this table are ignored during conversion. Verify the ALB Ingress configuration after conversion.
Step 2: Gradually shift traffic to ALB Ingress
Before switching traffic, compare and test the forwarding rules of your NGINX Ingress and ALB Ingress to ensure identical functionality.
Switch traffic during off-peak hours.
After configuring the ALB Ingress, direct a small portion of traffic to it as a canary release. Verify the forwarding rules and configurations before gradually increasing the weight.
Configure a temporary domain for the CLB instance
DNS does not support resolving a domain name to both an A record and a CNAME record. Because ALB instances use a default domain name, you must configure a temporary domain name for the CLB instance.
Log on to the Alibaba Cloud DNS console.
On the Public Zone page, find and click the DNS domain name
www.example.netthat points to the CLB instance to be migrated.On the Settings page, find the A record that points from
www.example.netto the IP address of the CLB instance. In the Actions column, click Edit.In the Edit Record panel, change the Hostname, and then click OK. In this example, the Hostname is changed to web0. Keep the other parameters unchanged.
On the Settings page, click Add Record. In the Add Record panel, configure the following parameters and click OK.
Parameter
Description
Record Type
Select CNAME.
Hostname
The prefix of the domain name. In this example, enter
www.Query Source
Select Default.
Record Value
Enter the temporary domain name. In this example, enter
web0.example.net.TTL
Keep the default value.
NoteThe CNAME record now resolves
www.example.nettoweb0.example.net, and the A record resolvesweb0.example.netto the CLB IP address.
Add a CNAME record for the ALB instance
Run the following command to find the domain name of the ALB instance.
kubectl get albconfigExpected output.
alb-a8mmh2tqbmrm11****.cn-hangzhou.alb.aliyuncs.comis the domain name of the ALB instance.NAME ALBID DNSNAME PORT&PROTOCOL CERTID AGE from_nginx alb-a8mmh2tqbmrm11**** alb-a8mmh2tqbmrm11****.cn-hangzhou.alb.aliyuncs.com 20mOn the Settings page, click Add Record. In the Add Record panel, configure the following parameters and click OK.
Parameter
Description
Record Type
Select CNAME.
Hostname
The prefix of the domain name. In this example, enter
www.Query Source
Select Default.
Record Value
Enter the domain name of the ALB instance.
TTL
Keep the default value.
Set the traffic weight
On the Settings page, find the CNAME record that you added in the previous step. In the Actions column, click the arrow next to Edit and select Edit Record Set.
In the Edit Record panel, set the CLB weight to 100 and the ALB weight to 0. Click OK.
Gradually decrease the CLB weight and increase the ALB weight after confirming no business impact.
Run the
digcommand multiple times to verify the traffic shifting effect.[root@xxx 2uvl6raykm3Z ~]# dig www.xxx.net ; <<>> DiG 9.11.4-P2-RedHat-9.11.4-26.P2.el7_9.10 <<>> www.xxx.net ;; global options: +cmd ;; Got answer: ;; ->>HEADER<<- opcode: QUERY, status: NOERROR, id: 31592 ;; flags: qr rd ra; QUERY: 1, ANSWER: 2, AUTHORITY: 0, ADDITIONAL: 0 ;; QUESTION SECTION: ;www.xxx.net. IN A ;; ANSWER SECTION: www.xxx.net. 5 IN CNAME web0.xxx.net. web0.xxx.net. 5 IN A 47.xxx.144 ;; Query time: 63 msec ;; SERVER: 100.xxx.136#53(100.xxx.136) ;; WHEN: Thu Jan 19 15:46:40 CST 2023 ;; MSG SIZE rcvd: 66[root@xxx ~]# dig www.xxx.net ; <<>> DiG 9.11.4-P2-RedHat-9.11.4-26.P2.el7_9.10 <<>> www.xxx.net ;; global options: +cmd ;; Got answer: ;; ->>HEADER<<- opcode: QUERY, status: NOERROR, id: 14224 ;; flags: qr rd ra; QUERY: 1, ANSWER: 3, AUTHORITY: 0, ADDITIONAL: 0 ;; QUESTION SECTION: ;www.xxx.net. IN A ;; ANSWER SECTION: www.xxx.net. 5 IN CNAME alb-a8mmh2xxxm74.cn-hangzhou.alb.aliyuncs.com. alb-a8mxxxm74.cn-hangzhou.alb.aliyuncs.com. 60 IN A 116.xxx.54 alb-a8mxxxm74.cn-hangzhou.alb.aliyuncs.com. 60 IN A 118.xxx.39 ;; Query time: 4 msec ;; SERVER: 100.xxx.136#53(100.xxx.136) ;; WHEN: Thu Jan 19 15:47:52 CST 2023 ;; MSG SIZE rcvd: 128After verification, gradually set the CLB weight to 0 and the ALB weight to 100.
Step 3: Delete NGINX Ingress resources
After all persistent connections to the NGINX Ingress close and no new traffic reaches it, monitor the system for a period appropriate to your business before releasing the redundant resources.
Delete the NGINX Ingress-related DNS entries from the Alibaba Cloud DNS console.
Uninstall the NGINX Ingress controller add-on.
Log on to the ACK console.
On the Clusters page, click the name of the target cluster. In the navigation pane on the left, choose .
Find the NGINX Ingress. In the Actions column, choose
 > Delete. In the dialog box that appears, click Confirm Deletion.
In the navigation pane on the left, choose Add-ons. Click the Networking tab. On the NGINX Ingress controller card, click Uninstall.
In the dialog box that appears, click OK.
Uninstalling the add-on automatically releases the CLB instance used by the NGINX Ingress controller, which will no longer incur fees.
Log on to the Container Compute Service console. In the navigation pane on the left, click Applications > Helm and uninstall the NGINX Ingress controller add-on.