Workflow Studio is a low-code, visual designer for building and editing CloudFlow workflows. It provides three modes, each accessible from the menu bar at the top of the page:
CloudFlow Studio -- Drag and drop states onto a visual canvas to design workflows without writing code.
YAML -- Write and edit workflow definitions in a code editor with real-time visualization.
Configure Workflow -- Set workflow metadata and assign an execution role with the required permissions.
CloudFlow Studio mode
CloudFlow Studio mode provides a graphical interface for visually building workflows. The Edit Workflow page contains five sections:
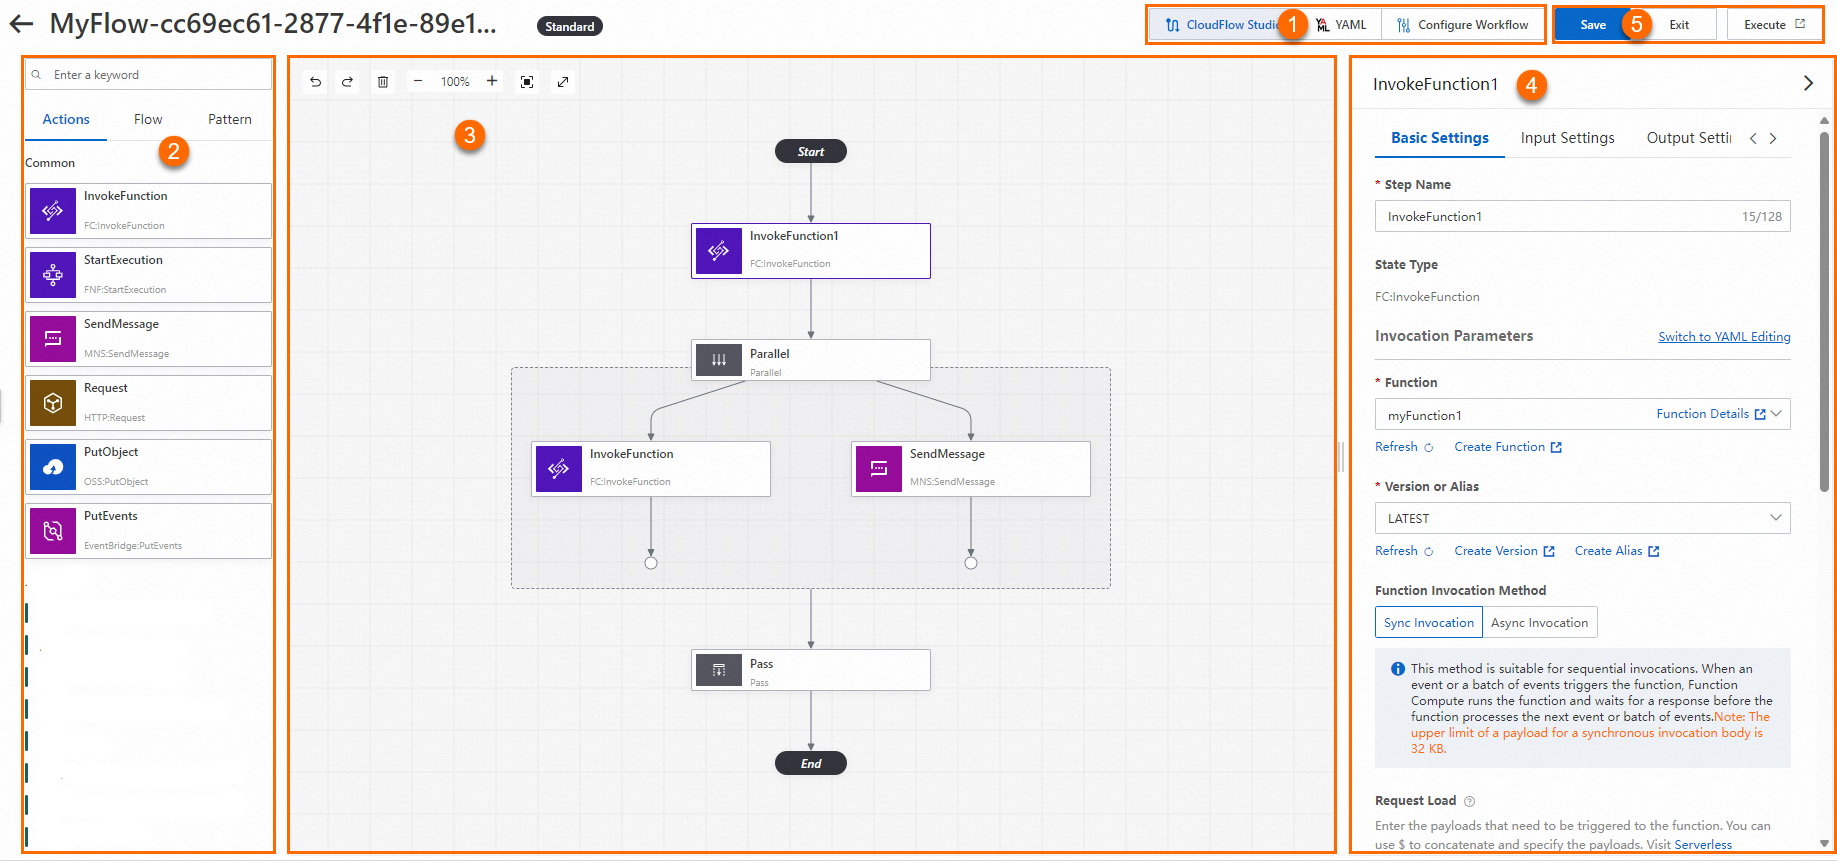
| Section | Description |
|---|---|
| 1 - Menu bar | Switch between the CloudFlow Studio, YAML, and Configure Workflow modes. |
| 2 - State display section | Browse and search available states across the Actions, Flow, and Pattern tabs. Drag states from here onto the canvas. |
| 3 - Workflow canvas | The main workspace where you arrange states into a workflow. Workflow Studio auto-generates the corresponding YAML as you build. |
| 4 - Parameter configuration section | View and edit properties of any selected state, including basic settings, input/output filtering, and error handling. |
| 5 - Function button section | Save, Exit, and Execute the workflow. |
State display section
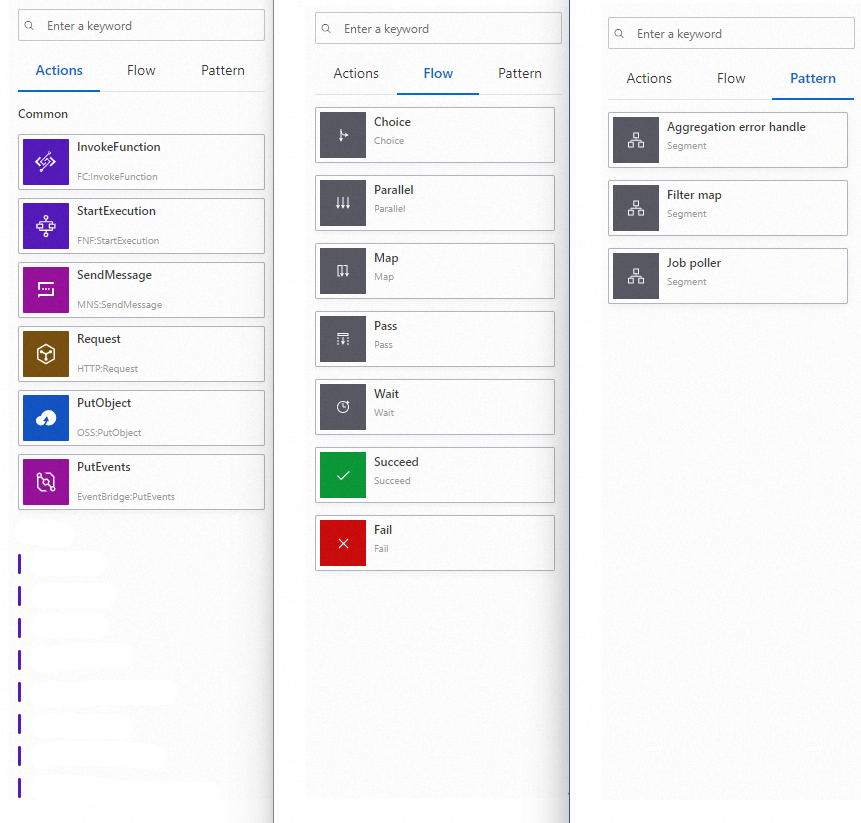
The State display section contains three tabs:
Actions tab
Lists API operations from Alibaba Cloud services -- including elastic computing, Internet middleware, database, and AI services -- that you can integrate into your workflow. Each API operation is a task state. Drag an operation onto the canvas to add it as a step.
Flow tab
Lists flow control states for directing workflow logic without performing specific actions. Available flow states:
Choice -- Branch based on conditions
Parallel -- Run branches concurrently
Map -- Iterate over a collection
Pass -- Pass input to output without performing work
Wait -- Pause for a specified duration
Succeed -- Mark successful completion
Fail -- Mark failure and stop execution
Pattern tab
Lists preset workflow building blocks. Drag a pattern onto the canvas to quickly scaffold common workflow structures.
Use the search box at the top of the State display section to find any state by keyword.
Workflow canvas
The canvas is where you assemble your workflow. Drag states from the State display section onto the canvas -- a horizontal or vertical guide line appears to indicate valid drop positions. Workflow Studio automatically generates the YAML definition as you build the flowchart.

Canvas toolbar
The toolbar in the upper-left corner of the canvas provides the following controls:
Zoom in / Zoom out
Center the flowchart
Delete the selected state
Undo the last action

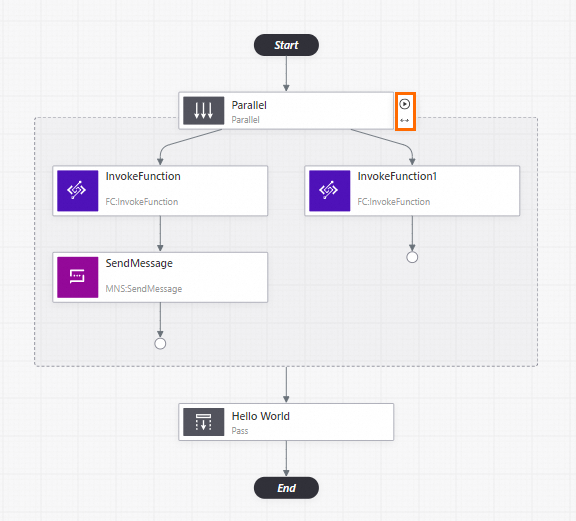
Debug a state inline
After configuring parameters for a state, debug it directly on the canvas without leaving the editor. Hover over the state and click the ![]() icon to run it. After execution completes, click the
icon to run it. After execution completes, click the ![]() icon to view the result.
icon to view the result.
Parameter configuration section
Select a state on the canvas to open its properties in the Parameter configuration section. The panel has four tabs: Basic Settings, Input Settings, Output Settings, and Troubleshooting.
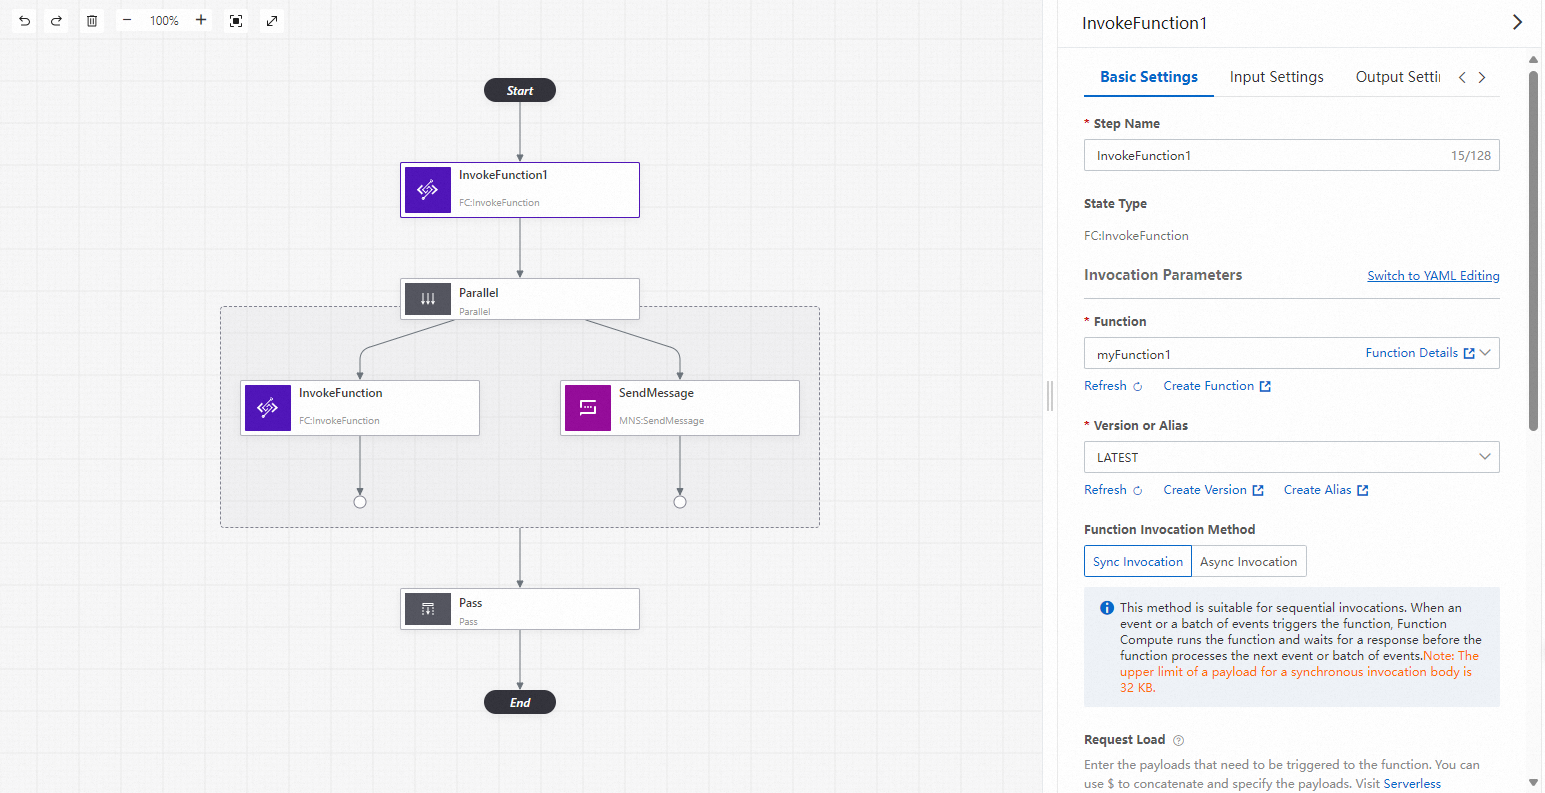
The following tables describe the key parameters, using the InvokeFunction task state as an example. For other parameters, keep the default values.
Basic settings
| Parameter | Description | Example |
|---|---|---|
| State Name | A descriptive name for the state. | InvokeFunction |
| Invocation Parameters | The function name, version or alias, invocation method, and payload. Click Switch to YAML Editing to configure in YAML. | See the YAML sample below. |
| Function | The function to invoke. | myfunction |
| Version or Alias | The function version or alias. | LATEST |
| Function Invocation Method | Sync Invocation or Async Invocation. For details, see Function invocation. | Sync Invocation |
| Request Load | The payload that triggers the function, in YAML or JSON format. | See the JSON sample below. |
| Next State | The state to transition to after this one completes. Takes effect immediately. | Parallel |
YAML invocation sample:
invocationType: Sync
resourceArn: acs:fc:cn-beijing:1034354682****:functions/GPU-demo/LATEST
body:
  key: value
JSON payload sample:
{
  "key1": "value1",
  "key2.$": "$.myStateInput.key",
  "key3": 100
}
Input settings
Control how input data is passed to the state:
| Option | Description |
|---|---|
| Use JSONPath to select some parameters | Enter a JSONPath expression to extract specific fields from the input as the state input. |
| Original inputs as node inputs | Pass the full input directly to the state without filtering. |
| Use parameter filters to construct parameters | Build new input parameters in YAML or JSON format. |
Parameter filter example:
FieldA: 123
FieldB: string
FieldC.$: $Input
Output settings
Control how output data is passed downstream:
| Option | Description |
|---|---|
| Use JSONPath to select some parameters | Enter a JSONPath expression to extract specific fields from the output. |
| Pass raw inputs to outputs | Forward the original input as the state output instead of using the execution result. |
| Use parameter filters to construct parameters | Build new output parameters in YAML or JSON format. |
Troubleshooting
Configure retry and error capture policies for the state.
Retry upon Error
Click Add Retry to define retry policies. Each policy includes:
| Parameter | Description | Example |
|---|---|---|
| Error Type | One or more error types to match. | FC.BadResponse |
| Maximum Retries | Maximum number of retry attempts. | 5 |
| Retry Interval Seconds | Seconds between retries. Maximum: 86400. | 3 |
| Backoff Multiplication Factor | Multiplier applied to the retry interval after each attempt. | 1 |
| Maximum Backoff Seconds | Upper limit for the retry interval during exponential backoff. | 5 |
Capture errors and exceptions
Click Add Capture Rule to define error recovery rules. When a matching error occurs, the workflow transitions to the specified fallback state:
| Parameter | Description | Example |
|---|---|---|
| Error Type | One or more error types to match. | FC.EntityTooLarge |
| Fallback Status | The state to transition to when the error is caught. | Hello World |
| Response | The result returned when the error is caught. This value is added to the input of the fallback state. Supports YAML or JSON format. | {"key": "hello world"} |
YAML mode
YAML mode provides a code editor alongside a real-time visualization pane. The Edit Workflow page contains four sections:
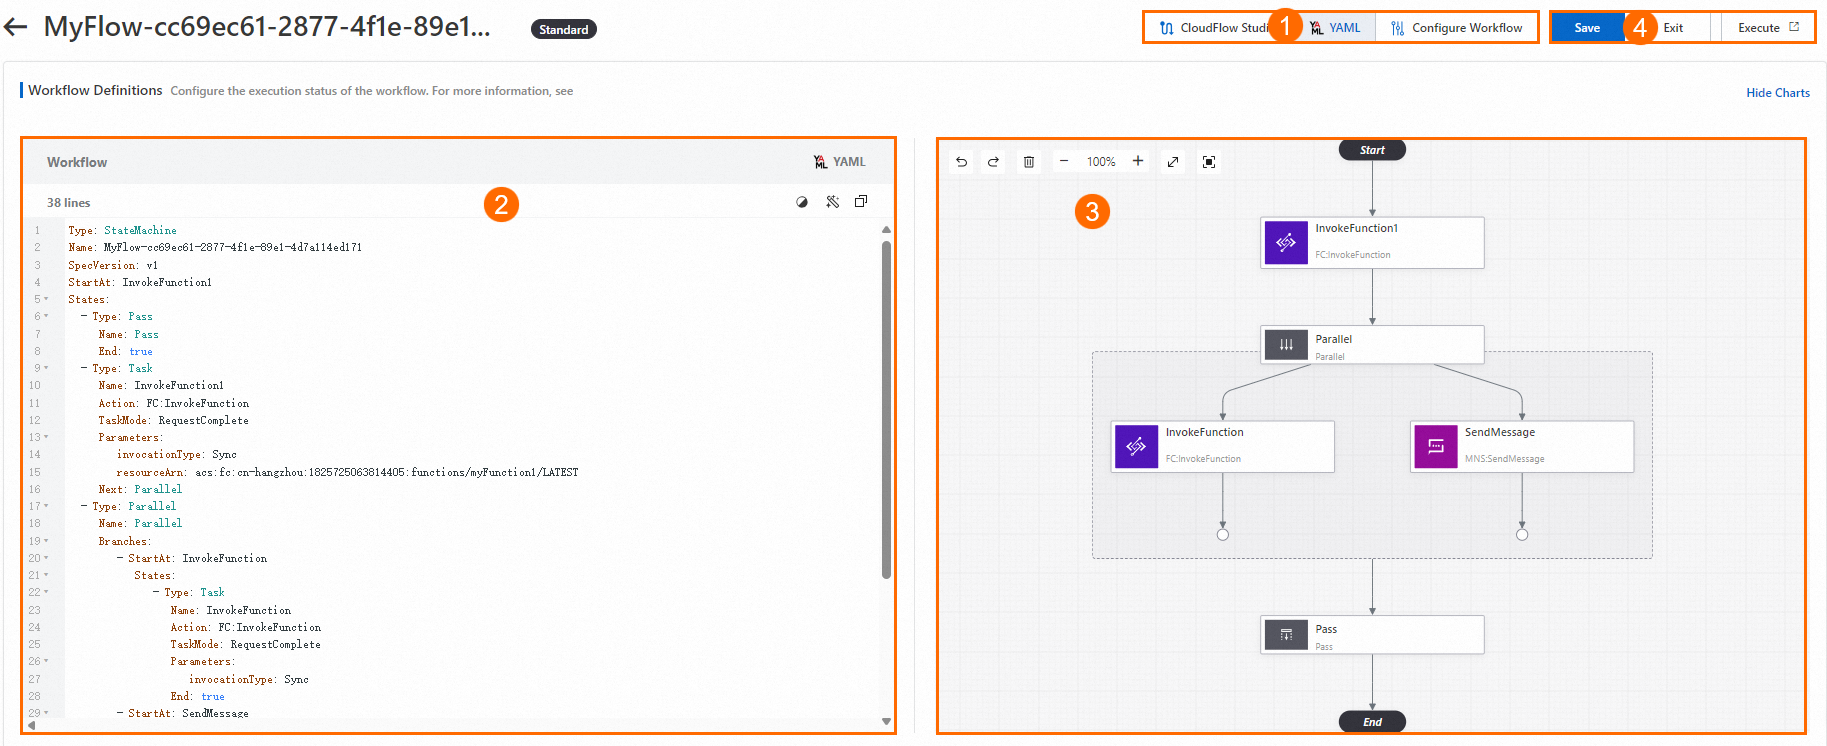
| Section | Description |
|---|---|
| 1 - Menu bar | Switch between the CloudFlow Studio, YAML, and Configure Workflow modes. |
| 2 - YAML editor | Write and edit workflow definitions in YAML format. |
| 3 - Visualization pane | Displays a real-time flowchart of your workflow definition. You can also delete states from this pane. |
| 4 - Function button section | Save, Exit, and Execute the workflow. |
YAML editor
The YAML editor supports writing and editing workflow definitions directly. Changes sync bidirectionally:
Code to visual: When you update the YAML definition, the visualization pane renders the updated flowchart in real time. The updated flowchart is also reflected on the CloudFlow Studio tab.
Visual to code: When you reorder, delete, or add a state on the CloudFlow Studio tab or delete a state in the visualization pane, the YAML code updates automatically.
Visualization pane
The visualization pane shows the overall structure of your workflow in real time. As you write or edit the YAML definition, the flowchart updates automatically.
If the YAML definition contains syntax errors, the visualization pane pauses rendering until the errors are resolved.
Configure Workflow mode
Configure Workflow mode lets you set workflow metadata and assign an execution role. The Edit Workflow page contains four sections:
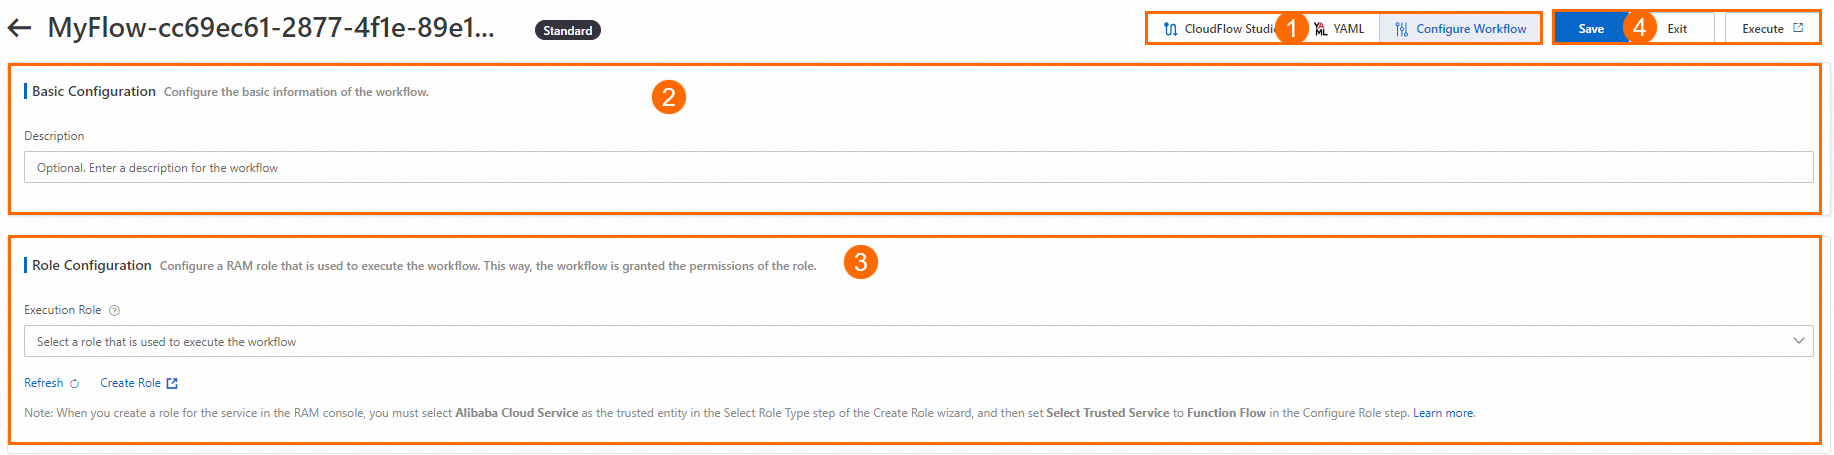
| Section | Description |
|---|---|
| 1 - Menu bar | Switch between the CloudFlow Studio, YAML, and Configure Workflow modes. |
| 2 - Basic Configuration | Enter a description for the workflow. This description appears in the workflow list. |
| 3 - Role Configuration | Assign an execution role that grants the permissions your workflow needs to run. |
| 4 - Function button section | Save, Exit, and Execute the workflow. |
Role Configuration
Two options are available:
Select an existing execution role -- Choose a role from the drop-down list. Make sure the attached policy includes the permissions required by your workflow states.
Create Role -- Click Create Role to open the Roles page in the Resource Access Management (RAM) console. For details, see the "Create an execution role" section in Create execution roles.