Attack path analysis maps the access relationships between your Alibaba Cloud resources and surfaces chained permission risks that could let an attacker move from an exposed entry point to a critical target. For example, a compromised ECS instance that holds a RAM role with access to OSS buckets represents a multi-hop attack path. Security Center visualizes these paths and generates remediation suggestions so you can close dangerous permission chains before they are exploited.
Prerequisites
Before you begin, ensure that you have:
Purchased the Cloud Security Posture Management (CSPM) feature (subscription or pay-as-you-go billing). Attack path analysis does not consume your CSPM quota.
For details on purchasing CSPM, see Authorization and purchase.
How it works
Attack path analysis does not alert on individual risks in isolation. Instead, it correlates multiple permission relationships across your resources and generates an alert only when a chain of weak signals — taken together — creates an exploitable path from an entry point to a sensitive target.
An attack path starts at an entry point (an intruded asset) and ends at a targeted asset. The path is detected only when:
The entry point meets at least one vulnerable condition (see Supported assets).
A permission chain connects the entry point to a sensitive target (see Configure sensitive assets).
The chain falls into one of the four attack path types.
Security Center scans for attack paths once per day automatically, and you can trigger a manual scan at any time.
Supported assets
Entry points (intruded assets):
ECS instances
RAM roles
AccessKey IDs
An entry point triggers an alert only if at least one of the following conditions is met:
An urgent vulnerability is detected on an ECS instance.
An ECS instance is exposed to the Internet and at least one risk is detected on it.
An urgent alert is generated on an ECS instance and is displayed on the Assets > Host page.
An urgent alert of the Cloud Workload Protect Platform (CWPP) type is generated on the AccessKey pair of a RAM role.
A RAM role can be assumed across accounts.
Targeted assets:
ECS instances
Alibaba Cloud accounts
RAM users
RAM policies
RAM user groups
RAM roles
OSS buckets
Attack path types
Security Center detects four attack path types. Each type covers a set of specific permission scenarios.
Abnormal AccessKey pair
Scenarios where a RAM user with an abnormal AccessKey pair has elevated permissions:
The RAM user can manage RAM.
The RAM user has administrative rights.
Sensitive asset
Scenarios where an attacker can reach a configured sensitive asset:
A role assigned to an ECS instance can access a sensitive asset.
A RAM user with an abnormal AccessKey pair can access a sensitive asset.
A role can access a sensitive asset and be assumed by other Alibaba Cloud accounts.
If no sensitive assets are configured, no attack path is detected after the scan is complete. See Configure sensitive assets.
Privilege escalation by role
Scenarios where an ECS instance or a cross-account role escalates privileges using RAM role permissions:
An ECS instance gets administrative rights via its assigned RAM role.
An ECS instance manages RAM via its assigned role.
An ECS instance escalates privileges by attaching, modifying, or changing the default version of policies on its assigned role.
An ECS instance escalates privileges by changing its own role binding.
An ECS instance gets long-term credentials by creating AccessKey pairs or enabling console logon for RAM users.
An ECS instance escalates privileges by modifying the logon settings, policies, or user group of a RAM user.
An ECS instance escalates privileges by modifying a high-risk trust policy.
An ECS instance escalates privileges by modifying or assuming a role that a RAM user can assume.
An ECS instance escalates privileges by assuming a role that its assigned role can assume.
An ECS instance escalates privileges by getting high-risk permissions from the role assigned to another ECS instance.
A role with administrative rights, RAM management permissions, or high-risk permissions can be assumed by other Alibaba Cloud accounts.
A role can escalate privileges by attaching or modifying its own policies and can be assumed by other Alibaba Cloud accounts.
Privilege escalation by user
Scenarios where a RAM user escalates privileges using direct or indirect ECS-based access:
A RAM user escalates privileges by attaching or modifying policies on itself.
A RAM user escalates privileges by attaching or modifying policies on its user group.
A RAM user escalates privileges by modifying the trust policy of a role and then assuming it.
A RAM user escalates privileges by running commands on an ECS instance to get a role's permissions.
A RAM user escalates privileges by sending files from an ECS instance to get a role's permissions.
A RAM user escalates privileges by starting a web shell console session on an ECS instance.
A RAM user escalates privileges by resetting an ECS instance password.
A RAM user escalates privileges by binding an SSH key pair to a Linux server.
A RAM user escalates privileges by creating an ECS instance and assigning its role to themselves.
A RAM user escalates privileges by modifying the role binding configuration of an ECS instance.
Configure sensitive assets
Attack path scans look for paths that lead to your configured sensitive assets. Without this configuration, the scan does not detect attack paths.
Log on to the Security Center console. In the top navigation bar, select China as the region.
In the left-side navigation pane, choose Risk Governance > Cloud Security Posture Management.
On the Attack Path tab, click Policy Management in the upper-right corner, or click Scan Configuration in the Attack Path section.
On the Sensitive Asset to Scan tab, click an asset type on the left, then select the assets on the right.
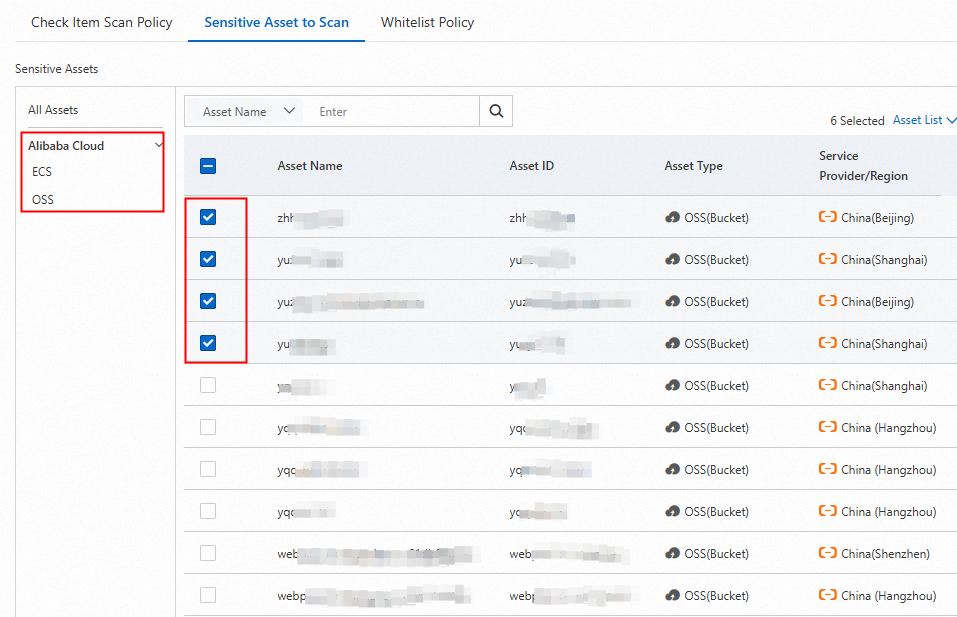
Click OK.
Configure a whitelist rule
If specific attack paths between known entry points and targets are acceptable in your environment, add them to a whitelist rule. Security Center stops scanning for and alerting on whitelisted paths.
On the Attack Path tab, click Policy Management in the upper-right corner, or click Scan Configuration in the Attack Path section.
On the Whitelist Rule tab, click the By Attack Path tab.
Click Create Whitelist Rule. In the panel that appears, configure the parameters and click OK.
Parameter Description Whitelist name A name for the whitelist rule. Supports letters, digits, and underscores (_). Attack path type The attack path type to suppress. Valid values: Abnormal AccessKey Pair, Sensitive Asset, Privilege Escalation by Role, Privilege Escalation by User. Attack path A specific attack path of the selected type. Asset scope The assets to apply the rule to. Select All Assets or Specific Assets. If you select Specific Assets, also select the entry points and targets to suppress.
Run an attack path scan
Automatic scanning
Security Center runs an attack path scan once per day automatically.
If no sensitive assets are configured, the scan does not detect attack paths.
Whitelisted attack paths are excluded from scan results and do not generate alerts.
Run a manual scan
On the Attack Path tab, click Quick Scan in the Attack Path Scan section.
View scan task history
The Task Management panel shows records for the previous seven days, including both automatic and manual scans.
In the upper-right corner of the Cloud Security Posture Management page, click Task Management.
In the Attack Path panel, review the task details.
Field Description Task ID Unique identifier of the scan task. Task type Whether the task was automatic or manual. Start time/End time When the task started and finished. Status Started, Complete, Timed Out, Handling, or Failed. Progress Percentage of assets scanned. 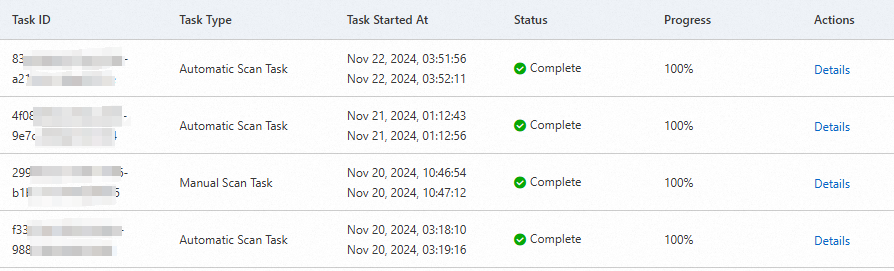
Find a task and click Details in the Actions column to view asset-level results: number of vulnerable assets, number of attack paths detected, number of assets successfully scanned, number of assets that failed, and the full asset list. Filter results by task status, asset type, or asset ID.

View and handle attack paths
View the attack path list
The Attack Path tab displays all detected attack paths. The statistics are automatically refreshed on a daily basis and displayed at the top of the page.
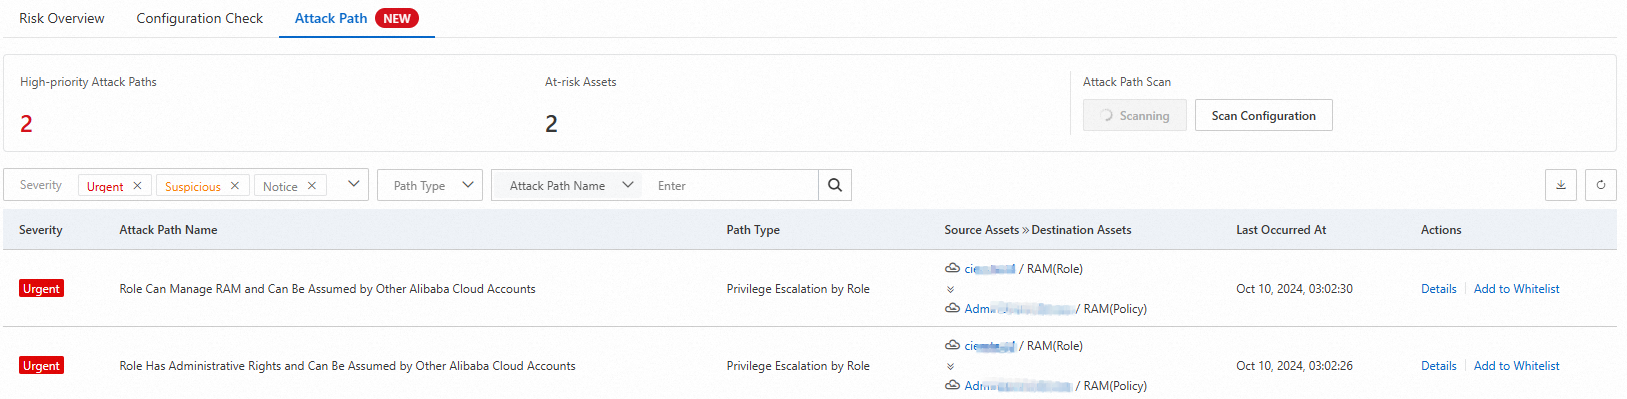
| Statistical item | Description |
|---|---|
| High-priority Attack Paths | The total number of high-priority attack paths. |
| At-risk Assets | The total number of vulnerable assets that involve attack paths. |
| Attack path information | The list of alerts triggered by attack paths, including attack path names, path types, intruded assets, and targeted assets. |
The attack path list shows the following fields:
| Field | Description |
|---|---|
| Severity | Priority of the attack path: Urgent (red), Suspicious (orange), or Notice (gray). |
| Attack path name | Name of the detected attack path. |
| Path type | Abnormal AccessKey Pair, Sensitive Asset, Privilege Escalation by Role, or Privilege Escalation by User. |
| Intruded asset and targeted asset | The entry point and target connected by the attack path. |
| Last occurred at | The time when the attack path was last detected. |
View attack path details
Find an attack path and click Details in the Actions column.
The details panel contains the following sections:
Basic information: priority, attack path type, time first detected, and time last detected.
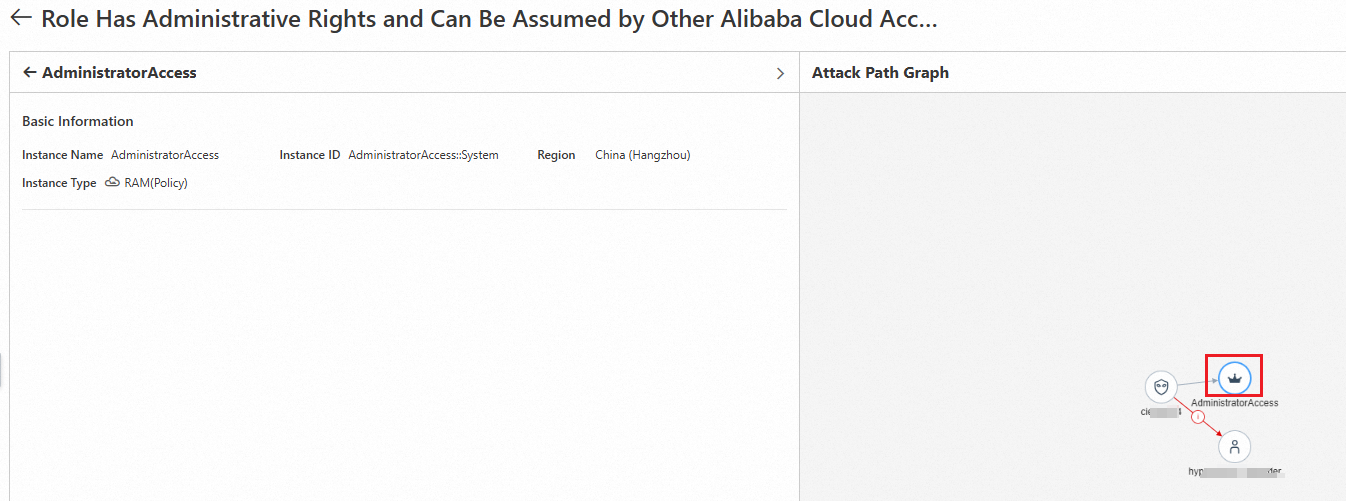
Intruded asset and asset type / Targeted asset and asset type: instance IDs and types of the intruded and targeted assets. Click an instance ID to go to the asset's details page in the Assets module.
Attack path information: the logic used to detect the attack path.
Solution: suggestions and instructions for remediating the attack path.
Attack path graph: a visual map of the relationships between affected assets.
Work with the attack path graph
The attack path graph lets you trace the permission chain visually and navigate directly to affected resources.
Red lines indicate risks between nodes. Click a red line to view fix suggestions for that risk.
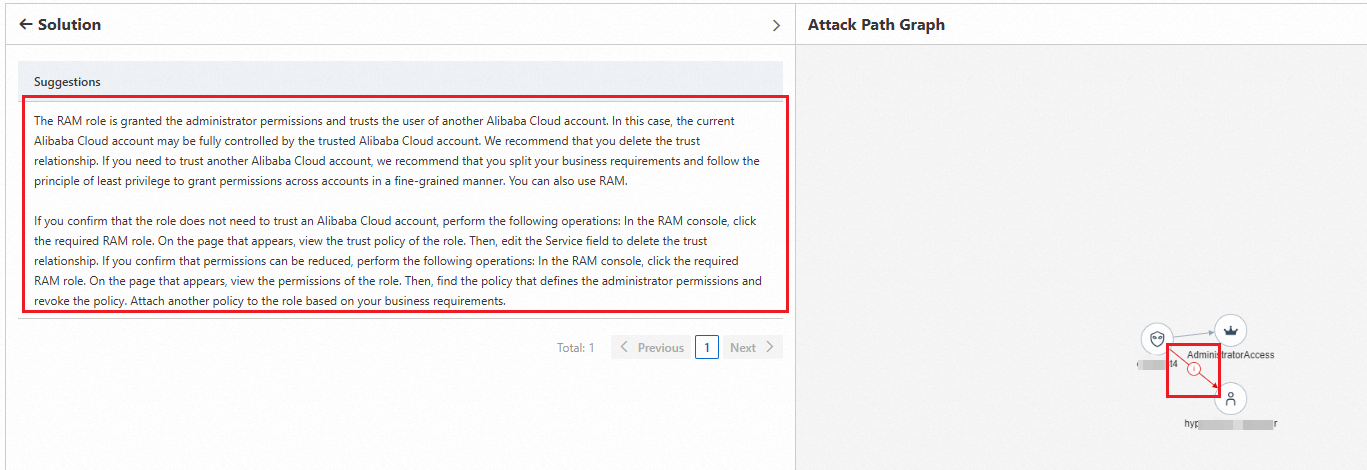
Nodes represent assets. Click a node to view its basic information and related vulnerabilities.
Click the
 icon in the upper-right corner to view the legend of node icons and their descriptions.
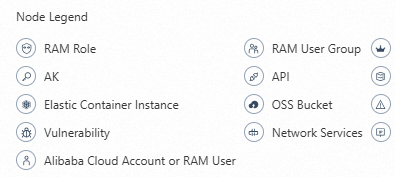
Click the
 icon in the upper-right corner to change the graph layout.
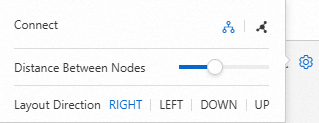
Click the
 icon in the upper-right corner to download the graph. Share the downloaded graph with security administrators to improve traceability and analysis efficiency.
Add an attack path to the whitelist
If a detected attack path is acceptable and you want to suppress it in future scans, add it to a whitelist rule directly from the results list.
On the Attack Path tab, find the attack path and click Add to Whitelist in the Actions column.
Enter a name in the Whitelist Name field and select an asset scope:
All Assets: suppresses detection and alerts for this attack path across all assets, including assets added in the future.
Current Asset: suppresses detection and alerts only for the current intruded asset and targeted asset.
Click OK.
To view existing whitelist rules, go to the By Attack Path tab under Whitelist Rule in the Policy Management panel.
Next steps
To handle vulnerabilities detected on entry-point assets, see View and handle vulnerabilities and Fix vulnerabilities.
To handle urgent alerts on assets involved in attack paths, see View and handle alerts.