Security Center allows you to add self-managed Kubernetes clusters to Security Center for centralized management and risk detection. This topic describes how to add a self-managed Kubernetes cluster to Security Center.
Edition requirements
Subscription service: Ultimate (If your current version is unsupported, you must upgrade).
NoteThe server's protection edition must be set to Ultimate. For more information, see Attach a protection edition to a server.
Pay-as-you-go service: The pay-as-you-go service is enabled for Host and Container Security. If not, see Purchase.
NoteYou must set the server protection level to Host and Container Protection. For more information, see Attach a server protection level.
Limits
Self-managed Kubernetes clusters must reside in supported regions.
If a self-managed Kubernetes cluster that you want to add is deployed in a virtual private cloud (VPC), the cluster must reside in the China (Hangzhou), China (Beijing), China (Shanghai), China (Shenzhen), or China (Hong Kong) region.
If a self-managed Kubernetes cluster that you want to add is deployed on the Internet, no limits are imposed on the region of the cluster.
Prerequisites
A Kubernetes cluster is created on your server.
Docker is installed.
To use the cluster exposure analysis feature, you must also perform the following network configurations based on your cluster deployment method and access control policy. For more information, see Manage clusters and images.
If your self-managed Kubernetes cluster is deployed on a hybrid cloud and is not accessible over the Internet, traffic forwarding rules are configured and the network connection is normal.
If access control policies are configured for your cluster, make sure that the IP addresses that correspond to the region of your container are added to the whitelist.
Add a self-managed Kubernetes cluster to Security Center
Log on to the Security Center console. In the top navigation bar, select the region of the asset that you want to manage. You can select China or Outside China.
In the left-side navigation pane, choose .
On the Cluster tab, click Self-built cluster access.
In the Self-built cluster management panel, click Self-built cluster access. In the panel that appears, configure the cluster that you want to add to Security Center and click Generate Command.
Parameter
Description
Cluster name
Enter the name of the self-managed Kubernetes cluster. Example: text-001.
Expiration Time
Select the expiration time of the command that is used to add the self-managed Kubernetes cluster.
Group
Select the group to which you want to add the cluster. Set this parameter to the group of the server on which the cluster is created.
Service Provider
Select the provider of the server on which the cluster is created.
Optional. In the Enable Log Collection section, specify whether to enable log-based threat detection for the Kubernetes cluster.
After you enable log-based threat detection, Security Center collects more audit logs for further risk detection. Before you enable log-based threat detection, you must install the Logtail components on the Kubernetes cluster and configure audit-related settings. For more information, see Enable log-based threat detection.
Log on to the server on which the cluster is created, create a YAML file named text-001 on the server, copy the generated command to the file, and run the
kubectl apply -f text-001.yamlcommand on the server. Then, the cluster is added to Security Center.The command generated in Step 4 does not add Master and taint nodes by default. If you need to add Master and taint nodes, you can modify the YAML file configuration based on the following instructions.
After the self-managed Kubernetes cluster is added to Security Center, you can view the cluster information in the cluster list on the Cluster tab.
Enable log-based threat detection
If the Kubernetes version of the cluster is 1.16 or later, you can enable log-based threat detection for more comprehensive risk detection on the cluster. Risks such as high-risk operations and attack behavior can be detected.
Step 1. Install the Logtail components
For specific instructions, see Install Logtail in Install Logtail components in a self-managed Kubernetes cluster.
Step 2. Enable the cluster audit feature
The following procedure is for reference only. For more information, see Enable cluster auditing for clusters.
Create a registered cluster and add the self-managed Kubernetes cluster to the registered cluster. For more information, see Create ACK One registered clusters.
Configure the audit-policy.yaml file for master nodes.
Log on to a master node and modify the /etc/kubernetes/audit-policy.yaml file based on the following template. You must also perform this step on the other master nodes.
NoteIf the Kubernetes version of the cluster is earlier than 1.24, set
apiVersiontoaudit.k8s.io/v1beta1. Otherwise, setapiVersiontoaudit.k8s.io/v1. For more information, see (Discontinued) Kubernetes 1.24.apiVersion: audit.k8s.io/v1beta1 kind: Policy # Don't generate audit events for all requests in RequestReceived stage. omitStages: - "RequestReceived" rules: # The following requests were manually identified as high-volume and low-risk, # so drop them. - level: None users: ["system:kube-proxy"] verbs: ["watch"] resources: - group: "" # core resources: ["endpoints", "services"] - level: None users: ["system:unsecured"] namespaces: ["kube-system"] verbs: ["get"] resources: - group: "" # core resources: ["configmaps"] - level: None users: ["kubelet"] # legacy kubelet identity verbs: ["get"] resources: - group: "" # core resources: ["nodes"] - level: None userGroups: ["system:nodes"] verbs: ["get"] resources: - group: "" # core resources: ["nodes"] - level: None users: - system:kube-controller-manager - system:kube-scheduler - system:serviceaccount:kube-system:endpoint-controller verbs: ["get", "update"] namespaces: ["kube-system"] resources: - group: "" # core resources: ["endpoints"] - level: None users: ["system:apiserver"] verbs: ["get"] resources: - group: "" # core resources: ["namespaces"] # Don't log these read-only URLs. - level: None nonResourceURLs: - /healthz* - /version - /swagger* # Don't log events requests. - level: None resources: - group: "" # core resources: ["events"] # Secrets, ConfigMaps, and TokenReviews can contain sensitive & binary data, # so only log at the Metadata level. - level: Metadata resources: - group: "" # core resources: ["secrets", "configmaps"] - group: authentication.k8s.io resources: ["tokenreviews"] # Get repsonses can be large; skip them. - level: Request verbs: ["get", "list", "watch"] resources: - group: "" # core - group: "admissionregistration.k8s.io" - group: "apps" - group: "authentication.k8s.io" - group: "authorization.k8s.io" - group: "autoscaling" - group: "batch" - group: "certificates.k8s.io" - group: "extensions" - group: "networking.k8s.io" - group: "policy" - group: "rbac.authorization.k8s.io" - group: "settings.k8s.io" - group: "storage.k8s.io" # Default level for known APIs - level: RequestResponse resources: - group: "" # core - group: "admissionregistration.k8s.io" - group: "apps" - group: "authentication.k8s.io" - group: "authorization.k8s.io" - group: "autoscaling" - group: "batch" - group: "certificates.k8s.io" - group: "extensions" - group: "networking.k8s.io" - group: "policy" - group: "rbac.authorization.k8s.io" - group: "settings.k8s.io" - group: "storage.k8s.io" # Default level for all other requests. - level: MetadataConfigure the kube-apiserver.yaml file for master nodes.
Log on to a master node and modify the /etc/kubernetes/manifests/kube-apiserver.yaml file based on the following description. You must also perform this step on the other master nodes.
Add
--audit-log-*parameters to the command section:... spec: containers: - command: - kube-apiserver - --audit-log-maxbackup=10 - --audit-log-maxsize=100 - --audit-log-path=/var/log/kubernetes/kubernetes.audit - --audit-log-maxage=30 - --audit-policy-file=/etc/kubernetes/audit-policy.yaml ...Add the
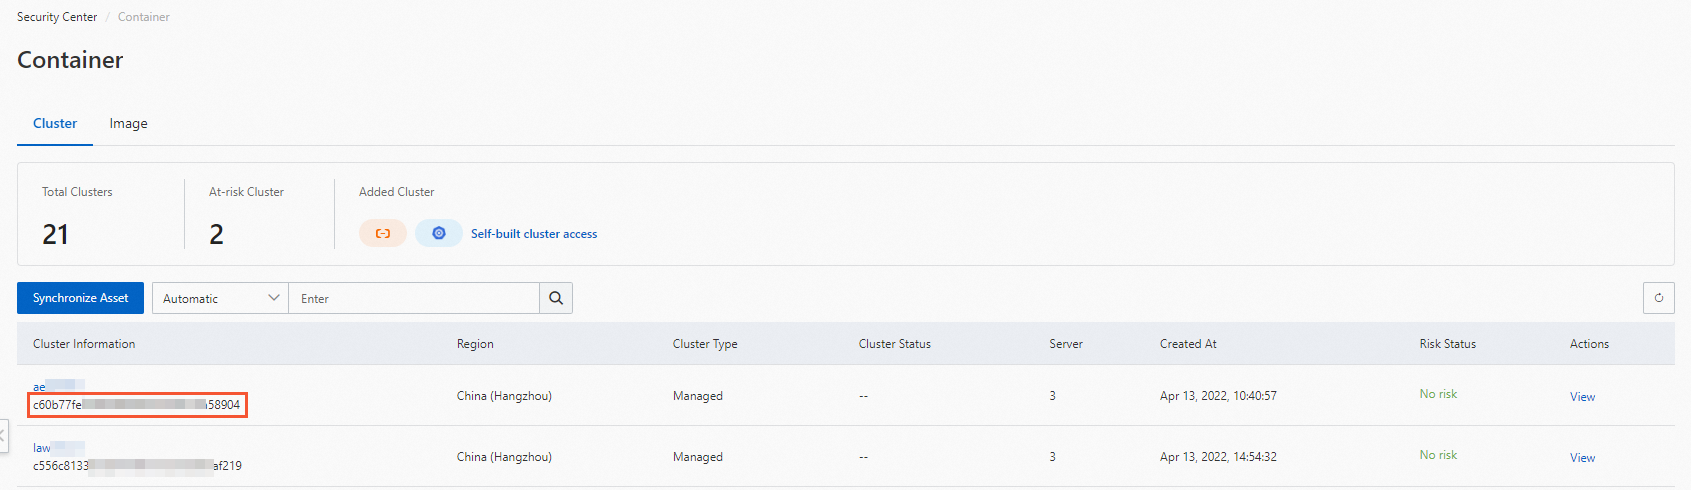
aliyun_logs_audit-*parameters to the env section.You must replace {cluster_id} with the ID of your cluster. To obtain the ID of your cluster, perform the following operations: Log on to the Security Center console and open the Cluster tab on the Container page. The following figure shows how to obtain the ID of your cluster.
... spec: containers: - command: - kube-apiserver - --audit-log-maxbackup=10 - --audit-log-maxsize=100 - --audit-log-path=/var/log/kubernetes/kubernetes.audit - --audit-log-maxage=30 - --audit-policy-file=/etc/kubernetes/audit-policy.yaml ... ... env: - name: aliyun_logs_audit-${cluster_id} value: /var/log/kubernetes/kubernetes.audit - name: aliyun_logs_audit-${cluster_id}_tags value: audit=apiserver - name: aliyun_logs_audit-${cluster_id}_product value: k8s-audit - name: aliyun_logs_audit-${cluster_id}_jsonfile value: "true" image: registry-vpc.cn-shenzhen.aliyuncs.com/acs/kube-apiserver:v1.20.4-aliyun.1Use the following template to mount /etc/kubernetes/audit-policy.yaml to the pods of kube-apiserver:
... spec: containers: - command: - kube-apiserver - --audit-log-maxbackup=10 - --audit-log-maxsize=100 - --audit-log-path=/var/log/kubernetes/kubernetes.audit - --audit-log-maxage=30 - --audit-policy-file=/etc/kubernetes/audit-policy.yaml ... ... env: - name: aliyun_logs_audit-${cluster_id} value: /var/log/kubernetes/kubernetes.audit - name: aliyun_logs_audit-${cluster_id}_tags value: audit=apiserver - name: aliyun_logs_audit-${cluster_id}_product value: k8s-audit - name: aliyun_logs_audit-${cluster_id}_jsonfile value: "true" image: registry-vpc.cn-shenzhen.aliyuncs.com/acs/kube-apiserver:v1.20.4-aliyun.1 ... ... volumeMounts: - mountPath: /var/log/kubernetes name: k8s-audit - mountPath: /etc/kubernetes/audit-policy.yaml name: audit-policy readOnly: true ... ... volumes: - hostPath: path: /var/log/kubernetes type: DirectoryOrCreate name: k8s-audit - hostPath: path: /etc/kubernetes/audit-policy.yaml type: FileOrCreate name: audit-policy ...
Step 3. Check whether logs are collected
Log on to the Simple Log Service console.
Click the name of the required project.
Check whether related logs are collected to the specified Logstore in the project.
Step 4. Enable threat detection
Log on to the Security Center console. In the top navigation bar, select the region of the asset that you want to manage. You can select China or Outside China.
In the left-side navigation pane, choose .
On the Cluster tab, click Self-built cluster access.
Find the required self-managed Kubernetes cluster and click Edit in the Actions column.
On the Enable Log Collection tab, select Enable Kubernetes Log Reporting to Detect Threats, configure the following parameters, and then click Save.
Region of Log Audit Service: Select the region in which you want to store logs.
Project of Log Audit Service: Enter the name of the project that you created in Step 1. Install the Logtail components. Example: k8s-log-custom-sd89ehdq.
Logstore of Log Audit Service: Enter the name of the Logstore that is automatically created in Step 1. Install the Logtail components. Example: audit-027b007a7dd11967a9f7e2449d8dc497.