To remotely diagnose applications that are deployed in Serverless App Engine (SAE), you can use the remote debugging feature of SAE. This topic describes how to perform remote debugging using a jump server and OpenSSH.
Prerequisites
Background information
A jump server is a server that you can use to access other servers. In SAE, a jump server establishes a network connection between on-premises devices and remote SAE application instances for remote management over the Secure Shell (SSH) protocol. SAE provides namespace-level jump servers. After you attach a jump server to the same Virtual Private Cloud (VPC) as the namespace, you can log on to all application instances in the namespace with a few clicks. This lets you access and debug the SAE application instances from your on-premises devices.
Remote debugging is intended for temporary use only. If you enable remote debugging for an extended period, you may be exposed to risks such as data breaches. After you complete the remote diagnostics tasks, delete the jump server to disable remote debugging.
Step 1: Configure a jump server
Log on to the SAE console.
In the left-side navigation pane, click Namespaces. In the top navigation bar, select a region. Then, click the name of a namespace.
On the Basic Information tab, find the Jump Server Information section and click Add Jump Server.
In the Add Jump Server panel, configure the parameters.
On the Configure Jump Server Creation Information page, configure the parameters and click Next.
Configuration item
Description
VPC
The VPC is the same as the one attached to the target SAE application and is automatically populated.
vSwitch
You must specify at least one vSwitch. We recommend that you specify no more than three vSwitches. Click Modify. In the Select VSwitch dialog box, view and select a vSwitch in a recommended zone.
Security group
Make sure that the selected security group has a custom inbound rule that allows TCP port 22 (the SSH port).
SSH certificate
In the code editor, enter the SSH certificate or click Select File to upload an SSH certificate.
Run the
ssh-keygen -t rsa -b 4096 -C "your_email@example.com"command to generate an SSH certificate. For more information about generating an SSH certificate, see Generating a new SSH key and adding it to the ssh-agent.In the Create Jump Server Resource step, confirm the configuration and click OK.
The system automatically creates a jump server instance with a 0.5-core CPU and 1 GiB of memory and an Elastic IP Address (EIP) for the specified VPC and vSwitch in the current namespace. You are charged based on the usage duration. For more information, see SAE pay-as-you-go and EIP pay-as-you-go.
After the jump server is created, you can view its network configuration details on the Basic Information tab, such as the Elastic IP Address, VPC, vSwitch, and security group.
Step 2: Install OpenSSH
You can install OpenSSH to log on over the SSH protocol and upload or download files over the SFTP or SCP protocol. This lets you easily perform temporary debugging on an SAE application instance. For more information, see Copy a command to install O&M components.
Log on to the SAE console.
In the left-side navigation pane, click Applications. In the top navigation bar, select a region. Then, click the name of an application.
On the Basic Information page, click the Instance Deployment Information tab. In the Default Group section, find the target instance and click Webshell in the Actions column.
Click the
 icon in the upper right corner of the webshell window.
 In the Copy Command dialog box, select the Install OpenSSH check box, preview the command, and then click Copy.
In the Webshell window, run the following commands to configure OpenSSH:
Run the copied OpenSSH installation command.
Run the passwd command to configure the instance password for logging on.
Step 3: Perform remote debugging
After you enable remote debugging, you can use the remote debugging IP address and port that you obtained to perform remote debugging from a host that has an SSH client and can access the internet. The following scenarios describe how to verify the remote debugging connection.
Scenario 1: Access an SAE application instance from an on-premises device
Run the following command:
ssh root@{IP address of the SAE application instance} -J root@{IP address of the jump server}Scenario 2: Map a specific port of an SAE application instance to a local port
Run the following command:
ssh -L {Local debugging port}:{SAE application instance IP}:{SAE application instance port} root@{Jump server IP} -NScenario 3: Perform remote debugging using a Java application
Log on to the SAE console.
In the left-side navigation pane, click Applications. In the top navigation bar, select a region. Then, click the name of an application.
In the upper-right corner of the Basic Information page, click Deploy Application.
On the Deploy Application page, expand the Startup Command Settings section and configure the startup command. After you configure the command, click Confirm.
The required startup command parameters depend on the Application Deployment Method that you selected when you created the Java application.
ImportantAfter you click Confirm, the application is restarted. To prevent unexpected errors, we recommend that you deploy applications during off-peak hours.
Image
In this example, the
ENTRYPOINT: [nginx, '-g', 'daemon off;']command is configured. The following table describe the parameters in the command.Parameter
Description
Startup Command
Enter a startup command. Example:
nginx.Startup Parameter
Enter a startup parameter. Example:
-g.Click + Add to add a parameter in a new line. Example:
daemon off.JAR package
Parameter
Description
Default Startup Command
The default startup command that is provided by SAE.
options Settings
The JVM parameters. For more information, see JVM options, Tuning Java Virtual Machines, and JVM Tuning: How to Prepare Your Environment for Performance Tuning.
If you want to use the remote debugging feature of the application, configure the following command according to the JDK version:
JDK 11 and JDK 17
-agentlib:jdwp=transport=dt_socket,address=*:9000,server=y,suspend=nOther JDK versions
-agentlib:jdwp=transport=dt_socket,address=9000,server=y,suspend=n
where:
transport: the method that is used to transmit data during remote debugging.
address: the IP address of the client from which the O&M engineer performs remote debugging. Use the port that you specified when you enabled remote debugging. For more information, see Perform remote debugging.
ImportantThe startup command that is used when you deploy an application by using a WAR package is different from the startup command that is used when you deploy an application by using a JAR package. We recommend that you do not use the same startup command when you deploy applications by using different methods. You can use the preceding remote debugging command to debug an application regardless of whether you use a WAR package or a JAR package to deploy the application.
args Settings
The redirection parameter for standard output (stdout) and standard errors (stderr). Example:
1>>/tmp/std.log>&1.options Shortcut Settings
This parameter is available only if you set the Java Environment parameter to Dragonwell.
Enable Performance Improvement for Microservices (Wisp2 Coroutine): By default, this feature is enabled. This feature improves the performance of multiple threads at runtime.
Enable Application Memory Optimization (G1): By default, this feature is enabled. This feature reduces the GC time in scenarios in which multiple CPUs and large-capacity memory are required. This feature is also suitable for GC optimization and big data scenarios.
Enable Application Startup Acceleration (Quickstart): This parameter is available only if you set the Java Environment parameter to Dragonwell 11. You can select Enable Application Startup Acceleration (Quickstart) and configure the Persistent Storage Directory parameter to improve the application startup efficiency.
ImportantBefore you select Enable Application Startup Acceleration (Quickstart), you must configure a File Storage NAS file system. For more information, see Configure NAS storage.
Persistent Storage Directory: This parameter is required if you select Enable Application Startup Acceleration (Quickstart). To accelerate application startup across instances, we recommend that you set the Persistent Storage Directory parameter to the directory or subdirectory of the NAS file system. For information about how to configure a NAS file system, see Configure NAS storage.
WAR package
Parameter
Description
Default Startup Command
The default startup command that is provided by SAE.
options Settings
The JVM parameters. For more information, see JVM options, Tuning Java Virtual Machines, and JVM Tuning: How to Prepare Your Environment for Performance Tuning.
If you want to use the remote debugging feature of the application, configure the following command according to the JDK version:
JDK 11 and JDK 17
-agentlib:jdwp=transport=dt_socket,address=*:9000,server=y,suspend=nOther JDK versions
-agentlib:jdwp=transport=dt_socket,address=9000,server=y,suspend=n
where:
transport: the method that is used to transmit data during remote debugging.
address: the IP address of the client from which the O&M engineer performs remote debugging. Use the port that you specified when you enabled remote debugging. For more information, see Perform remote debugging.
ImportantThe startup command that is used when you deploy an application by using a WAR package is different from the startup command that is used when you deploy an application by using a JAR package. We recommend that you do not use the same startup command when you deploy applications by using different methods. You can use the preceding remote debugging command to debug an application regardless of whether you use a WAR package or a JAR package to deploy the application.
options Shortcut Settings
This parameter is available only if you set the Java Environment parameter to Dragonwell.
Enable Performance Improvement for Microservices (Wisp2 Coroutine): By default, this feature is enabled. This feature improves the performance of multiple threads at runtime.
Enable Application Memory Optimization (G1): By default, this feature is enabled. This feature reduces the GC time in scenarios in which multiple CPUs and large-capacity memory are required. This feature is also suitable for GC optimization and big data scenarios.
Enable Application Startup Acceleration (Quickstart): This parameter is available only if you set the Java Environment parameter to Dragonwell 11. You can select Enable Application Startup Acceleration (Quickstart)and configure the Persistent Storage Directory parameter to improve the application startup efficiency.
Important
Before you select Enable Application Startup Acceleration (Quickstart), you must configure a File Storage NAS file system. For more information, see Configure NAS storage.
Persistent Storage Directory: This parameter is required if you select Enable Application Startup Acceleration (Quickstart). To accelerate application startup across instances, we recommend that you set the Persistent Storage Directory parameter to the directory or subdirectory of the NAS file system. For information about how to configure a NAS file system, see Configure NAS storage.
Enable debugging for the desired SAE application instance by following the instructions in Step 1 and Step 2.
Run the following command to map a port of the SAE application instance to a local port:
ssh -L {Local debugging port}:{SAE application instance IP}:{SAE application instance port} root@{Jump server IP} -NConnect to
127.0.0.1:{Local debugging port}on your local machine to start debugging.
Delete a jump server
On the SAE namespace page, select the desired region from the top navigation bar, find the target namespace, and then click Delete Jump Server in the Jump Server Information column.
Follow the on-screen instructions to complete the operation.
More information
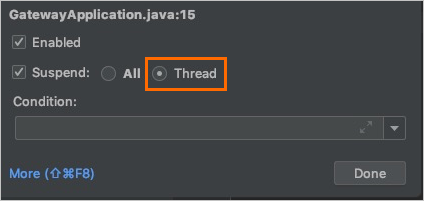
If you configure a health check for the Java remote debugging port, you must set the breakpoint suspension policy in IntelliJ IDEA to Thread during debugging. Otherwise, the health check fails. For more information, see Configure health checks.