Walk through the end-to-end setup of role-based single sign-on (SSO) from Shibboleth to Alibaba Cloud, including SAML metadata exchange, attribute mapping, and NameID configuration.
Before you begin
-
Install Shibboleth, Tomcat, and a Lightweight Directory Access Protocol (LDAP) server.
-
Configure the LDAP server.
For this example, add an administrator account to LDAP with the distinguished name (DN)
uid=admin,ou=systemand the passwordsecret.Add a test account to LDAP with the DN
cn=Test User,ou=users,dc=wimpi,dc=netand the passwordsecret. The account details are shown in the following figure.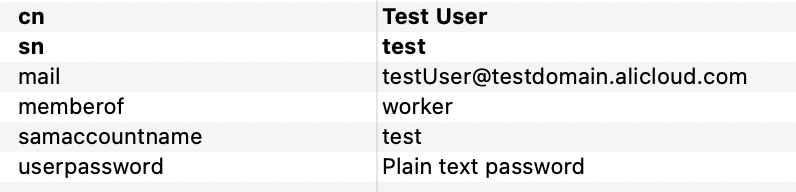
User information fields:
-
mail: Maps to the logon name of a RAM user in Alibaba Cloud.
-
memberof: Maps to a RAM role name in Alibaba Cloud.
-
samaccountname: The username used to log on to Shibboleth.
-
userpassword: The logon password.
-
-
Configure Shibboleth to connect to the LDAP server.
Modify the following settings in the
/opt/shibboleth-idp/conf/ldap.propertiesfile:# LDAP authentication mode idp.authn.LDAP.authenticator = bindSearchAuthenticator # LDAP server address idp.authn.LDAP.ldapURL = ldaps://[LDAP-server-address]:389 # Disable TLS and SSL idp.authn.LDAP.useStartTLS = false idp.authn.LDAP.useSSL = false # Base search directory idp.authn.LDAP.baseDN = dc=wimpi,dc=net idp.authn.LDAP.subtreeSearch = true # Logon matching rule. samaccountname is a field in the user data used for LDAP logon. idp.authn.LDAP.userFilter= (samaccountname={user}) # Admin account and password idp.authn.LDAP.bindDN = uid=admin,ou=system idp.authn.LDAP.bindDNCredential = secret idp.attribute.resolver.LDAP.searchFilter =(samaccountname=$resolutionContext.principal)
The Shibboleth configurations in this topic are for demonstration only, intended to illustrate the end-to-end process of setting up SSO with Alibaba Cloud. Alibaba Cloud does not provide consulting services for Shibboleth configuration.
Step 1: Obtain SAML service provider metadata
-
Log on to the RAM console as a RAM administrator.
-
In the left-side navigation pane, choose .
-
On the Role-based SSO tab, click the SAML tab and copy the Alibaba Cloud SAML service provider metadata URL.
-
Open the copied link in a new browser window and save the metadata file as
/opt/shibboleth-idp/metadata/aliyun-ram-role-metadata.xml.NoteRecord the value of the
entityIDattribute from theEntityDescriptorelement. This value is required for subsequent configuration in Shibboleth.
Step 2: Register Alibaba Cloud with Shibboleth
In /opt/shibboleth-idp/conf/metadata-providers.xml, specify the metadata file from Step 1: Obtain SAML service provider metadata to register Alibaba Cloud with Shibboleth.
<!--
    <MetadataProvider id="LocalMetadata"  xsi:type="FilesystemMetadataProvider" metadataFile="PATH_TO_YOUR_METADATA"/>
-->

<!-- Find the preceding commented-out code and replace it with the following code. -->

<MetadataProvider id="AliyunMetadata"  xsi:type="FilesystemMetadataProvider" metadataFile="%{idp.home}/metadata/aliyun-ram-role-metadata.xml"/>
Step 3: Obtain SAML IdP metadata
-
Restart Tomcat to apply your changes.
-
Access
https://<your server address>/idp/shibbolethand save the metadata file to your local machine.
Step 4: Create a SAML identity provider
-
Log on to the RAM console with your Alibaba Cloud account.
-
In the left-side navigation pane, choose Integrations > SSO.
-
On the Role-based SSO tab, click the SAML tab, and then click Create IdP.
-
On the Create IdP page, enter an IdP Name (shibboleth-provider) and a Note.
-
In the Metadata File section, click Upload Metadata File and upload the IdP metadata from Step 3: Obtain SAML IdP metadata.
-
Click Create IdP.
Record the ARN of the new identity provider for later steps.
Step 5: Create a RAM role
-
In the left-side navigation pane of the RAM console, choose .
-
On the Roles page, click Create Role.
-
In the upper-right corner of the Create Role page, click Switch to Policy Editor.
-
Specify the SAML identity provider in the editor.
In the Visual Editor, set the Principal to the identity provider (shibboleth-provider) from Step 4: Create a SAML identity provider. For IdP Type, select SAML.
-
In the editor, set the
saml:recipientcondition tohttps://signin.alibabacloud.com/saml-role/sso. -
In the Create Role dialog box, enter a Role Name (worker) and click OK.
Record the ARN of the new RAM role for later steps.
Step 6: Configure user attributes in Shibboleth
-
Modify the
/opt/shibboleth/conf/services.xmlfile.The default
attribute-resolver.xmllacks required settings. Replace it withattribute-resolver-full.xml.<value>%{idp.home}/conf/attribute-resolver.xml</value> <!-- Find the preceding code and replace it with the following code. --> <value>%{idp.home}/conf/attribute-resolver-full.xml</value> -
Modify the
/opt/shibboleth/conf/attribute-resolver-full.xmlfile.-
Configure Shibboleth to return the
mailandmemberofuser attributes.The
idof thememberofattribute isrole, which represents the user's role. TheReturnValueis<part of the role ARN without the role name (worker)>+'$1',<service provider ARN>. Get the<service provider ARN>from Step 4: Create a SAML identity provider and therole ARNfrom Step 5: Create a RAM role.NoteThe role name is replaced with
$1to support multiple roles. Change a user's role by adjusting thememberoffield in the user information.memberofis a custom attribute. You can replace it with any attribute that indicates the user's role.<!-- ========================================== --> <!-- Attribute Definitions --> <!-- ========================================== --> <!-- Schema: Core schema attributes--> <!-- Find the preceding comment and add the following code after it. --> <AttributeDefinition xsi:type="Simple" id="mail"> <InputDataConnector ref="myLDAP" attributeNames="mail" /> <AttributeEncoder xsi:type="SAML1String" name="urn:mace:dir:attribute-def:mail" encodeType="false" /> <AttributeEncoder xsi:type="SAML2String" name="https://www.aliyun.com/SAML-Role/Attributes/RoleSessionName" friendlyName="mail" encodeType="false" /> </AttributeDefinition> <AttributeDefinition xsi:type="Mapped" id="role"> <InputDataConnector ref="myLDAP" attributeNames="memberof" /> <AttributeEncoder xsi:type="SAML1String" name="urn:mace:dir:attribute-def:role" encodeType="false" /> <AttributeEncoder xsi:type="SAML2String" name="https://www.aliyun.com/SAML-Role/Attributes/Role" friendlyName="role" encodeType="false" /> <ValueMap> <ReturnValue>acs:ram::114*******71701:role/$1,acs:ram::114*******71701:saml-provider/shibboleth-provider</ReturnValue> <SourceValue>(.+)</SourceValue> </ValueMap> </AttributeDefinition> -
This LDAP connection reads its settings from
/opt/shibboleth/conf/ldap.properties.<!-- Example LDAP Connector --> <!-- <DataConnector id="myLDAP" xsi:type="LDAPDirectory" ldapURL="%{idp.attribute.resolver.LDAP.ldapURL}" baseDN="%{idp.attribute.resolver.LDAP.baseDN}" principal="%{idp.attribute.resolver.LDAP.bindDN}" principalCredential="%{idp.attribute.resolver.LDAP.bindDNCredential}" useStartTLS="%{idp.attribute.resolver.LDAP.useStartTLS:true}" ...omitted... </DataConnector> --> <!-- Find the preceding example code and replace it with the following code. --> <DataConnector id="myLDAP" xsi:type="LDAPDirectory" ldapURL="%{idp.attribute.resolver.LDAP.ldapURL}" baseDN="%{idp.attribute.resolver.LDAP.baseDN}" principal="%{idp.attribute.resolver.LDAP.bindDN}" principalCredential="%{idp.attribute.resolver.LDAP.bindDNCredential}" useStartTLS="%{idp.attribute.resolver.LDAP.useStartTLS}" connectTimeout="%{idp.attribute.resolver.LDAP.connectTimeout}" responseTimeout="%{idp.attribute.resolver.LDAP.responseTimeout}"> <FilterTemplate> <![CDATA[ %{idp.attribute.resolver.LDAP.searchFilter} ]]> </FilterTemplate> </DataConnector>
-
-
Add an attribute filter in
/opt/shibboleth/conf/attribute-filter.xml.Set the
valuein thePolicyRequirementRuletag to the Alibaba CloudentityIDfrom Step 1: Obtain SAML service provider metadata.<AttributeFilterPolicyGroup id="ShibbolethFilterPolicy" xmlns="urn:mace:shibboleth:2.0:afp" xmlns:xsi="http://www.w3.org/2001/XMLSchema-instance" xsi:schemaLocation="urn:mace:shibboleth:2.0:afp http://shibboleth.net/schema/idp/shibboleth-afp.xsd"> <!-- Find the preceding code and add the following code after it. --> <AttributeFilterPolicy id="aliyun"> <PolicyRequirementRule xsi:type="Requester" value="[entityID]" /> <AttributeRule attributeID="mail"> <PermitValueRule xsi:type="ANY" /> </AttributeRule> <AttributeRule attributeID="role"> <PermitValueRule xsi:type="ANY" /> </AttributeRule> </AttributeFilterPolicy>
Step 7: Configure the NameID
-
Configure the NameID for Alibaba Cloud in
/opt/shibboleth/conf/relying-party.xml.Set the
relyingPartyIdsin thebeantag to the Alibaba CloudentityIDfrom Step 1: Obtain SAML service provider metadata.<!-- Override example that identifies a single RP by name and configures it for SAML 2 SSO without encryption. This is a common "vendor" scenario. --> <!-- <bean parent="RelyingPartyByName" c:relyingPartyIds="https://sp.example.org"> <property name="profileConfigurations"> <list> <bean parent="SAML2.SSO" p:encryptAssertions="false" /> </list> </property> </bean> --> <!-- Find the preceding commented-out code and replace it with the following code. --> <bean parent="RelyingPartyByName" c:relyingPartyIds="[entityID]"> <property name="profileConfigurations"> <list> <bean parent="SAML2.SSO" p:encryptAssertions="false" p:nameIDFormatPrecedence="urn:oasis:names:tc:SAML:1.1:nameid-format:emailAddress" /> </list> </property> </bean> -
Configure NameID generation in
/opt/shibboleth/conf/saml-nameid.xml.<!-- Find the following two code blocks and uncomment them to apply the configuration. --> <bean parent="shibboleth.SAML2AttributeSourcedGenerator" p:omitQualifiers="true" p:format="urn:oasis:names:tc:SAML:1.1:nameid-format:emailAddress" p:attributeSourceIds="#{ {'mail'} }" /> <bean parent="shibboleth.SAML1AttributeSourcedGenerator" p:omitQualifiers="true" p:format="urn:oasis:names:tc:SAML:1.1:nameid-format:emailAddress" p:attributeSourceIds="#{ {'mail'} }" /> -
Update the NameID properties in
/opt/shibboleth/conf/saml-nameid.properties.idp.nameid.saml2.default = urn:oasis:names:tc:SAML:1.1:nameid-format:emailAddress idp.persistentId.useUnfilteredAttributes = true idp.persistentId.encoding = BASE32
Step 8: Restart Tomcat
Restart Tomcat to apply your changes.
Test role-based SSO
Test the SSO integration after completing the configuration.
-
Access
https://<your server address>/idp/profile/SAML2/Unsolicited/SSO?providerId=<entityID>.In the URL,
<entityID>is the Alibaba CloudentityIDfrom Step 1: Obtain SAML service provider metadata. -
On the Shibboleth logon page, enter your username and password, and click Log On.
The system performs SSO and logs you in to the Alibaba Cloud console as the specified role (worker).
FAQ
Check /opt/shibboleth-idp/logs/idp-process.log for error details. Common issues:
Login fails despite correct credentials
Check /opt/shibboleth-idp/logs/idp-process.log. If the error relates to ValidateUsernamePassword, verify the LDAP connection configuration. Ensure commented-out sections are correctly enabled with no extra spaces.
Unresponsive login and an unable to connect to the ldap error
Check the LDAP connection settings in the ldap.properties and attribute-resolver-full.xml files.
Redirect error: The NameID is missing
Verify the mail attribute mapping in Step 6: Configure user attributes in Shibboleth and the NameID configuration in Step 7: Configure the NameID.
Accessing https://<your server address>/idp/profile/SAML2/Unsolicited/SSO?providerId=<entityID> returns an Unsupported Request error
Verify that entityID is correct. The entityID must be consistent across the metadata file in the metadata folder, attribute-filter.xml, and relying-party.xml.
Redirect error: Cannot find SAML role attribute which is required
In Step 6: Configure user attributes in Shibboleth, verify the memberof attribute mapping to role and the ReturnValue value.
Redirect error: Cannot find SAML role session name attribute which is required
In Step 6: Configure user attributes in Shibboleth, verify that the name of the mail attribute is https://www.aliyun.com/SAML-Role/Attributes/RoleSessionName. This commonly occurs when converting a user-based SSO configuration to role-based SSO without updating the name value.
Redirect error: The response signature is invalid
Re-upload the Shibboleth metadata to Alibaba Cloud.