Integration
QuickTracking React Native SDK is an extension based on the QuickTracking native client tracking SDK. It encapsulates the commonly used APIs of QT tracking, such as global properties, page properties, and custom events.
React Native SDK integration
Npm Online Address: react-native-quicktracking-analytics-module
Download the npm package to the project
# npm
npm install react-native-quicktracking-analytics-module

# yarn
yarn add react-native-quicktracking-analytics-module

# pnpm
pnpm add react-native-quicktracking-analytics-module
Introduce SDK environment variables
import { QT } from "react-native-quicktracking-analytics-module";Android Dock Integration
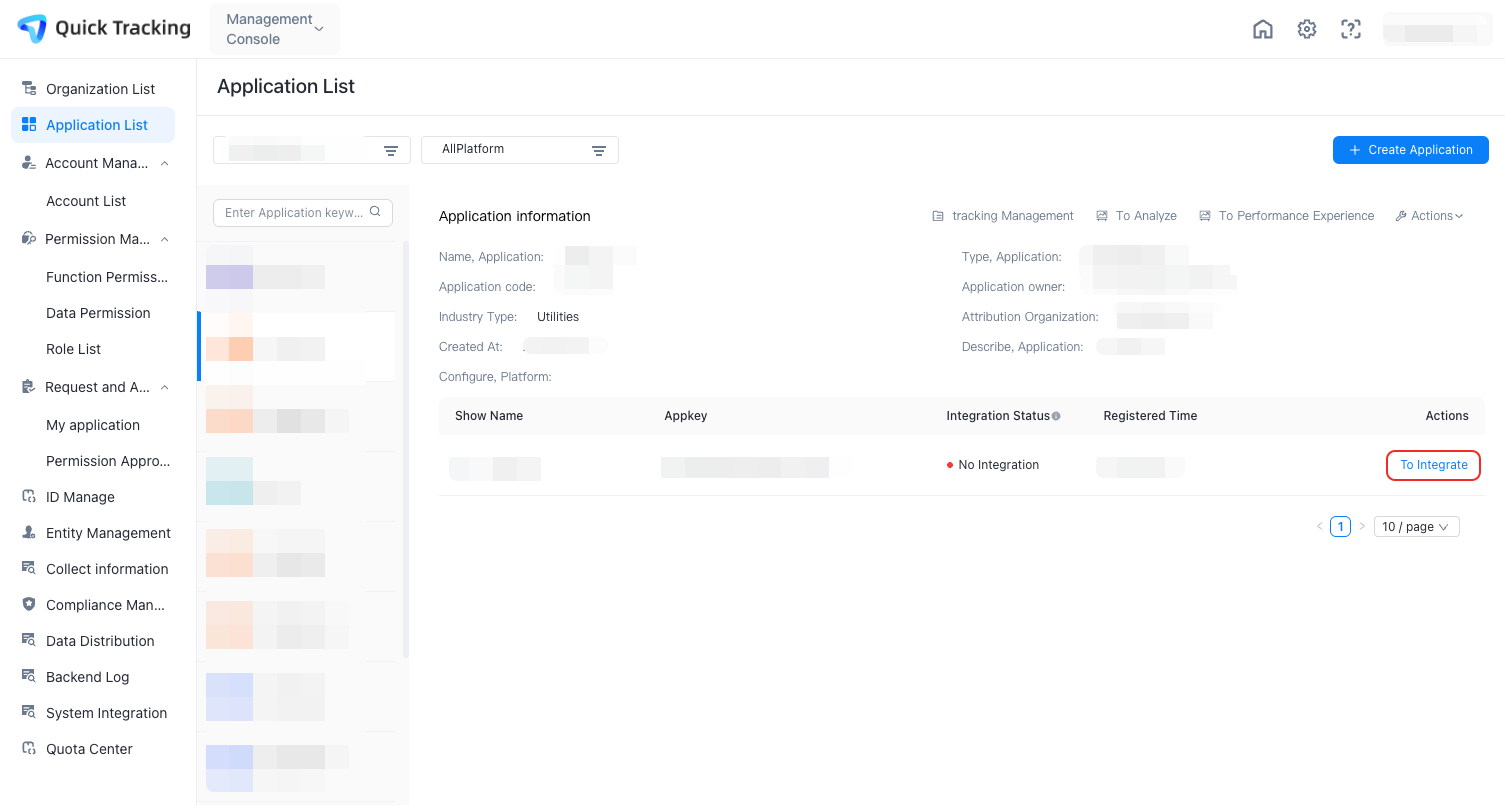
Go to the MPS console.
Enter the QT background and click "Management Console"
Integrated application
Find the application for which you want to integrate the tracking point: Go to the Applications page, select the organization that you want to use, and then click Details or Integrate.
Maven address configuration
Add the URL of the sdk maven repository to the buildscript and allprojects sections in the build.gradle configuration script of the project.
buildscript {
    repositories {
    google()
    jcenter()
    maven { url 'https://repo1.maven.org/maven2/' }
  }
  dependencies {
      classpath 'com.android.tools.build:gradle:3.4.0'}
      // NOTE: Do not place your application dependencies here; they belong
      // in the individual module build.gradle files
  }
}
allprojects {
    repositories {
    google()
    jcenter()
    maven { url 'https://repo1.maven.org/maven2/' }
  }
}
Component Reference
In the dependencies section of the build.gradle configuration script corresponding to the project app, add the dependencies required for integration.
dependencies {
    implementation fileTree(include:['*.jar'], dir:'libs')

    // QuickTracking statistical analysis SDK
    implementation 'com.lydaas.qtsdk:qt-px-common:1.6.3.PX'
}
Note: If you have added QuickTracking ReactNative SDK dependencies by using package.json, you do not need to separately integrate QuickTracking SDK for Android.
Tracking verification configuration
In Android.manifest, find the activity tag corresponding to MainActivity, paste the following code, and replace the appkey with your own
//1. The evocation code defaults to "atm. The appkey corresponding to the app, which cannot be changed.
//2. Use a single intent-filter and other intent-filters side by side.
// Do not add the following code to other intent-filters.

<intent-filter>
    <action android:name="android.intent.action.VIEW" />
    <category android:name="android.intent.category.DEFAULT" />
    <category android:name="android.intent.category.BROWSABLE" />
    <data android:scheme="atm.appkey" />
</intent-filter>
Add permissions
The statistics SDK requires the host application to be granted the following permissions:
Permission | Purpose |
ACCESS_NETWORK_STATE | Detects the networking mode and avoids data sending in abnormal network conditions to save traffic and power. |
READ_PHONE_STATE (optional) | The IMEI of the user equipment is obtained, and the user is uniquely identified by the IMEI, so as to provide a statistical analysis service. |
ACCESS_WIFI_STATE | Obtain the WIFI mac address. On a tablet device or TV box, the device cannot be identified by IMEI. We will use the WIFI mac address as the unique identifier of the user in order to provide statistical analysis services normally. |
INTERNET | Permissions that allow applications to network and send statistical data in order to provide statistical analysis services. |
An example AndroidManifest.xml manifest file is given below:
<manifest ……>
    <uses-permission android:name="android.permission.ACCESS_NETWORK_STATE"/>
    <uses-permission android:name="android.permission.ACCESS_WIFI_STATE"/>
    <uses-permission android:name="android.permission.READ_PHONE_STATE"/>
    <uses-permission android:name="android.permission.INTERNET"/>
    <application ……>
</manifest>
Configure obfuscation
If your application uses code obfuscation, add the following configuration to prevent the SDK from being unavailable due to Quick Tracking SDK obfuscation.
-keep class com.umeng.** {*;}
-keep class org.repackage.** {*;}

-keep class com.quick.qt.** {*;}
-keep class rpk.quick.qt.** {*;}

-keepclassmembers class * {
   public <init> (org.json.JSONObject);
}
-keepclassmembers enum * {
    public static **[] values();
    public static ** valueOf(java.lang.String);
}
The SDK needs to reference the resource file of the imported project, and obtains the resource reference file R.java through the reflection mechanism, but proguard may delete R.java when the developer processes the apk through confusion optimization tools such as proguard. If this problem occurs, please add the following configuration:
-keep public class [your app package name]. R$*{
    public stac final int
Initialize the short video SDK for Android
Domain Settings
Be sure to set up the domain of the private environment before initialization.
/**
 * Set the primary and alternate domain for uploading statistics logs. The SDK will first report the statistics to the primary domain. If it fails, it will try to report the data to the alternate domain again.
 * The primary domain primaryDomain or cannot specify null or an empty string. Otherwise, a SdkDomainUndefined run time exception is thrown.
 */
QtConfigure.setCustomDomain("tracking domain", null);
Pre-initialization
Call the underlying component library initialization function in the Application.onCreate function of the hosting app.
// The SDK pre-initialization function does not track device information or report data to the QT backend.
// The preInit pre-initialization function takes very little time and does not affect the user experience of the first cold start of the app.
QtConfigure.preInit(this,"appkey","Channel");
3. Formal initialization
// Initialize the SDK. Call the
public static void init(Context context,String appkey,String channel,int deviceType,String pushSecret);
Value | Description | Remarks |
appkey | QT is the unique identifier issued by the current application platform. |
|
channel | App market for app delivery | The data source of "upgrade channel" in "system properties" of QT analysis platform |
deviceType | QtConfigure.DEVICE_TYPE_PHONE | By default, you can enter QtConfigure.DEVICE_TYPE_PHONE |
pushSecret | Abandoned field, enter empty | Abandoned field, enter empty |
Example
public class MainApplication extends Application implements ReactApplication {
    @Override
    public void onCreate() {
    super.onCreate();

    // The SDK pre-initialization function does not track device information or report data to the QT backend.
    // The preInit pre-initialization function takes very little time and does not affect the user experience of the first cold start of the app.
    QtConfigure.preInit(this,"Your appkey","aliyun");
    // Initialize the SDK. You must call the
    QtConfigure.init(this, "Your appkey","aliyun",QtConfigure.DEVICE_TYPE_PHONE, "");
  }
For more information about how to integrate the statistical analysis SDK for Android, see Android SDK.
iOS Dock Integration
Use CocoaPods integration
Go to the iOS project directory
cd ios && pod install && cd .. Initialize the SDK and integrate the appKey
To ensure that your app can meet the compliance requirements of the Ministry of Industry and Information Technology (MIIT) after you integrate the statistics SDK, you must make sure that the initial initialization function is called to initialize the statistics SDK after the user reads your Privacy Policy and obtains the user's authorization during the first cold start of the app. In this case, the SDK tracks device information and reports data. Conversely, if the user does not agree with the Privacy Policy authorization, the initialization function cannot be called
- (BOOL)application:(UIApplication *)application didFinishLaunchingWithOptions:(NSDictionary *)launchOptions
{

    /**Initialize all component products
      * @param appKey The appkey that the developer applied for in QT.
      * @param channel The channel identifier. You can set nil to "App Store".
      */
    [QTConfigure initWithAppkey:@"AppKey of the application" channel:@"Installation channel"];

    return YES;
}
Once the App obtains the user authorization of the Privacy Policy, the developer should ensure that the initialization function is called for subsequent App cold start.
Configure a receipt domain
#import <QTCommon/UMConfigure.h>

- (BOOL)application:(UIApplication *)application didFinishLaunchingWithOptions:(NSDictionary *)launchOptions
{

    /**Specify the primary and alternate domain for reporting statistics logs. This function must be called before the SDK initializes the function call.
      * @param primaryDomain The receipt address of the primary domain to which logs are passed. The parameter cannot be null or an empty string.
      * @param standbyDomain The receiving address of the backup domain for uploading logs. The parameter can be null or an empty string. If this parameter is left empty, the SDK automatically sets the primary domain as the backup domain.
      */
    [QTConfigure setCustomDomain:@"Primary receipt domain" standbyDomain:@"Alternate receipt domain"];

    return YES;
}
Import log components as needed
Introduce component libraries required for statistics (when updating the SDK, you can directly use the pod update command for direct update)
pod 'UMCCommonLog'Podfile example
require_relative '../node_modules/react-native/scripts/react_native_pods'
require_relative '../node_modules/@react-native-community/cli-platform-ios/native_modules'

platform :ios, '12.0'

target 'qt_reactnative_demo' do
  config = use_native_modules!

  // QuickTracking statistical analysis SDK
  pod 'QTCommon', '~> 1.5.8.PX'// You must specify the version number.

  // You can add the UMCCommonLog in the basic Logstore to the project for development and debugging.
  pod 'UMCCommonLog'

  use_react_native!(
    :path => config[:reactNativePath],
    # to enable hermes on iOS, change `false` to `true` and then install pods
    :hermes_enabled => flags[:hermes_enabled],
  )

  use_flipper!()

  post_install do |installer|
    react_native_post_install(installer)
    __apply_Xcode_12_5_M1_post_install_workaround(installer)
  end
end
Note: If you have added QuickTracking ReactNative SDK dependencies by using package.json, you do not need to separately integrate QuickTracking SDK for iOS.
Enable log printing
#import <QTCommon/UMConfigure.h>
#import <UMCommonLog/UMCommonLogHeaders.h>
- (BOOL)application:(UIApplication *)application didFinishLaunchingWithOptions:(NSDictionary *)launchOptions
{
[UMCommonLogManager setUpUMCommonLogManager];
[QTConfigure setLogEnabled:YES];
return YES;
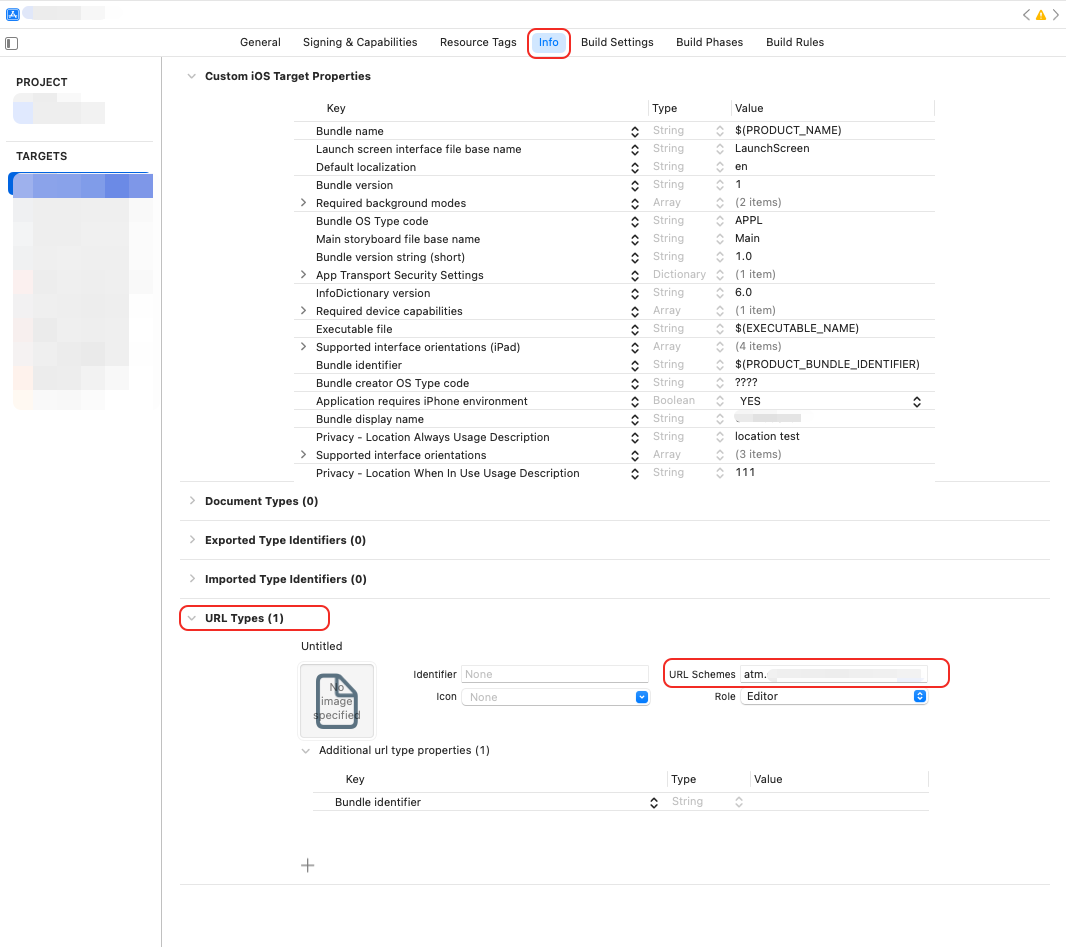
}Tracking verification configuration
Add your URL Scheme to the project. The URL Scheme is located in the project settings target - > tab Info - > URL Types.
The scheme:atm.yourappkey.
Call function [QTMobClick handleUrl:url] in AppDelegate to receive URL
- (BOOL)application:(UIApplication *)application openURL:(nonnull NSURL *)url options:(nonnull NSDictionary<UIApplicationOpenURLOptionsKey,id> *)options
{
    if ([QTMobClick handleUrl:url]) {
        return YES;
    }
    return YES;
}
For more information about how to integrate the statistical analysis SDK for iOS, see iOS SDK.
For more information about tracking verification, see Tracking Verification Detailed Guide.
Tracking API
SDK initialization
Formal Initialization
Be sure to call. Be sure to initialize the SDK after the user agrees to the privacy policy.
function init(appKey: string, channel: string): voidValue | Description |
appKey | Unique application key value provided by QT background |
channel | Download channel |
Examples
QT.init('appkey', 'quicktracking');Report by User Account
User Logon Settings
"Login Users" in the corresponding product for uploading this value: Calculate the number of "Login Users", that is, calculate the number of unique count of the uploaded value of the following API
function profileSignIn(ID: string, provider?: string): voidValue | Description |
ID | The user account. The value is less than 64 bytes in length. "Login Users" in the product corresponding to the upload of this value: the number of "logon users" is calculated, which is the number of deduplication of the user account. |
provider | The field is invalid. You can set this parameter to null. |
User Logout
You must call this operation when you log off the account. After you call this operation, no account-related content is sent.
function profileSignOff(): voidExamples
QT.profileSignIn ('User ID');
QT.profileSignOff();
Upload user properties
Use a custom event whose event code is fixed as "$$_user_profile" to upload. The event attributes carried by the event are placed in the user table as user attributes.
function sendEvent(eventId: string, params: any): voidValue | Description |
eventId | The ID of the current statistical event. |
params | Parameter description for the current event, defined as the "<key-value>" pair of "Parameter name: Parameter value" |
Note: User attributes must be uploaded after the user account is reported.
Example
QT.onProfileSignIn("Zhang San");

const user = {
  gender: "male",
  age: "8"
}
QT.sendEvent("$$_user_profile", user);
The business meaning of the above upload is: Zhang Sannan is 8 years old.
Global Properties
Global properties are the properties carried by each event.
Register Global Attributes
function registerGlobalProperty(globalProperty: any): voidValue | Description |
globalProperty | The global property to register, defined as a <key-value> pair for the property name: property value. It is a single-layer object structure and does not support multi-layer nesting. |
Note
Property names and property values of the string type. Only letters, digits, and underscores are supported.
In Android, the attribute value does not support the boolean type of JavaScript. You need to manually convert it to 0 or 1 in JS.
In Android, for scenarios where the global property value is null or undefined, the underlying Android SDK filters this global property field. If you need a null value analysis scenario, you must customize the default null value
In iOS, global property values do not support null and undefined and need to be filtered manually.
Example
QT.registerGlobalProperty({
    name: 'MyApp',
    description: 'this is a app',
    aBoolean: 1, // The boolean type must be set to 0 or 1,
    aNull: '', // The null or undefined type must be an empty string.
    // The default value is of the number type. If the return value is null or undefined, you must customize the default value of the number type.
    aNumber: 66,
});
Delete a specific global attribute
function unregisterGlobalProperty(propertyName: string): voidValue | Description |
propertyName | The name of the global attribute to delete |
Example
QT.unregisterGlobalProperty('name'); // Delete the global attribute nameObtain specific global properties
async function getGlobalProperty(propertyName: string): Promise<any>Value | Description |
propertyName | The name of the global property to get |
Example
await QT.getGlobalProperty('name'); // Obtain the global property name and return {name: "MyApp"}Obtain all global attributes
async function getGlobalProperties(propertyName: string): Promise<any>Example
await QT.getGlobalProperties(); // Get all global propertiesClear all global attributes
function clearGlobalProperties(): voidExample
QT.clearGlobalProperties(); // All global attributes are cleared (with caution)Page browsing event tracking
Developers who want to track and track statistics on page paths and page stay duration. You can manually burial points by calling this operation
function onPageStart(pageName: string): void
function onPageEnd(pageName: string): void
Value | Description |
pageName | Page encoding |
Example
QT.onPageStart('MainPage');
QT.onPageEnd('MainPage');
Notes:
The onPageStart SDK records page entry information. The onPageStart SDK does not report events. The onPageEnd SDK only reports page browsing events when you call the onPageEnd SDK.
onPageStart and onPageEnd must be called in pairs, and the pageName of the value passed must be the same. If onPageEnd is not used or the pageName of the value passed by onPageEnd is inconsistent with that of onPageStart, the information recorded in onPageStart does not take effect.
Page property upload
Support for attaching custom properties to the current page
function uploadPageProperties(pageName: string, params: EventParams): voidParameter:
Value | Description |
pageName | The name of the target page (page encoding), which must be the same as the current page name. If not, the function execution is invalid. |
params | The parameter description of the current event is defined as a "<key-value>" pair of "parameter name: parameter value". It is a single-layer object structure and does not support multi-layer nesting. |
Example
QT.uploadPageProperties('detail_page', { test: 1 })Please note that:
This API must be called between onPageStart and onPageEnd.
Property names and property values of the string type. Only letters, digits, and underscores are supported.
In Android, the attribute value does not support the boolean type of JavaScript. You need to manually convert it to 0 or 1 in JS.
In Android, for scenarios where the global property value is null or undefined, the underlying Android SDK filters this global property field. If you need a null value analysis scenario, you must customize the default null value
In iOS, global property values do not support null and undefined and need to be filtered manually.
Custom event tracking
Custom events can be used to track user behavior and record the specific details of behavior occurrence.
Use the sendEvent interface to track statistics on events. The API is as follows:
/**
  * Custom event tracking points
  * @param eventId The code of the event.
  * @param params The parameter description of the current event, which is defined as the "<key-value>" pair of "parameter name: parameter value"
  * @param pageName The event code.
  */
function sendEvent(eventId: string, params?: any, pageName?: string): void
Value | Description |
eventId | The event code for the current statistics. |
params | The parameter description of the current event is defined as a "<key-value> pair" of "parameter name: parameter value". It is a single-layer object structure and does not support multi-layer nesting. |
pageName | The page code of the current statistical event. |
Example
// The custom event that carries event parameters.
QT.sendEvent(
  'event1',
  {
    name: 'quick tracking',
    method: 'func',
  },
);

// The custom event that carries event parameters and page encoding.
QT.sendEvent(
  'event2',
  {
    name: 'quick tracking',
    method: 'func',
  },
  'main-page'
);
Remarks:
Multi-parameter type events can meet the original analysis scenarios of computing events /counting events;
Different parameter type of computational events correspond to different computing methods, which can be divided into two categories, numeric and character.
Digital type: supports the calculation of accumulated value, maximum value, minimum value, average value, and unique count.
Character type: supports unique count calculation.
Notes:
Like global properties, event properties also have differences in type processing on different platforms of Android and iOS:
In Android, the boolean type of JavaScript is not supported. You need to manually convert it to 0 and 1 in JS.
In Android, for scenarios where the global property value is null or undefined, the underlying Android SDK filters this global property field. If you need a null value analysis scenario, you must customize the default null value
In iOS, global property values do not support null and undefined and need to be filtered manually.
Bridge event tracking
Bridge events are used in the scenario of h5 bridge RN. This interface is used to send H5 logs to the App.
/**
  * Bridge event tracking points
  * @param data H5 the log body of the forwarded event.
  */
function sendEventForH5(data: string): void
Value | Description |
data | Log body of H5 forwarding events |
Example
const content = data.nativeEvent.data;
QT.sendEventForH5(content);
Embed h5 page in RN App (RN bridge mode)
H5 Integrated QuickTracking Web SDK
For this step, refer to: Web SDK
Forward H5 logs to React Native WebView
<script charset="UTF-8">
  ...
  // SDK access and configuration
  ...

  // Send custom events on the page (click, element exposure, and other events)
  aplus_queue.push({
    action: 'aplus.aplus_pubsub.subscribe',
    arguments: ['mw_change_hjlj', function (content) {
      var eventData = content && content.what_to_send && content.what_to_send.hjljdataToUmNative;
      if (/*iOS environment */) {
        window.ReactNativeWebView.postMessage(JSON.stringify(eventData), '*');
      } else {
        window.ReactNativeWebView.postMessage(JSON.stringify(eventData));
      }
    }]
  })

  aplus_queue.push({
    action: 'aplus.aplus_pubsub.subscribe',
    arguments: ['mw_change_pv', function (content) {
      var pvData = content && content.what_to_send && content.what_to_send.pvdataToUmNative;
      if (/*iOS environment */) {
        window.ReactNativeWebView.postMessage(JSON.stringify(pvData), '*');
      } else {
        window.ReactNativeWebView.postMessage(JSON.stringify(pvData));
      }
    }]
  })
</script>
React Native WebView receives messages and calls the QT SDK to report logs
import * as React from 'react'
import { WebView } from 'react-native-webview';
import { QT } from 'react-native-quicktracking-analytics-module';
import { Platform, SafeAreaView } from 'react-native';

export default function WebPage() {
  const onMessage = (data) => {
    try {
      const content = data.nativeEvent.data;
      QT.sendEventForH5(content);
    } catch (error) {
      console.log('webview message error:', error);
    }
  };

  return (
    <SafeAreaView style={{ flex: 1 }}>
    	<WebView
      	...
        onMessage={onMessage}
      	...
      />
    </SafeAreaView>
  );
}
RN auto-tracking
QuickTracking ReactNative SDK 2.0.0 or later is required.
Automatic tracking of page view events
Considering the rich scenario support of the React Navigation library itself and its influence in the community, the SDK's automatic tracking of page browsing events directly uses the open interface capability of React Navigation. The following example shows:
import {QT} from 'react-native-quicktracking-analytics-module';
import {
  NavigationContainer,
  useNavigationContainerRef,
} from '@react-navigation/native';
import {createNativeStackNavigator} from '@react-navigation/native-stack';

const Stack = createNativeStackNavigator();

const App = () => {
  const navigationRef = useNavigationContainerRef();
  const routeNameRef = useRef('');

  return (
    <NavigationContainer
      ref={navigationRef}
      onReady={() => {
        routeNameRef.current = currentRouteName;
        // Set the page encoding.
        QT.onPageStart(currentRouteName);
      }}
      onStateChange={() => {
        const previousRouteName = routeNameRef.current;
        const currentRouteName = navigationRef.getCurrentRoute()?.name;
        // Set page properties as needed (optional)
        QT.uploadPageProperties(previousRouteName, {
          test_page_p_1: 1,
          test_page_p_2: "test"
        });
        // track page browsing events.
        QT.onPageEnd(previousRouteName);
        if (currentRouteName) {
          if (previousRouteName !== currentRouteName) {
            // update the new page encoding
            QT.onPageStart(currentRouteName);
            routeNameRef.current = currentRouteName;
          }
        }
      }}
    >
      ...
    </NavigationContainer>
  )
}
Automatic tracking of control click events
Run the node command in the path of the project to be buried
node node_modules/react-native-quicktracking-analytics-module/src/hook.js -runNote: If you need to restore the original file, you can run the reset command.
node node_modules/react-native-quicktracking-analytics-module/src/hook.js -resetIgnore auto-tracking tracking of RN controls
Due to mixed development scenarios, you can separately disable the automatic tracking of React Native control click events. Add the QTSDKConfig configuration to the package.json of the project to be tracked:
{
  "name": "reactnative_demo",
  "QTSDKConfig": {
    "enableAutoCLK": true
  }
}
Valid values of the enableAutoCLK field:
true to enable automatic tracking of RN controls
false Disable automatic tracking of RN controls
Note: To enable the automatic tracking function of RN control click events, you need to use it with the above node command.
Enable automatic tracking of click events for iOS controls
#import <QTCommon/UMConfigure.h>
#import <QTCommon/MobClick.h>
#import <UMCommonLog/UMCommonLogHeaders.h>

- (BOOL)application:(UIApplication *)application didFinishLaunchingWithOptions:(NSDictionary *)launchOptions
{

    // Enable the automatic tracking feature when the native control is fully embedded.
    [QTMobClick setAutoEventEnabled:YES];

    return YES;
}
Enable automatic tracking of click events for Android controls
import com.quick.qt.analytics.QtTrackAgent;

public class MainApplication extends Application implements ReactApplication {
  ...

  @Override
  public void onCreate() {
    super.onCreate();
    ...
    // Enable the automatic tracking feature when the native control is fully embedded.
    QtTrackAgent.setAutoEventEnabled(true);
    ...
  }

  ...
}
Set ReactNative control custom properties
Note: Only React Native controls such as TouchableHighlight, TouchableOpacity, Pressable, etc are supported
<Pressable
  onPress={()=>{}}
  qtParams={{
    pressable: "press_1",
  }}
>
  {({pressed}) => (
    <Text style={styles.text}>
      {pressed ?  'Click the Pressable control! ' : 'Pressable control'}
    </Text>
  )}
</Pressable>

<TouchableHighlight
  onPress={()=>{}}
  qtParams={{aTouchableHighlight: 1, b: 2}}>
  <Text>TouchableHighlight controls </Text>
</TouchableHighlight>

<TouchableOpacity
  onPress={()=>{}}
  qtParams={{aTouchableOpacity: 1, b: 2}}>
  <Text>TouchableOpacity controls </Text>
</TouchableOpacity>

<TouchableWithoutFeedback
  onPress={()=>{}}
  qtParams={{aTouchableWithoutFeedback: 1, b: 2}}>
  <Text>TouchableWithoutFeedback controls </Text>
</TouchableWithoutFeedback>
Ignore automatic tracking of a single control
Add the ignore field to the event attribute equal to true
<TouchableHighlight
  onPress={()=>{}}
  qtParams={{
    aTouchableHighlight: 1,
    b: 2,
    ignore: true
  }}>
  <Text>TouchableHighlight controls </Text>
</TouchableHighlight>