You can connect Quick BI to external APIs as data sources for reporting and analysis.
Prerequisites
An API interface is created.
Limits
-
The API data source feature is not supported in the international site (alibabacloud.com).
-
Only the Professional Edition supports creating API data sources.
-
When the connection method of the API data source is direct connection mode, the data volume returned by each request must meet the following conditions: no more than 10 MB, no more than 100 columns, and no more than 1,000 rows.
Feature Entry
You can access the API data source creation page by using either of the following methods.
-
Go to the data source creation page from the data source creation entry, and select API data source.

-
You can also Add API Data Source on the API data source management interface.

Procedure
Creating an API data source involves three steps: establishing API connection, parsing request results, and data synchronization settings.
Step 1: Establish API Connection
Configure the basic authentication information, connection method, and parameter settings for the API connection.
-
Configure the information for each item under Basic Authentication.

Parameter name
Description
Connection Name
A custom name for the API interface, displayed in the Quick BI data source list.
The name can consist of Chinese characters, numbers, letters, underscores (_), or hyphens (-).
Interface Address
The request URL of the API interface.
Request Type
The request type of the API interface. Two types are supported: GET and POST. The default is GET.
-
GET: Retrieves resources from the server. Cannot modify server data.
-
POST: Sends data to the server, such as form submissions. Can modify server data.
-
-
Select the Connection method. You can choose either Extract or Direct connection.

-
Extract: Supports manual or scheduled data updates. Suitable for scenarios with low real-time requirements.
-
Direct connection: Connects directly to the API for real-time data updates. Suitable for small data volumes with high real-time requirements.
Direct connection supports Short-term cache, with cache durations of 5, 10, or 30 minutes. Caching avoids repeated requests within a given period, protecting the source API service and reducing call costs.
NoteIn direct connection mode, the data volume returned by each request must meet the following conditions: no more than 10 MB, no more than 100 columns, and no more than 1,000 rows.

-
-
(Optional) Configure the parameters to pass in Parameter settings.
Parameter name
Description
Common Parameters
Parameters after the request address are common parameters, in the format
url?key1=value1&key2=value2.You can click Add Parameter to pass parameters through common parameters. For example, for API interfaces with large data volumes, you can request through pagination by providing a dynamic parameter
${PageIndex}. For detailed information about parameters, see Parameter Introduction.
Header Parameters
Parameters in the HTTP request header.
Typically used for constant values. You can manually add (①), delete (②), and modify (③) header parameters.

For detailed information about parameters, see Parameter Introduction.
Request Body
Available when the Request type in Basic Authentication is POST.
The request body carries the data to send to the server. Write its content and format according to the API field requirements.
Quick BI supports two request body formats: JSON and x-www-form-urlencoded.

-
JSON: Handles complex data structures with nested objects or arrays.
-
x-www-form-urlencoded: Handles simple key-value pair data for form submissions.
Authorization Verification
Select no authorization, Basic Authentication, or Digest Authentication.
For specific information, see HTTP authentication 01 basic authentication and digest authentication.
Pre-request
If the API requires preparation steps before a request, such as obtaining a token through an authentication interface, you can configure a pre-request.
The system executes pre-requests in sequence before calling the main API. Response results can be stored as dynamic parameters and referenced in the main API's header parameters, common parameters, request body, or other pre-requests.
For examples of using pre-requests, see Operation Example.
NoteA maximum of 3 pre-requests are supported.

-
-
Click Test connection, and after success, proceed to the Next step.

Step 2: Parse Request Results
The Data structure area under Parse request results displays all fields returned by the API request. Select the fields you need and modify their field types as required.
-
In extract mode, only selected parameters will be synchronized to the Quick BI system.
-
When selecting fields, they must be at the same level, otherwise parsing will fail.
-
You can view the values of selected fields in the Data preview area.

Step 3: Data Synchronization Settings
Set the update cycle for the API data source in Data synchronization settings.
-
Click the Update cycle dropdown and select an update cycle. You can choose manual update or scheduled update.
NoteThe update cycle only applies when the connection method is set to extract.

-
Manual update: Data synchronization occurs only when manually triggered.
-
Scheduled update: Configure the update frequency (daily or hourly) to synchronize data at scheduled intervals.
-
-
Click Finish to create the API data source. The new data source appears in the API data source management interface.
Click the
 icon next to an API data source to edit it.Note
The connection method cannot be edited.

Parameter Introduction
Quick BI supports custom key-value pair parameters in common parameters and header parameters to help integrate API data sources. The parameter types are as follows.
-
Fixed parameters: Parameters with constant values, in the format
KeyA = ValueA, for example:user=myname. -
Variable parameters: Parameters with dynamically changing values, in the format
KeyA = ${ValueA}, for example:mydate=${bizdate}.Quick BI provides built-in variable parameters, including system variables, system functions and other dynamic parameters, for standardized parameter writing. For details about built-in variable parameters, see Built-in Variable Parameters below.
Built-in Variable Parameters
Click the  icon next to the parameter value input box to select built-in parameters from the variable panel.
System Variables
Quick BI provides date-type variables and pagination-type variables. These variables can be used in: interface address, common parameters, header parameters, request body, and pre-request.
-
Date-type variables
Date-type system variables consist of two parts: basic date parameters and time interval offset:
-
Date dynamic parameters: Provide offsets based on the business date.
-
{yyyyMMdd}is the business date, which is the day before the current data update date, i.e., T-1.
-
-
Hour parameter offset: Provides offset based on hours.
-
HHrepresents hours -
mmrepresents minutes -
ssrepresents seconds -
Hour offset:
delta/24
For example, the expression for 1 hour before the specified business time is:
${HH-1/24}. -
-
Minute parameter offset: Provides offset based on minutes.
-
HHrepresents hours -
mmrepresents minutes -
ssrepresents seconds -
Minute offset:
delta/24/60
For example, 1 minute before the business date:
${HHmmss-1/24/60}. -
-
Seconds are not currently supported.
System variable
Variable description
Current date
Actual value
${yyyyMMdd}
The day before the current data update date, i.e., T-1.
2022-01-10
20220109
${yyyy-MM-dd}
The day before the current data update date, i.e., T-1.
2022-01-10
2022-01-09
${yyyy-MM}
Extract the year and month part of the current update date.
2022-01-10
2022-01
${yyyy}
Extract the year part of the current update date.
2022-01-10
2022
${yyyy/MM/dd HH:mm:ss}
Extract the current update date and convert it to yyyy/MM/dd HH:mm:ss format.
2022-01-10
2022/01/09 00:00:00
${HH}
Extract the hour part of the current update date.
2022-01-10
00
${timestamp}
Extract the timestamp of the current request, in seconds
1725936000
2024-11-11 00:00:00
-
-
Pagination-type variables
In extract mode, API data sources support Pagination Requests.
Note-
By default, a maximum of 1,000 records per page and a maximum of 100 pages are supported.
-
When a single page returns more than 1,000 records, the current synchronization task will report an error and exit.
-
Both GET and POST requests are supported. Request examples are as follows.

System variable
Variable description
Example
${PageIndex}
Indicates that the marked parameter is the starting page number for pagination, defaulting to 1.
${PageIndex} starts retrieving data from page 1 by default.
${PageIndex:num}
Indicates that the marked parameter is the starting page number for pagination, with the starting page number specified as num.
${PageIndex:2} will start retrieving data from page 2.
-
System Functions
System functions can be used in: interface address, common parameters, header parameters, request body, and pre-request.
|
System function |
Function description |
Example |
|
BI_MD5(String data) |
Returns the result after MD5 encryption |
b10a8db164e0754105b7a99be72e3fe5 |
Dynamic parameters
The Dynamic parameters tab displays only the dynamic parameters created in Pre-request. Dynamic parameters can be used in: interface address, common parameters, header parameters, request body, and pre-request.
Operation Example
The following example uses the Get DingTalk user attendance data API to demonstrate how to create an API data source.
This example follows the three steps in the Procedure section: establishing API connection, parsing request results, and data synchronization settings.
Step 1: Establish API Connection
Configure the API connection information as follows.
-
Configure Basic Authentication information.

-
Connection name: In this example, we use the business meaning of the API interface as the name, entering Get User Attendance Data.
-
Interface address: Obtain the request address from the API documentation page.
-
Request type: Obtain the request type from the API documentation page. In this example, it is POST.
-
-
Configure the Connection method.
In this example, we only need to obtain attendance data for the current day, with low real-time requirements, so the connection method is set to Extract.

-
Configure Pre-request.
Before calling the Get User Attendance Data interface (the main API), you need to obtain an
access_tokenthrough the Get enterprise internal application access_token interface and inject it into the request address of the main API. Configure the pre-request to obtain theaccess_tokenand append it as a common parameter to the main API request address.-
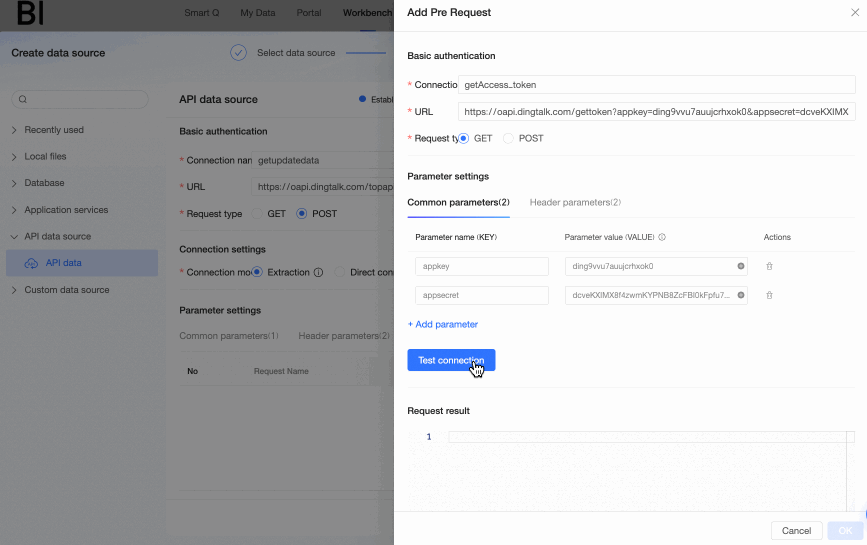
Click Add pre-request under the Pre-request tab.

-
In the Add pre-request dialog box, complete the following configuration.

-
Connection name: In this example, we enter the business meaning of the authentication interface, which is Get enterprise internal application access_token.
-
Interface address: Obtain the request address of the authentication interface through the interface documentation.
-
Request type: Obtain the request type of the authentication interface through the interface documentation. In this example, it is GET.
-
Common parameters: According to the interface documentation, the request address needs to carry
appkeyandappsecretparameters, so add appkey and appsecret in the common parameters and enter the corresponding values. After completion, the parameters will be automatically appended to the request address. -
Header parameters: In this example, we keep the default settings, i.e., select
Content-Typeasapplication/jsonto tell the server receiving the request that the data transmission format is JSON;Connectionaskeep-aliveto tell the server receiving the request that the current request requires a persistent connection.
-
-
Click Test connection to view the return information in the Request result module. Quick BI automatically parses the fields in the request result. In the Dynamic parameters module, select fields to use as dynamic parameters and reference them in the main API using
${parameter name}.In this example, pass the
access_tokenfrom the pre-request as a dynamic parameter to the main API by creating the access_token dynamic parameter.NoteA maximum of 10 dynamic parameters can be added.
-
-
Configure Common parameters.
In this example, reference the access_token dynamic parameter from the pre-request in the main API's common parameters using
${parameter name}. Click Add parameter under the Common parameters tab.NoteDynamic parameters can be referenced to the common parameters, header parameters, request body of the main API, or other pre-requests. You can choose as needed in actual operations.

-
Enter the parameter name, click the
 icon in the parameter value input box, select a parameter from the variable panel, and click the
  icon to save.
In this example, switch to the Dynamic parameters tab, which lists the dynamic parameters created in the current flow, and select
${access_token}.
-
Configure the Request body.
In this example, the request type is POST, so write the request body according to the Get enterprise internal application access_token API's request parameters.
-
JSON format example code is as follows:
{ "work_date": "2024-11-14", "userid": "user01" } -
x-www-form-urlencoded format example code is as follows:
work_date=2024-11-14&userid=user01
-
-
Other parameter configurations.
In this example, header parameters and authorization verification maintain the default settings.
-
Click Test connection, and after success, proceed to the Next step.
Step 2: Parse Request Results
In Parse request results, select the required fields, adjust their field types, and click Next step.
Step 3: Data Synchronization Settings
-
In the data synchronization settings section, set the update cycle of this example's API data source to Manual update.

-
Click Finish to successfully create the Get User Attendance Data API data source.
