Configure and import a user tag table to label users with characteristic attributes for profiling and audience analysis.
A user tag table records characteristic attributes of users. You can assign tag aliases to fields so that each tag maps to a specific field. Based on user tag data, you can build user profiles for pivot analysis and audience filtering.
After import, the tags appear in the Tag List section. Administrators can manage tags directly or authorize other users to manage and use them.
Prerequisites
-
The user tag table is stored in the Computing Source that you configured. For data format, see User Tag Table Data Requirements.
-
All user ID types in your user tag table must exist in the ID Type List of the workspace.
-
If the user ID field is AES-encrypted, enter the decryption key in the Organization System Configuration before pushing or using the data.
-
To build a basic user information system, set the user information type to User Attributes so that you can associate fields with attributes during import.
Procedure
-
Choose Workspace> Configuration Management > Data Import > Data Import > Table Structure Configuration.

-
In the upper-right corner, choose Create Table Configuration > User Tag. The Create User Tag page appears.
-
Select the computing source and data table that you want to import.
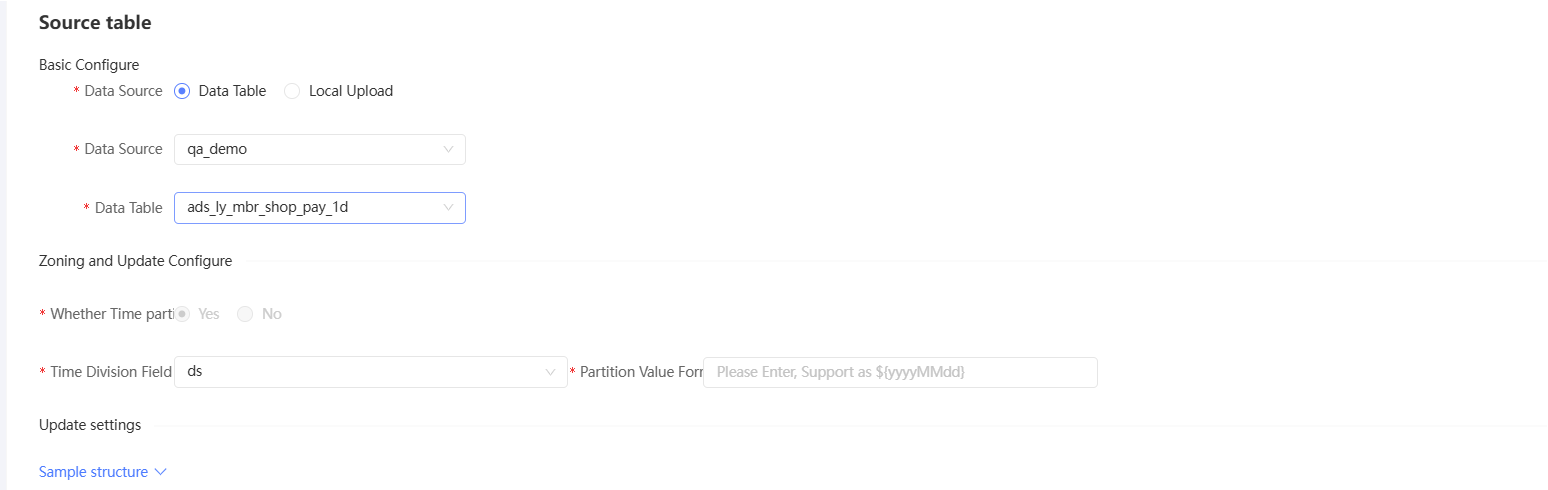
You can select either a table or a view as the data source.
-
If you select Table, the system automatically detects whether the table contains time partitions.
-
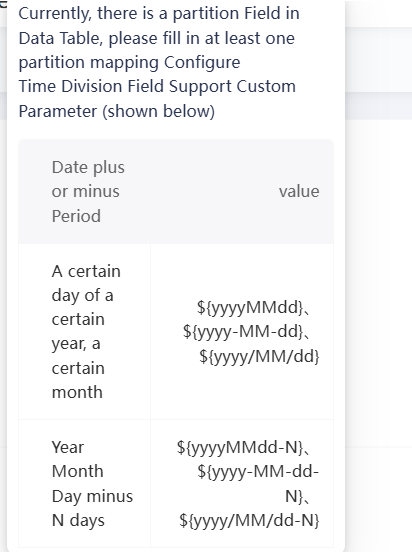
If the table contains time partitions, select the Time Partition field and enter the format of the partition value. The following figure shows the supported formats.
-
If the table does not contain time partitions, you do not need to select them.
-
-
If you select View, manually specify whether the view includes time partitions.
-
If the view contains time partitions, select the Time Partition field and enter the format of the partition value. The supported formats are shown in the preceding figure.
-
If the view does not contain time partitions, you do not need to select them.
-
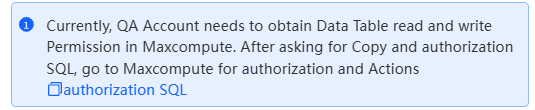
If the current account lacks the read permission on the selected table, an error message appears as shown in the following figure. Grant read permissions on the data table to the Quick Audience account in the MaxCompute project. Click Authorize SQL to obtain the authorization statement, then click Update to continue the configuration.
-
-
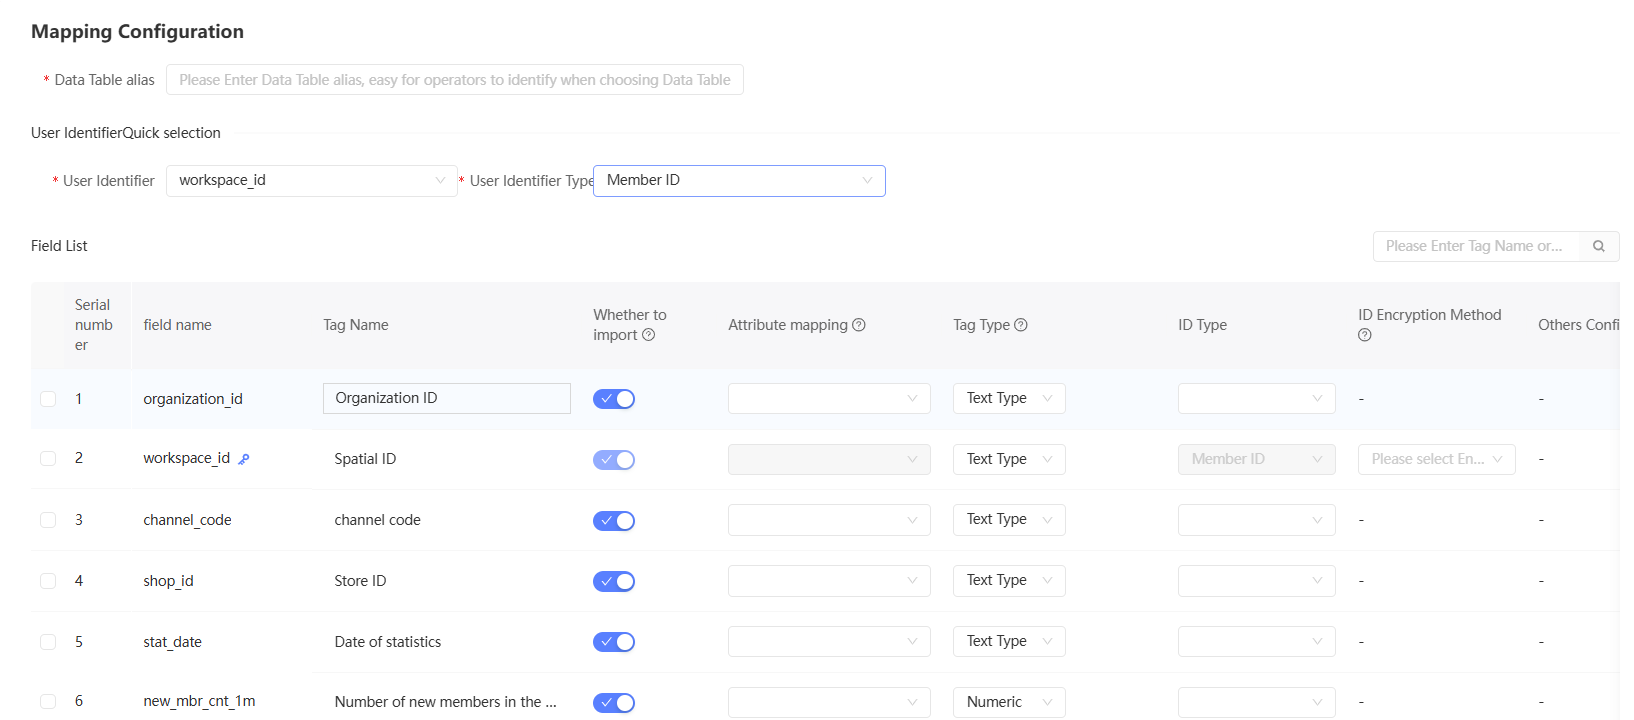
Enter an alias for the data table.
NoteTag source information on the Tag Management and Pivot Analysis pages is displayed as this alias.
-
Set the user identification field and user identification type.
-
A user identifier uniquely identifies a user in the table. No two rows can share the same user identifier. The user identifier field is marked with an
 icon.
icon. -
The user identity type is the ID type that corresponds to the user identifier.
-
-
In the field list, turn off the Import switch for fields that do not need to be imported. Disabled fields are excluded from all applications but can be re-enabled later when editing the table configuration.
-
Set the tag alias and tag type for the fields to be imported, set the ID type and ID encryption method for the ID field, and set the attribute mapping, tag category, and tag description for the non-ID field.
-
The tag alias is the display name used for the field in subsequent operations.
-
Attribute Mapping: An attribute refers to a User Attributes, which defines a user's basic information. If a field stores a user attribute value, map it to the corresponding user attribute. After mapping, the mapped user attribute name replaces the tag alias in operations such as tag filtering.
NoteIf the field name matches the attribute code of a user attribute, the field is automatically mapped to that attribute. You can modify the mapping as needed.
-
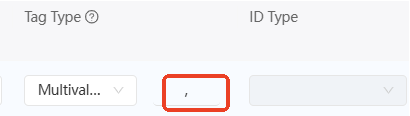
If the tag type is multi-value, you must enter the separator on the right and cannot select the ID type, as shown in the following figure.
-
When you configure a tag category, click Manage Tag Category in the drop-down list. In the dialog box that appears, you can modify the tag category. For more information, see Tag Category Management.
-
-
Click Complete.
After configuring the table structure, configure a scheduling task to import data. For more information, see Scheduling Task. For information about managing table structures, see Table Structure Configuration Management.
Tag category management
To manage tag categories, click Manage Tag Category in the drop-down list. The following dialog box appears. 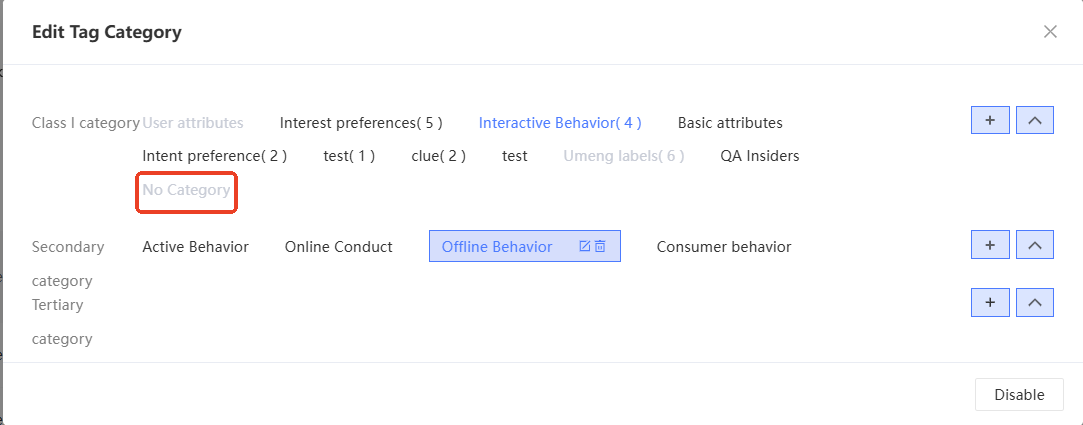
-
Click the + icon next to a category to add a subcategory. To add a second-level or third-level category, first select the parent category.
-
Click an existing category to display its subcategories. The
 and
and  icons appear, which you can click to edit or delete the category.
 -
Unclassified is the default category. All tags without a category belong to Unclassified. If you delete a category, its tags are moved to the Unclassified category.