PolarDB for PostgreSQL integrates Apache AGE, an open-source graph engine. This integration lets you run standard SQL and openCypher graph queries in the same cluster, so you can store, query, and analyze graph data for complex relationship scenarios.
The visualization tool is a browser-based interface for exploring graph data interactively. It connects directly to your PolarDB cluster and renders query results as a visual graph — nodes, edges, and their properties — without requiring any local installation.
Prerequisites
Before you begin, make sure you have:
A PolarDB for PostgreSQL cluster that meets the applicability requirements
A database account with the necessary access permissions
The public IP address of the machine you will use to access the visualization tool
Step 1: Create a graph application
Open the PolarDB console and navigate to your cluster. Use either of the following paths:
In the left navigation pane, click PolarDB AI, then click Create AI Application.
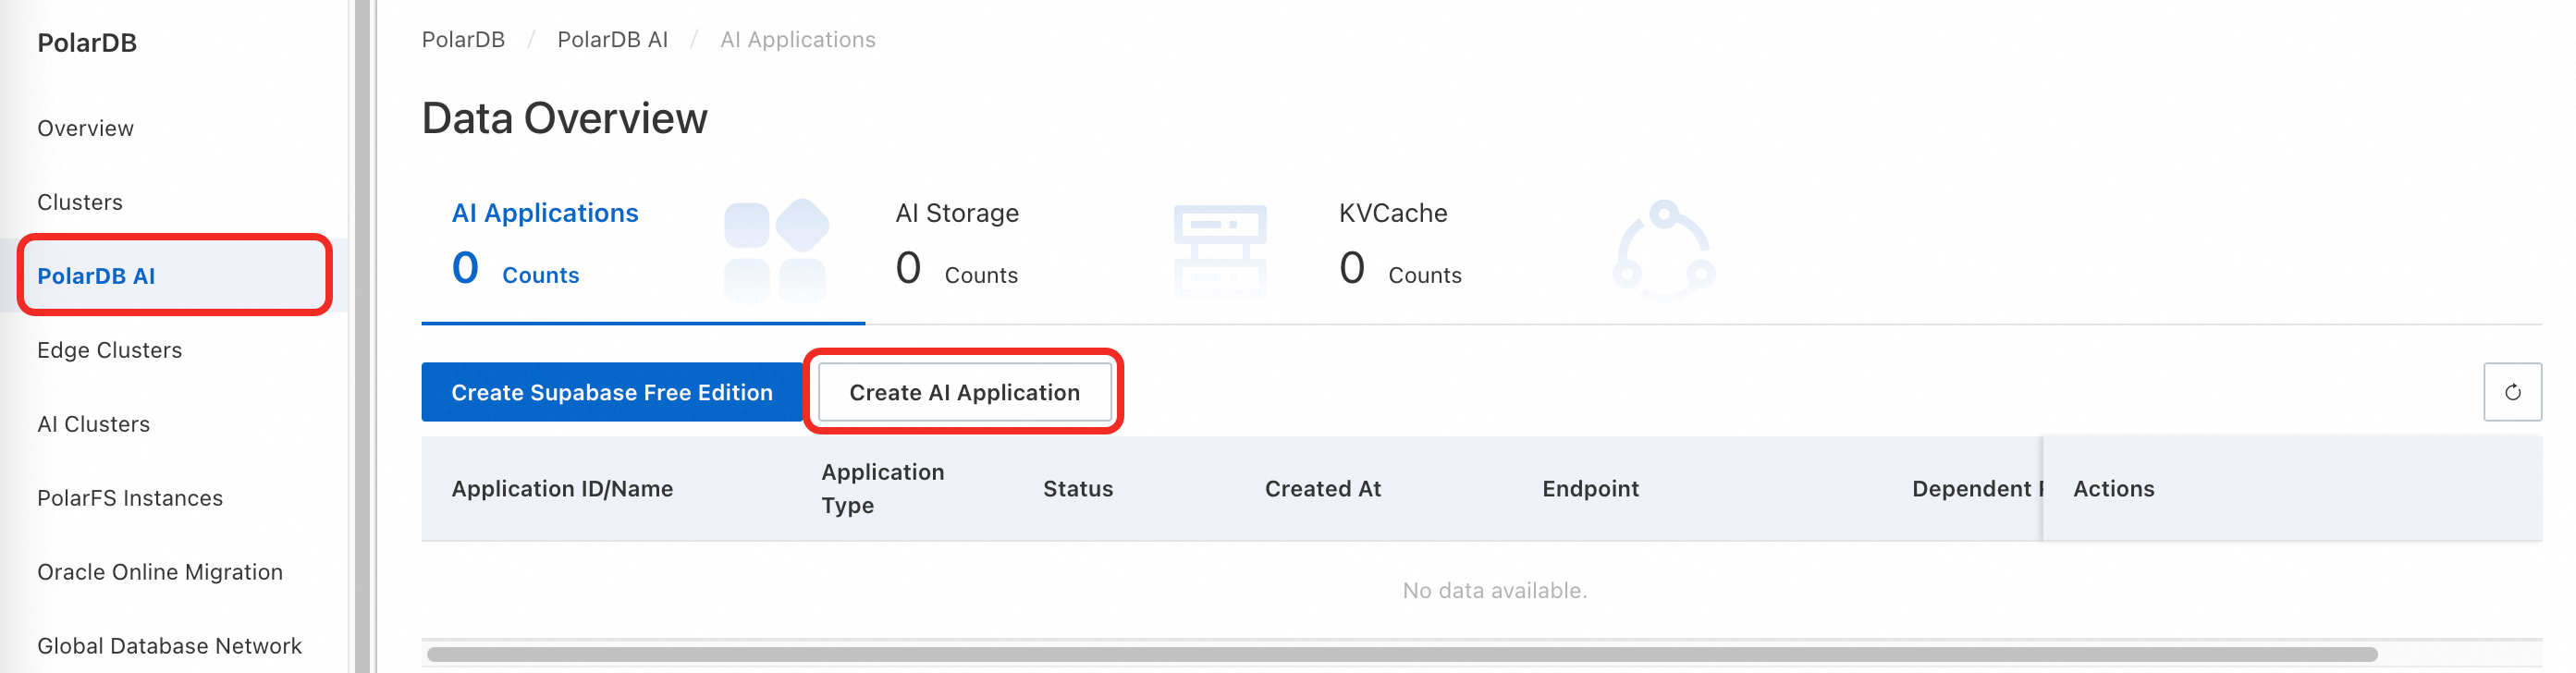
In the left navigation pane, click Clusters. On the cluster details page, choose AI Capabilities > AI Applications, then click Create AI Application.
On the purchase page, configure the application:
Configuration item Description Billing method Subscription: Pay upfront for a fixed term. Suitable for stable, long-term workloads. The longer the term, the larger the discount. Pay-as-you-go: Pay based on actual usage duration. Suitable for flexible workloads. Engine Fixed as PolarDB. Region Select the region where your PolarDB for PostgreSQL cluster is located. The application and cluster must be in the same region. To avoid routing traffic over the public network, deploy the application and the Elastic Compute Service (ECS) instance you plan to connect from in the same region. NoteRegion cannot be changed after purchase.
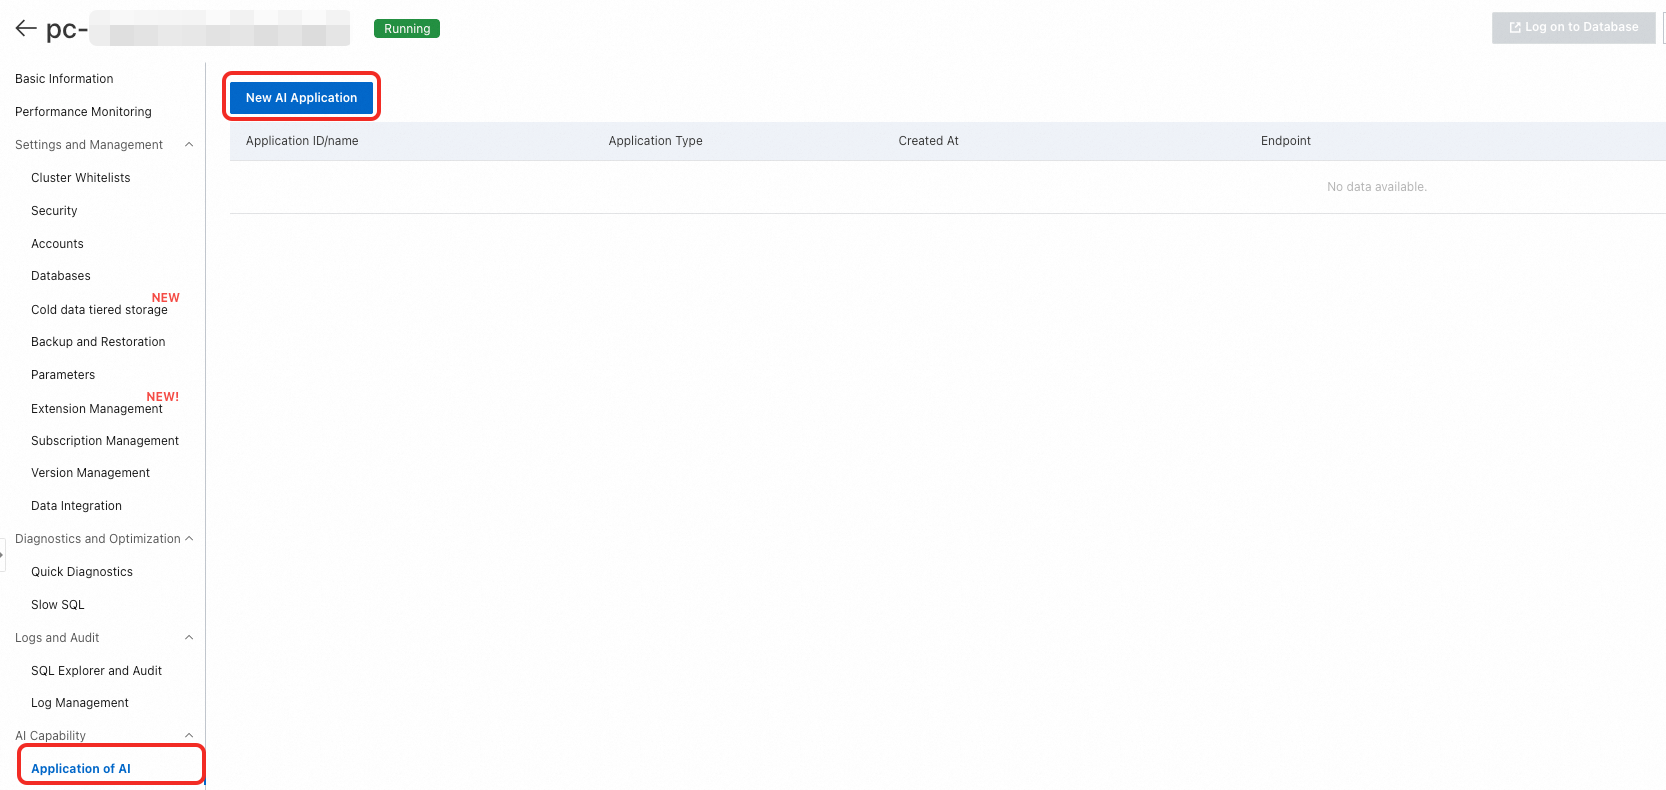
Architecture Select AI Application. Ecosystem Auto-filled from the source PolarDB cluster. Source PolarDB cluster Select the PolarDB cluster for which you want to create the application. Version Auto-filled from the source PolarDB cluster. AI application Select Graph Management. Component set Customize the number and specifications of Backend Components as needed. AI application name Enter a custom name. The name must be 2–256 characters and cannot start with http://orhttps://.Network type Fixed as VPC. VPC Auto-filled from the source PolarDB cluster. Zone and vSwitch Select a vSwitch in the same primary zone as your PolarDB for PostgreSQL cluster for optimal network performance. To create a new vSwitch, see Create a vSwitch. Security group Select the security group for the application. Quantity Select the number of applications to purchase. Each PolarDB for PostgreSQL cluster can have only one AI application of the same type. (Subscription only.) Duration Select the subscription term. (Subscription only.) Auto-renewal Enable auto-renewal to prevent service interruptions. (Subscription only.) After purchase, go to the AI Applications page of your cluster. The system takes 3 to 5 minutes to create the application.
Step 2: Connect to the graph application
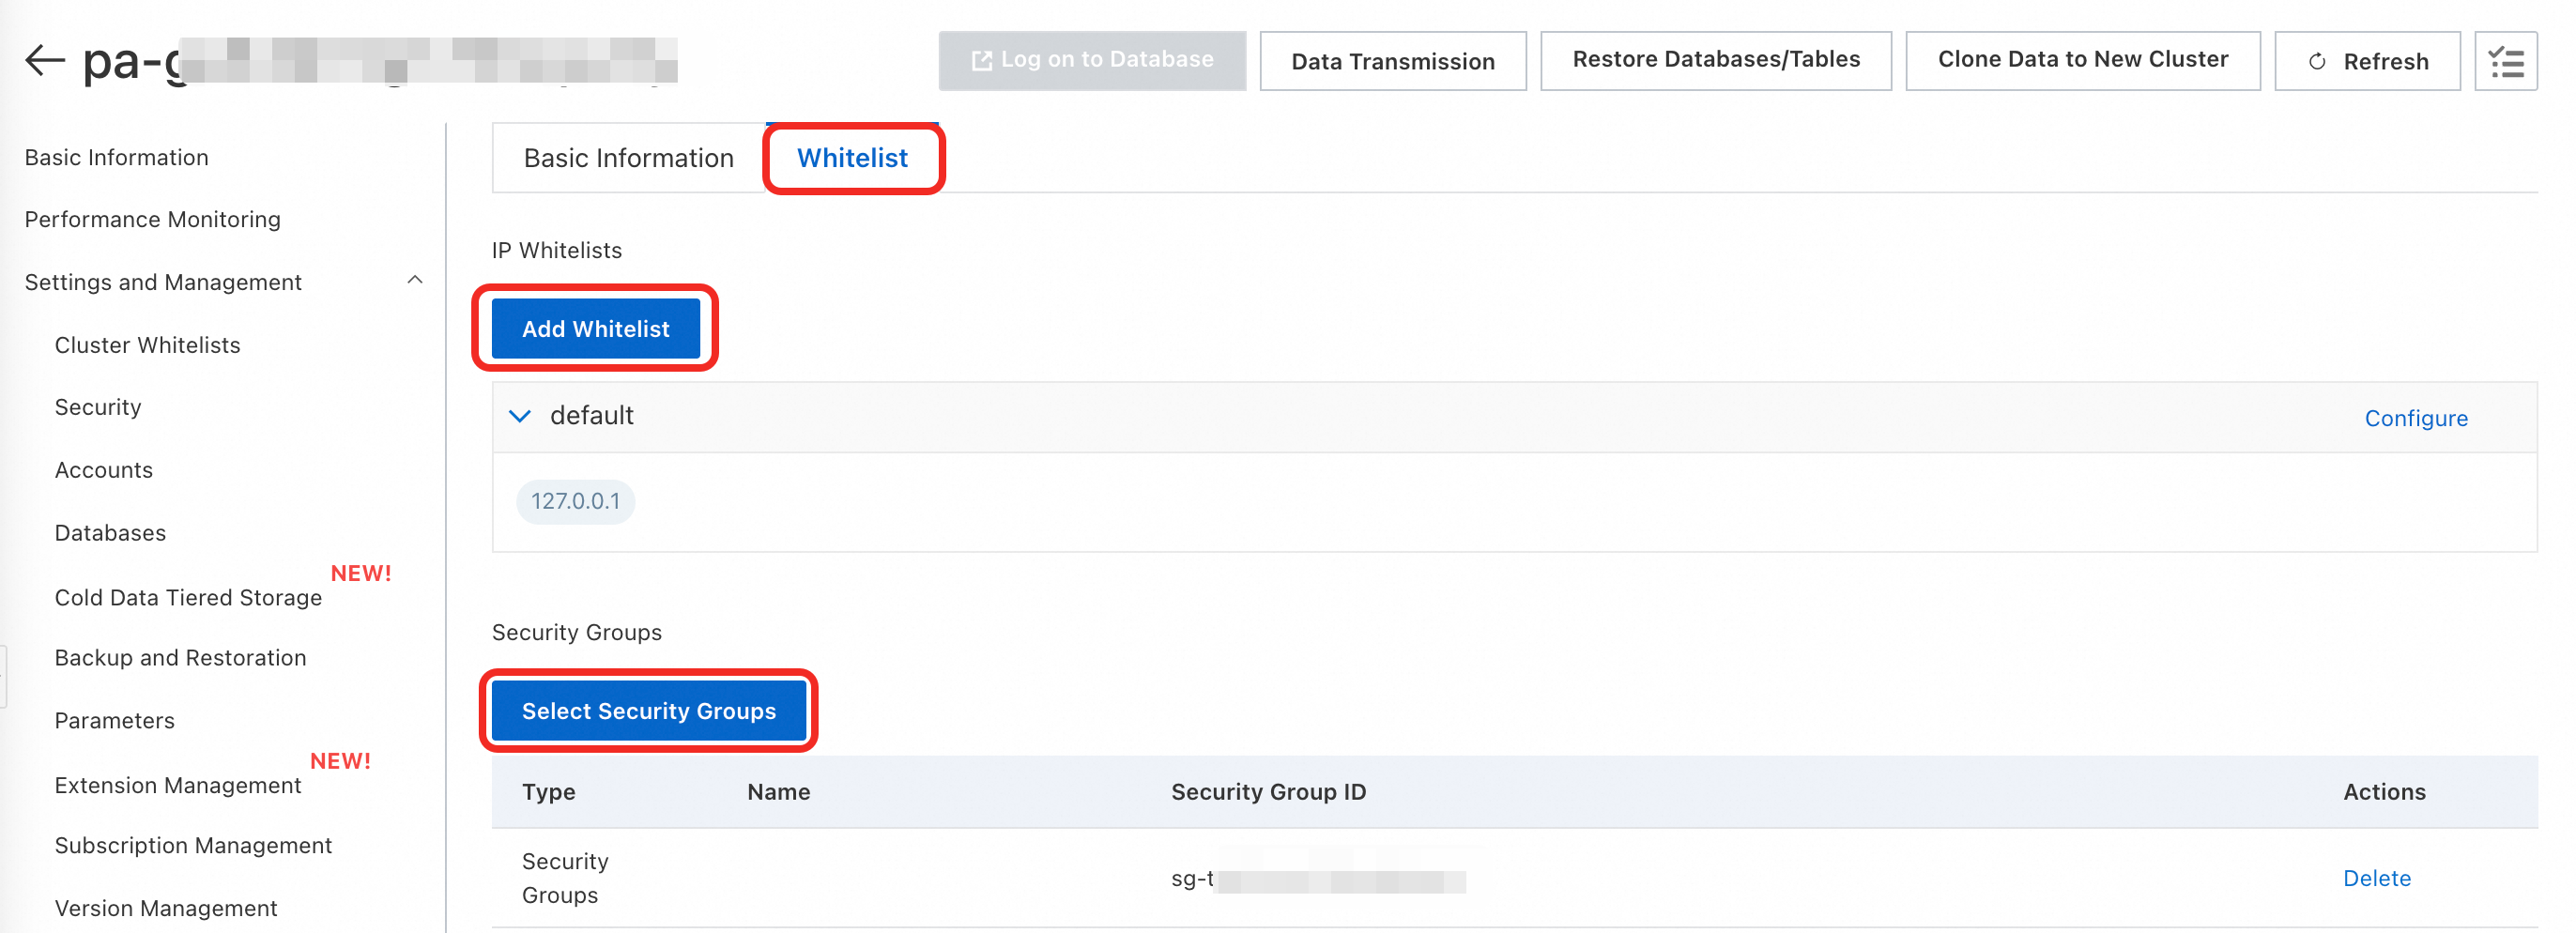
Configure the whitelist
The application whitelist is separate from the cluster whitelist and must be configured independently.
On the AI Applications list page, click your Application ID to open the application details page.
On the Whitelist tab, click Add Whitelist, Select Security Groups, or Configure to add the IP address or security group of the machine that needs access:
If your ECS instance is in the same Virtual Private Cloud (VPC) as the application, add the private IP address of the ECS instance or its VPC CIDR block.
If your ECS instance is in a different VPC, add the public IP address of the ECS instance or the security group where it is located.
If you are connecting from an on-premises server or another cloud provider, add its public IP address.
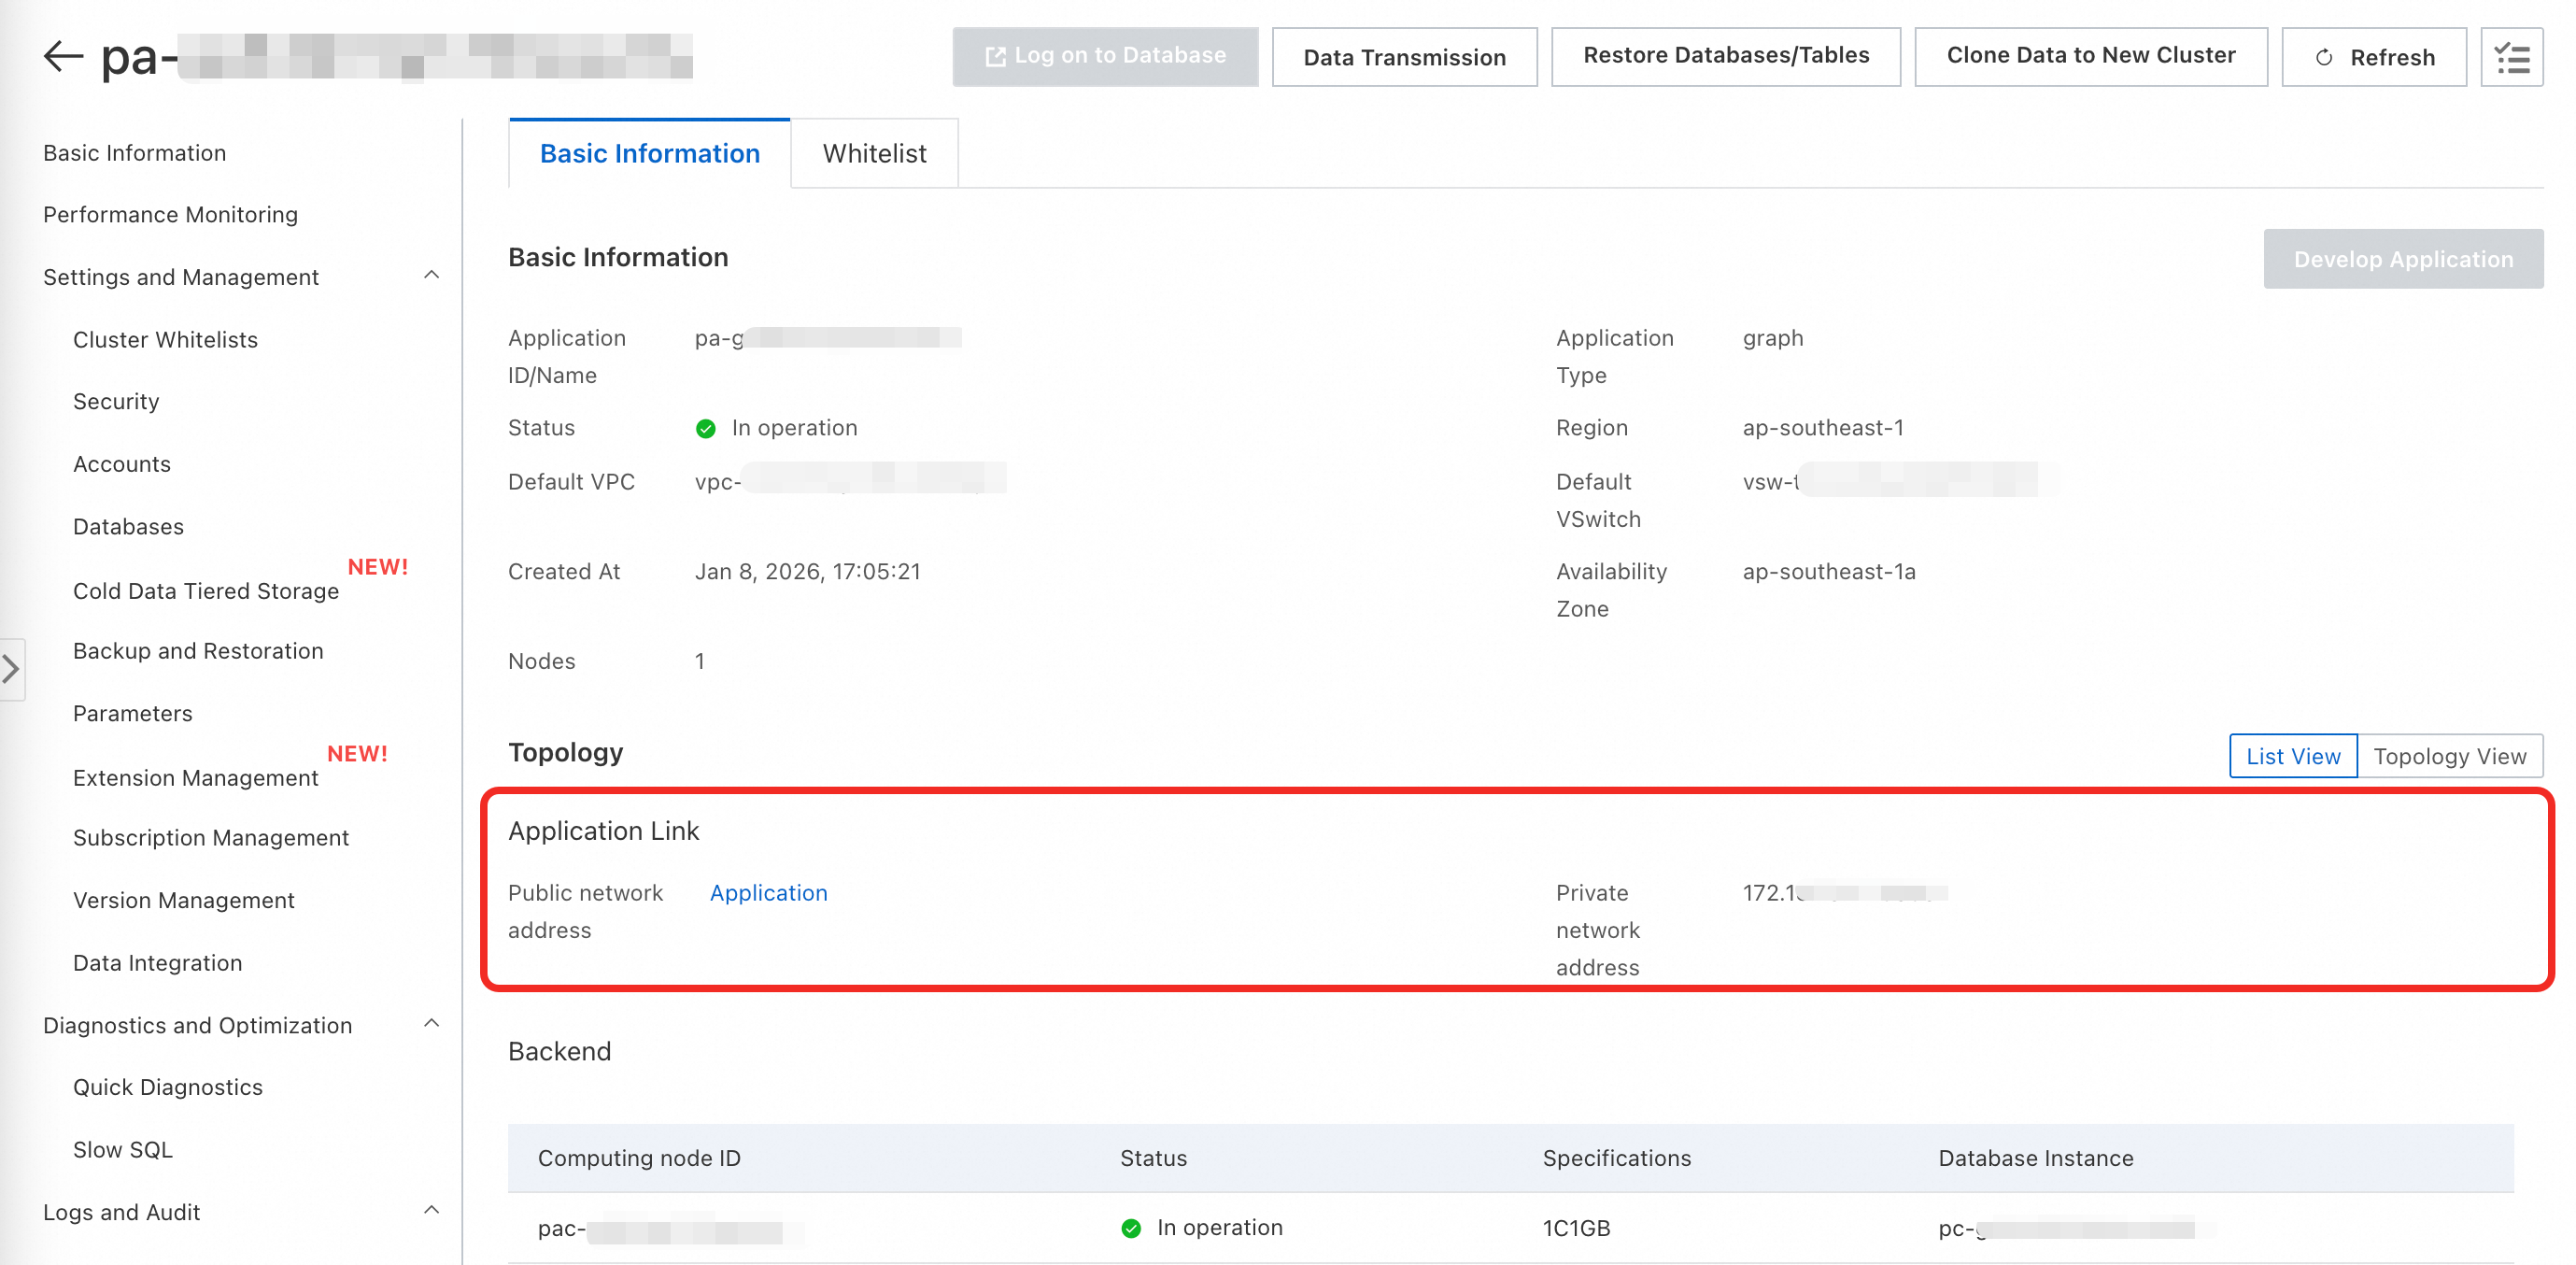
Get the endpoint
On the application details page, go to the Basic Information tab.
In the Topology section, copy the Private Endpoint.
The public endpoint is not created by default. Click Request to submit a request. The public endpoint provides only an IP address and port — if you need a domain name, bind one yourself.
Step 3: Create the extension and configure the database
Create the extension
Run the following statement using a privileged account:
CREATE EXTENSION age;The age extension does not support manual creation. To use this feature, submit a ticket to request its creation.Per-connection settings
For each new database connection, add ag_catalog to the search_path and load the extension using the get_cypher_keywords function:
SET search_path = ag_catalog, "$user", public;If you use Data Management Service (DMS) to run this statement, compatibility issues may occur. Use PolarDB-Tools instead.
Permanent settings
To avoid repeating the per-connection setup on every new connection, use a privileged account to set these database parameters once:
ALTER DATABASE <dbname> SET search_path = "$user", public, ag_catalog;
ALTER DATABASE <dbname> SET session_preload_libraries TO 'age';
Grant access to regular users (optional)
Grant the USAGE permission on the ag_catalog schema:
GRANT USAGE ON SCHEMA ag_catalog TO <username>;If the user also needs to create tables, grant the CREATE permission:
GRANT CREATE ON DATABASE <dbname> TO <username>;Step 4: Create a graph and insert data
Create a graph
Use the create_graph function in the ag_catalog namespace. Create a graph before using it.
Syntax:
SELECT create_graph('<graph_name>');Example:
SELECT ag_catalog.create_graph('moviedb');Insert data
Use a Cypher CREATE statement wrapped in a cypher() SQL function call. The following example inserts sample data into the moviedb graph:
SELECT * FROM cypher('moviedb', $$
CREATE (matrix:Movie {title: 'The Matrix', released: 1997})
CREATE (cloudAtlas:Movie {title: 'Cloud Atlas', released: 2012})
CREATE (forrestGump:Movie {title: 'Forrest Gump', released: 1994})
CREATE (keanu:Person {name: 'Keanu Reeves', born: 1964})
CREATE (robert:Person {name: 'Robert Zemeckis', born: 1951})
CREATE (tom:Person {name: 'Tom Hanks', born: 1956})
CREATE (tom)-[:ACTED_IN {roles: ['Forrest']}]->(forrestGump)
CREATE (tom)-[:ACTED_IN {roles: ['Zachry']}]->(cloudAtlas)
CREATE (robert)-[:DIRECTED]->(forrestGump)
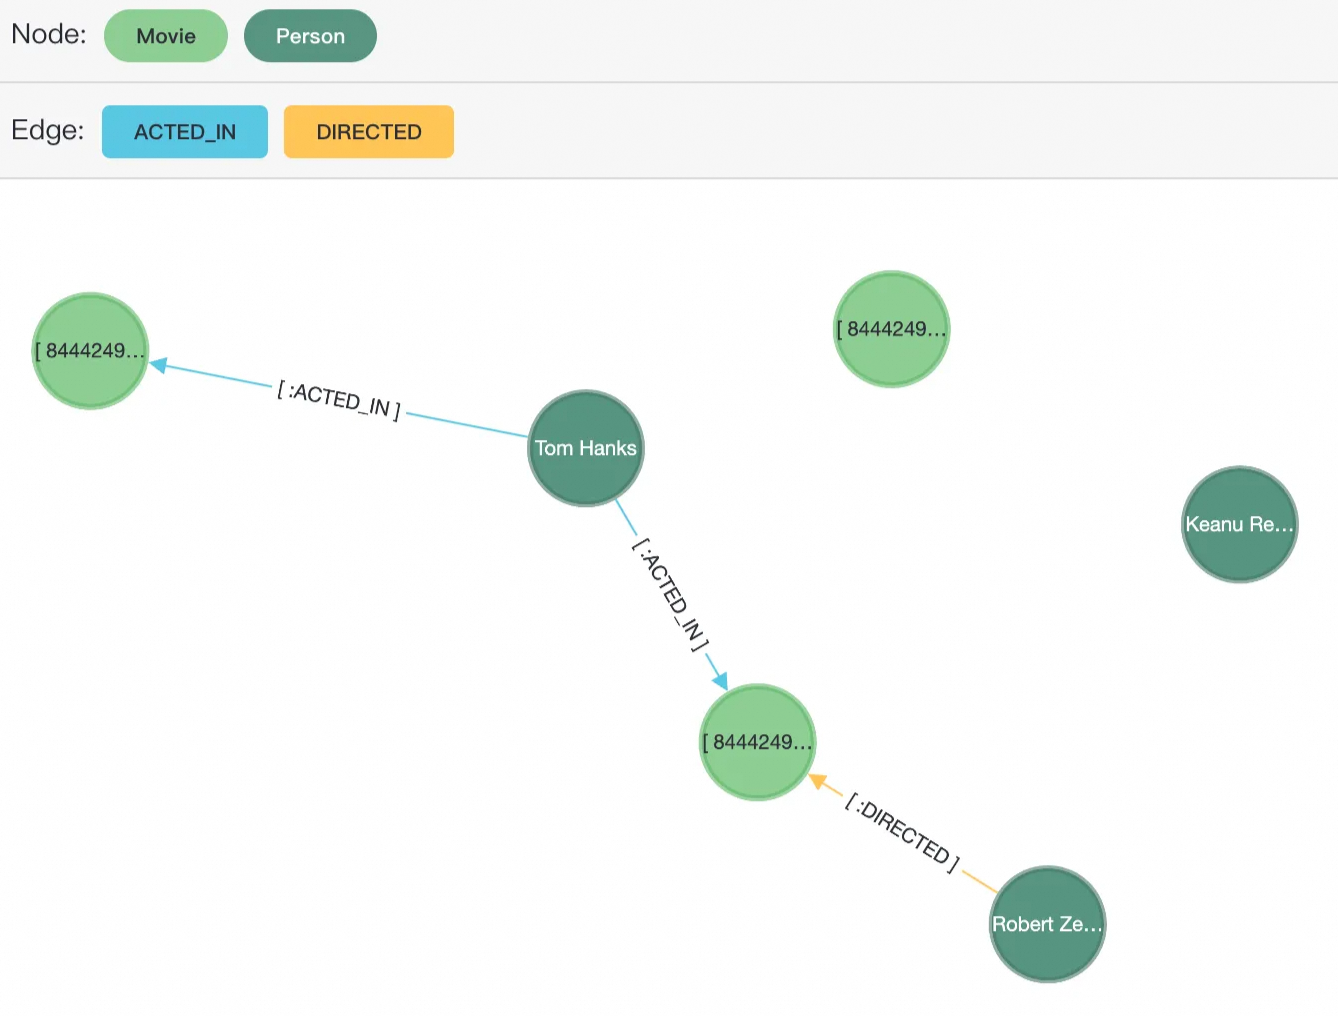
$$) AS (result1 agtype);This creates six nodes — three with the Movie label and three with the Person label — and three edges: two ACTED_IN and one DIRECTED.
Step 5: Develop the application
Access the visualization tool
First, add your public IP address to the application whitelist (see Step 2).
Then open the visualization tool using either method:
On the AI Applications list page, click Develop Application. This opens the public endpoint in your browser.
Enter the public IP address and port of the application directly in your browser's address bar.

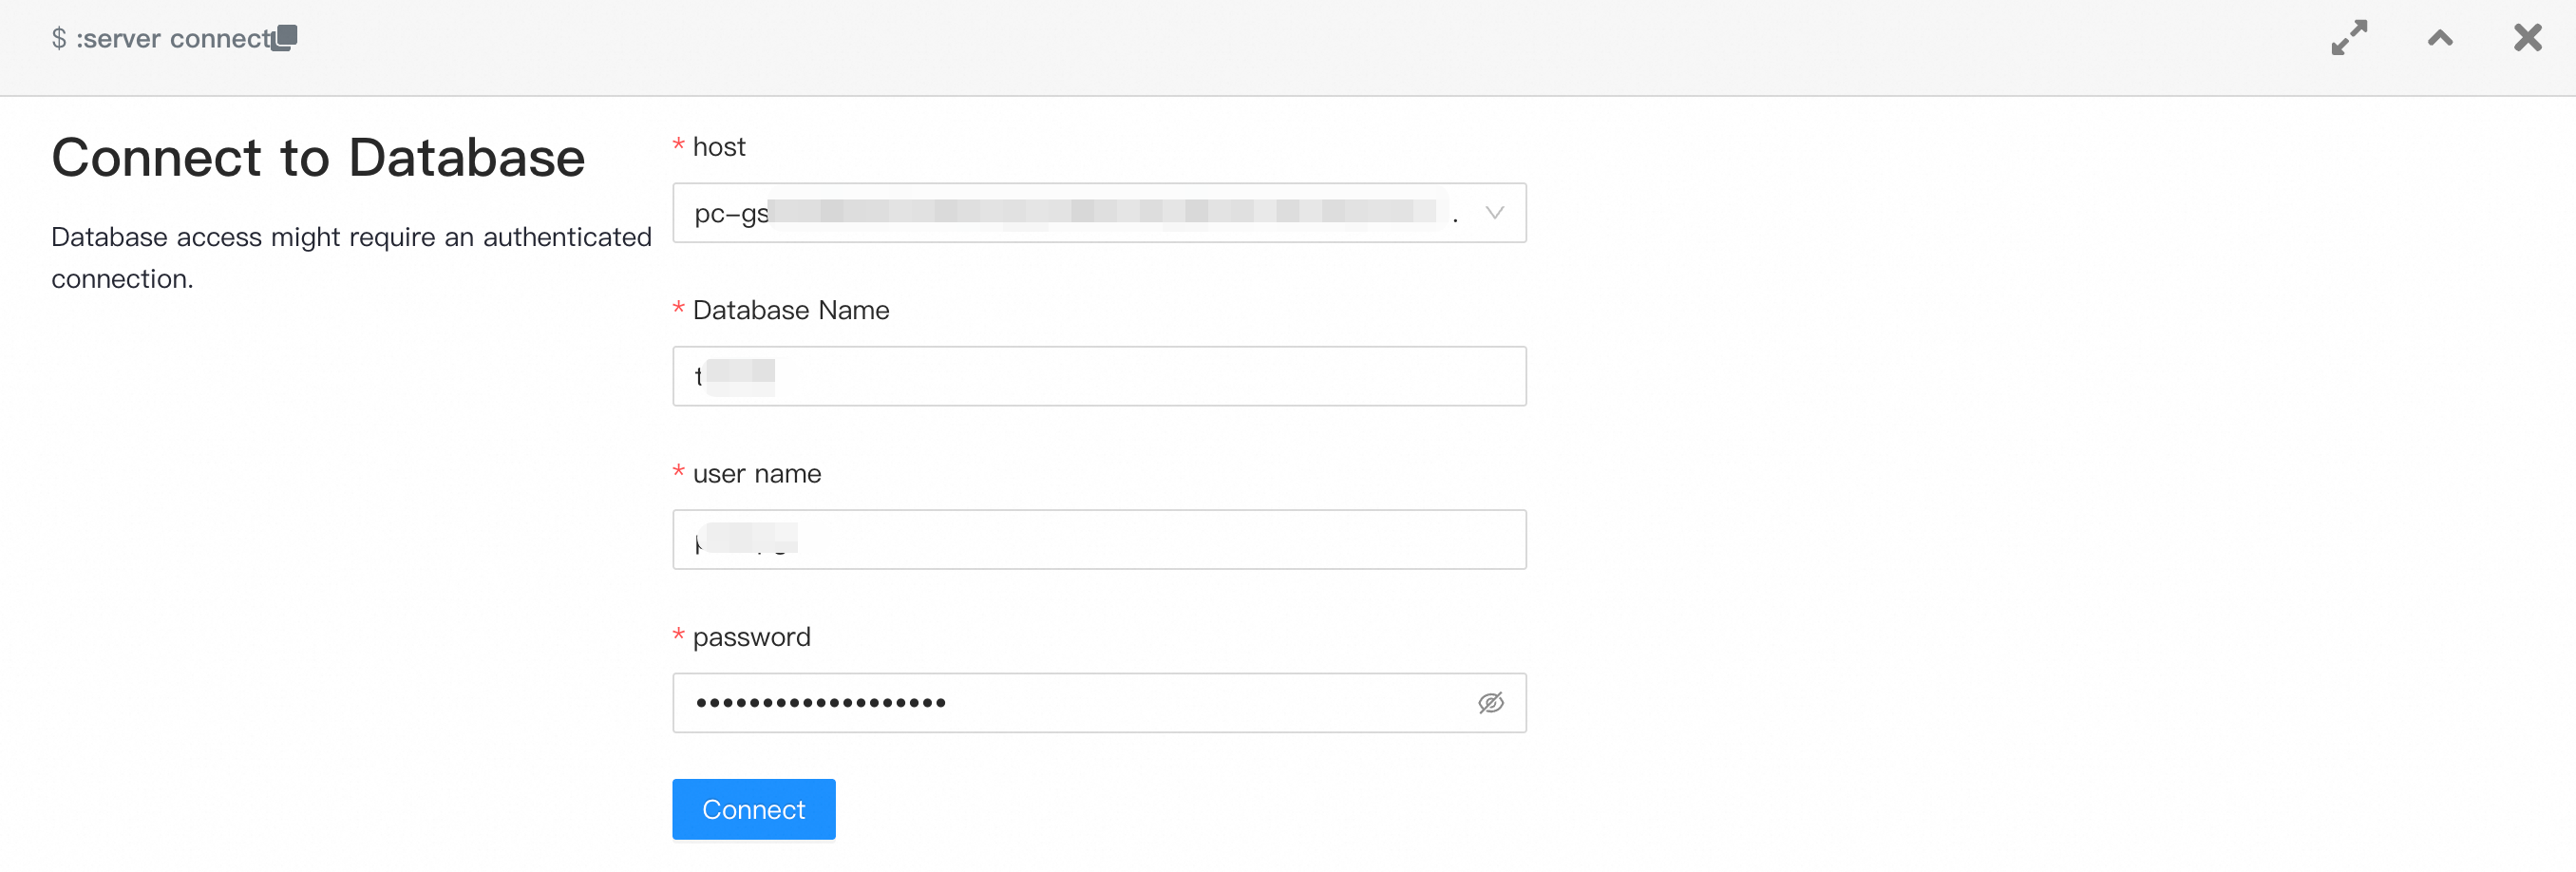
Log in
On the login page, enter the following connection details:
| Field | Value |
|---|---|
| host | The endpoint of your PolarDB cluster (from Step 2). |
| Database name | The name of a database in the cluster. To create one, see Manage databases. |
| User name | A database account with access to the target database. |
| Password | The password for the database account. |
Query data
All queries use the cypher() SQL function. Inside the function, use the Cypher MATCH keyword for pattern matching and RETURN to specify the output.
Syntax:
SELECT * FROM cypher('graph_name', $$
MATCH <patterns>
RETURN <variables>
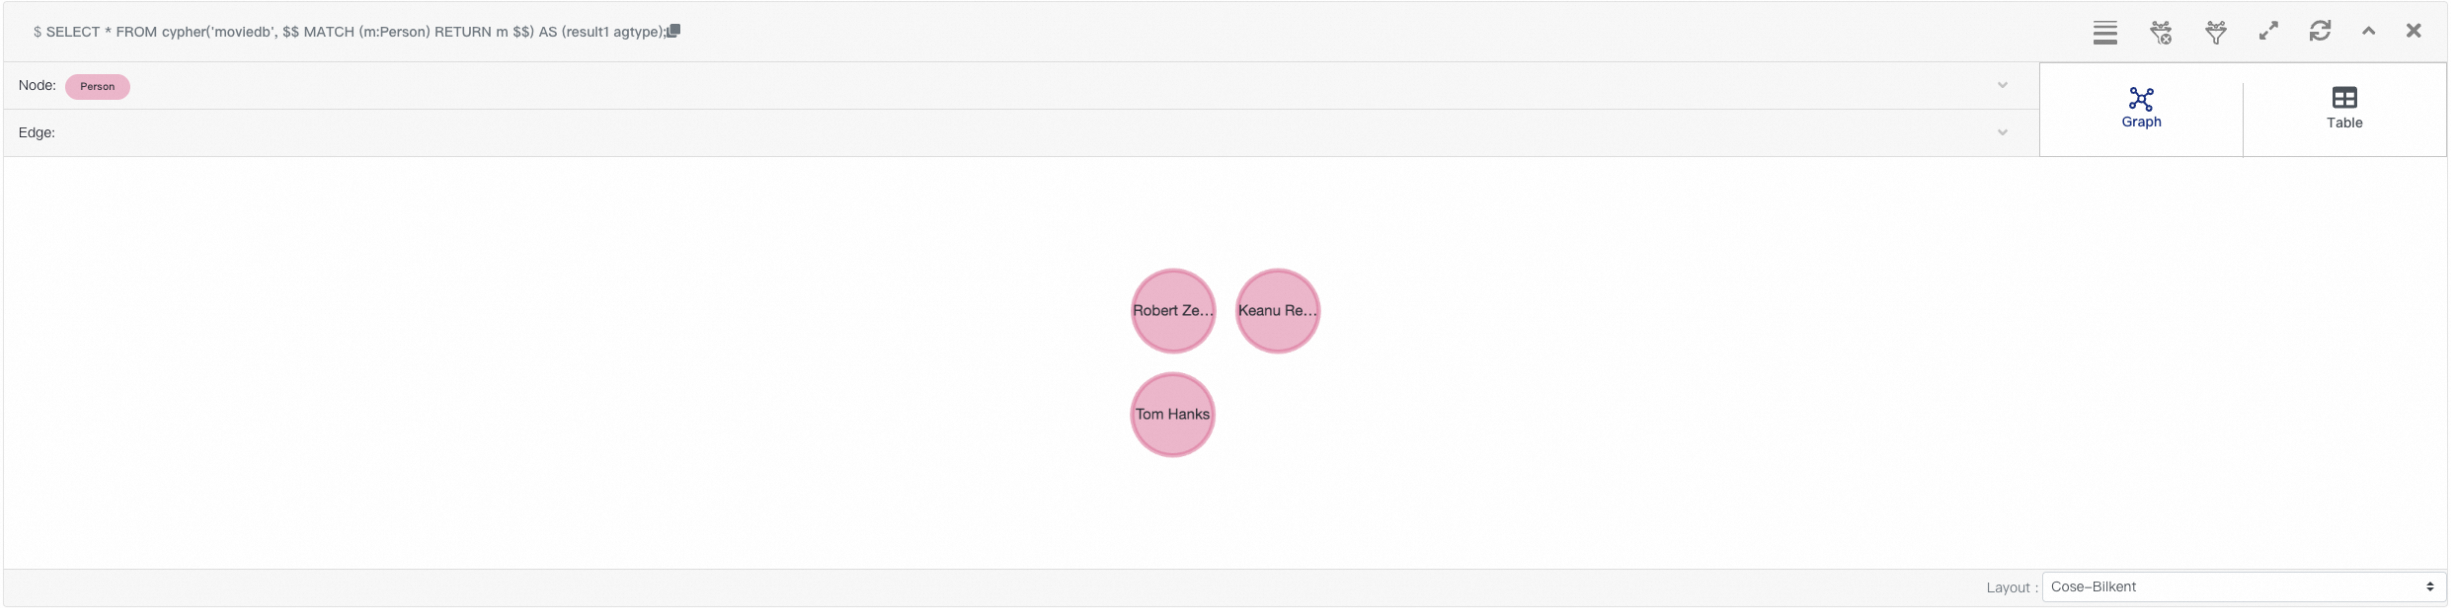
$$) AS (result1 agtype);Example — query all Person nodes in moviedb:
SELECT * FROM cypher('moviedb', $$
  MATCH (m:Person)
  RETURN m
$$) AS (result1 agtype);
After the query runs, the three Person nodes appear in the visualization area.
Step 6: Release the graph application (optional)
When you no longer need the visualization tool, release the application to stop incurring charges.
In the AI Applications list, find the application and click Release Application in the Actions column.
Releasing a graph application deletes only the visualization tool (the web interface). It does not delete any graph data stored in your PolarDB cluster. After release, all configurations — including the public endpoint — are permanently lost and cannot be recovered.