PolarSearch is PolarDB's distributed search service, supporting both full-text search and vector search. Built on OpenSearch, it is compatible with the Elasticsearch ecosystem and tightly integrated with PolarDB databases. PolarSearch offers a one-stop solution that simplifies your data retrieval.
This guide assumes that you have a basic understanding of Elasticsearch or OpenSearch. For more information, see the OpenSearch Documentation.
Prerequisites
Cluster configuration requirements
Product Edition: Enterprise Edition.
Series: Cluster Edition.
Database Engine: MySQL 8.0.1 or MySQL 8.0.2.
NoteThere are no specific minor version requirements for the database engines listed above. For more information, see Query the version number.
Supported regions and availability zones
PolarSearch is supported in the following availability zones:
Region | Availability zone |
China (Hangzhou) | Zone K, Zone J |
China (Shanghai) | Zone E, Zone F, Zone L, Zone N |
China (Shenzhen) | Zone C, Zone D, Zone F |
China (Beijing) | Zone F, Zone L, Zone I, Zone K |
China (Zhangjiakou) | Zone B |
China (Ulanqab) | Zone B, Zone C |
China (Hong Kong) | Zone B, Zone D |
Singapore | Zone A, Zone B |
Japan (Tokyo) | Zone A, Zone C |
South Korea (Seoul) | Zone A, Zone B |
Germany (Frankfurt) | Zone A |
US (Silicon Valley) | Zone B |
Philippines (Manila) | Zone A |
If you need support for additional availability zones, submit a ticket.
Billing
PolarSearch provides search functionality by using dedicated search nodes, and fees are charged for these nodes. Search nodes are billed based on Billing for regular compute nodes. Additionally, the indexes and data in the search nodes consume storage space, which is also subject to corresponding storage fees and .
Add PolarSearch search nodes
You can add search nodes to an existing cluster that meets the Prerequisites.
Log on to the PolarDB console. In the left-side navigation pane, click Clusters. Then, select the region of the cluster and find the target cluster.
Click the cluster ID to open the Basic Information page.
In the Database Nodes section, click Add/Remove Node.

In the Add/Remove Node wizard, choose to add a search node.
Create search node accounts
Set up the admin account
The account you add is a standard account.
This standard account serves as the admin account for PolarSearch.
Log on to the PolarDB console. In the left-side navigation pane, click Clusters. Then, select the region of the cluster and find the target cluster.
Click the cluster ID to open the Basic Information page.
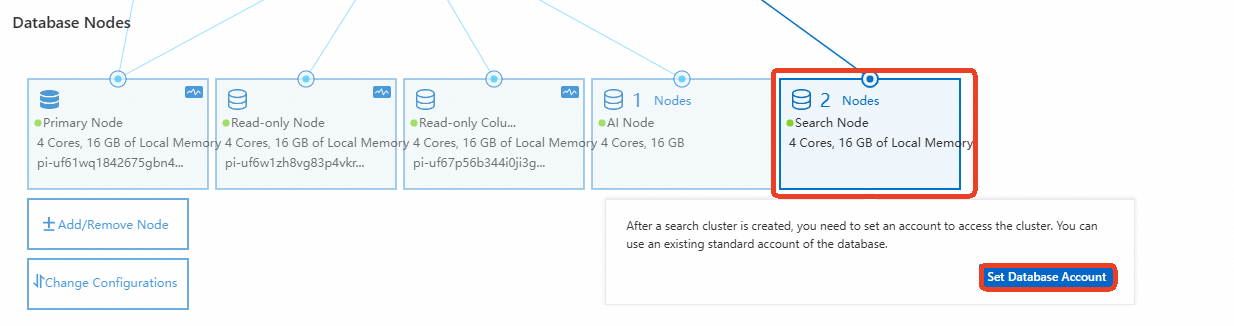
In the Database Nodes section, hover over Search Node and click Set Database Account.
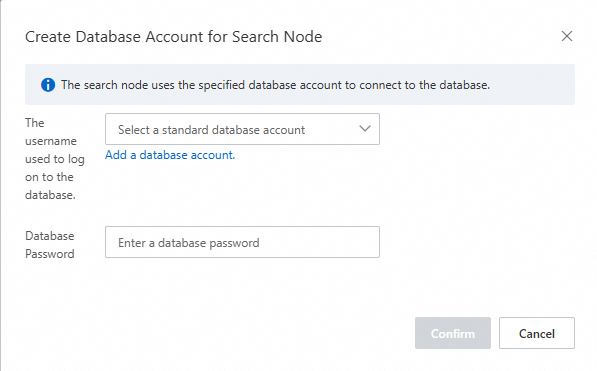
In the dialog box that appears, you can select an existing standard account or create a new one, and then enter the account password.
 Important
The database account name cannot be a substring of its password. The check is case-insensitive. For example, for a database account named
search_test, the password cannot beSEARCH_test@123, but it can beSEARCHtest@123orSEARCH@_test.
Set up standard accounts
Permissions for standard accounts can be configured on a per-index basis. You can set them in two ways: using the Dashboard or the REST API.
Dashboard configuration
The account must have the security_rest_api_access role. Otherwise, the Security page is not displayed.
Create a user:
In the left-side navigation pane, go to the page, select Internal users, and then click Create internal user.

On the user creation page, enter a username and password to create the user. For example, create a user named
testuserwith the passwordUSER@test123, and then click Create.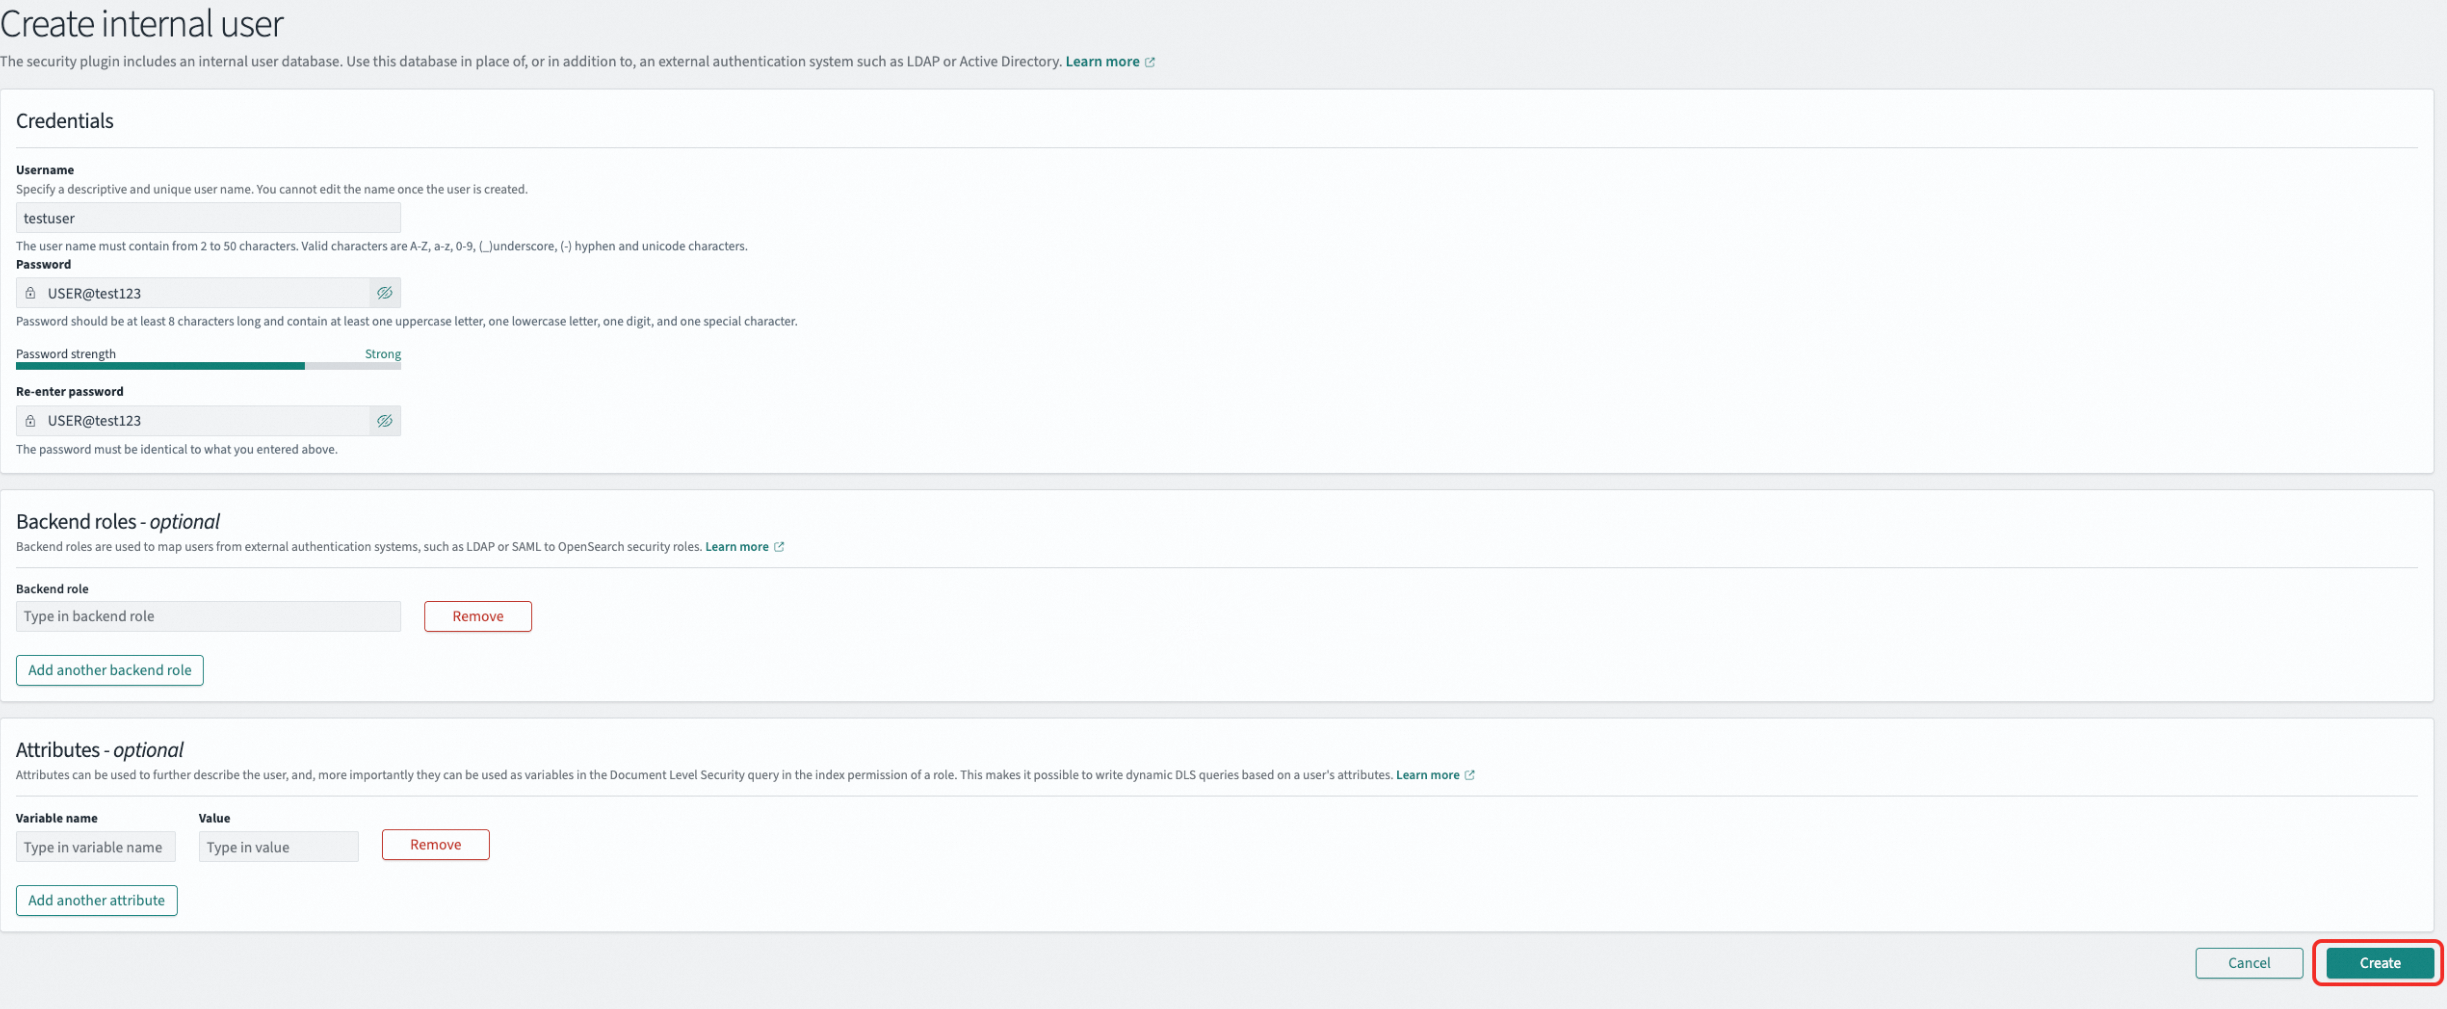
Create a role
In the left-side navigation pane, go to the page, select Roles, and then click Create role.

Role permissions include cluster permissions and index permissions, which you can configure by adding action groups. In the Index field, specify an index name or use the
*wildcard to match a set of index names. In the Index permissions section, select specific permissions, such as read-only or read/write.Example: Create a role named
onlyreadrolethat has full cluster permissions (unlimited is equivalent to full permissions) and read-only permission for all indexes prefixed withindextest.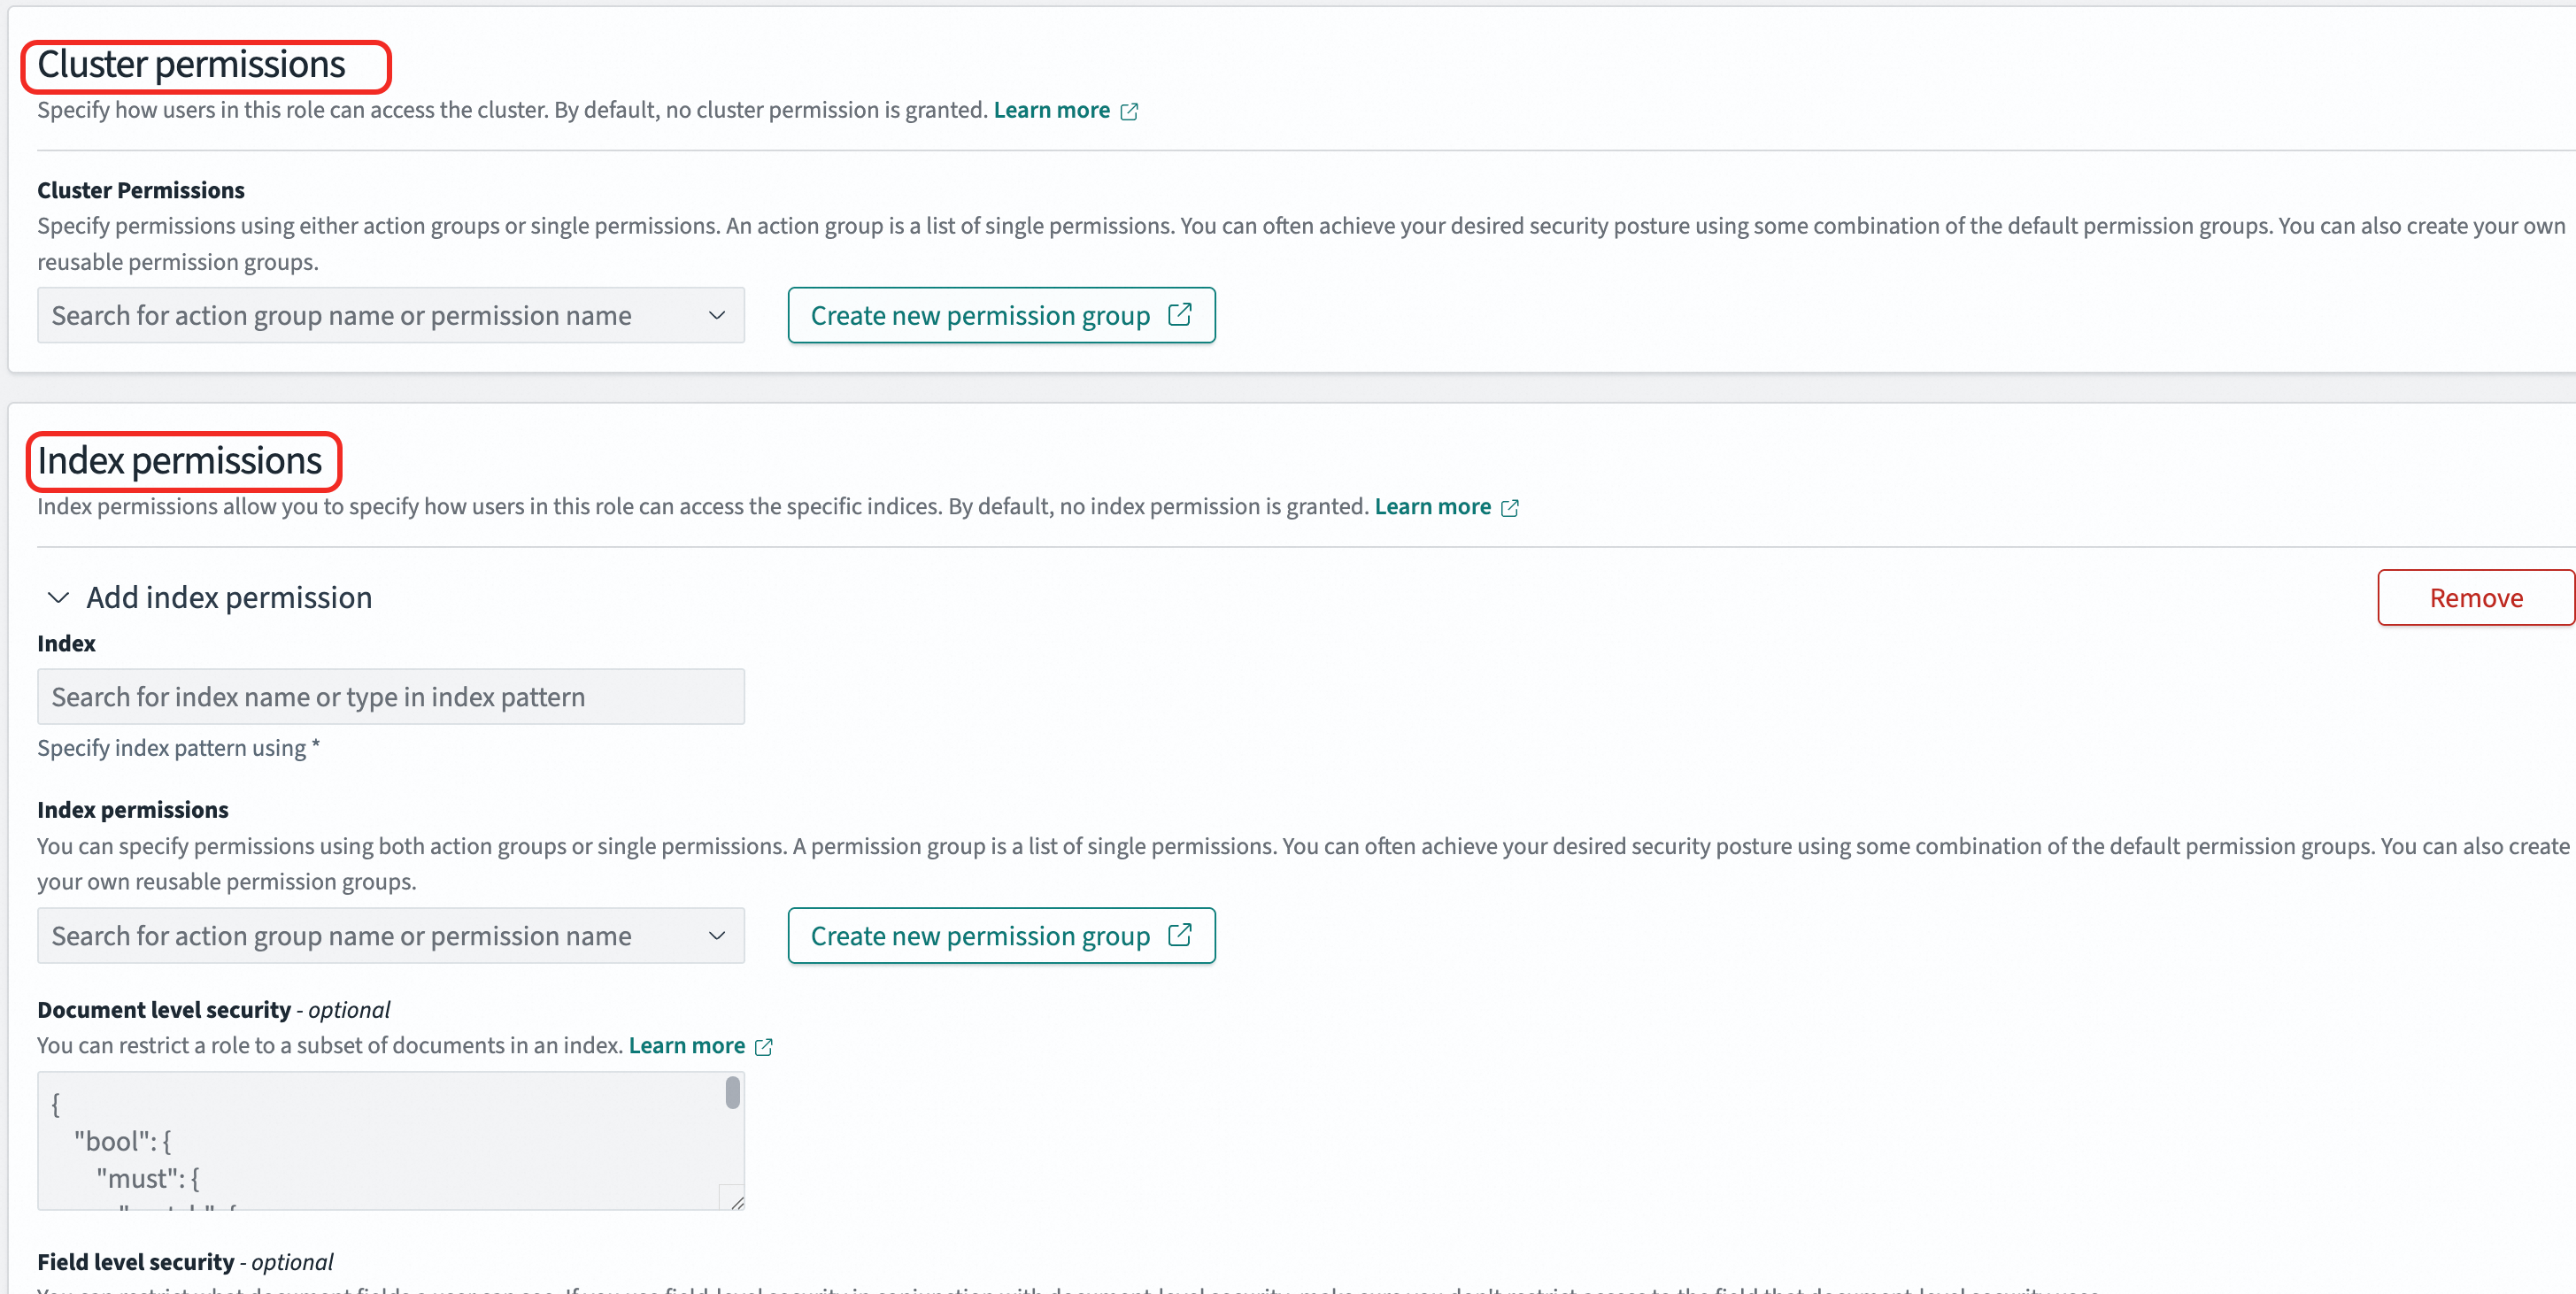
Map a role to a user
In the left-side navigation pane, go to the page, select Roles, and then click the target role.
On the Mapped users tab, add a user mapping. A user can be mapped to multiple roles and inherits the permissions of all mapped roles.
Example: Map the
onlyreadrolerole to thetestuseruser. This grants thetestuseruser the permissions of theonlyreadrolerole.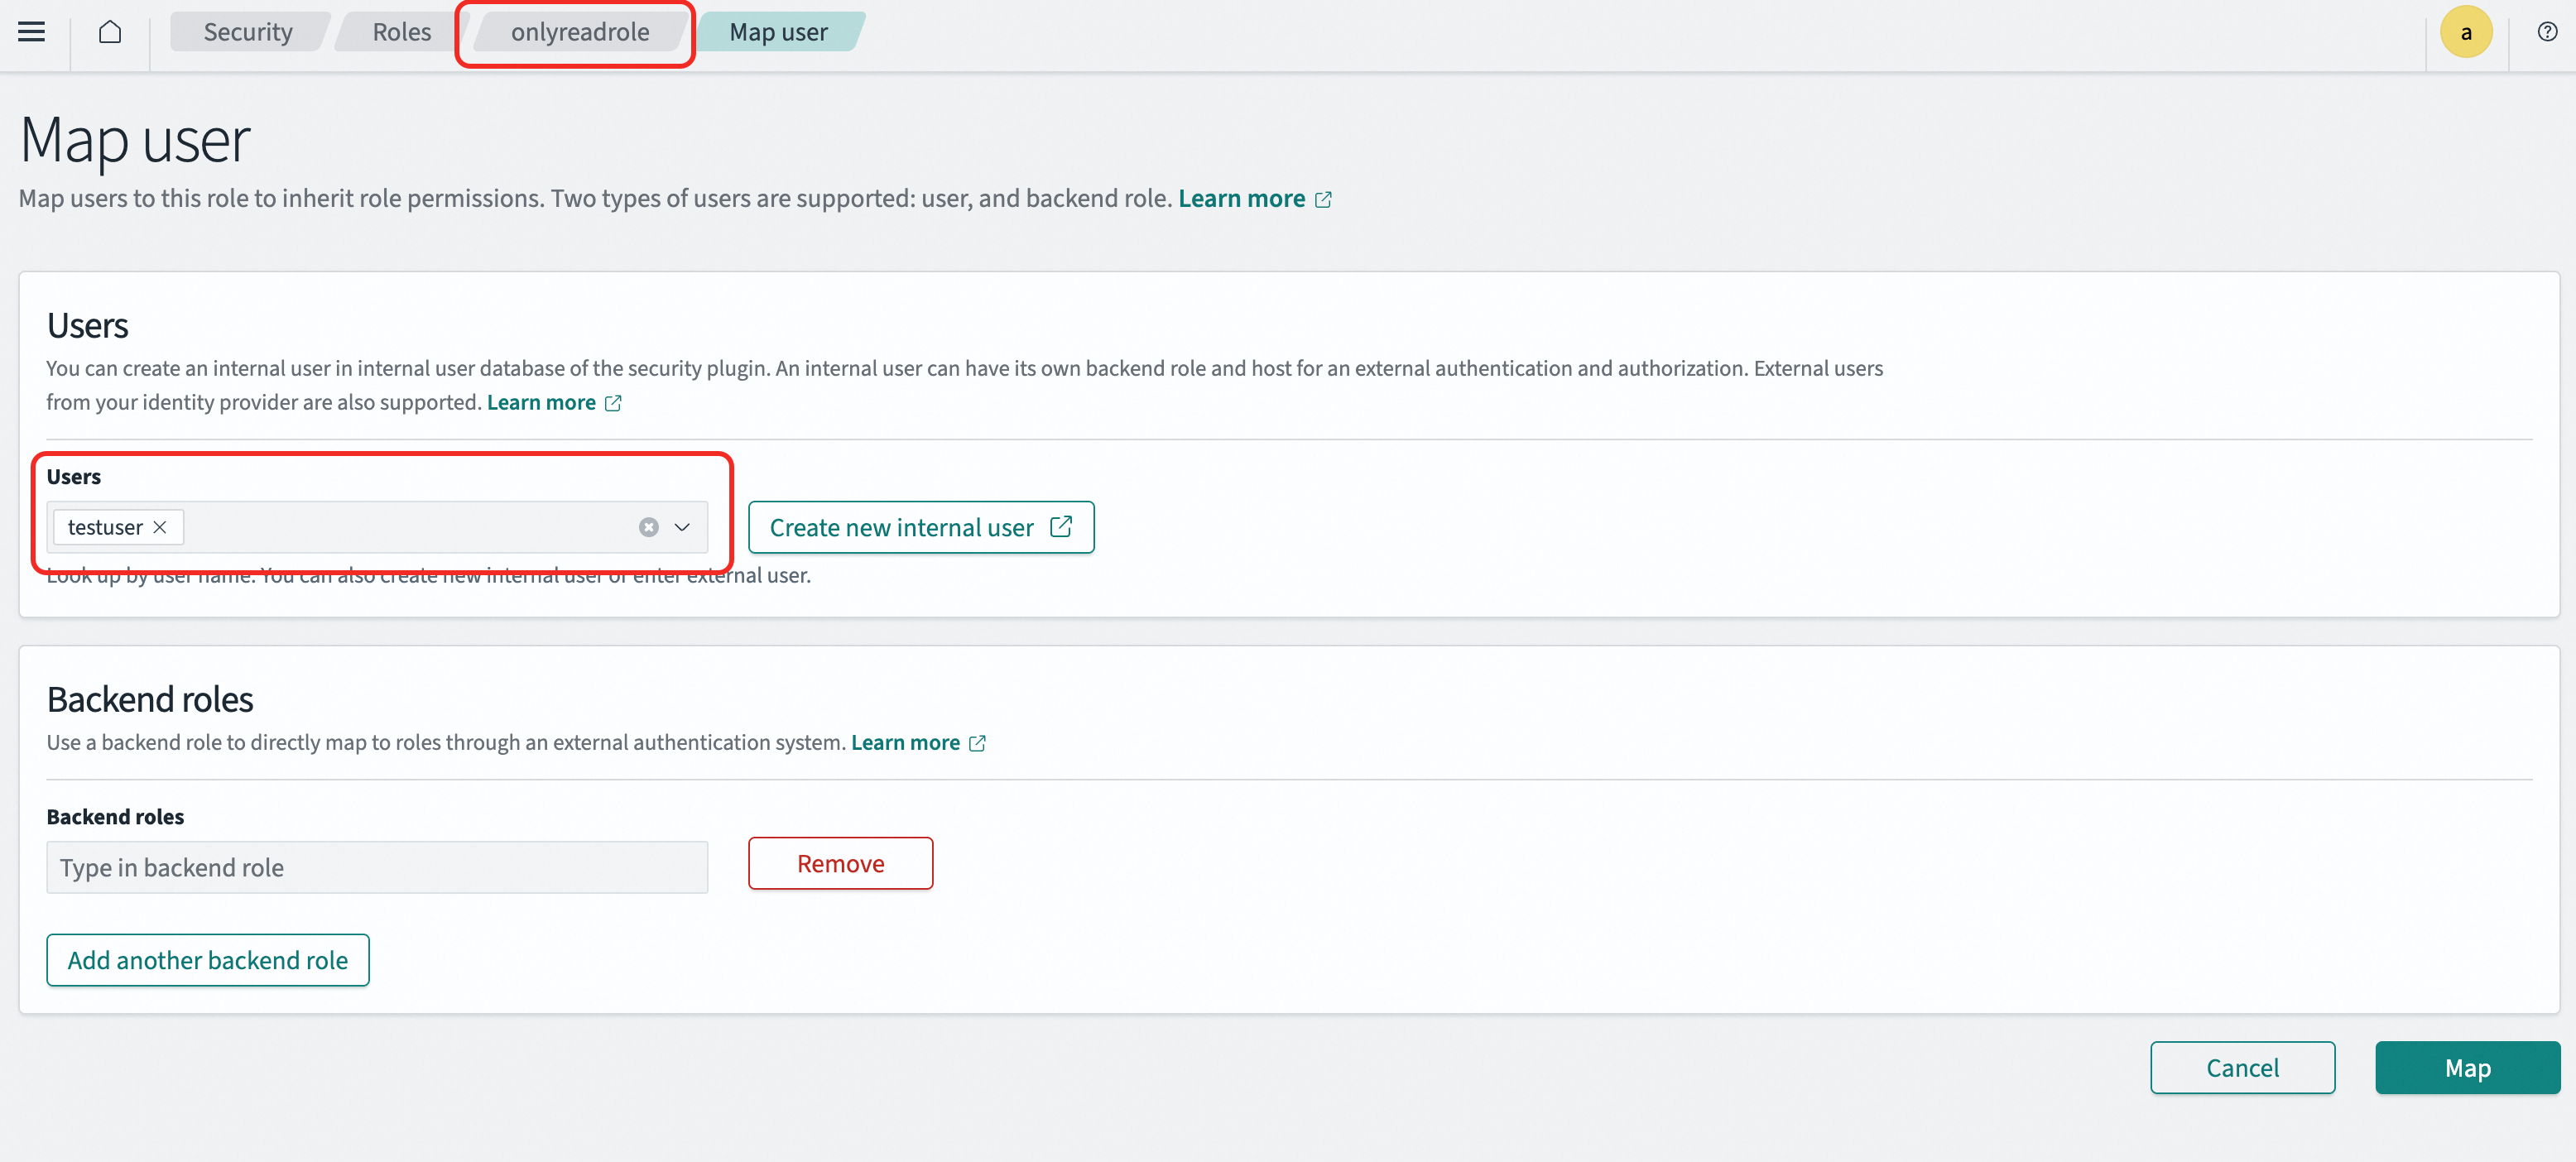
REST API configuration
Search nodes support full access control by using APIs. For more information, see the OpenSearch API documentation.
Create a user
curl -X PUT "http://<endpoint>:<port>/_plugins/_security/api/internalusers/<new_user>" \
  --user "<user_name>:<passwd>" \
  -H "Content-Type: application/json" \
  -d '{
    "password": "<new_password>",
    "backend_roles": [],
    "attributes": {}
  }'
Example: Create a user named
testuserwith the passwordUSER@test123.curl -X PUT "http://<endpoint>:<port>/_plugins/_security/api/internalusers/testuser" \ --user "<user_name>:<passwd>" \ -H "Content-Type: application/json" \ -d '{ "password": "USER@test123", "backend_roles": [], "attributes": {} }'Create a role
curl -X PUT "http://<endpoint>:<port>/_plugins/_security/api/roles/<role_name>" \ --user "<user_name>:<passwd>" \ -H "Content-Type: application/json" \ -d '{ "cluster_permissions": ["*"], "index_permissions": [ { "index_patterns": ["*"], "allowed_actions": ["*"] } ] }'index_patterns: Specifies the indexes to be configured. You can use the*wildcard to configure multiple indexes at once.allowed_actions: Specifies the permissions to grant, such asreadandwrite.
Example: Create a role named
onlyreadrolewith full cluster permissions and read-only permission for all indexes prefixed withindextest.curl -X PUT "http://<endpoint>:<port>/_plugins/_security/api/roles/onlyreadrole" \ --user "<user_name>:<passwd>" \ -H "Content-Type: application/json" \ -d '{ "cluster_permissions": ["*"], "index_permissions": [ { "index_patterns": ["indextest*"], "allowed_actions": ["read"] } ] }'Map a role
curl -X PUT "http://<endpoint>:<port>/_plugins/_security/api/rolesmapping/<role_name>" \
  --user "<user_name>:<passwd>" \
  -H "Content-Type: application/json" \
  -d '{
    "backend_roles": [],
    "hosts": [],
    "users": ["<new_user>"]
  }'
Example: Map the
onlyreadrolerole to thetestuseruser. This grants thetestuseruser the permissions of theonlyreadrolerole.curl -X PUT "http://<endpoint>:<port>/_plugins/_security/api/rolesmapping/onlyreadrole" \ --user "<user_name>:<passwd>" \ -H "Content-Type: application/json" \ -d '{ "backend_roles": [], "hosts": [], "users": ["testuser"] }'
Obtain connection endpoints
Search endpoint
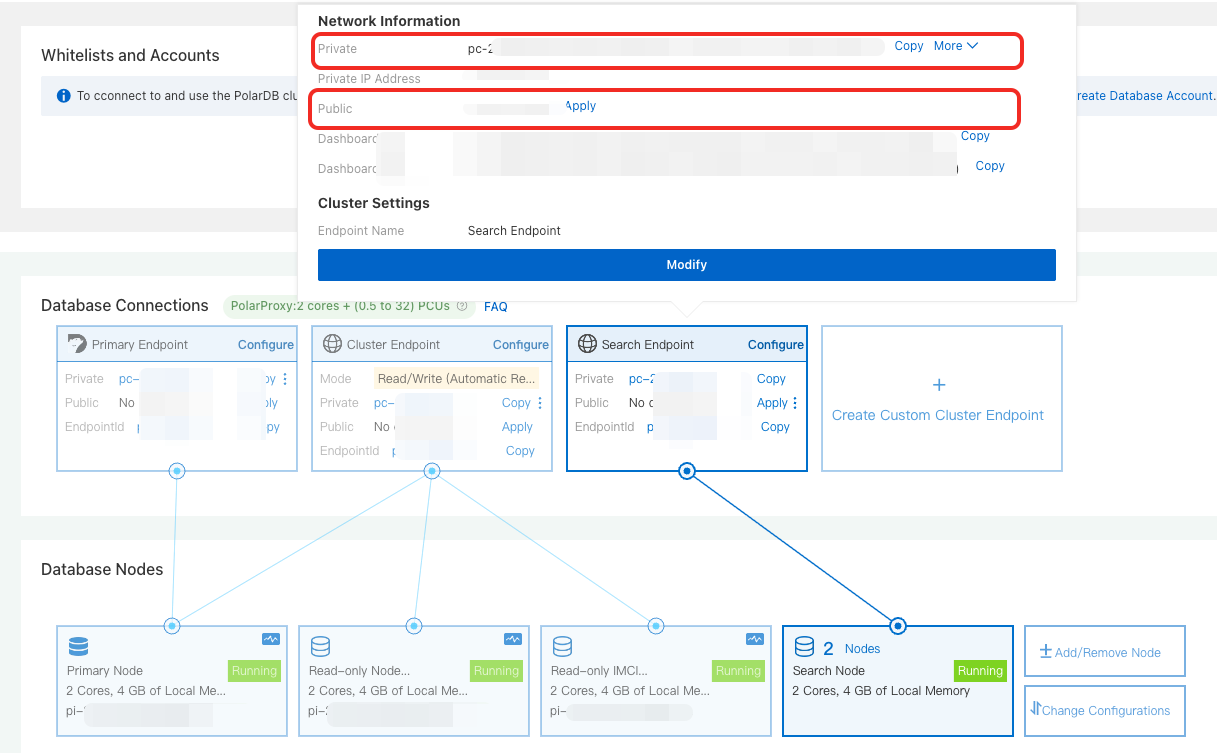
In the Database Nodes section, hover over a Search Node to obtain the private or public endpoint that corresponds to your environment.
Dashboard endpoint
In the Database Nodes section, hover over a Search Node to obtain the private or public Dashboard endpoint that corresponds to your environment.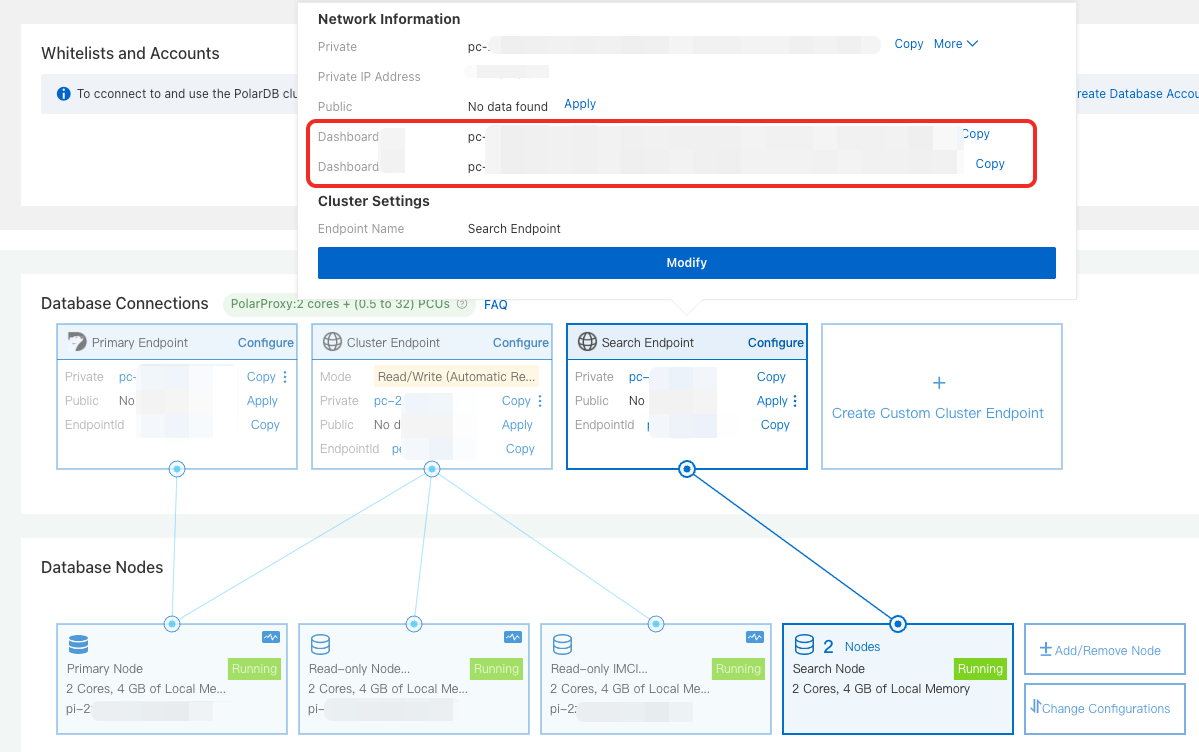
Connect to PolarSearch
Connect via search endpoint
If you prefer to manage indexes and data by using APIs, you can connect to PolarSearch through its search endpoint. The following example shows how to connect from an ECS instance.
Configure the cluster whitelist: Add the IP address of your ECS instance to the PolarDB cluster whitelist.
NoteIf your ECS instance and PolarDB cluster are in the same virtual private cloud (VPC), add the private IP address of the ECS instance to the whitelist.
If your ECS instance and PolarDB cluster are not in the same VPC, add the public IP address of the ECS instance to the whitelist.
Connect to PolarSearch: Run the following command. If the command returns cluster information, the connection is successful. Replace
<endpoint>:<port>with the PolarSearch search endpoint and<user_name>:<passwd>with the PolarSearch admin account.curl http://<endpoint>:<port>/ -u <user_name>:<passwd>
Connect via Dashboard
If you prefer to manage PolarSearch by using a GUI, you can access it through the Dashboard. The following example uses a browser in a local environment:
Configure the cluster whitelist: Add the public IP address of your local machine to the PolarDB cluster whitelist.
Log on to the PolarSearch console in a browser:
In the address bar of your browser, enter
http://<endpoint>:<port>and press Enter. Replace<endpoint>:<port>with the public Dashboard endpoint for PolarSearch.On the logon page, enter the admin account credentials for PolarSearch to access the Kibana-compatible PolarSearch console.
Examples
All examples in this section are performed from the command line on an ECS instance.
PolarSearch is fully compatible with the OpenSearch 2.19.0 SDK and REST API. Using other versions may cause compatibility issues. For more information, see OpenSearch.
Create an index
An index in a search node is analogous to a table in a relational database. You can create an index by using an Elasticsearch-compatible REST API or by running commands directly in the Dashboard. The following are examples:
CLI
curl -XPUT "http://<endpoint>:<port>/articles" \
--user "<user_name>:<passwd>" \
-H 'Content-Type: application/json' \
-d '{
  "settings": {
    "number_of_shards": 1,
    "number_of_replicas": 1
  },
  "mappings": {
    "properties": {
      "title": {
        "type": "text"
      },
      "content": {
        "type": "text"
      },
      "author": {
        "type": "keyword"
      }
    }
  }
}'
Dashboard
PUT articles
{
  "settings": {
    "number_of_shards": 1,
    "number_of_replicas": 1
  },
  "mappings": {
    "properties": {
      "title": {
        "type": "text"
      },
      "content": {
        "type": "text"
      },
      "author": {
        "type": "keyword"
      }
    }
  }
}
Import data
CLI
curl -XPOST "http://<endpoint>:<port>/articles/_bulk" \
--user "<user_name>:<passwd>" \
-H 'Content-Type: application/json' \
-d '
{"index": {}}
{"title": "Introduction to PolarSearch", "content": "PolarSearch is a powerful search engine.", "author": "Allen"}
{"index": {}}
{"title": "Advanced Search Techniques", "content": "Learn how to use full-text search and filters in PolarDB.", "author": "Lang"}
{"index": {}}
{"title": "Elasticsearch vs PolarSearch", "content": "A comparison of Elasticsearch and PolarSearch features.", "author": "Zhao"}
'
Dashboard
POST articles/_bulk
{"index": {}}
{"title": "Introduction to PolarSearch", "content": "PolarSearch is a powerful search engine.", "author": "Allen"}
{"index": {}}
{"title": "Advanced Search Techniques", "content": "Learn how to use full-text search and filters in PolarDB.", "author": "Lang"}
{"index": {}}
{"title": "Elasticsearch vs PolarSearch", "content": "A comparison of Elasticsearch and PolarSearch features.", "author": "Zhao"}
Run a search query
After the data is imported, you can perform a full-text search by using an SDK, the REST API, or the Dashboard. The following examples show how:
CLI
curl -XGET "http://<endpoint>:<port>/articles/_search" \
--user "<user_name>:<passwd>" \
-H 'Content-Type: application/json' \
-d '
{
  "query": {
    "match": {
      "content": "PolarSearch"
    }
  }
}'
Dashboard
GET articles/_search
{
  "query": {
    "match": {
      "content": "PolarSearch"
    }
  }
}For more information about search query syntax, see the OpenSearch documentation.
Create a vector index
CLI
curl -XPUT "http://<endpoint>:<port>/my-vector-index" \
--user "<user_name>:<passwd>" \
-H "Content-Type:application/json" \
-d '
{
  "settings": {
    "index": {
      "knn": true
    }
  },
  "mappings": {
    "properties": {
      "vector_field": {
        "type": "knn_vector",
        "dimension": 4
      },
      "metadata": {
        "type": "text"
      }
    }
  }
}
'
Dashboard
PUT my-vector-index
{
  "settings": {
    "index": {
      "knn": true
    }
  },
  "mappings": {
    "properties": {
      "vector_field": {
        "type": "knn_vector",
        "dimension": 4
      },
      "metadata": {
        "type": "text"
      }
    }
  }
}
Insert vector data
CLI
curl -XPOST "http://<endpoint>:<port>/my-vector-index/_bulk" \
--user "<user_name>:<passwd>" \
-H "Content-Type:application/json" \
-d '
{"index": {}}
{"vector_field": [0.1, 0.5, -0.3, 0.8], "metadata": "Document 1"}
{"index": {}}
{"vector_field": [-0.2, 0.7, 0.4, -0.1], "metadata": "Document 2"}
'
Dashboard
POST my-vector-index/_bulk
{"index": {}}
{"vector_field": [0.1, 0.5, -0.3, 0.8], "metadata": "Document 1"}
{"index": {}}
{"vector_field": [-0.2, 0.7, 0.4, -0.1], "metadata": "Document 2"}
Vector search
CLI
curl -XGET "http://<endpoint>:<port>/my-vector-index/_search" \
--user "<user_name>:<passwd>" \
-H "Content-Type:application/json" \
-d '
{
  "size": 2,
  "query": {
    "knn": {
      "vector_field": {
        "vector": [0.1, 0.5, -0.3, 0.8],
        "k": 2
      }
    }
  }
}
'
Dashboard
GET my-vector-index/_search
{
  "size": 2,
  "query": {
    "knn": {
      "vector_field": {
        "vector": [0.1, 0.5, -0.3, 0.8],
        "k": 2
      }
    }
  }
}