After you create a global database network (GDN), you can add a new cluster to it as a secondary cluster. You can also remove the secondary cluster. After a secondary cluster is removed, it becomes a standalone PolarDB cluster.
Applicability
You must create a global database network before you can add a secondary cluster to the GDN.
Supported regions
All regions in the Chinese mainland, China (Hong Kong), Japan (Tokyo), South Korea (Seoul), Singapore, Malaysia (Kuala Lumpur), Indonesia (Jakarta), Philippines (Manila), Thailand (Bangkok), Germany (Frankfurt), US (Silicon Valley), US (Virginia), and UK (London).
Feature limitations
Clusters in a Global Database Network (GDN) support the In-Memory Column Index (IMCI) feature. However, you must enable the
loose_polar_enable_imci_with_standbycluster parameter before you can add a read-only column store node. The cluster version must also meet one of the following requirements:MySQL 8.0.1 with revision version 8.0.1.1.48 or later.
MySQL 8.0.2 with revision version 8.0.2.2.27 or later.
Clusters in a GDN can be serverless clusters or clusters with defined specifications that have the serverless feature enabled. However, if the minor engine version of the primary cluster is earlier than the following versions, all clusters in the GDN must have at least one read-only node:
MySQL 8.0.1 with a minor engine version earlier than 8.0.1.1.42.
MySQL 8.0.2 with a minor engine version earlier than 8.0.2.2.23.
Clusters in a GDN do not support the database and table restoration feature.
Other limitations
A GDN consists of one primary cluster and up to four secondary clusters.
NoteTo add more secondary clusters, go to Quota Center, find the quota item based on the quota ID
polardb_mysql_gdn_region, and click Apply in the Actions column.A cluster can belong to only one GDN.
You can only create new clusters as secondary clusters. You cannot add an existing cluster as a secondary one.
The primary and secondary clusters must use the same database engine version: MySQL 8.0, MySQL 5.7, or MySQL 5.6.
For secondary clusters in a GDN that are not serverless clusters, each compute node must have at least 4 CPU cores.
By default, each cluster in a GDN contains 2 nodes. You can add up to 16 nodes.
Pricing
When you use a GDN, you are charged for the clusters and any inter-region data transfer fees. Data transfer fees vary based on whether the transfer is cross-border.
Non-cross-border data transfer (Free)
Scenario: The primary and secondary clusters are both deployed in regions outside the Chinese mainland, or both are deployed in regions within the Chinese mainland.
Billing rule: Free.
Cross-border data transfer (Billable)
ImportantCross-border data transfer fees will be charged starting from 00:00 on January 1, 2026 (Singapore time). Before this date, this service is free.
Scenario: One of your clusters (primary or secondary) is deployed in a region outside the Chinese mainland, and the other is deployed in a region in the Chinese mainland.
Billing rule: USD 0.80 per GB, billed hourly. The fee is calculated based on the amount of Redo Log data that is physically replicated from the primary cluster to a cross-border secondary cluster within one hour. You can estimate this traffic fee by querying the physical position converted from the log sequence number (LSN).
If you use the global domain name feature, you will incur additional fees for internal DNS resolution and inter-region data transfer. For more information, see Global domain name pricing.
Usage notes
A GDN synchronizes data using a physical replication mechanism that is based on redo logs. Therefore, you do not need to enable binary logging by default. If you have specific business requirements, such as change tracking, and want to synchronize binary logs (binlogs) between clusters, ensure that the binlog parameter (loose_polar_log_bin) is identical for the primary and secondary clusters. Otherwise, if you switch the primary cluster, data inconsistency may occur in the binlogs.
Add a secondary cluster
A GDN supports adding cross-border secondary clusters using China Unicom's cross-border Express Connect and Cloud Enterprise Network (CEN). A configuration is considered cross-border if the primary and secondary clusters are in different types of regions, as described below. Adding a cross-border secondary cluster requires additional preparation.
If your primary cluster is in US (Silicon Valley) or US (Virginia) and the secondary cluster to be added is in the Chinese mainland or China (Hong Kong), submit a ticket to contact us.
Chinese mainland: China (Hangzhou), China (Shanghai), China (Shenzhen), China (Heyuan), China (Guangzhou), China (Qingdao), China (Beijing), China (Zhangjiakou), China (Hohhot), China (Ulanqab), and China (Chengdu).
Other regions: China (Hong Kong), Japan (Tokyo), South Korea (Seoul), Singapore, Malaysia (Kuala Lumpur), Indonesia (Jakarta), Philippines (Manila), Thailand (Bangkok), Germany (Frankfurt), US (Silicon Valley), US (Virginia), and UK (London).
Preparations (for cross-border secondary clusters only)
Sign the PolarDB Cross-border Data Transmission Compliance Commitment.
Procedure
The time required to create a secondary cluster depends on the data volume of the primary cluster. The initial data copy process can be slow.
Log on to the PolarDB console. In the navigation pane on the left, click Global Database Network.
On the GDN page, find the target GDN and click Add Secondary Cluster in the Actions column.

In the purchase pop-up window, you can set the following parameters. You can configure other parameters based on your business needs. For more information, see Custom Purchase.
Region: Select the region where you want to add the secondary cluster.
Creation Method: Select Create Secondary Cluster.
GDN: Select the GDN that you want the cluster to join. The GDN that you selected in the previous step is used by default.
Database Engine: This must be the same as the database engine of the primary cluster: MySQL 8.0, MySQL 5.7, or MySQL 5.6.
Node Specifications: We recommend that you set the node specifications of the secondary cluster to be the same as the specifications of the primary cluster to ensure low-latency synchronization. The number of read-only nodes does not need to be the same as that of the primary cluster. You can specify the number of read-only nodes based on the read request volume of the secondary cluster.
After you complete the purchase, return to the GDN page. Find the target GDN and click its GDN ID/Name to go to the details page. The newly created secondary cluster appears in the Clusters section.

The time it takes to create a secondary cluster depends on the data volume of the primary cluster. The initial data copy process can be time-consuming, so please wait for it to complete.
Creating a secondary cluster has minimal performance impact on the primary cluster.
You cannot create database accounts on secondary clusters. You must create accounts on the primary cluster. The system automatically synchronizes the accounts to the secondary clusters.
Remove a secondary cluster
Log on to the PolarDB console. In the navigation pane on the left, click Global Database Network.
On the GDN page, find the target GDN and click its GDN ID/Name to go to the details page.
In the Clusters section, find the target secondary cluster and click Remove in the Actions column.
 Note
NoteThe removal process takes about 5 minutes.
During the removal process, the endpoints of all clusters in the GDN, including the secondary cluster that is being removed, remain available. You can continue to access the databases using the cluster endpoints.
Only secondary clusters can be removed from a GDN. The primary cluster cannot be removed.
After a secondary cluster is removed from a GDN, it stops synchronizing data from the primary cluster and is set to read/write mode.
After a secondary cluster is removed from a GDN, it cannot be added back to the GDN as a secondary cluster. Perform this operation with caution.
In the dialog box that appears, read the notes, and then click OK to remove the secondary cluster.
Switch the primary cluster
Log on to the PolarDB console. In the navigation pane on the left, click Global Database Network.
On the GDN page, find the target GDN and click its GDN ID/Name to go to the details page.
In the Clusters section, find the target secondary cluster and click Switch to Primary Cluster in the Actions column.

In the Primary/Secondary Switchover dialog box, select the ID of the secondary cluster that you want to promote to the primary cluster, and then click OK.
NoteA primary/secondary switchover does not swap the connection addresses of the two clusters. You must reconfigure your application. If the original primary cluster has a public endpoint, you must ensure that the new primary cluster also has a public endpoint. Otherwise, your application cannot access the database. For more information, see View endpoints and ports.
A primary/secondary switchover in a GDN is typically completed in less than 5 minutes, but can take up to 10 minutes. During the switchover, a transient disconnection of up to 160 seconds may occur. We recommend that you perform the switchover during off-peak hours and make sure that your application has a reconnection mechanism.
If you enable the Forced Switchover switch in the Primary/Secondary Switchover dialog box:
You cannot specify a target cluster for a forced switchover. By default, the secondary cluster with the largest log sequence number (LSN) is promoted to the new primary cluster.
A forced switchover may cause data loss. After the switchover, the original primary cluster is automatically removed from the GDN. Perform this operation with caution.
Recreate a secondary cluster
Scenarios
You may need to recreate a secondary cluster in a GDN in the following scenarios:
A secondary cluster fails and cannot be recovered. You need to recreate it to restore the service.
The underlying configuration or environment of the secondary cluster needs to be updated.
The data on the secondary cluster has been out of sync with the primary cluster for a long time. The secondary cluster must be rebuilt to ensure data consistency.
The feature of recreating a secondary cluster is in phased release. To use this feature, go to Quota Center, find the quota with the ID
polardb_gdn_reset_member, and click Apply in the Actions column to request a trial.The specified secondary cluster is unavailable while it is being recreated. Perform this operation with caution.
Procedure
Log on to the PolarDB console. In the navigation pane on the left, click Global Database Network.
On the GDN page, find the target GDN and click its GDN ID/Name to go to the details page.
In the Clusters section, find the target secondary cluster and click Recreate Secondary Cluster in the Actions column.
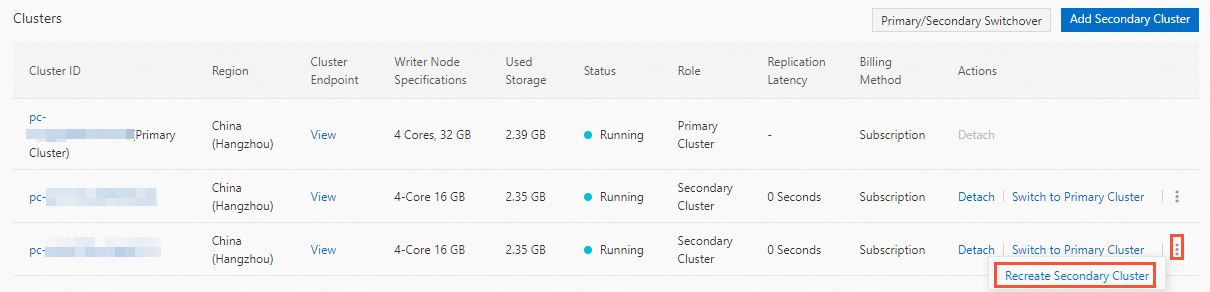
In the dialog box that appears, read the notes, and then click OK.
FAQ
References
Connect to a global database network: Describes how to connect to a global database network (GDN).
Create a global domain name: Describes how to create a unified endpoint that provides nearest access and remains unchanged after a primary cluster switchover.
Related API operations
API | Description |
Add a secondary cluster to a GDN. The following parameters are required:
| |
Remove a secondary cluster from a GDN. | |
Switch the primary cluster of a GDN. |