Log on to PAI using role-based SSO to simplify authentication, improve security, and enable flexible role management.
Background
Alibaba Cloud offers role-based logon to meet enterprise security requirements. Role-based logon is more secure than traditional account and password access to the Alibaba Cloud Management Console. For more information, see SAML-based role SSO overview.
Logon methods
PAI supports the following logon methods:
-
Alibaba Cloud account:
Log on using an Alibaba Cloud account or RAM user. After entering account credentials, access the Alibaba Cloud Management Console. Your account automatically becomes a workspace member with required permissions.
-
CloudSSO provides unified identity management and access control for multiple accounts in an Alibaba Cloud Resource Directory (RD). You can use CloudSSO to centrally manage enterprise users who access Alibaba Cloud, configure single sign-on (SSO) between your corporate identity provider and Alibaba Cloud, and centrally manage access permissions to all accounts in your RD.
-
Use role-based SSO to log on to the Alibaba Cloud Management Console. A RAM role becomes a workspace member and users assuming this role obtain the same permissions as account members. For more information about RAM roles, see Overview of RAM roles.
Procedure
-
Create a RAM role and configure trust policy.
Assume role as RAM user
To allow RAM users to assume a RAM role by switching identity, select Alibaba Cloud Account as trusted entity type.
-
Create a RAM role with trusted entity type Alibaba Cloud Account. For more information, see Create a RAM role for a trusted Alibaba Cloud account.
Set Trusted Principal Name to Current Alibaba Cloud Account.
-
Open the role details page and modify trust policy.
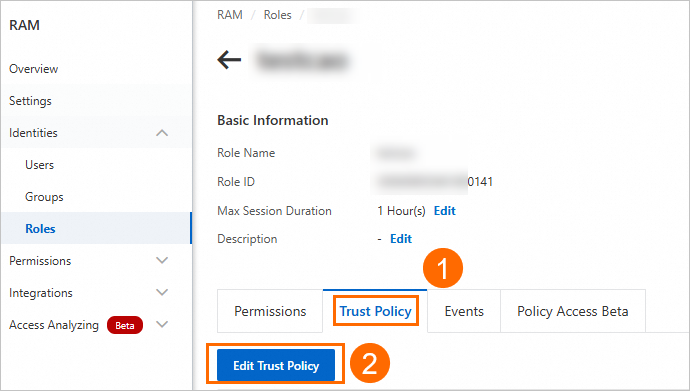
Modify trust policy using this script:
{
  "Statement": [
    {
      "Action": "sts:AssumeRole",
      "Effect": "Allow",
      "Principal": {
        "RAM": [
          "acs:ram::RootAccountID:root"
        ]
      }
    },
    {
      "Action": "sts:AssumeRole",
      "Effect": "Allow",
      "Principal": {
        "Service": [
          "dataworks.aliyuncs.com"
        ]
      }
    }
  ],
  "Version": "1"
}
Replace RootAccountID in acs:ram::RootAccountID:root with your account ID. Obtain account ID from Basic Information page.
-
Create RAM users. For more information, see Create a RAM user.
-
In the Actions column, click Add Permissions and grant AliyunSTSAssumeRoleAccess permission. This allows calling AssumeRole operation of Security Token Service (STS).

Assume role through identity provider
To log on as an identity provider (IdP) user, select Identity Provider as trusted entity type.
-
Create a RAM role with trusted entity type Identity Provider. For more information, see Create a RAM role for a trusted IdP.
-
Open the role details page and modify trust policy.

Modify trust policy using this script:
{
   "Statement": [
        {
            "Action": "sts:AssumeRole",
            "Effect": "Allow",
            "Principal": {
                "Federated": [
                    "acs:ram::RootAccountID:saml-provider/IDP"
                ]
            },
            "Condition": {
                "StringEquals": {
                    "saml:recipient": "https://signin.aliyun.com/saml-role/sso"
                }
            }
        },
        {
            "Action": "sts:AssumeRole",
            "Effect": "Allow",
            "Principal": {
              "Service": [
                "dataworks.aliyuncs.com"
              ]
            }
        }
    ],
    "Version": "1"
}
Replace RootAccountID in acs:ram::RootAccountID:saml-provider/IDP with your account ID. Obtain account ID from Basic Information page.
-
-
Configure an access policy.
Add an access policy for the role based on products to use after logon. Without an access policy, some workspace features such as datasets may not be available.
-
Create an access policy named PAIDefaultPolicy. For more information, see Alibaba Cloud service dependencies and authorization: Designer. On the Script Editor tab, use the following policy content:
{
    "Version": "1",
    "Statement": [
        {
            "Action": [
                "cs:GetClusterById",
                "cs:GetClusters",
                "cs:GetUserConfig",
                "cs:DescribeClusterNodes",
                "cs:DescribeClusterInnerServiceKubeconfig",
                "cs:RevokeClusterInnerServiceKubeconfig"
            ],
            "Resource": "*",
            "Effect": "Allow"
        },
        {
            "Action": [
                "vpc:DescribeVSwitchAttributes",
                "vpc:DescribeVpcs",
                "vpc:DescribeVSwitches",
                "vpc:DescribeVpcAttribute"
            ],
            "Resource": "*",
            "Effect": "Allow"
        },
        {
            "Action": [
                "ecs:DescribeSecurityGroupAttribute",
                "ecs:DescribeSecurityGroups",
                "ecs:CreateNetworkInterface",
                "ecs:DeleteNetworkInterface",
                "ecs:DescribeNetworkInterfaces",
                "ecs:CreateNetworkInterfacePermission",
                "ecs:DescribeNetworkInterfacePermissions",
                "ecs:DeleteNetworkInterfacePermission"
            ],
            "Resource": "*",
            "Effect": "Allow"
        },
        {
            "Action": [
                "nas:DescribeFileSystems",
                "nas:CreateMountTarget",
                "nas:DescribeMountTargets",
                "nas:ModifyMountTarget",
                "nas:DescribeProtocolMountTarget"
            ],
            "Resource": "*",
            "Effect": "Allow"
        },
        {
            "Action": [
                "cr:ListNamespace",
                "cr:ListRepository",
                "cr:GetAuthorizationToken",
                "cr:ListInstanceEndpoint",
                "cr:PullRepository",
                "cr:PushRepository",
                "cr:GetInstance",
                "cr:GetInstanceVpcEndpoint",
                "cr:ListInstance",
                "cr:ListInstanceDomain"
            ],
            "Resource": "*",
            "Effect": "Allow"
        },
        {
            "Action": [
                "oss:ListBuckets",
                "oss:GetObjectMetadata",
                "oss:GetObject",
                "oss:ListObjects",
                "oss:PutObject",
                "oss:CopyObject",
                "oss:CompleteMultipartUpload",
                "oss:AbortMultipartUpload",
                "oss:InitiateMultipartUpload",
                "oss:UploadPartCopy",
                "oss:UploadPart",
                "oss:DeleteObject"
            ],
            "Resource": "acs:oss:*:*:*",
            "Effect": "Allow"
        },
        {
            "Action": [
                "datasetacc:DescribeInstance",
                "datasetacc:DescribeSlot",
                "datasetacc:DescribeEndpoint"
            ],
            "Resource": "*",
            "Effect": "Allow"
        }
    ]
}
Permission Type
Description
Container Service (CS)
Container Service operations
Virtual Private Cloud (VPC)
VPC operations
Elastic Compute Service (ECS)
ECS operations
NAS
NAS operations
Container Registry
Container Registry operations
Object Storage Service (OSS)
OSS operations
Dataset acceleration
Dataset acceleration operations
-
On the Resource Access Management page, choose .
-
Search for the role created in Step 1 and click the role name to go to the Role Details page.
-
On the Permissions tab, click Add Permissions and grant the access policy you created.
-
-
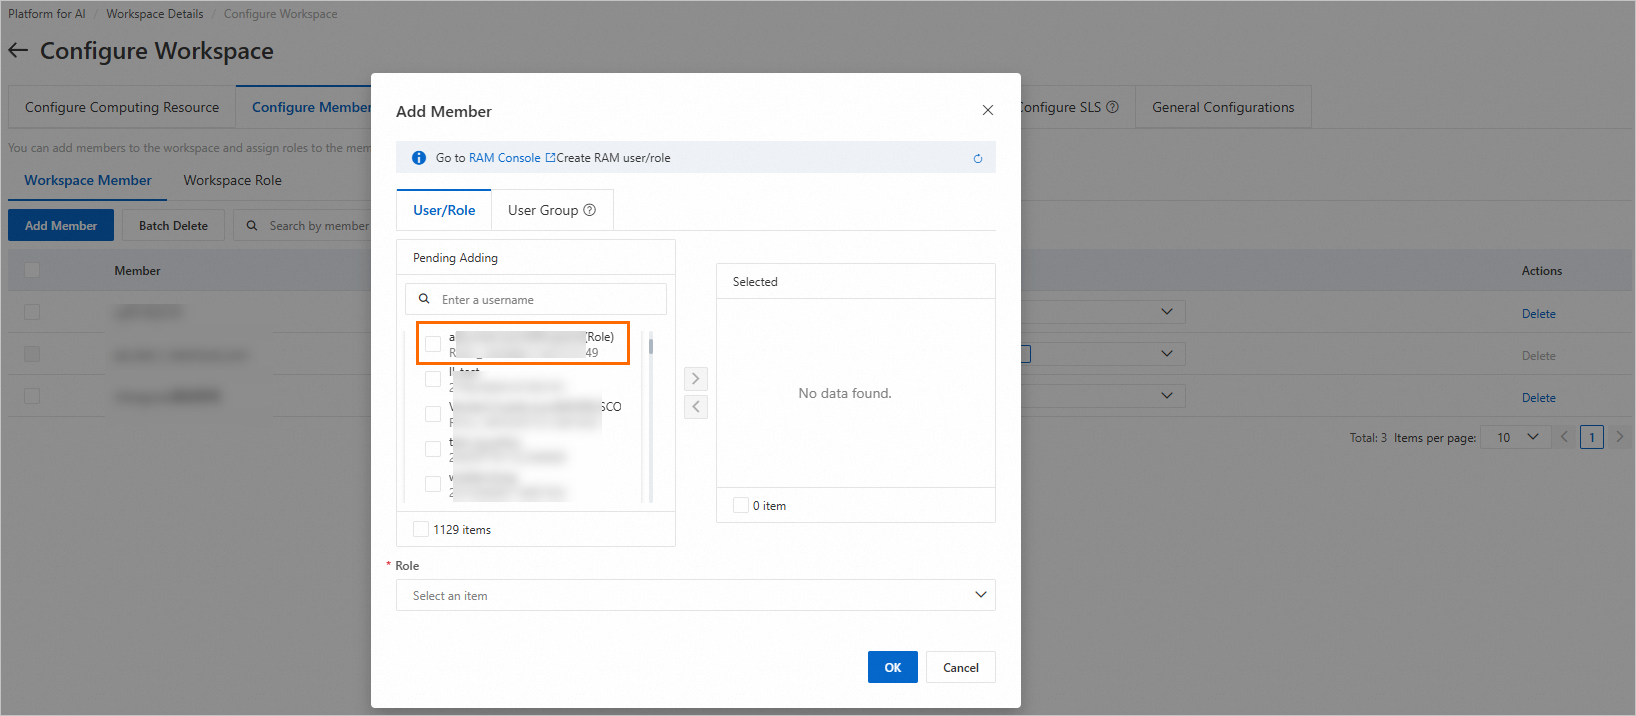
Add the RAM role to a workspace.
RAM roles must be added as workspace members to use PAI products. A workspace administrator can add the role on the Members and Roles page. For more information, see Manage workspace members.
 Note
NoteIf the role is not in search results, perform one of the following operations:
-
In the Add Members dialog box, click Refresh to update the account list.
-
Log on to the PAI console by assuming the RAM role, then search for and add it. For more information, see Assume a RAM role.
-
-
Log on to PAI.
After authorization, assume the RAM role to log on to the PAI console and start algorithm development. For more information, see Assume a RAM role.