A workspace is the primary organizing unit in Platform for AI (PAI). It centralizes the management of compute resources and user permissions for enterprises and teams. For AI developers, a workspace provides a full-stack development toolkit that supports team collaboration and AI asset management.
Limitations
Only the administrator or owner of a workspace can modify workspace configurations.
Voice call, SMS, and email notifications are available only in the China (Hangzhou), China (Shanghai), and China (Ulanqab) regions.
Account and permission requirements
Alibaba Cloud account (main account): Your main account can perform all tasks without requiring additional permissions.
RAM user (sub-account): You must grant the AliyunPAIFullAccess permission to a sub-account. The
AliyunPAIFullAccesspermission grants full access to all PAI resources. Assign this permission with caution. We recommend using your Alibaba Cloud account for these tasks.
Create a workspace
Go to the PAI workspace list and click Create Workspace to configure the parameters:
Configure the Basic Information.
Add Member: Add members and assign roles to the workspace. You can also skip this step and add members after you create the workspace. For more information, see Configure members and roles.
Workspace Default Storage: We recommend configuring a default storage location for the workspace. This location stores temporary data and models generated during tasks such as model training, simplifying management.
Configure the Associate Resource settings.
Intelligent Computing Lingjun Resources: Provides high-performance computing resource groups for model development and training, featuring high performance, high efficiency, and high resource utilization.
General Computing Resources: Use dedicated general computing resources to improve AI development and training efficiency. For more information, see Create a resource group and purchase general computing resources.
MaxCompute Resources: Provides CPU resources from MaxCompute. These resources can be used for specific algorithms in Designer. For more information, see MaxCompute resource quotas.
Fully Managed Flink Resources: Used for large-scale distributed model training in PAI. For more information, see Fully managed Flink resource management.
For more information about AI computing resources, see AI computing resources.
Confirm the configuration and enter the workspace.
After you enter the workspace, use the navigation pane on the left to access all PAI features and perform tasks across the entire AI lifecycle. For more information, see AI development.
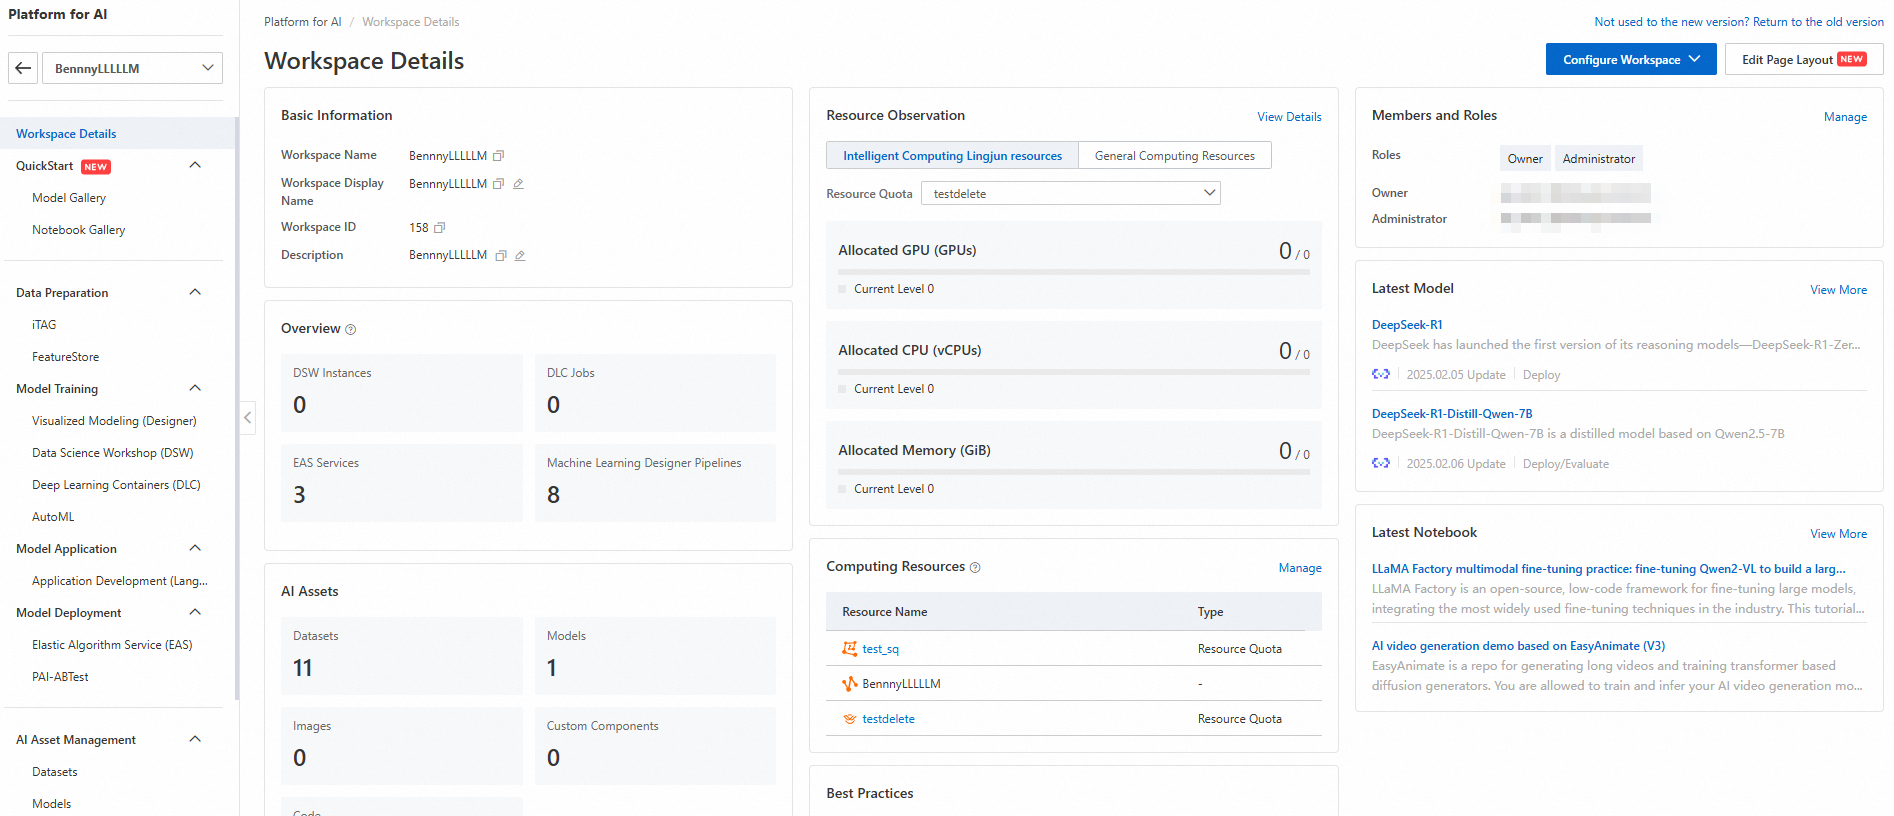
Manage a workspace
Go to the Workspace Details page and click Configure Workspace in the upper-right corner:
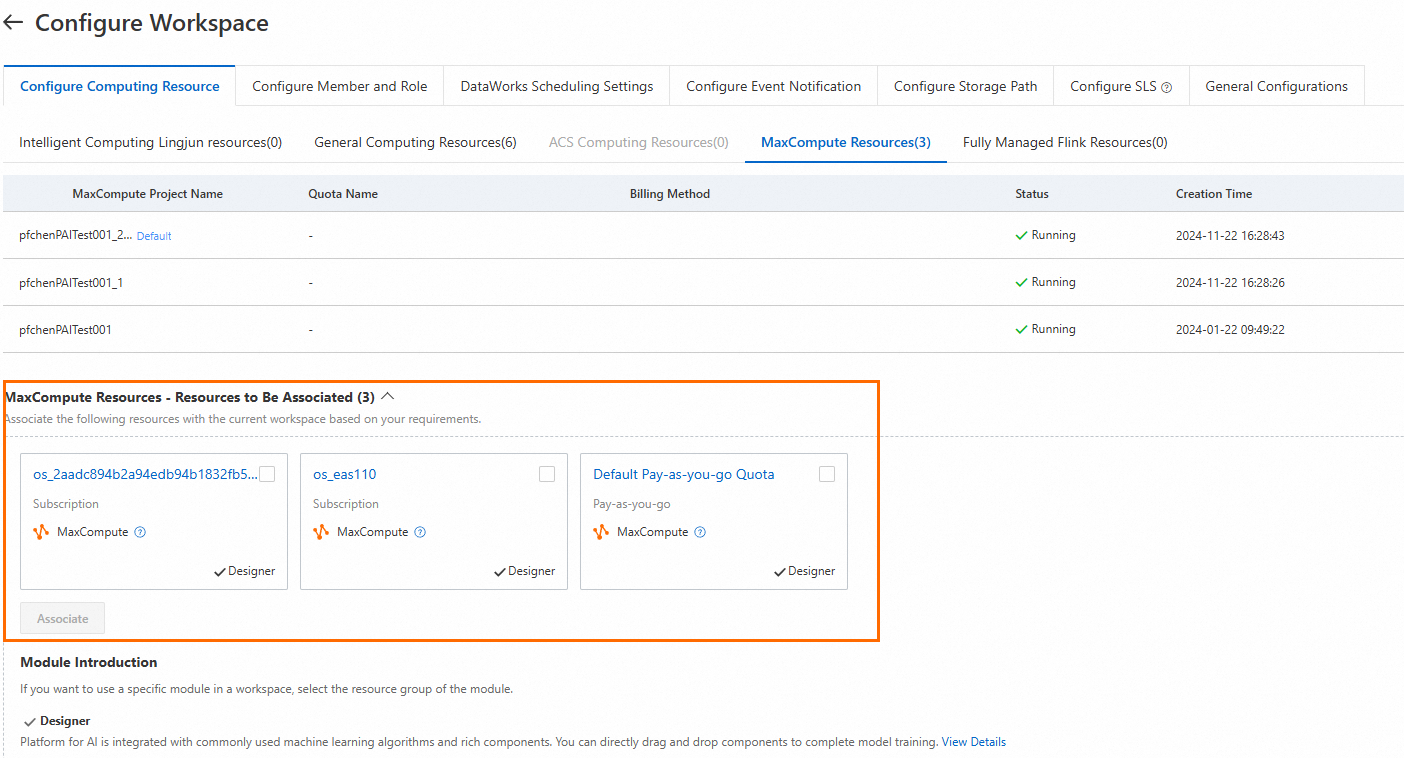
Configure computing resources
View and associate computing resources.
You cannot currently disassociate computing resources that are already associated with a workspace. To disassociate a resource, contact your business manager.
Intelligent Computing Lingjun Resources: Provides high-performance computing resource groups for model development and training, featuring high performance, high efficiency, and high resource utilization.
General Computing Resources: Use dedicated general computing resources to improve AI development and training efficiency. For more information, see Create a resource group and purchase general computing resources.
MaxCompute Resources: Provides CPU resources from MaxCompute. These resources can be used for specific algorithms in Designer. For more information, see MaxCompute resource quotas.
Fully Managed Flink Resources: Used for large-scale distributed model training in PAI. For more information, see Fully managed Flink resource management.
For more information about AI computing resources, see AI computing resources.
Configure members and roles
If multiple users need to perform tasks in the same workspace, add them as members and assign them the appropriate roles. PAI provides several roles. View the role-to-permission mapping to assign appropriate roles to members.
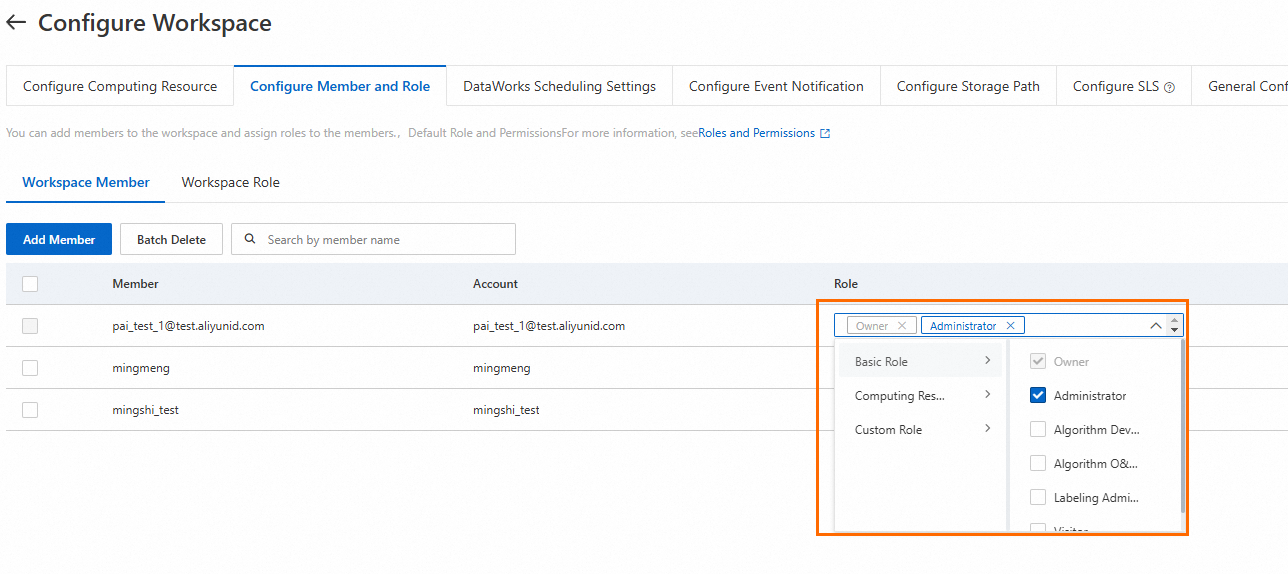
Add members/roles
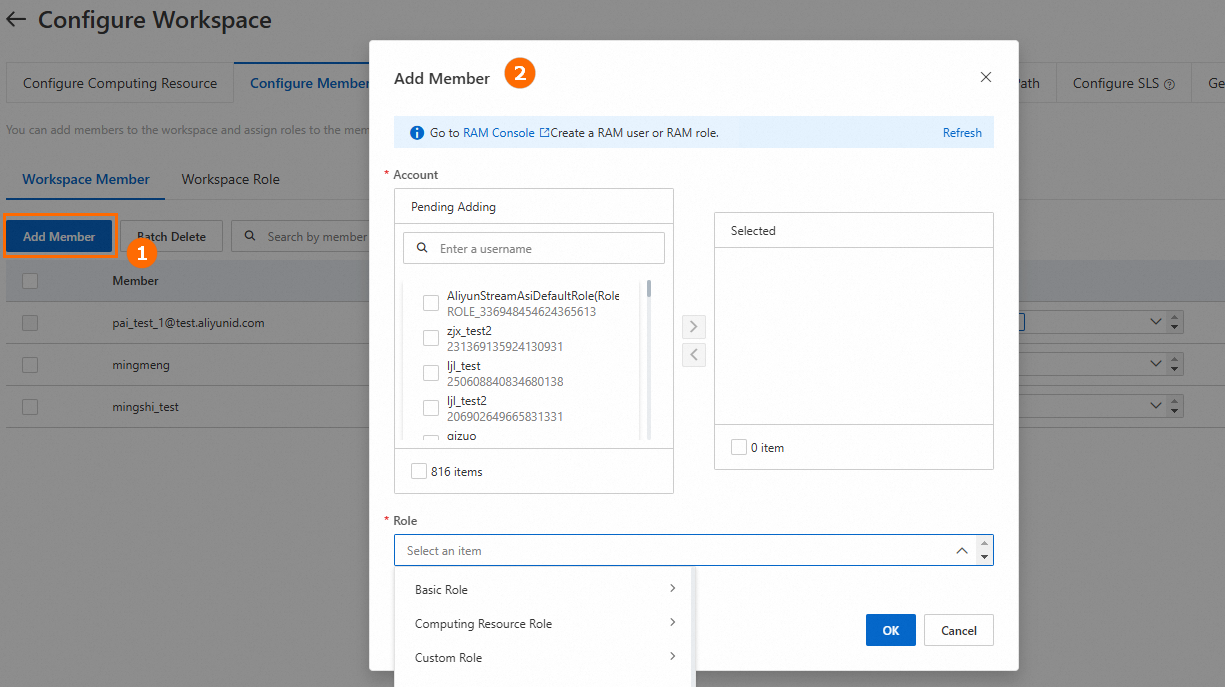
You can assign multiple roles to a single RAM user. The system supports the following roles:
Role type
Description
Workspace Member
Basic roles include:
Administrator: Has permissions to manage workspace members, resource groups, and all assets within the workspace.
Algorithm Developer: Has permissions to perform development and model training within the workspace.
Algorithm O&M Engineer: Has permissions for task priority management, model deployment, and online service monitoring.
Labeling Administrator: Has operational permissions for intelligent labeling.
Visitor: Has read-only permissions for all assets in the workspace.
Computing Resource
This role currently refers to MaxCompute development, which is the developer role in DataWorks. It grants permissions related to MaxCompute data development. You can assign this role to RAM users who submit tasks from PAI to MaxCompute.
Workspace Role
To add a custom role:
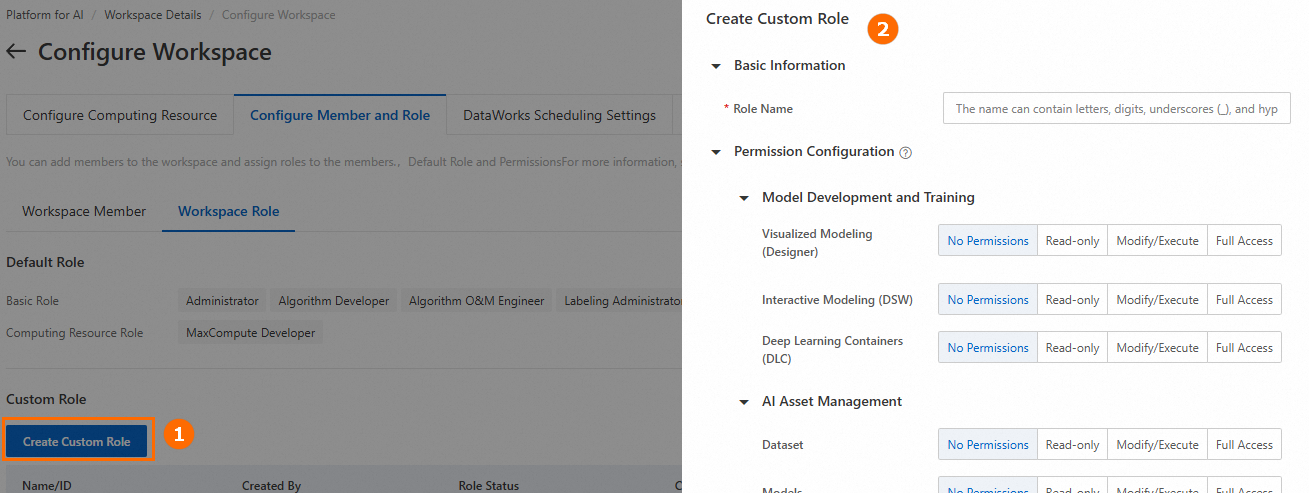
Permission levels:
No Permissions: Grants no permissions within the specified product module.
Read-only: Allows users to view their own resources and publicly visible resources in the specified product module.
Modify/Execute: Allows users to edit and run their own resources in the specified product module.
Full Access: Grants full management permissions over all resources in the specified product module.
Modify member roles
The following rules apply to members and roles:
Each member must have at least one role.
You cannot delete the Owner role. The Alibaba Cloud account or RAM user that creates the workspace automatically becomes the Owner and can manage workspace members, reference and manage resource groups, and manage all assets within the workspace.
PAI and DataWorks workspaces are interconnected. The Administrator, Visitor, and Developer roles are shared between them. If a member's Administrator, Visitor, or Developer role is removed in PAI, and it is their last role in the corresponding DataWorks workspace, DataWorks automatically removes the member. This may trigger an entity transfer.
Configure Scheduling
PAI provides a workspace-level resource management and scheduling mechanism. This allows administrators to flexibly configure resource scheduling based on different business requirements and scenarios. For more information, see Scheduling configuration.
Configure event notifications
Configure event notifications to monitor the status of DLC Jobs, Pipeline Jobs, and DSW instances, or to automatically trigger downstream operations when the status of Models changes. For more information, see Event notification configuration.
Configure storage path
Configure the default storage path for the workspace.
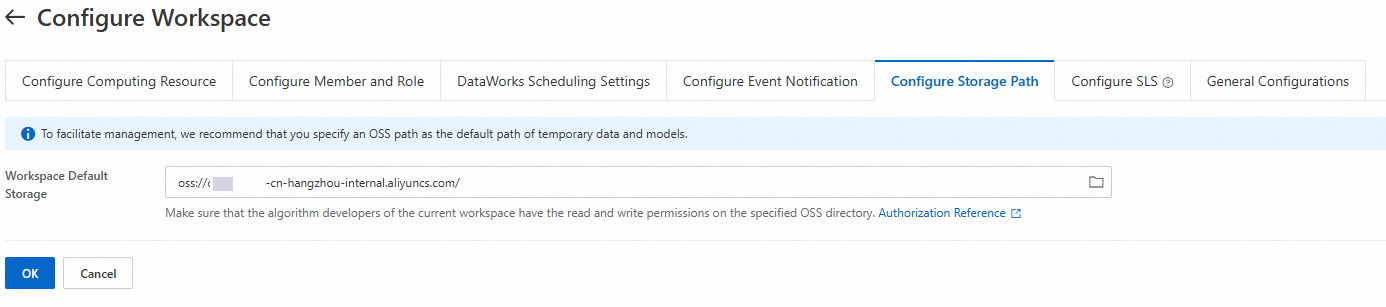
We recommend configuring a default storage location for the workspace. Use this location to store temporary data and models generated during tasks such as model training, which simplifies management.
If a Workflow Data Storage path is also set in Designer, that path takes precedence when a pipeline runs.
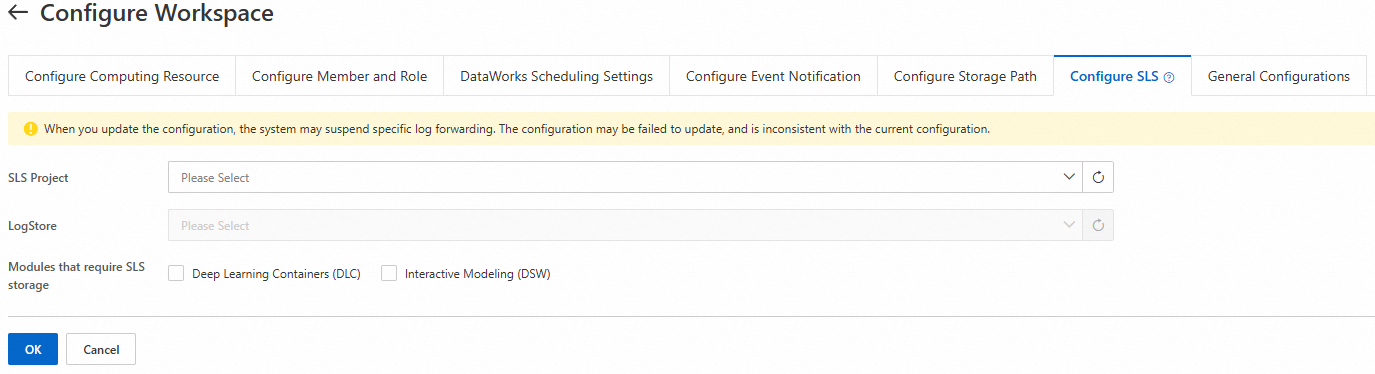
Configure SLS
Configure log forwarding for DSW instances and DLC jobs to Log Service (SLS) for custom analysis.
Parameter | Description |
SLS Project | A resource management unit in Log Service (SLS) used for resource isolation and control. If no projects are available, you can create a project. |
LogStore | A unit for collecting, storing, and querying log data in SLS. If no Logstores are available, you can create a Logstore. |
Modules for log forwarding to SLS | Supports log forwarding for DSW instances and DLC jobs. |
General configurations
The general configuration for a workspace provides the following options. Note: You must restart instances after toggling a switch.
DLC configuration:
Access node containers: Controls whether users can enter the compute node containers of DLC jobs for debugging or troubleshooting. When enabled, authorized users can access the containers using a terminal.
DSW configurations:
Log on to instances from the public network using SSH: Specifies whether users can connect to DSW instances over the internet by using SSH.
Open instances from the public network: Specifies whether users can access DSW instances over the internet.
Limit public network access speed: Specifies whether to limit the network speed of DSW instances when they access the internet through a dedicated NAT gateway. This prevents a single instance from consuming excessive bandwidth and protects the stability of shared resources.

FAQ
Q: Why do I get a "name already exists" error when creating a workspace?
This error can occur if a workspace with the same name already exists in DataWorks, even if it does not appear in your PAI workspace list. PAI and DataWorks workspaces are interconnected. To resolve this, choose a unique name for your new workspace.
Q: Why is there no data on the list page when I set up SLS log forwarding?
Error message: denied by sts or ram, action: log:ListProject, resource: acs:log.....
Cause: This issue occurs because the user does not have permission to read the SLS Logstore.
Solution: To resolve this issue, grant the user Logstore permissions in the Resource Access Management (RAM) console.

Set the authorized entity to a RAM user or RAM role, and then select the AliyunLogFullAccess authorization policy.
For more granular SLS permissions, go to the Simple Log Service console. In the project that requires authorization, use the Permission Assistant to generate a custom RAM authorization policy.
Q: Why does the request fail when I set up SLS log forwarding?
Error message: Modify configuration failed [SLS] cannot init client for sis service: com.alibaba.pai.workspace.common.exception.ServiceExceptionV2: No Privilege error: {0}
Cause: This issue occurs because the user does not have permission to enable or disable forwarding for the SLS Logstore.
Solution: To resolve this issue, grant the user Logstore forwarding permissions in the RAM console by configuring a custom authorization policy as follows:
{
    "Version": "1",
    "Statement": [
        {
            "Effect": "Allow",
            "Action": [
                "log:GetProductDataCollection",
                "log:CloseProductDataCollection",
                "log:OpenProductDataCollection"
            ],
            "Resource": "*"
        }
    ]
}
For more granular control, modify the Resource section to specify the desired resources.