Create a labeling job in iTAG by using a preset general template or a custom template.
Prerequisites
-
PAI is activated and a workspace is created.
Use the default workspace or create a new one. For more information, see Activate PAI and create a default workspace or Create and manage workspaces.
-
Alibaba Cloud OSS is activated, and a dataset with the data files to label is created. For more information, see Create a dataset for data labeling.
Limitations
Only administrators and annotation administrators can perform labeling operations. To request the required permissions, see Manage workspace members.
Procedure
-
Go to the iTAG page.
-
Log on to the PAI console.
-
In the left-side navigation pane, click Workspaces. On the Workspaces page, click the name of the workspace that you want to manage.
-
In the left-side navigation pane, choose .
-
-
On the iTAG page, on the Jobs tab, click Create Task.
-
On the Create Labeling Job page, configure the following key parameters. Configure other parameters as needed.
Parameter
Description
Task Name
1 to 100 characters. Must start with a letter, digit, or Chinese character. Can contain underscores (_) and hyphens (-).
Input Dataset
Select the dataset created in PAI.
Template type
Supported template types:
-
General Template: Preset template provided by the platform.
-
Custom Template: Create a custom template by combining Content Components and Topic Components.
For more information about custom template data formats, see Custom templates.
Template
When Template Type is set to General Template, select one of the following templates:
-
Image
For use cases and data formats, see Image.
-
OCR: Recognizes text within a selected area of an image.
-
Object Detection: Detects and locates specific objects in an image.
-
Image Classification: Classifies an image based on preset labels.
-
PDF: Performs OCR and label classification on PDF files.
-
Moderation and Matting: Performs moderation and matting on images.
-
Table Recognition: Uses algorithms to pre-recognize key elements in a table. You can edit the results as needed.
-
-
Text
For use cases and data formats, see Text.
-
Entity Recognition: Establishes relationships between text entities.
-
Text Classification: Classifies text based on preset labels. This template supports single-label and multi-label classification.
-
Entity relationship: Defines relationships between text entities for knowledge graph scenarios.
-
-
Video
For use cases and data formats, see Video.
-
Video Classification: Classifies videos based on preset labels. This template supports single-label and multi-label classification.
-
-
Audio
For use cases and data formats, see Audio.
-
Audio Classification: Classifies audio based on preset labels. This template supports single-label and multi-label classification.
-
Audio segmentation: Segments the content of an audio dataset and adds labels to the segments.
-
Audio Recognition: Transcribes text from audio content.
-
OCR recognition results configuration
Available only when Template is set to Image > OCR.
By default, OCR Recognition Results is selected. OCR recognizes text within a selected area of an image.
Label Configuration
Enter label names for the job. Press Enter after each label name.
For example, to identify cats in images, you can add labels such as "Cat", "American Shorthair", and "British Shorthair". This helps labelers apply labels to samples.
Specify whether a single selection supports one or multiple labels.
-
For single-label selection, set this option to Single Choice.
-
For multi-label selection, set this option to Multiple Choice.
For example, when identifying cats in images, if the label selection mode is set to Multiple Choice, the labeler can select a cat in a sample and apply both the "Cat" and "American Shorthair" labels.
NoteThe Single Choice and Multiple Choice options determine the number of labels that can be applied to a single selection within a sample, not the number of selections that can be made on the sample.
Enable Intelligent Labeling
For configuration details, see Data pre-labeling: Intelligent labeling configurations.
Task Description
A brief description of the labeling job to distinguish it from other jobs.
Assign Subtask Packages
iTAG groups labeling tasks into subtask packages that team members can claim and work on.
Supported allocation rules:
-
Fixed size: Each subtask package contains a fixed number of labeling tasks.
The allowed package size range depends on the dataset size:
-
If a dataset contains 0 to 20,000 items, the size of a subtask package can range from 1 to 200.
-
If a dataset contains 20,000 to 100,000 items, the size of a subtask package can range from 5 to 200.
-
If a dataset contains 100,000 to 500,000 items, the size of a subtask package can range from 25 to 200.
-
If a dataset contains 500,000 to 1,000,000 items, the size of a subtask package can range from 50 to 200.
-
-
Press Import Fields: Groups data into subtask packages based on a selected field in the dataset. All items with the same field value are placed in the same package.
-
Targeted Assignment: Assigns subtask packages to specific labelers or teams.
Check Proportion
If the Task Workflow you select includes a check step, such as Marking-Check or Marking-Inspection-Acceptance, you must configure the sampling ratio for the check process. The default value is 100%.
User Configuration
Depending on the selected Task Workflow, assign the appropriate members or groups to roles such as labeler, checker, accepter, or task administrator. You can collaborate with multiple members of the workspace to complete the labeling job. For more information about role permissions in iTAG, see iTAG overview.
-
-
After configuring the parameters, click Create.
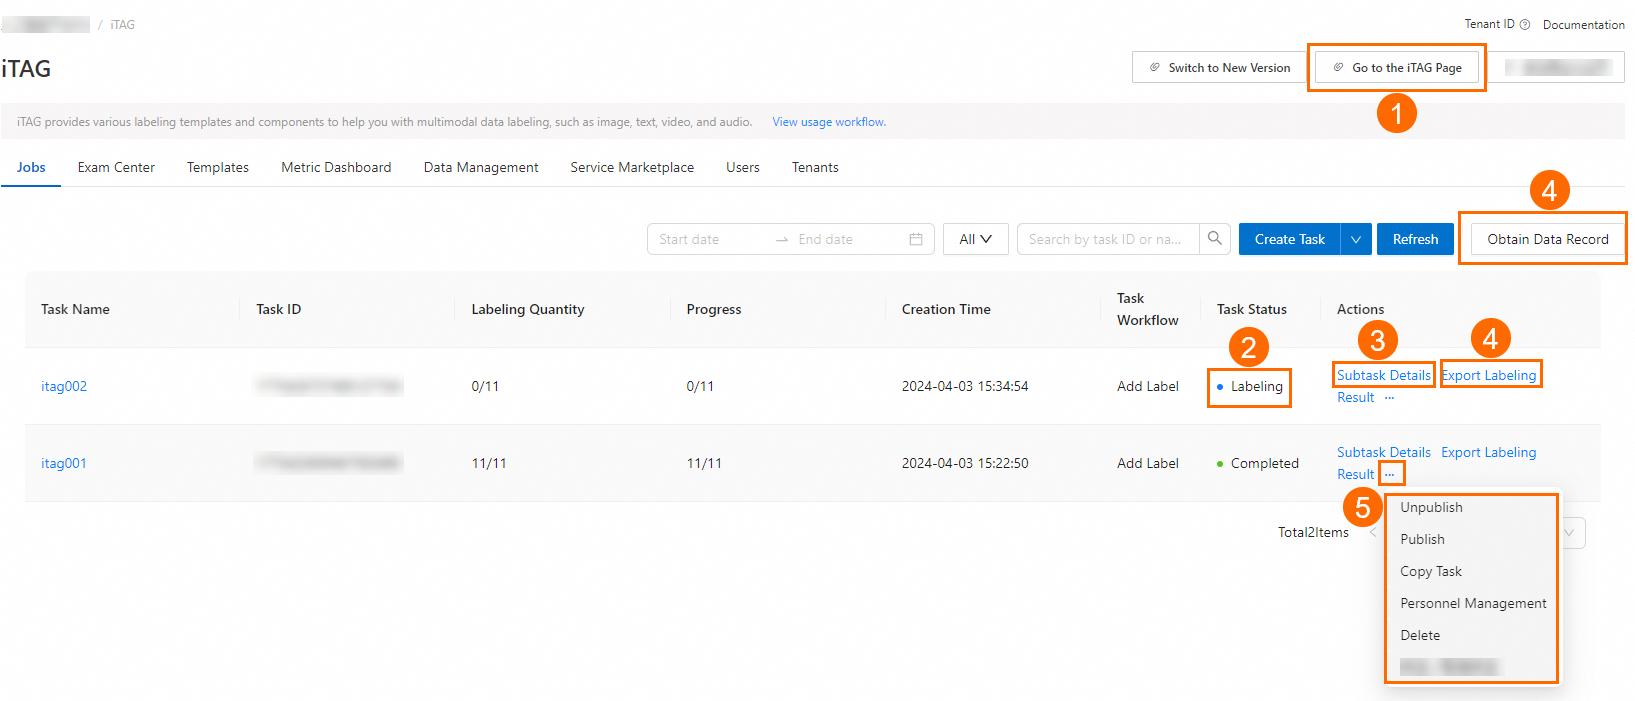
View and manage labeling jobs
All labeling, check, and acceptance jobs are listed on the Task Center page in iTAG. Check job statuses and use the Actions column to view subtask package details, export labeling results, or perform other operations.
|
Area |
Task |
Description |
|
① |
Process labeling tasks |
Click Go to the iTAG Page in the upper-right corner to go to the iTAG labeling page. You can claim and process pending labeling, check, and acceptance tasks. For more information, see Process labeling tasks. |
|
② |
View the job status |
View the status of all jobs on the Task Center page. |
|
③ |
Subtask package details |
For an unfinished job, click Subtask Details to view the completion status of its subtask packages. For an unfinished subtask package, click Transfer to assign it to another user, or click Release to make it available for anyone to claim. |
|
④ |
Export labeling result View export progress |
For a completed job, click Export Labeling Result to export the labeling result. Click Obtain Data Record to view the export progress and result. For more information, see Export labeling result data. |
|
⑤ |
More operations |
Click the More icon ( |
 ) in the Actions column of a job to perform management operations, such as taking it offline or bringing it online.
Next steps
Claim and process labeling jobs. For more information, see Process labeling tasks.