Attach a RAM role to your EAS service so that code running inside the service can call other Alibaba Cloud APIs without storing long-term AccessKeys. At runtime, the service instance retrieves short-lived STS credentials automatically and refreshes them before they expire.
Benefits
Using a RAM role instead of hard-coded AccessKeys gives you two things:
Security: Credentials are short-lived and never stored in your service image or configuration. There is no long-term key to leak.
Fine-grained control: Update the RAM role's permission policy at any time to change what the service can access — without redeploying.
Limitations
Each EAS service can be associated with only one RAM role.
Choose a role type
| PAI default role | Custom role | |
|---|---|---|
| What it is | The built-in service role AliyunServiceRoleForPaiEas, automatically available | A RAM role you create and configure |
| Permissions | MaxCompute and OSS only | Any Alibaba Cloud service you grant |
| When to use | Accessing the workspace's default OSS bucket or MaxCompute projects where the service owner has execution permissions | Any other scenario, or when you need more granular permission control |
| Setup effort | Add one JSON field to the service config | Create a role, grant policies, then add the role ARN to the service config |
Prerequisites
Before you begin, ensure that you have:
An EAS service in PAI, or a deployment ready to configure
(For custom roles) RAM console access to create and manage roles
(For RAM users) Contact the primary account to grant
ram:PassRolepermission — see Grant PassRole permission to a RAM user
Attach the PAI default role
Add the following field to the JSON in the Service Configuration section when deploying:
"options": {
  "enable_ram_role": true
}
After enabling this, the service instance can access:
Data in MaxCompute projects where the EAS service owner has execution permissions, via the PyODPS SDK
Data in the default OSS bucket preset in the current workspace, via the OSS SDK
If you deploy using direct JSON and want to use the OSS SDK through the PAI default role, include the metadata.workspace_id field in the service configuration.Attach a custom RAM role
Step 1: Create a RAM role
Log on to the RAM console and create a RAM role.
Set the following parameters:
Parameter Value Principal Type Cloud Service Principal Name Platform for AI/PAI ( eas.pai.aliyuncs.com)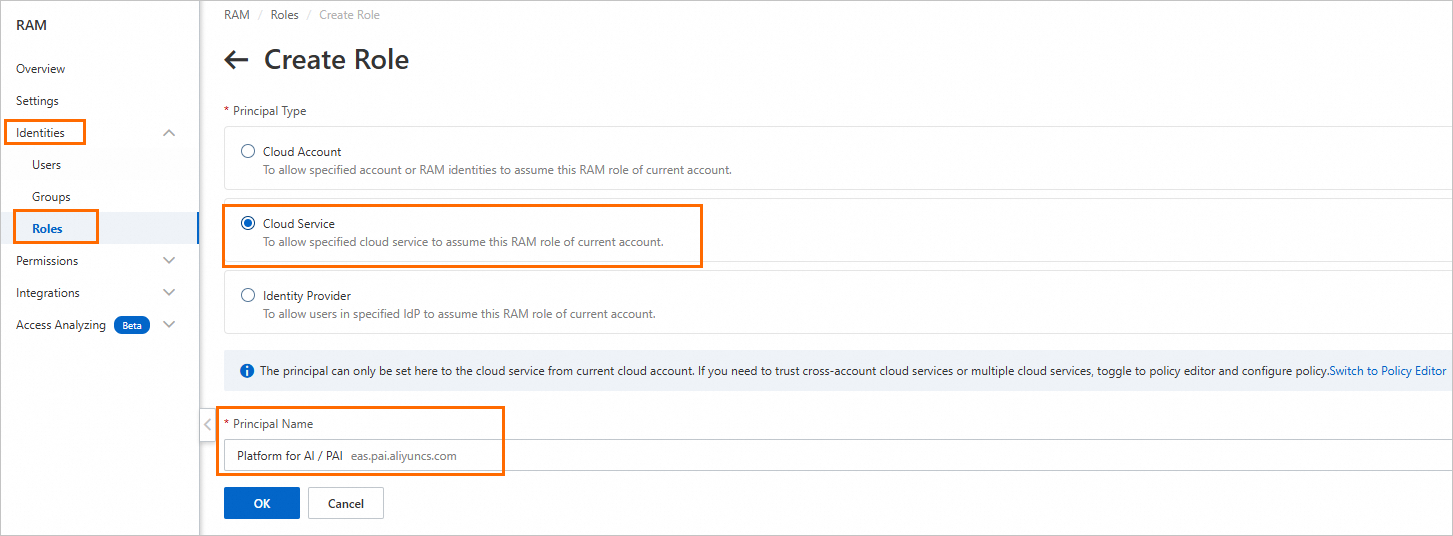
On the Trust Policy tab of the new role, confirm that
eas.pai.aliyuncs.comappears in theServiceprincipal array. This trust policy controls which services can assume the role. A correctly configured trust policy looks like this:ImportantMissing this entry is the most common cause of the
failed to assume roledeployment error. If the role was created with a different principal (for example, another service), click Edit Trust Policy and add"eas.pai.aliyuncs.com"to theServicearray.{ "Statement": [ { "Action": "sts:AssumeRole", "Effect": "Allow", "Principal": { "Service": [ "eas.pai.aliyuncs.com" ] } } ], "Version": "1" }
Step 2: Grant permissions to the role
Attach system or custom policies to give the role access to the resources your service needs. For example, attach AliyunOSSReadOnlyAccess to allow read access to OSS.
If the service mounts data sources (NAS or OSS) or pulls custom images at deployment, grant the role the corresponding permissions:
Data sources: NAS access control or OSS access control
Container images: Container Registry
Step 3: Associate the role when deploying
Add the following to the JSON in the Service Configuration section. Replace role_arn with the ARN of the role you created. To find the ARN, see View the RAM role.
"options": {
  "enable_ram_role": true
},
"role_arn": "acs:ram::111*************:role/${RoleName}"
Grant PassRole permission to a RAM user
If you deploy EAS services as a RAM user (sub-account), the primary account must grant you the ram:PassRole permission. Without it, deployment fails with a role configuration error.
Ask the primary account to attach the following custom policy to your RAM user. Replace ${RoleName} with the name of the RAM role associated with the EAS service. For help, see Create a custom permission policy and Grant permissions to a RAM user.
{
  "Version": "1",
  "Statement": [
    {
      "Effect": "Allow",
      "Action": "ram:PassRole",
      "Resource": "acs:ram::*:role/${RoleName}"
    }
  ]
}
Get temporary access credentials
After attaching a role, the service instance can retrieve STS temporary credentials in three ways. All three methods return the same credential fields.
Method 1: Credentials tool
The Credentials tool reads credentials from a local endpoint automatically injected into the service instance. Credentials are periodically updated — your code never needs to handle rotation.
When deploying, install alibabacloud_credentials in the Third-party Library Configuration section (skip this if it is already in your image).
Then use the following code to initialize an authenticated client:
from alibabacloud_credentials.client import Client as CredClient
from alibabacloud_credentials.models import Config as CredConfig

credentials_config = CredConfig(type='credentials_uri')
credentials_client = CredClient(credentials_config)
For examples in other languages, see Best practices for accessing Alibaba Cloud OpenAPI using access credentials.
Method 2: Call the local credentials endpoint
Inside the service instance, call the automatically injected local server to get current credentials:
# Retrieve temporary credentials for the instance RAM role
curl $ALIBABA_CLOUD_CREDENTIALS_URI
Sample response:
{
  "Code": "Success",
  "AccessKeyId": "STS.N*********7",
  "AccessKeySecret": "3***************d",
  "SecurityToken": "DFE32G*******",
  "Expiration": "2024-05-21T10:39:29Z"
}| Field | Description |
|---|---|
SecurityToken | The temporary token for the RAM role |
Expiration | When the credentials expire (UTC) |
Method 3: Read the credentials file
PAI-EAS automatically writes credentials to /etc/ram/credentials inside the service instance and periodically refreshes the file. Read this file directly when a local HTTP call is inconvenient:
{
  "Code": "Success",
  "AccessKeyId": "STS.N*********7",
  "AccessKeySecret": "3***************d",
  "SecurityToken": "DFE32G*******",
  "Expiration": "2024-05-21T10:39:29Z"
}
Examples
The following examples show how to access OSS and MaxCompute from within an EAS service using the RAM role. Both examples use providers.DefaultCredentialsProvider(), which picks up credentials from the injected local endpoint automatically.
The examples use the Custom Deployment page in the PAI console. For full parameter descriptions, see Console custom deployment parameter description.
How the examples work: Mount a Python script to the service instance via Model Configuration, then set the run command to execute it. This avoids building a custom image.
Example 1: Access OSS data
import oss2
from alibabacloud_credentials.client import Client
from alibabacloud_credentials import providers
from itertools import islice

if __name__ == '__main__':
    auth = oss2.ProviderAuth(providers.DefaultCredentialsProvider())
    bucket = oss2.Bucket(
        auth,
        '<oss_endpoint>',   # Internal endpoint, e.g. oss-cn-hangzhou-internal.aliyuncs.com
        '<oss_bucket>'      # Must be the default OSS bucket for the current workspace
    )

    for b in islice(oss2.ObjectIterator(bucket), 10):
        print(b.key)
Replace the placeholders:
| Placeholder | Description |
|---|---|
<oss_bucket> | Your OSS bucket name. Must be the default OSS bucket preset in the current workspace. |
<oss_endpoint> | The endpoint for your bucket's region. EAS does not connect to the public internet by default, so use the internal endpoint (for example, oss-cn-hangzhou-internal.aliyuncs.com). To use a public endpoint, configure a virtual private cloud (VPC) with internet access for EAS. See Network configuration. |
Example 2: Access MaxCompute (PyODPS)
from alibabacloud_credentials import providers
from odps.accounts import CredentialProviderAccount
from odps import ODPS

if __name__ == '__main__':
    account = CredentialProviderAccount(providers.DefaultCredentialsProvider())
    o = ODPS(
        account=account,
        project='<odps_project>',    # Your MaxCompute project name
        endpoint='<odps_endpoint>'   # Internal endpoint, e.g. https://service.cn-hangzhou-vpc.maxcompute.aliyun-inc.com/api
    )

    for t in o.list_tables():
        print(t)
Replace the placeholders:
| Placeholder | Description |
|---|---|
<odps_project> | Your MaxCompute project name. Find it in the MaxCompute console under Workspace > Project Management. If deploying as a RAM user, make sure the user has operation permissions for the project. See Authorize other users. |
<odps_endpoint> | The endpoint for your project's region. EAS does not connect to the public internet by default, so use the internal endpoint (for example, https://service.cn-hangzhou-vpc.maxcompute.aliyun-inc.com/api). To use a public endpoint, configure a VPC with internet access for EAS. See Network configuration. |
Deploy the examples
On the Custom Deployment page, configure the following parameters:
| Parameter | Value |
|---|---|
| Run Command (under Environment Information) | python /mnt/data/xx.py |
| Model Configuration | Mount the directory containing your script and set the mount path to /mnt/data/ |
| Third-party Library List (under Third-party Library Configuration) | alibabacloud_credentials, pyodps, oss2 — skip if pre-installed in your image |
| Service Configuration | Add "options": { "enable_ram_role": true } to the JSON |
After clicking Deploy, view the output in the service logs once the service is running.
Troubleshooting
Role not found
Symptom: 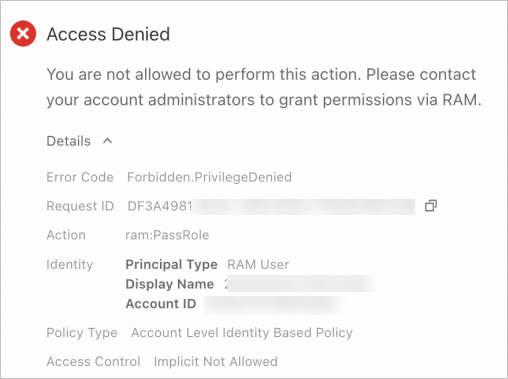
Check in the RAM console whether the role exists.
Role doesn't exist: Update the service configuration to reference an existing role name.
Role exists but error persists: The RAM user deploying the service lacks
ram:PassRolepermission. Ask the primary account to attach the following policy (replace${RoleName}with the role name). See Grant permissions to a RAM user.{ "Version": "1", "Statement": [ { "Effect": "Allow", "Action": "ram:PassRole", "Resource": "acs:ram::*:role/${RoleName}" } ] }
Failed to assume role
Symptom: The Deployment Events tab on the Elastic Algorithm Service page shows:
unable to render, error: failed to assume role for user, reason: You are not authorized to do this action. You should be authorized by RAM.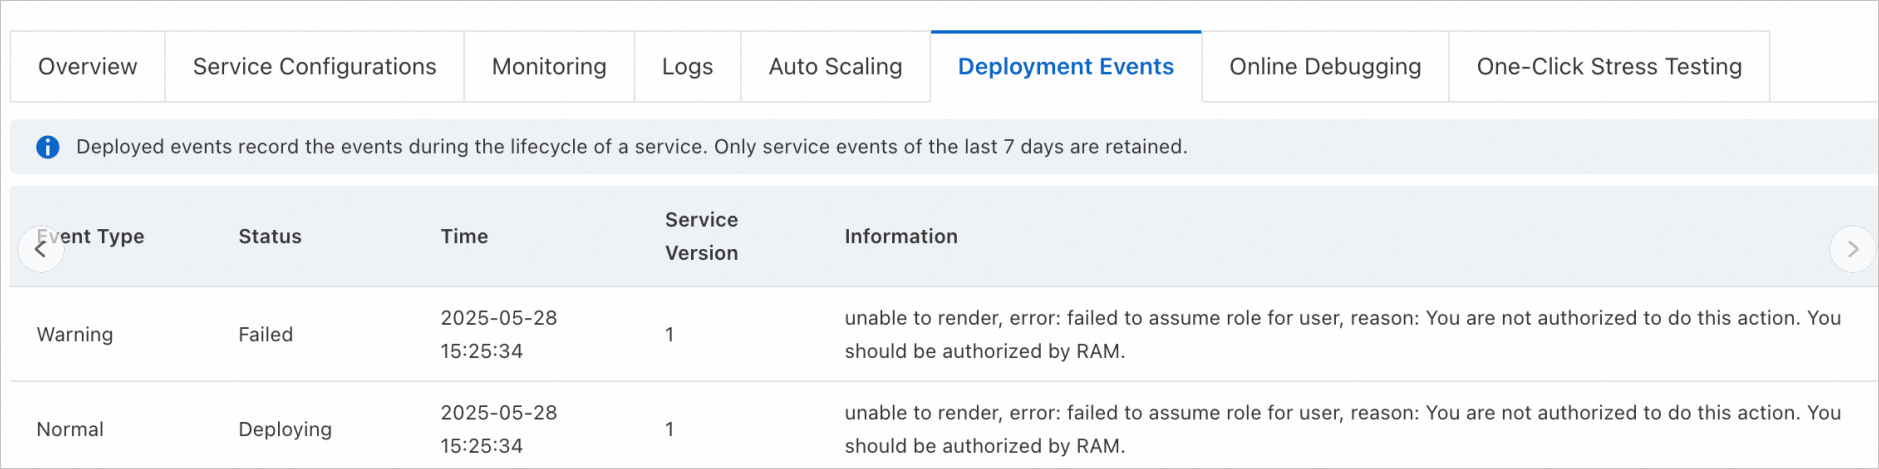
The RAM role's trust policy does not include eas.pai.aliyuncs.com as a trusted principal. To fix this:
Log on to the RAM console as a RAM administrator.
In the left navigation pane, choose Identities > Roles.
Click the name of the target RAM role.
On the Trust Policy tab, click Edit Trust Policy.
In the
Servicearray, add"eas.pai.aliyuncs.com"and click OK.
Before:
{
  "Statement": [
    {
      "Action": "sts:AssumeRole",
      "Effect": "Allow",
      "Principal": {
        "RAM": ["acs:ram::aaa:root"],
        "Service": ["xxx.aliyuncs.com"]
      }
    }
  ],
  "Version": "1"
}
After:
{
  "Statement": [
    {
      "Action": "sts:AssumeRole",
      "Effect": "Allow",
      "Principal": {
        "RAM": ["acs:ram::aaa:root"],
        "Service": [
          "xxx.aliyuncs.com",
          "eas.pai.aliyuncs.com"
        ]
      }
    }
  ],
  "Version": "1"
}