All Products
Search
Document Center

Platform For AI:Deploy a ComfyUI service for AI video generation

Last Updated:Aug 26, 2026

ComfyUI is a node-based AIGC tool built on Stable Diffusion, designed for short-form video generation and animation production. PAI-EAS supports scenario-based deployment of ComfyUI services.

Before you begin

Key limitations and considerations

Read this section before you deploy to avoid wasted resources and common mistakes.

  • Deployment resources: We recommend GU30, NVIDIA A10, or NVIDIA T4 GPU instance types. The ml.gu7i.c16m60.1-gu30 instance type offers the best price-performance ratio.

    Important

    Each PAI-EAS instance runs a single ComfyUI process and supports only one GPU (single-instance single-GPU or multi-instance single-GPU). Multi-GPU parallel inference is not supported. Do not select multi-GPU instance types (such as 2×A10). Multi-GPU instance types waste resources and do not improve single-task performance.

  • Horizontal scaling: To increase concurrency, use the API Edition and increase the number of replicas instead of selecting a multi-GPU instance type.

Choose a deployment edition

Select the edition that best fits your use case:

Edition

Use case

Access method

Key features

Billing method

Standard Edition

Single-user development and testing

  • WebUI

  • API calls (synchronous, with online debugging)

  • Limited concurrency

  • Deploy a single instance

When deployed on public resources, billing starts as soon as the instance is running, even without any API calls.

API Edition

High-concurrency production workloads

API calls (asynchronous)

  • Built on the PAI-EAS queue service

  • Requires additional CPU resources

  • Supports load balancing

Cluster Edition WebUI

Multi-user teams and training

WebUI

  • Isolated user environments

  • Shared GPU resources

  • Higher resource consumption

For more information about how this works, see How Cluster Edition works

For more billing information, see Elastic Algorithm Service (EAS) billing.

Note

Synchronous and asynchronous API calls differ based on whether the PAI-EAS queue service is used:

  • Synchronous call: Sends a request directly to the inference instance without using the PAI-EAS queue service.

  • Asynchronous call: Uses the PAI-EAS queue service. Requests are submitted to an input queue, and results are delivered through a subscription model.

Because ComfyUI has its own built-in asynchronous queue system, even synchronous calls are processed asynchronously under the hood. After you submit a request, the system returns a Prompt ID that you use to poll for the inference result.

Deploy the service

Standard Edition, Cluster Edition, and API Edition: You can use scenario-based model deployment for a simplified experience, or custom model deployment for advanced configuration options.

Method 1: Scenario-based model deployment (recommended)

  1. Log on to the PAI console. Select a region on the top of the page. Then, select the desired workspace and click Elastic Algorithm Service (EAS).

  2. On the Elastic Algorithm Service (EAS) page, click Deploy Service. In the Scenario-based Model Deployment section, click AI Video Generation: ComfyUI-based Deployment.

  3. Configure the following key parameters and set other parameters as needed:

    • Version: See Choose a deployment edition.

    • Model Settings: For example, using Object Storage Service (OSS), select a bucket and directory. After deployment succeeds, the system automatically creates the required ComfyUI directories in this location.

      Important

      PAI-EAS does not support installing custom nodes (plugins) directly from the network through ComfyUI Manager or Git Clone. To use your own models, install custom nodes, or make API calls, you must configure this storage mount.

    • Resource Configuration: You must select a GPU instance type. We recommend GU30, NVIDIA A10, or NVIDIA T4. ml.gu7i.c16m60.1-gu30 offers the best price-performance ratio. If this instance type is unavailable, select ecs.gn6i-c16g1.4xlarge instead.

  4. Click Deploy. Wait approximately 5 minutes. When Service Status changes to Running, the deployment is complete.

Method 2: Custom model deployment

  1. Log on to the PAI console. Select a region on the top of the page. Then, select the desired workspace and click Elastic Algorithm Service (EAS).

  2. Click Deploy Service. In the Custom Model Deployment section, click Custom Deployment.

  3. Configure the following key parameters:

    • Deployment Method: Select Image-based Deployment and select the Enable Web App check box.

    • Image Configuration: In the Alibaba Cloud Image list, select comfyui:2.3. Image version naming convention: x.x for Standard Edition, x.x-api for API Edition, and x.x-cluster for Cluster Edition.

      Note
      • Because versions are updated frequently, select the latest available image version when you deploy.

      • For the use cases of each edition, see Choose a deployment edition.

    • Mount storage: Using Object Storage Service (OSS) as an example, select a bucket and directory. After deployment succeeds, the system automatically creates the required ComfyUI directories in this location. Make sure the bucket is in the same region as the PAI-EAS service.

      Important

      PAI-EAS does not support installing custom nodes (plugins) directly from the network through ComfyUI Manager or Git Clone. To use your own models, install custom nodes, or make API calls, you must configure this storage mount.

      • URI: Click image to select an existing OSS directory. For example, oss://bucket-test/data-oss/.

      • Mount Path: Set this to /mnt/data to mount the OSS directory to the container path /mnt/data.

    • Command to Run:

      • After you select an image version, the system automatically configures the runtime command.

      • If you configured a storage mount, you must add the --data-dir parameter to the Command, and its value must match the Mount Path exactly. For example, python main.py --listen --port 8000 --data-dir /mnt/data --cache-root /stable-diffusion-cache.

    • Resource Type: Select Public Resources.

    • Deployment: You must select a GPU instance type. We recommend GU30, NVIDIA A10, or NVIDIA T4. ml.gu7i.c16m60.1-gu30 offers the best price-performance ratio. If this instance type is unavailable, select ecs.gn6i-c16g1.4xlarge instead.

  4. Click Deploy. Deployment takes approximately 5 minutes. When Service Status changes to Running, the service is deployed.

Use the service through WebUI

Important

Standard Edition and Cluster Edition support access through WebUI.

Open the web interface

Click the name of the target service to open the Overview page, and then click Web Application in the upper-right corner.

If the page takes a long time to load, see Page freezes or takes too long to load .

Use a template workflow

ComfyUI provides prebuilt templates for common tasks.

  1. Select a template (for example, Wan VACE Text to Video).

    Note

    Templates vary across ComfyUI image versions. If the sample template is not available, select a different template or load a workflow file from the local file system.

  2. After the workflow loads, you may see errors about missing models. You can dismiss these errors (we recommend selecting the option to not show this message again).

  3. Because model paths may have changed, running the workflow directly may produce the following error:

    Prompt outputs failed validation:
    UNETLoader:
    - Value not in list: unet_name: 'wan2.1_vace_14B_fp16.safetensors' not in (list of length 200)
    LoraLoader:
    - Value not in list: lora_name: 'Wan21_CausVid_14B_T2V_lora_rank32.safetensors' not in (list of length 364)

    In the Load models here section, reselect wan2.1_vace_14B_fp16.safetensors in the UNET loader and Wan21_CausVid_14B_T2V_lora_rank32.safetensors in the LoRA loader.

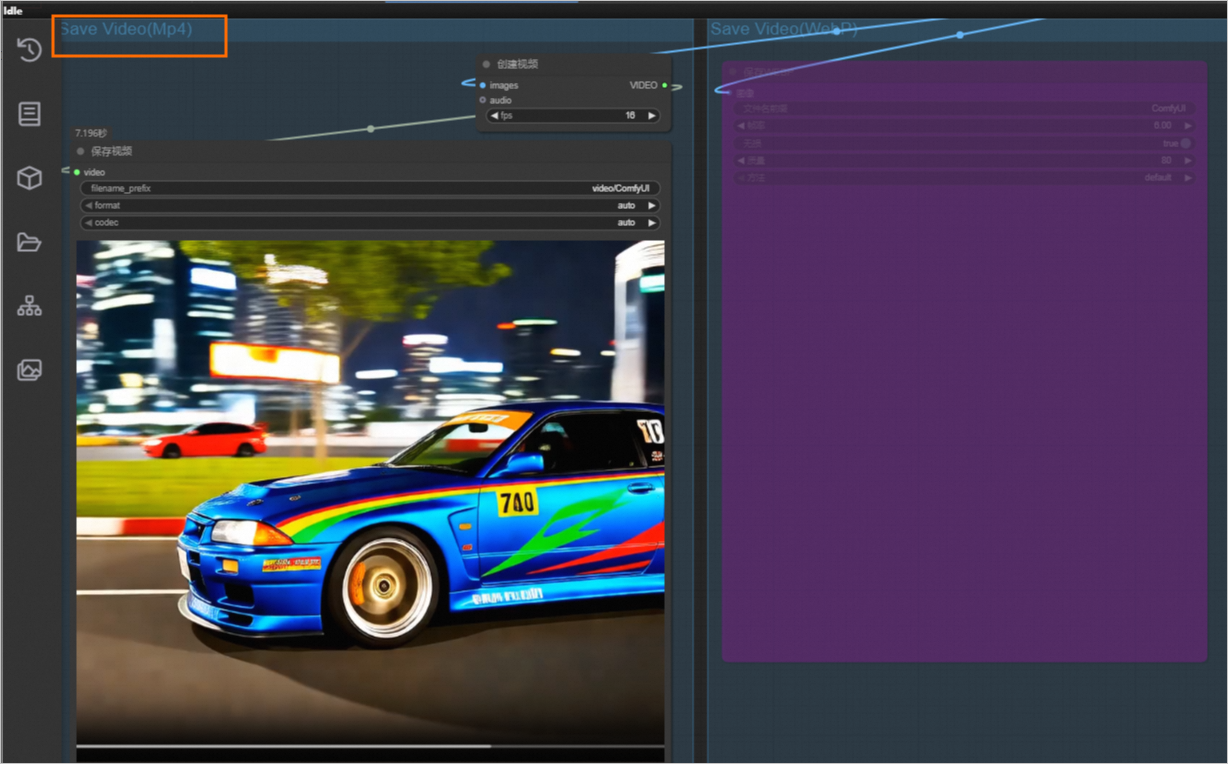
  4. After the workflow runs successfully, the generated video appears in the Save Video section. image
Use custom models and nodes

  1. Make sure the service has a storage mount configured. After the service is deployed, the system automatically creates the following directory structure in the mounted OSS or NAS storage.

    data-oss/
    ├── custom_nodes/     # Custom node files (ComfyUI plugins)
    ├── models/           # Model files
    ├── input/
    ├── output/
    ├── unet/
    └── temp/
  2. Upload model or node files. For example, you can use OSS and upload files to OSS through the console. For large files, see How do I upload large objects to OSS?.

    • Upload model files: Check the documentation of the source repository for the node that uses the model, and upload the model to the corresponding subdirectory under models. For example:

      • Checkpoint loader: Upload models to models/checkpoints.

      • Style model loader: Upload models to models/styles.

    • Upload node files: Upload custom nodes to the custom_nodes directory in the mounted storage.

  3. Load new content.

    • Models: At the top of the page, click PaiCustom > Load New Models. If the model still does not appear, click PaiCustom > Restart Process. After the process restarts, refresh the browser page.

    • Nodes: Click Restart Process. After the process restarts, refresh the browser page.

Call the service through API

You can call the ComfyUI service through its API to integrate it into your applications for automated content generation. The core workflow: submit a workflow JSON > get a task ID > use the task ID to retrieve the generation result.

Important
  • Edition support: Standard Edition supports only synchronous calls and provides online debugging. API Edition supports only asynchronous calls and only the /prompt endpoint.

  • Retrieving generated output: Generated images and videos are stored in the mounted output directory. API responses return file names and subdirectory names rather than the files themselves. For OSS, construct the full file path to download the files. For more information, see Download OSS files by using the Alibaba Cloud SDK.

Prepare the API request body

The request body format depends on the call method:

  • Synchronous call: Wrap the workflow JSON content inside a prompt key-value pair.

  • Asynchronous call: The request body is the workflow JSON content directly.

Note

How to download a workflow: In the upper-left corner of the ComfyUI page, click image > File > Export (API).

Because the Wan VACE Text to Video workflow above is time-consuming, the following test workflow is provided for easier testing (each run takes approximately 3 minutes).

Click to view the request body example for the test workflow

Synchronous call

{
    "prompt": {
        "3": {
            "inputs": {
                "seed": 423988542100860,
                "steps": 40,
                "cfg": 7,
                "sampler_name": "dpmpp_sde_gpu",
                "scheduler": "karras",
                "denoise": 1,
                "model": [
                    "4",
                    0
                ],
                "positive": [
                    "6",
                    0
                ],
                "negative": [
                    "7",
                    0
                ],
                "latent_image": [
                    "5",
                    0
                ]
            },
            "class_type": "KSampler",
            "_meta": {
                "title": "KSampler"
            }
        },
        "4": {
            "inputs": {
                "ckpt_name": "LandscapeBING_v10.safetensors"
            },
            "class_type": "CheckpointLoaderSimple",
            "_meta": {
                "title": "Checkpoint Loader (Simple)"
            }
        },
        "5": {
            "inputs": {
                "width": 720,
                "height": 1280,
                "batch_size": 1
            },
            "class_type": "EmptyLatentImage",
            "_meta": {
                "title": "Empty Latent"
            }
        },
        "6": {
            "inputs": {
                "text": "Rocket takes off from the ground, fire,sky, airplane",
                "speak_and_recognation": {
                    "__value__": [
                        false,
                        true
                    ]
                },
                "clip": [
                    "4",
                    1
                ]
            },
            "class_type": "CLIPTextEncode",
            "_meta": {
                "title": "CLIP Text Encoder"
            }
        },
        "7": {
            "inputs": {
                "text": "",
                "speak_and_recognation": {
                    "__value__": [
                        false,
                        true
                    ]
                },
                "clip": [
                    "4",
                    1
                ]
            },
            "class_type": "CLIPTextEncode",
            "_meta": {
                "title": "CLIP Text Encoder"
            }
        },
        "8": {
            "inputs": {
                "samples": [
                    "3",
                    0
                ],
                "vae": [
                    "4",
                    2
                ]
            },
            "class_type": "VAEDecode",
            "_meta": {
                "title": "VAE Decode"
            }
        },
        "9": {
            "inputs": {
                "filename_prefix": "ComfyUI",
                "images": [
                    "8",
                    0
                ]
            },
            "class_type": "SaveImage",
            "_meta": {
                "title": "Save Image"
            }
        },
        "13": {
            "inputs": {
                "seed": 788620942678235,
                "steps": 40,
                "cfg": 2.5,
                "sampler_name": "euler_ancestral",
                "scheduler": "karras",
                "denoise": 1,
                "model": [
                    "17",
                    0
                ],
                "positive": [
                    "16",
                    0
                ],
                "negative": [
                    "16",
                    1
                ],
                "latent_image": [
                    "16",
                    2
                ]
            },
            "class_type": "KSampler",
            "_meta": {
                "title": "KSampler"
            }
        },
        "14": {
            "inputs": {
                "samples": [
                    "13",
                    0
                ],
                "vae": [
                    "18",
                    2
                ]
            },
            "class_type": "VAEDecode",
            "_meta": {
                "title": "VAE Decode"
            }
        },
        "15": {
            "inputs": {
                "filename_prefix": "ComfyUI",
                "fps": 10.000000000000002,
                "lossless": false,
                "quality": 85,
                "method": "default",
                "images": [
                    "14",
                    0
                ]
            },
            "class_type": "SaveAnimatedWEBP",
            "_meta": {
                "title": "Save WEBP"
            }
        },
        "16": {
            "inputs": {
                "width": 512,
                "height": 768,
                "video_frames": 35,
                "motion_bucket_id": 140,
                "fps": 15,
                "augmentation_level": 0.15000000000000002,
                "clip_vision": [
                    "18",
                    1
                ],
                "init_image": [
                    "8",
                    0
                ],
                "vae": [
                    "18",
                    2
                ]
            },
            "class_type": "SVD_img2vid_Conditioning",
            "_meta": {
                "title": "SVD_Image to Video_Conditioning"
            }
        },
        "17": {
            "inputs": {
                "min_cfg": 1,
                "model": [
                    "18",
                    0
                ]
            },
            "class_type": "VideoLinearCFGGuidance",
            "_meta": {
                "title": "Linear CFG Guidance"
            }
        },
        "18": {
            "inputs": {
                "ckpt_name": "svd_xt.safetensors"
            },
            "class_type": "ImageOnlyCheckpointLoader",
            "_meta": {
                "title": "Checkpoint Loader (Image Only)"
            }
        },
        "19": {
            "inputs": {
                "frame_rate": 10,
                "loop_count": 0,
                "filename_prefix": "comfyUI",
                "format": "video/h264-mp4",
                "pix_fmt": "yuv420p",
                "crf": 20,
                "save_metadata": true,
                "trim_to_audio": false,
                "pingpong": false,
                "save_output": true,
                "images": [
                    "14",
                    0
                ]
            },
            "class_type": "VHS_VideoCombine",
            "_meta": {
                "title": "Combine to Video"
            }
        }
    }
}

Asynchronous call

{
    "3": {
        "inputs": {
            "seed": 423988542100860,
            "steps": 40,
            "cfg": 7,
            "sampler_name": "dpmpp_sde_gpu",
            "scheduler": "karras",
            "denoise": 1,
            "model": [
                "4",
                0
            ],
            "positive": [
                "6",
                0
            ],
            "negative": [
                "7",
                0
            ],
            "latent_image": [
                "5",
                0
            ]
        },
        "class_type": "KSampler",
        "_meta": {
            "title": "KSampler"
        }
    },
    "4": {
        "inputs": {
            "ckpt_name": "LandscapeBING_v10.safetensors"
        },
        "class_type": "CheckpointLoaderSimple",
        "_meta": {
            "title": "Checkpoint Loader (Simple)"
        }
    },
    "5": {
        "inputs": {
            "width": 720,
            "height": 1280,
            "batch_size": 1
        },
        "class_type": "EmptyLatentImage",
        "_meta": {
            "title": "Empty Latent"
        }
    },
    "6": {
        "inputs": {
            "text": "Rocket takes off from the ground, fire,sky, airplane",
            "speak_and_recognation": {
                "__value__": [
                    false,
                    true
                ]
            },
            "clip": [
                "4",
                1
            ]
        },
        "class_type": "CLIPTextEncode",
        "_meta": {
            "title": "CLIP Text Encoder"
        }
    },
    "7": {
        "inputs": {
            "text": "",
            "speak_and_recognation": {
                "__value__": [
                    false,
                    true
                ]
            },
            "clip": [
                "4",
                1
            ]
        },
        "class_type": "CLIPTextEncode",
        "_meta": {
            "title": "CLIP Text Encoder"
        }
    },
    "8": {
        "inputs": {
            "samples": [
                "3",
                0
            ],
            "vae": [
                "4",
                2
            ]
        },
        "class_type": "VAEDecode",
        "_meta": {
            "title": "VAE Decode"
        }
    },
    "9": {
        "inputs": {
            "filename_prefix": "ComfyUI",
            "images": [
                "8",
                0
            ]
        },
        "class_type": "SaveImage",
        "_meta": {
            "title": "Save Image"
        }
    },
    "13": {
        "inputs": {
            "seed": 788620942678235,
            "steps": 40,
            "cfg": 2.5,
            "sampler_name": "euler_ancestral",
            "scheduler": "karras",
            "denoise": 1,
            "model": [
                "17",
                0
            ],
            "positive": [
                "16",
                0
            ],
            "negative": [
                "16",
                1
            ],
            "latent_image": [
                "16",
                2
            ]
        },
        "class_type": "KSampler",
        "_meta": {
            "title": "KSampler"
        }
    },
    "14": {
        "inputs": {
            "samples": [
                "13",
                0
            ],
            "vae": [
                "18",
                2
            ]
        },
        "class_type": "VAEDecode",
        "_meta": {
            "title": "VAE Decode"
        }
    },
    "15": {
        "inputs": {
            "filename_prefix": "ComfyUI",
            "fps": 10.000000000000002,
            "lossless": false,
            "quality": 85,
            "method": "default",
            "images": [
                "14",
                0
            ]
        },
        "class_type": "SaveAnimatedWEBP",
        "_meta": {
            "title": "Save WEBP"
        }
    },
    "16": {
        "inputs": {
            "width": 512,
            "height": 768,
            "video_frames": 35,
            "motion_bucket_id": 140,
            "fps": 15,
            "augmentation_level": 0.15000000000000002,
            "clip_vision": [
                "18",
                1
            ],
            "init_image": [
                "8",
                0
            ],
            "vae": [
                "18",
                2
            ]
        },
        "class_type": "SVD_img2vid_Conditioning",
        "_meta": {
            "title": "SVD_Image to Video_Conditioning"
        }
    },
    "17": {
        "inputs": {
            "min_cfg": 1,
            "model": [
                "18",
                0
            ]
        },
        "class_type": "VideoLinearCFGGuidance",
        "_meta": {
            "title": "Linear CFG Guidance"
        }
    },
    "18": {
        "inputs": {
            "ckpt_name": "svd_xt.safetensors"
        },
        "class_type": "ImageOnlyCheckpointLoader",
        "_meta": {
            "title": "Checkpoint Loader (Image Only)"
        }
    },
    "19": {
        "inputs": {
            "frame_rate": 10,
            "loop_count": 0,
            "filename_prefix": "comfyUI",
            "format": "video/h264-mp4",
            "pix_fmt": "yuv420p",
            "crf": 20,
            "save_metadata": true,
            "trim_to_audio": false,
            "pingpong": false,
            "save_output": true,
            "images": [
                "14",
                0
            ]
        },
        "class_type": "VHS_VideoCombine",
        "_meta": {
            "title": "Combine to Video"
        }
    }
}

Synchronous calls

Synchronous calls send requests directly to the PAI-EAS service instance. This method is suitable for development, testing, and low-concurrency scenarios.

Online debugging

Online debugging lets you test API calls directly in the console without writing code. This is useful for quickly validating workflow configurations.

On the Elastic Algorithm Service (EAS) page, click Online Debugging in the Actions column of the target service to open the online debugging page.

  1. Send a POST request to get the Prompt ID.

    1. In the Request Parameter Online Tuning section of the debugging page, enter the prepared request body in the Body field, and append /prompt to the request URL.

    2. Click Send Request to view the response in the Debugging Information section.

      After the request is sent, the Debug Info panel on the right displays the response: Status Code is 200, and the Response Body contains the prompt_id (for example, 130bc***c8c-3a1359a04e5d), number, and node_errors fields. Record the prompt_id value for use in the next step.

  2. Send a GET request to retrieve the inference result using the Prompt ID.

    1. In the Request Parameter Online Tuning section, change the request method to GET and enter /history/<prompt id> in the URL field.

      Replace <prompt id> with the Prompt ID obtained in Step 1.

    2. Click Send Request to retrieve the inference result.

      You can find the generated output in the output directory of the mounted storage.

Code-based calls

You can call the API through code to integrate ComfyUI into your applications. The workflow is the same as online debugging: first obtain the Prompt ID, then query the inference result.

  1. View the call information.

    1. On the Inference Services tab, click the name of the target service to open the Overview page.

    2. In the Basic Information section, click View Call Information.

    3. In the Call Information panel, copy the access endpoint and token:

      The Call Information panel has two tabs: Shared Gateway and VPC Direct Connection. The public endpoint, VPC endpoint, and token are on the Shared Gateway tab.

      • Select the Public Endpoint or VPC Endpoint as needed.

      • The examples below use for the access endpoint and for the token.

  2. Send a request to obtain the Prompt ID.

    • HTTP method: POST.

    • Request URL: <EAS_ENDPOINT>/prompt. If the <EAS_ENDPOINT> ends with /, remove the trailing slash. The final URL looks like http://comfyui****.175805416243****.cn-beijing.pai-eas.aliyuncs.com/prompt.

    • Request headers:

      Header

      Value

      Description

      Authorization

      <EAS_TOKEN>

      The authorization token.

      Content-Type

      application/json

      Specifies the request body format.

    Code examples:

    cURL

    curl --location --request POST '<EAS_ENDPOINT>/prompt' \
    --header 'Authorization: <EAS_TOKEN>' \
    --header 'Content-Type: application/json' \
    --data-raw '{
        "prompt":
        ...omitted
    }'

    The --data-raw parameter contains the request body.

    Python

    Code example:

    import requests
    import json
    
    # Replace <EAS_ENDPOINT> and <EAS_TOKEN> with the endpoint and token from Step 1.
    service_url = "<EAS_ENDPOINT>"
    token = "<EAS_TOKEN>"
    
    if service_url[-1] == "/":
        service_url = service_url[:-1]
    
    # Request body: set the "prompt" value to the workflow JSON content.
    payload = """{
        "prompt":
        ...omitted
    }"""
    payload = json.loads(payload)
    
    session = requests.session()
    session.headers.update({"Authorization": token})
      
    response = session.post(url=f'{service_url}/prompt', json=payload)
    if response.status_code != 200:
        raise Exception(response.content)
    
    data = response.json()
    print(data)

    Example response:

    {
        "prompt_id": "021ebc5b-e245-4e37-8bd3-00f7b949****",
        "number": 5,
        "node_errors": {}
    }

    Extract the Prompt ID from the response.

  3. Retrieve the inference result.

    • HTTP method: GET

    • Request URL: <EAS_ENDPOINT>/history/<prompt_id>. Replace <prompt_id> with the prompt_id obtained in Step 1.

    • Request headers:

      Header

      Value

      Description

      Authorization

      <EAS_TOKEN>

      The authorization token obtained in Step 1.

    Code examples:

    cURL

    curl --location --request GET '<EAS_ENDPOINT>/history/<prompt_id>' \
         --header 'Authorization: <EAS_TOKEN>'

    Python

    import requests
    
    # Replace <EAS_ENDPOINT> and <EAS_TOKEN> with the endpoint and token from Step 1.
    # Replace <prompt_id> with the prompt_id obtained in Step 2.
    service_url = "<EAS_ENDPOINT>"
    token = "<EAS_TOKEN>"
    prompt_id = "<prompt_id>"
    
    if service_url[-1] == "/":
        service_url = service_url[:-1]
    
    session = requests.session()
    session.headers.update({"Authorization": token})
    
    response = session.get(url=f'{service_url}/history/{prompt_id}')
    
    if response.status_code != 200:
        raise Exception(response.content)
    
    data = response.json()
    print(data)

    Example response:

    Click to view the response example

    {
        "130bcd6b-5bb5-496c-9c8c-3a1359a0****": {
            "prompt": "...(omitted)",
            "outputs": {
                "9": {
                    "images": [
                        {
                            "filename": "ComfyUI_1712645398_18dba34d-df87-4735-a577-c63d5506a6a1_.png",
                            "subfolder": "",
                            "type": "output"
                        }
                    ]
                },
                "15": {
                    "images": [
                        {
                            "filename": "ComfyUI_1712645867_.webp",
                            "subfolder": "",
                            "type": "output"
                        }
                    ],
                    "animated": [
                        true
                    ]
                },
                "19": {
                    "gifs": [
                        {
                            "filename": "comfyUI_00002.mp4",
                            "subfolder": "",
                            "type": "output",
                            "format": "video/h264-mp4"
                        }
                    ]
                }
            },
            "status": {
                "status_str": "success",
                "completed": true,
                "messages": "...(omitted)"
            }
        }
    }

    The outputs field in the response contains the generated images (PNG/WebP) and videos (MP4). You can locate these files in the output directory of the mounted storage by searching for the file names.

Asynchronous calls

Asynchronous calls are designed for high-concurrency production workloads. This method uses the PAI-EAS queue service for load balancing. Requests return immediately, and you retrieve results by subscribing to the result queue.

Important

Asynchronous calls support only the api_prompt endpoint. The task_id parameter is a critical identifier for matching requests to results. Assign a unique value to each request so you can correlate it with the corresponding queue result. The request path is:

{service_url}/api_prompt?task_id={assign a unique value}

  1. View the call information.

    On the Inference Services tab, click the name of the target service to open the Overview page. In the Basic Information section, click View Call Information. On the Asynchronous Call tab of the Call Information dialog box, view the service access endpoint and token.

    image

    The following sections use <EAS_ENDPOINT> to refer to the Internet Input Endpoint (if the caller is in the same VPC as PAI-EAS, you can use the VPC Input Endpoint), and <EAS_TOKEN> to refer to the Token.

  2. Send a request.

    Code example:

    import requests
    import json
    
    service_url = "<EAS_ENDPOINT>"
    token = "<EAS_TOKEN>"
    
    if service_url[-1] == "/":
        service_url = service_url[:-1]
    
    session = requests.session()
    session.headers.update({"Authorization":token})
    
    # Request body - workflow JSON, no need to wrap with "prompt".
    # Use triple quotes to define it as a multi-line string, otherwise you need to capitalize the boolean values (true and false) in the workflow JSON.
    payload = """{
        '3':
        ...omitted
      }
      """
    payload = json.loads(payload)
    
    for i in range(5):
      # task_id is the key identifier for matching requests and results. Assign a unique value to each request to correlate with the queue results later.
      response = session.post(url=f'{service_url}/api_prompt?task_id=txt2img_{i}', json=payload)
      if response.status_code != 200:
        exit(f"send request error:{response.content}")
      else:
        print(f"send {i} success, index is {response.content}")
  3. Subscribe to results.

    1. Install the eas_prediction SDK.

      pip install eas_prediction  --user
    2. Run the following code to retrieve the result.

      from eas_prediction import QueueClient
      from urllib.parse import urlparse, urlunparse
      
      service_url     = "<EAS_ENDPOINT>"
      token           = "<EAS_TOKEN>"
      
      # Parse service URL
      def parse_service_url(service_url):
          parsed = urlparse(service_url)
          service_domain = f"{parsed.scheme}://{parsed.netloc}"
          path_parts = [p for p in parsed.path.strip('/').split('/') if p]
          service_name = path_parts[-1]
          return service_domain, service_name
      
      service_domain, service_name = parse_service_url(service_url)
      print(f"service_domain: {service_domain}, service_name: {service_name}.")
      
      # Create result queue client
      sink_queue = QueueClient(service_domain, f'{service_name}/sink')
      sink_queue.set_token(token)
      sink_queue.init()
      
      # Listen for results
      watcher = sink_queue.watch(0, 5, auto_commit=False)
      for x in watcher.run():
          if 'task_id' in x.tags:
              print('index {} task_id is {}'.format(x.index, x.tags['task_id']))
          print(f'index {x.index} data is {x.data}')
          # Commit acknowledgment
          sink_queue.commit(x.index)

      Example response:

      index 42 task_id is txt2img_0
      index 42 data is b'[{"type": "executed", "data": {"node": "9", "output": {"images": [{"filename": "ComfyUI_1712647318_8e7f3c93-d2a8-4377-92d5-8eb552adc172_.png", "subfolder": "", "type": "output"}]}, "prompt_id": "c3c983b6-f92b-4dd5-b4dc-442db4d1736f"}}, {"type": "executed", "data": {"node": "15", "output": {"images": [{"filename": "ComfyUI_1712647895_.webp", "subfolder": "", "type": "output"}], "animated": [true]}, "prompt_id": "c3c983b6-f92b-4dd5-b4dc-442db4d1736f"}}, {"type": "executed", "data": {"node": "19", "output": {"gifs": [{"filename": "comfyUI_00001.mp4", "subfolder": "", "type": "output", "format": "video/h264-mp4"}]}, "prompt_id": "c3c983b6-f92b-4dd5-b4dc-442db4d1736f"}}, {"9": {"images": [{"filename": "ComfyUI_1712647318_8e7f3c93-d2a8-4377-92d5-8eb552adc172_.png", "subfolder": "", "type": "output"}]}, "15": {"images": [{"filename": "ComfyUI_1712647895_.webp", "subfolder": "", "type": "output"}], "animated": [true]}, "19": {"gifs": [{"filename": "comfyUI_00001.mp4", "subfolder": "", "type": "output", "format": "video/h264-mp4"}]}}]'
      index 43 task_id is txt2img_1
      index 43 data is b'[{"9": {"images": [{"filename": "ComfyUI_1712647318_8e7f3c93-d2a8-4377-92d5-8eb552adc172_.png", "subfolder": "", "type": "output"}]}, "15": {"images": [{"filename": "ComfyUI_1712647895_.webp", "subfolder": "", "type": "output"}], "animated": [true]}, "19": {"gifs": [{"filename": "comfyUI_00001.mp4", "subfolder": "", "type": "output", "format": "video/h264-mp4"}]}}]'
      index 44 task_id is txt2img_2
      index 44 data is b'[{"9": {"images": [{"filename": "ComfyUI_1712647318_8e7f3c93-d2a8-4377-92d5-8eb552adc172_.png", "subfolder": "", "type": "output"}]}, "15": {"images": [{"filename": "ComfyUI_1712647895_.webp", "subfolder": "", "type": "output"}], "animated": [true]}, "19": {"gifs": [{"filename": "comfyUI_00001.mp4", "subfolder": "", "type": "output", "format": "video/h264-mp4"}]}}]'
      index 45 task_id is txt2img_3
      index 45 data is b'[{"9": {"images": [{"filename": "ComfyUI_1712647318_8e7f3c93-d2a8-4377-92d5-8eb552adc172_.png", "subfolder": "", "type": "output"}]}, "15": {"images": [{"filename": "ComfyUI_1712647895_.webp", "subfolder": "", "type": "output"}], "animated": [true]}, "19": {"gifs": [{"filename": "comfyUI_00001.mp4", "subfolder": "", "type": "output", "format": "video/h264-mp4"}]}}]'
      index 46 task_id is txt2img_4
      index 46 data is b'[{"9": {"images": [{"filename": "ComfyUI_1712647318_8e7f3c93-d2a8-4377-92d5-8eb552adc172_.png", "subfolder": "", "type": "output"}]}, "15": {"images": [{"filename": "ComfyUI_1712647895_.webp", "subfolder": "", "type": "output"}], "animated": [true]}, "19": {"gifs": [{"filename": "comfyUI_00001.mp4", "subfolder": "", "type": "output", "format": "video/h264-mp4"}]}}]'

      You can find the inference result files in the output directory of the mounted storage.

FAQ

The following are common issues and solutions for ComfyUI deployment and usage.

Deployment issues

Q: The service stays in a waiting state or ComfyUI cannot generate output

This is usually caused by insufficient resources. Verify that the service image and instance type are configured correctly. We recommend GU30, NVIDIA A10, or NVIDIA T4 GPU instance types. The ml.gu7i.c16m60.1-gu30 instance type offers the best price-performance ratio.

Model and node issues

Q: WebUI displays a "Missing Model" error

Problem: A dialog box titled Missing Model indicates that the model at checkpoints/v1-5-pruned-emaonly-fp16.safetensors is missing, and a red warning on the left shows Invalid directory specified (does this require custom nodes?).

Solution: You can safely ignore this error. This validation check is not applicable to ComfyUI deployed on PAI. Refer to the actual runtime errors instead.

We recommend selecting the option to not show this message again, or disable model validation in Settings.

Q: I uploaded a new model but cannot find it

Solution:

  1. Click PaiCustom and select Load New Models.

  2. If the model still does not appear, click Restart Process.

Q: The model loader shows "undefined"

First, verify that the model file is placed in the correct directory as required by the model loader node.

If you uploaded the model after deployment, restart the service.

Q: Cannot find a node

Q: ComfyUI Manager fails to download models or install nodes

We do not recommend using ComfyUI Manager with ComfyUI deployed on PAI-EAS. ComfyUI Manager downloads models and plugin code from external sources such as GitHub, which frequently fails due to network restrictions.

Instead, upload model and node files to the mounted storage. For more information, see Use custom models and install nodes (ComfyUI plugins).

Q: How to view available model files and nodes (ComfyUI plugins)

  • Model files: Check from the corresponding model loader node. For example, view available model files in the drop-down list of the Checkpoint loader.

  • Nodes: Right-click the WebUI page and click Add Node in the context menu to view all installed ComfyUI plugins.

Runtime errors

Q: The page freezes or takes too long to load

  • Refresh the page, clear the browser cache, or access the service in incognito/private browsing mode.

  • If storage is mounted, delete the files in the input/, output/, and temp/ directories.

  • Try restarting the service.

Q: The process restarts mid-workflow

If the instance logs contain run.sh: line 54: 531285 Killed python -u main_run.py "$@", the process was killed due to an out-of-memory (OOM) condition. The process automatically restarts after an OOM event.

Q: RuntimeError: CUDA error: out of memory

This means GPU memory is exhausted. For image models, reduce the image resolution or batch size. For video models, reduce the frame count or resolution.

Q: API call returns "url not found" or "404 page not found"

  1. Verify that the API endpoint URL is complete. For synchronous calls, you must append the /prompt path.

Other

Q: xFormers acceleration performance

xFormers is an open-source Transformer-based acceleration tool that reduces image and video generation time and GPU memory usage.

ComfyUI images have xFormers acceleration enabled by default. The acceleration effect depends on the size of the workflow, with the most noticeable improvements on GPU-intensive operations, especially with NVIDIA GPUs.

What to do next

After you deploy the ComfyUI service, you can:

  • Service monitoring: Configure monitoring and alerting to track service health in real time. For more information, see View service monitoring metrics.

  • Auto scaling: Configure auto scaling policies based on workload to optimize resource usage and costs. For more information, see Auto scaling.

  • Cost optimization: Understand PAI-EAS billing methods and choose the right instance type and deployment edition to reduce costs. For more information, see Billing overview.

Reference

Install Python packages

Install a .whl package by running a command

  1. Make sure the service has a storage mount configured. For example, assume the OSS path (URI) is oss://examplebucket/comfyui/ and the mount path is /mnt/data/.

  2. Upload the .whl file to the oss://examplebucket/comfyui/models/whl directory. If the whl directory does not exist, create it first.

  3. Update the Command to Run of the service: Prepend pip install /mnt/data/models/whl/xxx.whl to the runtime command. In this command, /mnt/data is the OSS mount path, and xxx.whl is the name of the .whl package.

  4. Restart the service.

Install packages through third-party library configuration

  1. On the service details page, click Update in the upper-right corner.

  2. If the service was deployed through scenario-based model deployment, switch to custom model deployment.

  3. In the Environment Information section, configure the dependencies in the Third-party Library Configuration area.

  4. Click Update at the bottom of the page to apply the update.

Update the image version

If the service has OSS or NAS storage mounted, custom models are stored in the OSS or NAS storage and are not affected by an image version update.

  1. On the service details page, click Update in the upper-right corner.

  2. If the service was deployed through scenario-based model deployment, switch to custom model deployment.

  3. In the Service Configuration section, edit the JSON configuration and update the image field under containers to the desired version (for example, change 1.9 to the target version).

  4. Click Update Directly.

Generate a sign-in-free URL with a custom validity period

You can use an API to generate a sign-in-free web access URL with a specified validity period.

  1. Go to the DescribeServiceSignedUrl API page.

  2. Select the service endpoint.

  3. Set the following parameters:

    • ClusterId (Region) and ServiceName: Enter the region and name of the service.

      On the EAS service overview page, the Service Name field shows the ServiceName value. The region is embedded in the node image address (for example, cn-hangzhou corresponds to the ClusterId region value). You can click View Web Application in the upper-right corner to open the service.

    • Type (Page type): Select webview from the drop-down list.

    • Expire (Expiration time): Enter an integer in seconds. The maximum value is 43200 seconds (12 hours). Set this as needed.

    • Internal (VPC access): Set to false (public access) or true (VPC access).

  4. Click Call API. The SignedUrl field in the response contains the sign-in-free web access URL.

Change the default language of the WebUI

  1. On the WebUI page, click the Settings button in the lower-left corner.

  2. Configure the language in the following two locations, then refresh and reload the page.

    • Comfy > Locale.

    • Language > Locale.

Appendix

How Cluster Edition works

The following diagram shows the architecture:

image

Cluster Edition is designed for multi-user scenarios. It introduces a proxy layer that decouples clients from backend inference instances.

  • Each user has an independent backend environment and working directory, but shares the backend GPU inference instance pool.

  • When a user sends an inference request, the proxy selects an available instance from the pool to handle the request.

This time-multiplexing mechanism isolates user environments while maximizing GPU resource utilization and reducing inference costs in multi-user scenarios.