In a DSW instance, you can install, view, uninstall, and update third-party Python packages through the Terminal. Changes are saved to the system disk of the instance and persist after a restart. However, new instances do not inherit these changes. To persist changes across instances, use the Save Image feature.
Install third-party libraries
DSW provides a variety of official images covering major frameworks such as PyTorch, TensorFlow, and ModelScope, with Python 3.10+ and CUDA 12.4+ preinstalled. To install a third-party library, use pip install to add it to the current Python environment. The command format is as follows:
pip install <yourLibraryName>Replace <yourLibraryName> with the name of the library you want to install. For example, run pip install bottle to install the bottle library.
If you run the install command in a Jupyter Notebook cell, prepend a percent sign % to the command, for example: %pip install bottle.
If a package was installed successfully but cannot be found in the Notebook, try reloading the kernel.
When installing large frameworks such as TensorFlow or PyTorch, pip uses a significant amount of memory to unpack wheel packages. If the process is Killed during installation, the instance likely does not have enough memory. We recommend at least 16 GiB of memory, and 32 GiB or more when installing frameworks with CUDA support. Alternatively, select a PAI official image that comes with the desired framework preinstalled when you create the instance, to avoid manual installation altogether.
View installed third-party libraries
Run the following command to view the installed third-party libraries.
pip listUninstall third-party libraries
Run the following command to uninstall a third-party library.
pip uninstall <yourLibraryName>Replace <yourLibraryName> with the name of the library you want to uninstall.
Exercise caution when uninstalling third-party libraries. Only uninstall packages that you installed yourself to avoid breaking the preinstalled system environment.
Update third-party libraries
Run the following commands to update an installed third-party library.
# Upgrade to the latest version
pip install --upgrade numpy

# Install a specific version
pip install numpy==<versionNumber>
Replace <versionNumber> with the target version number of numpy, and replace numpy with the name of the library you want to update.
View or change the pip source
Run the following command to view the pip configuration file:
pip config listIn the output, the value of the global.index-url parameter is the global pip source URL. The global. and install. prefixes correspond to the [global] and [install] sections in the configuration file, respectively. Example output:
global.index-url='https://mirrors.aliyun.com/pypi/simple/'
global.trusted-host='mirrors.aliyun.com'
install.trusted-host='mirrors.aliyun.com'
To temporarily set the pip source when installing a library:
pip install -i https://pypi.tuna.tsinghua.edu.cn/simple/ <yourLibraryName>
# If an SSL verification error occurs, add the --trusted-host parameter to skip HTTPS certificate validation (note: this reduces security and should only be used on trusted networks). Example:
pip install -i https://pypi.tuna.tsinghua.edu.cn/simple/ --trusted-host pypi.tuna.tsinghua.edu.cn <yourLibraryName>
To change the global pip source: pip reads multiple configuration files in order of priority (/etc/pip.conf, ~/.pip/pip.conf, ~/.config/pip/pip.conf, and others). We recommend that you first run pip config list -v to check the path of the active configuration file, and then edit that file. For example, to edit the user-level configuration file:
vim ~/.config/pip/pip.confThe following example shows how to change the pip source to the Tsinghua mirror. Modify the index-url and trusted-host parameters, then save and exit. The updated pip.conf file looks like this:
[global]
trusted-host=pypi.tuna.tsinghua.edu.cn
index-url = https://pypi.tuna.tsinghua.edu.cn/simple/

[install]
trusted-host=pypi.tuna.tsinghua.edu.cn
FAQ
Q: Will packages installed with pip and my code be lost after I stop a DSW instance?
No, they will not be lost as long as a cloud disk is used as the system disk. The instance's disk data (including environments under /mnt/workspace and /root) is preserved across restarts. Data is permanently deleted only when you delete the instance.
Q: Why don't my installed third-party packages take effect?
After installing a package with the pip command, if the package cannot be found when you import it, try restarting the service or kernel first. If the issue persists, verify that you are using the correct Python environment. Run which python to check the current Python path, and make sure that pip and the Notebook are using the same Python interpreter. The install command is as follows:
pip install xxxReplace xxx with the name of the package you want to install. Do not use the --user flag. Most DSW official images run as root, and --user installs packages to the /root/.local/ directory, which may conflict with system site-packages and cause the Notebook to fail to find the package.
Q: pip install fails with dependency conflicts or version errors. What should I do?
This is usually caused by environment incompatibility. Troubleshoot in the following order:
Preferred solution: switch to a different image. Stop the current instance, create a new DSW instance, and select a different official image. For example, if the current PyTorch 2.8 image does not work, try a PyTorch 2.13 image, or try a
modelscopeseries image, which generally offers better compatibility.Install a specific version. Check the official documentation of the package to find a version that supports your current DSW environment (Python/CUDA version), and then run
pip install package_name==x.y.z.Switch to a different download source. Try using a mirror such as the Tsinghua mirror:
pip install -i https://pypi.tuna.tsinghua.edu.cn/simple/ <yourLibraryName>.
Q: I installed a library in the DSW Terminal, but Jupyter Notebook still cannot find it when I try to import it. Why?
This may happen because the Terminal and Jupyter use different Python environments. Run the which python command to check the current Python environment, or install the required library directly in the Notebook. For example:
!which python
/usr/local/bin/python

!pip install bottle
Looking in indexes: https://mirrors.aliyun.com/pypi/simple/
Collecting bottle
  Downloading https://mirrors.aliyun.com/pypi/packages/83/f6/b55...
                                            103.8/103.8 kB 6.7 ...
Installing collected packages: bottle
Successfully installed bottle-0.13.4

WARNING: Running pip as the 'root' user can result in broken permissions...
You can ignore the WARNING: Running pip as the 'root' user warning. Most DSW official images run as root by default. For more information, see Q11.
Q: My code reports that the CUDA driver version is too low. Do I need to manually upgrade the NVIDIA driver in DSW?
Do not upgrade the driver. The driver and CUDA in a DSW instance are preinstalled and locked. You cannot and should not modify them manually, as doing so is very likely to damage the instance beyond recovery. The correct approach is to switch to a different DSW image. Stop the current instance, create a new one, and select an official image that includes a higher version of CUDA and driver.
For example, the official image modelscope:1.31.0-pytorch2.8.0-gpu-py311-cu124-ubuntu22.04: cu124 indicates CUDA version 12.4, and py311 indicates Python version 3.11.
Q: I get an ETIMEDOUT error when installing VS Code extensions in DSW. How do I fix this?
Installing VS Code extensions requires access to the VS Code Marketplace (marketplace.visualstudio.com), which is hosted outside China. If your DSW instance uses a public gateway (shared bandwidth), access to overseas resources may be extremely slow or time out.
Solution:
Verify network connectivity: run
curl -I https://marketplace.visualstudio.comin the Terminal and check whether a valid response is returned.If access to overseas resources times out, see Improve internet access with a private gateway to configure a public NAT gateway and EIP for the VPC where the instance resides, and switch to a dedicated gateway.
After configuring a dedicated gateway, if you still cannot access overseas resources, see Pull models or container images from overseas regions to enable Global Accelerator (GA).
Q: Can I use Docker in DSW to deploy my application?
The nested container (sub-container) feature is only supported on DSW instances created by Lingjun resource groups or general-purpose resource groups (v1.0). For details, see Manage sub-containers with DockerBoard and Use Docker in DSW.
Q: The unzip or 7z command is not available in my DSW instance. How do I decompress files?
You can install them using the apt-get command (if you are not the root user, prepend sudo to the command).
Install
unzip: runapt-get update && apt-get install -y unzipin the Terminal, then useunzip your_file.zip.Install
p7zip(for 7z): runapt-get update && apt-get install -y p7zip-fullin the Terminal, then use7z x your_file.7z.
Q: Package installation hangs or times out. What is going on?
If package installation hangs, times out, or is extremely slow, the cause is usually a network issue. Follow these steps to troubleshoot:
Step 1: Verify network connectivity
Run the ping www.aliyun.com command in the Terminal to test internet access. If the network is unreachable, proceed to Step 2 to check the gateway configuration.
Step 2: Check the gateway configuration
On the instance configuration page, check the type of the Internet Access Gateway:
Public gateway: DSW uses the Public Gateway to access the internet by default. You can confirm the gateway type on the DSW instance configuration page. Bandwidth is limited when using a public gateway, and download speeds may be insufficient for large files. In this case, consider switching to a dedicated gateway.
Dedicated gateway: A dedicated gateway provides faster network access. If you select a dedicated gateway, you must create a public NAT gateway in the VPC, bind an Elastic IP (EIP) to it, and configure SNAT rules. Otherwise, the instance cannot access the public network. For details, see Improve internet access with a private gateway.
Step 3: Try a different pip download source
DSW uses Alibaba Cloud mirrors by default. If downloads are slow, first check whether the current pip source has been changed incorrectly, and try restoring it to the Alibaba Cloud source or use the Tsinghua mirror as an alternative:
# Preferred: restore the default DSW Alibaba Cloud source
pip install -i https://mirrors.aliyun.com/pypi/simple/ --trusted-host mirrors.aliyun.com <yourLibraryName>

# Alternative: use the Tsinghua mirror
pip install -i https://pypi.tuna.tsinghua.edu.cn/simple/ --trusted-host pypi.tuna.tsinghua.edu.cn <yourLibraryName>
You can also permanently change the default pip source. For more information, see View or change the pip source.
Step 4: Use offline installation
If the network is completely unavailable or highly unstable, you can use offline installation:
On your local computer (with a good network connection), download the
.whlinstallation package:# Run on your local computer pip download <yourLibraryName> -d ./packagesUpload the downloaded
.whlfile to your DSW instance. For more information about file upload, see Upload and download files.Install the package offline in DSW:
pip install /path/to/your-package.whl
Q: Access to the aiext-pypi mirror source fails (e.g., aiext-pypi.mirrors.aliyuncs.com). How do I handle this?
aiext-pypi.mirrors.aliyuncs.com is an internal pip acceleration source configured exclusively for PAI-PPU series prebuilt images. It is only accessible within that image environment. If you are using other official images such as PyTorch, TensorFlow, or ModelScope, you will not be able to access this source. This is expected behavior by design and is not a network issue.
You can run the following command to check the current pip source configuration and confirm whether this acceleration source is in use:
cat /etc/pip.confResolution:
If you need to use this acceleration source, create a new instance using a PAI-PPU series image.
If you do not need a PAI-PPU image, switch to a different public pip mirror (such as the Alibaba Cloud or Tsinghua mirror). For more information, see View or change the pip source.
Q: How do I get root permissions in the DSW WebIDE?
Most DSW official images run as the root user by default. If the command prompt in the Terminal shows root@..., you are already root. You can safely ignore the "running pip as root user" warning that appears during pip installation. If your image does not start as root, this is determined by the image itself, and you need to switch to an image that supports root access.
Q: How do I start an X server in DSW?
DSW includes a built-in noVNC graphical desktop that you can access directly in the browser without manually starting an X server. To run GUI applications, open the desktop through the noVNC entry point provided by DSW. For headless computing scenarios that do not require a display, you can also use xvfb-run <command> to run commands with a virtual display (xvfb-run is preinstalled in some official images).
Q: Can I use Vulkan for graphics rendering in DSW?
Headless Vulkan is supported. A large number of Vulkan-dependent simulation and embodied AI applications (such as IsaacLab, Isaac Sim, SAPIEN, and ManiSkill) have been validated on DSW. We recommend using Headless Vulkan (VK_KHR_headless_surface/EGL displayless rendering) or pairing it with xvfb-run and the built-in noVNC to display rendering results.
The official Notebook Gallery has a dedicated "Embodied AI" category with relevant examples: Embodied AI.
If you encounter a Vulkan ICD initialization failure, switch to an official image that includes a complete GPU driver stack, and verify that the VK_ICD_FILENAMES and LD_LIBRARY_PATH environment variables are set correctly.
Install and use Miniconda
If you want to use Miniconda to manage the Python runtime environment and third-party packages, follow these steps to install it.
Open the Terminal and run the following commands to download and install Miniconda.
wget https://repo.anaconda.com/miniconda/Miniconda3-latest-Linux-x86_64.sh
bash Miniconda3-latest-Linux-x86_64.sh -b -p /root/miniconda3
/root/miniconda3/bin/conda init
Stop the DSW instance and restart it. After the restart, the conda Python environment is available. Run the following command to check the current Python environment.
# Run the following command in the Terminal
which python

# Run the following command in a Notebook cell
!which python
If the conda Python environment is still not active in the Terminal, try modifying the PATH in the
.bashrcfile. Follow these steps:Run
cd /root/in the Terminal to navigate to the directory that contains the.bashrcfile.Use vim to edit the
.bashrcfile. Addexport PATH="/root/miniconda3/bin:$PATH"at the beginning of the file, then save and exit.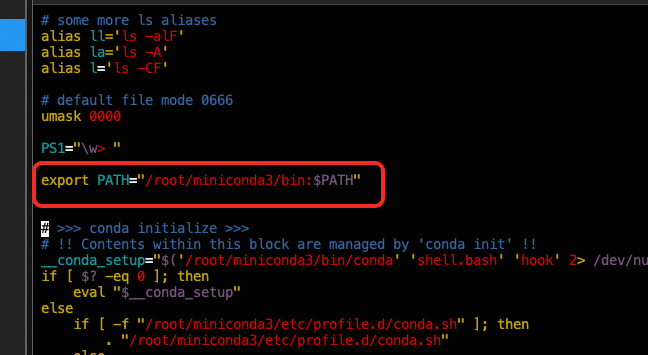
Run
source .bashrcin the Terminal to apply the changes.Run the
which pythoncommand again to verify the current Python environment.