DSW supports multiple methods for uploading and downloading files. Upload and download small files directly in Terminal, JupyterLab, or VSCode. For large files, upload them to Object Storage Service (OSS) first, and then mount an OSS bucket to your DSW instance.
Method overview
-
For small files, you can use one of the following three methods:
For large files, we recommend uploading the files to OSS by using the OSS SDK or ossutil, and then mounting an OSS bucket to the DSW instance.
Upload and download files in Terminal (recommended)
In the upper-left corner of the DSW page, click Launcher, and then click Terminal.
On the left side of the Terminal page, click
 to open the file browser.
Download a file: In the file browser, right-click the file and select Download.
Upload a file: Right-click an empty area in the file browser and select Upload Files....
File transfer station
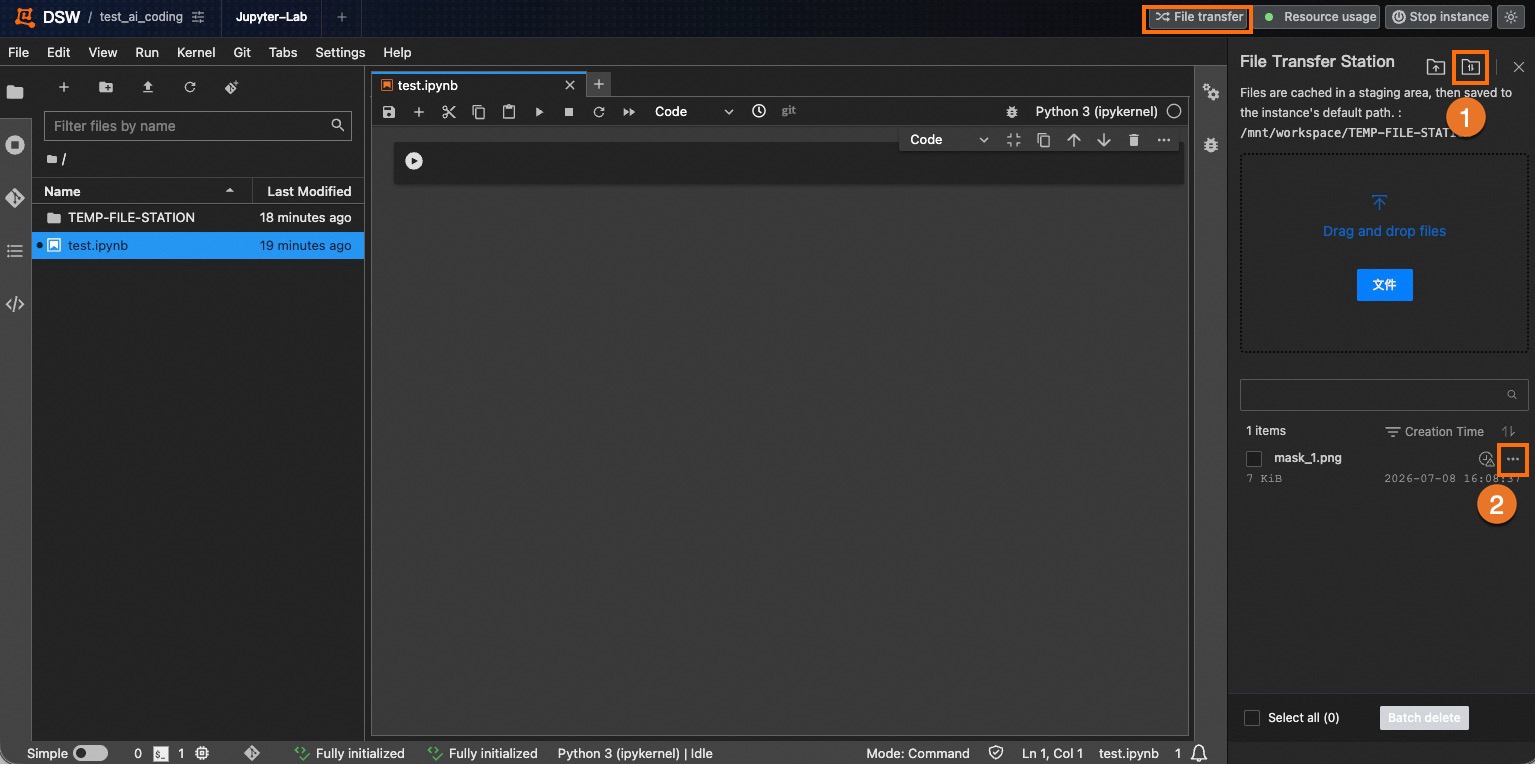
The file transfer station is available when you upload or download files in Terminal and JupyterLab. It quickly uploads large local files to a DSW instance at no extra cost. A single upload allows you to share the file across multiple DSW instances under the same RAM user.
In the upper-right corner of the page, click File Staging to view the transfer list or manage files in the file transfer station.
Click
 to view the transfer list in the file transfer station.
-
Click
 to the right of a file to perform the following actions:
After a file transfer completes, the system automatically saves the file to the instance. To use the file in another instance under the same RAM user, go to the destination instance and click Save to instance.
Files in the file transfer station expire after 7 days by default. To extend a file's validity period, click Extend before it expires.
-
Click Delete to remove the file from the file transfer station. This action does not delete the file from the instance.
In addition, the file transfer station has the following limitations:
Upload quantity: You can upload a maximum of 5 files at a time. Additional files are queued for upload.
Upload method: Files that are 10 MB or smaller are uploaded directly to the instance through your browser. Files that are larger than 10 MB and no more than 5 GB are automatically uploaded to the file transfer station and then saved to the instance.
Folder uploads: You cannot upload folders directly. Compress them into an archive file first. For more information, see How to upload and download folders.
File validity: By default, files are stored for 7 days. You can extend the validity period before a file expires, with each extension adding another 7 days.
Storage capacity: The total storage capacity is 10 GB for a maximum of 1,000 files. You can manually delete files in the file transfer station.
Download path: Files to be downloaded must be in the
/mnt/workspace/directory. If a file is not in this directory, copy or move it there first.
Upload and download files in JupyterLab
In the upper-left corner of the DSW page, click Launcher, and then click JupyterLab.
On the left side of the JupyterLab page, click
 to open the file browser.
Download a file: In the file browser, right-click the file and select Download.
Upload a file: In the upper-left corner of the page, click
 .
.
JupyterLab also supports the File transfer station feature.
Upload and download files in VSCode
In the upper-left corner of the DSW page, click Launcher, and then click VSCode.
On the left side of the VSCode page, click
 to open the Explorer.
Download a file: In the Explorer, right-click the file and select Download ....
Upload a file: Right-click an empty area in the Explorer and select Upload ....
Large file downloads in VSCode may get stuck. Use Terminal to download files instead, or try the following steps:
In the upper-left corner of VSCode, click
 > File > New Window.
In the new window, click Open Folder on the left side. Enter a path such as
/mnt/workspaceto switch to the working directory, and then try to download the file again.
FAQ
Q: How do I upload and download folders?
DSW does not support uploading or downloading folders directly. Instead, compress them into an archive file. The DSW Terminal provides a Linux environment where you can use commands such as tar, gzip, and unzip to compress and decompress files. The following example uses tar.
-
Run
tar --versionto check if tar is installed. If it is not installed, use the following commands to install it.# Installation command for Debian-based systems (such as Ubuntu) sudo apt install tar # Installation command for Red Hat-based systems (such as CentOS and Fedora) sudo yum install tar -
Compress or decompress a folder.
# Compress a folder. /path/to/directory is the folder to be compressed.
tar -cvf archive_name.tar /path/to/directory

# Decompress a folder.
tar -xvf archive_name.tar
Q: What should I do if clicking "Download" does not respond or the download fails?
This problem is usually caused by network congestion or browser-related issues. Try the following steps:
Use the Terminal method first.
Wait a few moments. Large files may take longer to begin downloading.
Switch to a different browser or retry the download in your browser's incognito mode.
For large files (such as those over 200 MB) or if your network connection is unstable, we recommend downloading the file via a mounted OSS bucket.
Q: What should I do if I get a "file transfer station is full" error?
The total storage capacity of the file transfer station is 10 GB. To free up space, go to the file transfer station management page and clear files. If the page does not update immediately, refresh your browser.
Q: Why am I always redirected to the file transfer station when uploading a file?
This is expected. To ensure stable and fast uploads, DSW automatically routes files larger than 10 MB through the file transfer station, saving them to your instance after the transfer completes.
Q: How do I upload large local files (such as models larger than 5 GB) or large amounts of data to DSW?
A DSW instance's system disk has limited space and is intended for temporary storage. Avoid uploading large files or datasets directly to the instance. Instead, upload the data to Alibaba Cloud OSS first, and then mount the OSS bucket to your DSW instance.