Common questions and solutions for TensorFlow on PAI, covering data access, model export, and troubleshooting.
Contents
How do I reference multiple Python files?
To reference functions across files, package all Python files (for example, `test1.py` and `test2.py`) into a .tar.gz file and upload it.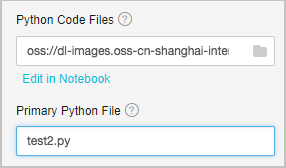 Where:
-
Python Code File: The .tar.gz package.
-
Main Python File: The main entry file.
How do I upload data to OSS?
Deep learning data is stored in OSS buckets. Create a bucket in the same region as your GPU cluster to use the classic network and avoid traffic fees. You can then create folders, organize data, or upload files from the OSS console.
Upload data to OSS using an API or SDK (Simple upload). OSS also provides tools such as ossutil and osscmd to upload and download files (Developer Tools for OSS).
Upload tools require an AccessKey ID and AccessKey secret, which you can create or view in the Alibaba Cloud console.
How do I read data from OSS?
Python does not natively support OSS paths. Standard file operations such as Open(), os.path.exist(), Scipy.misc.imread(), and numpy.load() cannot run directly on OSS.
Use one of the following methods to read data in PAI:
-
Use `tf.gfile` functions for simple read operations such as reading a single image or text file.
tf.gfile.Copy(oldpath, newpath, overwrite=False) # Copies a file. tf.gfile.DeleteRecursively(dirname) # Recursively deletes all files in a directory. tf.gfile.Exists(filename) # Checks if a file exists. tf.gfile.FastGFile(name, mode='r') # Reads a file without blocking. tf.gfile.GFile(name, mode='r') # Reads a file. tf.gfile.Glob(filename) # Lists all files in a folder. Supports patterns. tf.gfile.IsDirectory(dirname) # Returns whether dirname is a directory. tf.gfile.ListDirectory(dirname) # Lists all files under dirname. tf.gfile.MakeDirs(dirname) # Creates a folder under dirname. If the parent directory does not exist, it is automatically created. If the folder already exists and is writable, the operation succeeds. tf.gfile.MkDir(dirname) # Creates a folder at dirname. tf.gfile.Remove(filename) # Deletes filename. tf.gfile.Rename(oldname, newname, overwrite=False) # Renames a file. tf.gfile.Stat(dirname) # Returns statistics for a directory. tf.gfile.Walk(top, inOrder=True) # Returns the file tree of a directory. -
Use
tf.gfile.Glob,tf.gfile.FastGFile,tf.WholeFileReader(), andtf.train.shuffle_batch()for batch reading. Obtain a file list first, then create a batch.
In Designer, pass parameters such as read directories and code files using `tf.flags` in the `-XXX` format, where `XXX` is a string.
import tensorflow as tf
FLAGS = tf.flags.FLAGS
tf.flags.DEFINE_string('buckets', 'oss://{OSS Bucket}/', 'The folder where the training images are stored')
tf.flags.DEFINE_string('batch_size', '15', 'The batch size')
files = tf.gfile.Glob(os.path.join(FLAGS.buckets,'*.jpg')) # Lists the paths of all JPG files in the buckets.
Choose a batch reading method based on file size:
-
To read small files, use
tf.gfile.FastGFile().for path in files: file_content = tf.gfile.FastGFile(path, 'rb').read() # Make sure to use 'rb' to read the file. Otherwise, errors may occur in many cases. image = tf.image.decode_jpeg(file_content, channels=3) # This example uses a JPG image. -
To read large files, use
tf.WholeFileReader().reader = tf.WholeFileReader() # Instantiates the reader. fileQueue = tf.train.string_input_producer(files) # Creates a queue for the reader. file_name, file_content = reader.read(fileQueue) # Reads a file from the queue. image_content = tf.image.decode_jpeg(file_content, channels=3) # Decodes the read result into an image. label = XXX # The process of handling the label is omitted. batch = tf.train.shuffle_batch([label, image_content], batch_size=FLAGS.batch_size, num_threads=4, capacity=1000 + 3 * FLAGS.batch_size, min_after_dequeue=1000) sess = tf.Session() # Creates a session. tf.train.start_queue_runners(sess=sess) # Starts the queue. If you do not run this command, the thread remains blocked. labels, images = sess.run(batch) # Obtains the result.Key code:
-
tf.train.string_input_producer: Converts a list of filenames into a queue. You must calltf.train.start_queue_runnersto start the queue processing threads. -
tf.train.shuffle_batchparameters:-
batch_size: The number of data entries returned per batch operation.
-
num_threads: The number of threads used to enqueue data. A typical value is 4.
-
capacity: The maximum queue size, which defines the random shuffling range. For example, to shuffle from a buffer of 5,000 in a 10,000-entry dataset, set `capacity` to 5000.
-
min_after_dequeue: The minimum number of elements retained after a dequeue, ensuring a minimum level of mixing. Must not exceed capacity.
-
-
How do I write data to OSS?
Write data to OSS using one of the following methods. In these examples, output is stored at /model/example.txt:
-
Write data using
tf.gfile.FastGFile():tf.gfile.FastGFile(FLAGS.checkpointDir + 'example.txt', 'wb').write('hello world') -
Copy a local file to OSS using
tf.gfile.Copy():tf.gfile.Copy('./example.txt', FLAGS.checkpointDir + 'example.txt')
Why does an OOM error occur during runtime?
OOM occurs when memory usage exceeds 30 GB. Use `gfile` to stream data from OSS instead of loading entire datasets into memory. How do I read data from OSS?.
What are some examples of TensorFlow use cases?
Song composition: Code for the song composition example.
What is the purpose of model_average_iter_interval when two GPUs are configured?
Without `model_average_iter_interval`, GPUs run standard Parallel-SGD and exchange gradient updates every iteration. When set to a value greater than 1, Model Average is used instead—model parameters are averaged across both GPUs every `model_average_iter_interval` iterations.
How do I export a TensorFlow model as a SavedModel?
SavedModel format
To use the official pre-built processor in EAS to deploy a TensorFlow model as an online service, export it to the SavedModel format, which is the official format recommended by TensorFlow. The directory structure is as follows.
assets/
variables/
    variables.data-00000-of-00001
    variables.index
saved_model.pb|saved_model.pbtxt
Where:
-
assets: An optional folder that stores auxiliary files required for prediction, such as vocabulary files. -
variables: Stores the variable information saved by `tf.train.Saver`. -
saved_model.pborsaved_model.pbtxt: Stores the `MetaGraphDef`, which contains the graph structure of the trained model, and the `SignatureDef`, which specifies the inputs and outputs for prediction.
Export a SavedModel
The TensorFlow guide Saving and Restoring covers SavedModel export in detail. For simple models, use the following quick method.
tf.saved_model.simple_save(
  session,
  "./savedmodel/",
  inputs={"image": x},   ## x is the input variable of the model.
  outputs={"scores": y}  ## y is the output of the model.
)
When requesting online predictions, specify the model's `signature_name`. For models exported with simple_save(), the default `signature_name` is serving_default.
For complex models, manually export to SavedModel:
print('Exporting trained model to', export_path)
builder = tf.saved_model.builder.SavedModelBuilder(export_path)
tensor_info_x = tf.saved_model.utils.build_tensor_info(x)
tensor_info_y = tf.saved_model.utils.build_tensor_info(y)

prediction_signature = (
    tf.saved_model.signature_def_utils.build_signature_def(
        inputs={'images': tensor_info_x},
        outputs={'scores': tensor_info_y},
        method_name=tf.saved_model.signature_constants.PREDICT_METHOD_NAME)
)

legacy_init_op = tf.group(tf.tables_initializer(), name='legacy_init_op')

builder.add_meta_graph_and_variables(
    sess, [tf.saved_model.tag_constants.SERVING],
    signature_def_map={
        'predict_images': prediction_signature,
    },
    legacy_init_op=legacy_init_op
)

builder.save()
print('Done exporting!')
Where:
-
export_pathspecifies the path to which the model is exported. -
prediction_signature: The `SignatureDef` for the model's inputs and outputs (SignatureDef). In this example, the `signature_name` is `predict_images`. -
builder.add_meta_graph_and_variables: Specifies the export parameters.
-
When exporting a model for prediction, set the tag to `tf.saved_model.tag_constants.SERVING`.
Convert a Keras model to a SavedModel
Keras model.save() exports in H5 format. Convert to SavedModel for online prediction by loading the H5 model with load_model() and re-exporting:
import tensorflow as tf
with tf.device("/cpu:0"):
    model = tf.keras.models.load_model('./mnist.h5')
    tf.saved_model.simple_save(
      tf.keras.backend.get_session(),
      "./h5_savedmodel/",
      inputs={"image": model.input},
      outputs={"scores": model.output}
    )
Convert a checkpoint to a SavedModel
Checkpoint models saved with tf.train.Saver() must be converted to SavedModel for online prediction. Load the checkpoint with saver.restore() and re-export:
import tensorflow as tf
# variable define ...
saver = tf.train.Saver()
with tf.Session() as sess:
  # Initialize v1 since the saver will not.
    saver.restore(sess, "./lr_model/model.ckpt")
    tensor_info_x = tf.saved_model.utils.build_tensor_info(x)
    tensor_info_y = tf.saved_model.utils.build_tensor_info(y)
    tf.saved_model.simple_save(
      sess,
      "./savedmodel/",
      inputs={"image": tensor_info_x},
      outputs={"scores": tensor_info_y}
    )