Platform for AI (PAI) lets you build custom algorithm components and combine them with built-in components in Machine Learning Designer to create flexible training pipelines. This topic walks you through creating a custom component in the PAI console.
How it works
Custom components run on KubeDL, Alibaba Cloud's open-source Kubernetes-based framework for managing AI workloads.
When you create a custom component, you choose a job type (TensorFlow, PyTorch, XGBoost, or ElasticBatch), define input and output pipelines, and configure hyperparameters. After the component is created, you can drag it into a Machine Learning Designer pipeline and configure its runtime settings.
KubeDL injects environment variables based on the job type. Use these variables to access instance counts and topology information. See Appendix 1: Job types.
To access pipeline data and hyperparameters through environment variables, see Obtain pipeline and hyperparameter data.
To access input and output data directly from the container's mount path, see Input and output directory structure.
Prerequisites
Before you begin, ensure that you have:
A workspace. Custom components are associated with a workspace. To create one, see Create and manage a workspace
Create a custom component
Go to the Custom Components page.
Log on to the PAI console.
In the left-side navigation pane, click Workspaces. On the Workspaces page, click the name of your workspace.
In the left-side navigation pane, choose AI Asset Management > Custom Components.
Click Create Component and configure the following parameters.
Image requirements
Choose an image type based on your algorithm's dependencies:
If your algorithm dependencies can be installed with
pip, use an Alibaba Cloud official image and provide arequirements.txtfile in your code directory. PAI runspip install -r requirements.txtautomatically at startup.If your algorithm requires specific system-level dependencies, use a custom image.
Additional requirements:
Use Alibaba Cloud Container Registry (ACR) in the same region as your job for best reliability.
Only Container Registry Personal Edition is supported. Enterprise Edition is not supported. Specify the image address in the
registry-vpc.${region}.aliyuncs.comformat.For custom images: avoid updating the image within the same component version to prevent image cache delays at job startup.
The image must include
shshell commands. PAI runs commands usingsh -c.Custom images must include the Python environment and
pip.
Code: Mount OSS Path requirements
Store only the required algorithm files in the OSS path to prevent startup delays.
If a
requirements.txtfile exists in the code directory, PAI automatically runspip install -r requirements.txtat startup.
Pipeline and parameter
Click the
 icon to add input pipelines, output pipelines, and hyperparameters.
Name requirements for all pipelines and parameters:
Names must be globally unique.
Names can contain digits, letters, underscores (
_), and hyphens (-), but cannot start with an underscore.
When PAI generates environment variable names, it converts all letters to uppercase and replaces unsupported characters—including hyphens (
-)—with underscores (_). For example,test_modelandtest-modelboth becomePAI_HPS_TEST_MODEL, which causes a conflict. Use distinct names to avoid this.Basic information
Parameter Description Component name The name of the custom component. Must be unique within the same Alibaba Cloud account and region. Component description A description of the custom component. Component version The version number. Use the x.y.zformat: increment the patch version (for example,1.0.0to1.0.1) for minor fixes, and the minor version (for example,1.0.0to1.1.0) for feature updates.Version description A description of this version. Example: initial version.Execution configuration
Parameter Description Job type The framework for running the component. Options: TensorFlow (TFJob), PyTorch (PyTorchJob), XGBoost (XGBoostJob), and ElasticBatch (ElasticBatchJob of KubeDL). Each job type injects different environment variables for distributed training. See Appendix 1: Job types. Image The container image to use. Options: Community Image, Alibaba Cloud Image, and Custom Image. Select an image from the drop-down list, or select Image Address and enter an image URL. See Image requirements below. Code The source of your algorithm code. Options: Mount OSS Path (files are downloaded to /ml/usercode/at runtime) and Git (Git code repository).Command The command the container runs. See Configure the command below. The following figure shows how pipeline and parameter configurations map to component settings in Machine Learning Designer.
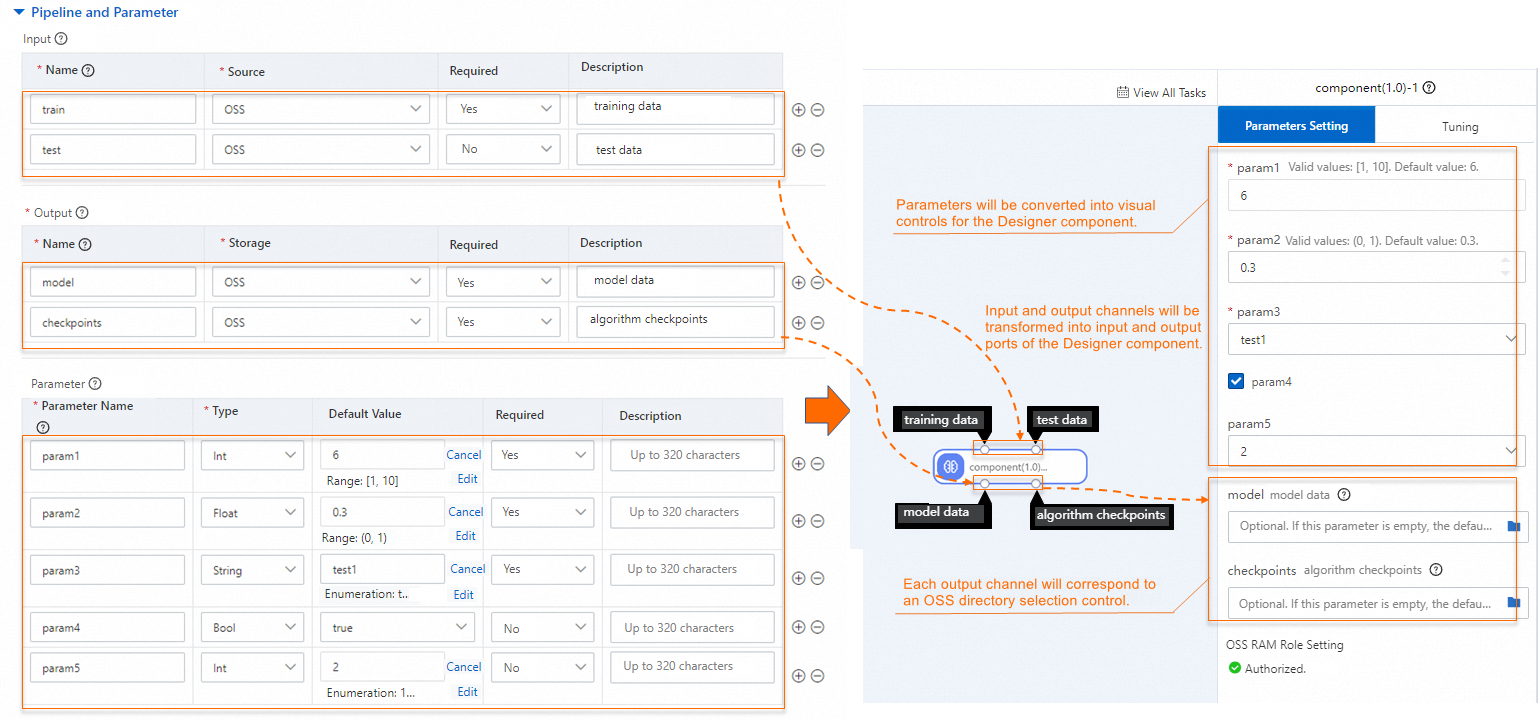
Parameter Description Input Defines where the component reads input data or models. Configure: Name (the channel name) and Source (an Object Storage Service (OSS) path, File Storage NAS (NAS) path, or MaxCompute path). Input data is mounted to /ml/input/data/{channel_name}/in the training container.Output Defines where the component writes results such as trained models and checkpoints. Configure: Name (the channel name) and Storage (an OSS or MaxCompute directory). Output data is mounted to /ml/output/{channel_name}/in the training container.Parameter Defines hyperparameters for the job. Configure: Parameter name, Type ( Int,Float,String, orBool), and optionally Constraint (forInt,Float, orString). Constraint types: Range (min/max values) or Enumeration (allowed values).Constraints
Turn on Enable Constraints to specify the compute resources required by the component. The following figure shows how training constraints map to the component's tuning parameters in Machine Learning Designer.
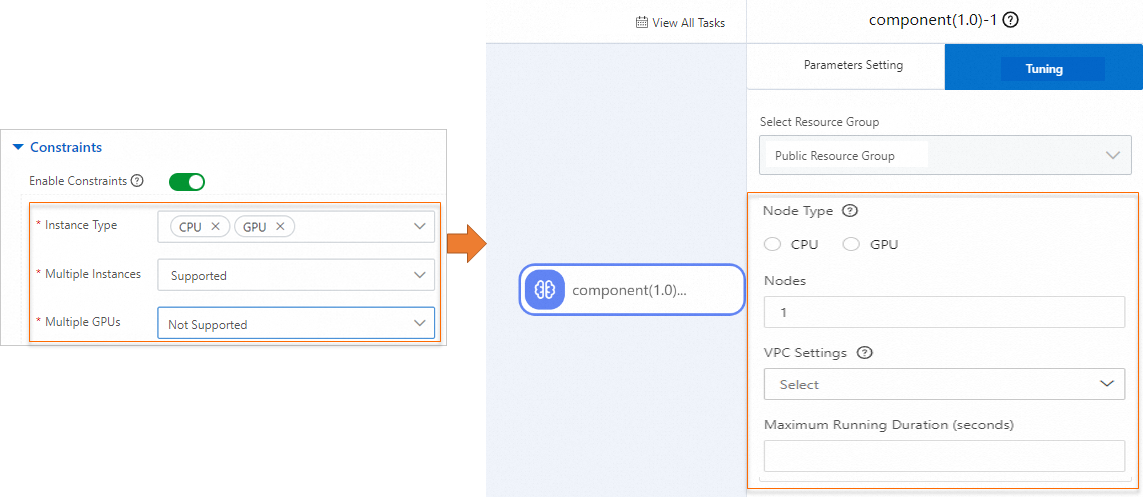
Parameter Description Instance type CPUorGPU.Multiple instances Whether the component supports distributed training. Supported: the instance count is configurable at runtime. Not Supported: fixed at one instance. Multiple GPUs Available when Instance type is GPU. Supported: single-GPU and multi-GPU instance types are both available. Not Supported: only single-GPU instance types are available.Click Submit.
The component appears on the Custom Components page.
Configure the command
The Command field specifies the shell command PAI runs when the component executes. Use the following environment variables to pass pipeline paths and hyperparameters to your script:
$PAI_USER_ARGS— all hyperparameters, formatted as command-line arguments$PAI_INPUT_{CHANNEL_NAME}— the local mount path of an input pipeline (channel name in uppercase)$PAI_OUTPUT_{CHANNEL_NAME}— the local mount path of an output pipeline (channel name in uppercase)
Command format:
python main.py $PAI_USER_ARGS --{CHANNEL_NAME} $PAI_INPUT_{CHANNEL_NAME} --{CHANNEL_NAME} $PAI_OUTPUT_{CHANNEL_NAME}Example: For input pipelines named train and test, and output pipelines named model and checkpoints:
python main.py $PAI_USER_ARGS --train $PAI_INPUT_TRAIN --test $PAI_INPUT_TEST --model $PAI_OUTPUT_MODEL --checkpoints $PAI_OUTPUT_CHECKPOINTS && sleep 150 && echo "job finished"The following example shows how main.py can parse these arguments:
import os
import argparse
import json

def parse_args():
    """Parse the arguments."""
    parser = argparse.ArgumentParser(description="PythonV2 component script example.")

    # Input and output channels
    parser.add_argument("--train", type=str, default=None, help="input channel train.")
    parser.add_argument("--test", type=str, default=None, help="input channel test.")
    parser.add_argument("--model", type=str, default=None, help="output channel model.")
    parser.add_argument("--checkpoints", type=str, default=None, help="output channel checkpoints.")

    # Hyperparameters
    parser.add_argument("--param1", type=int, default=None, help="param1")
    parser.add_argument("--param2", type=float, default=None, help="param2")
    parser.add_argument("--param3", type=str, default=None, help="param3")
    parser.add_argument("--param4", type=bool, default=None, help="param4")
    parser.add_argument("--param5", type=int, default=None, help="param5")

    args, _ = parser.parse_known_args()
    return args


if __name__ == "__main__":
    args = parse_args()

    print("Input channel train={}".format(args.train))
    print("Input channel test={}".format(args.test))
    print("Output channel model={}".format(args.model))
    print("Output channel checkpoints={}".format(args.checkpoints))

    print("Parameters param1={}".format(args.param1))
    print("Parameters param2={}".format(args.param2))
    print("Parameters param3={}".format(args.param3))
    print("Parameters param4={}".format(args.param4))
    print("Parameters param5={}".format(args.param5))
When the job runs, the resolved paths and parameter values appear in the logs:
Input channel train=/ml/input/data/train
Input channel test=/ml/input/data/test/easyrec_config.config
Output channel model=/ml/output/model/
Output channel checkpoints=/ml/output/checkpoints/
Parameters param1=6
Parameters param2=0.3
Parameters param3=test1
Parameters param4=True
Parameters param5=2
job finished
What's next
After creating a custom component, use it in Machine Learning Designer. See Use a custom component.
Appendix 1: Job types
KubeDL injects different environment variables depending on the job type you select. Use these variables in your training code to implement distributed logic.
TensorFlow (TFJob)
For TensorFlow jobs, KubeDL injects the TF_CONFIG environment variable with the cluster topology:
{
  "cluster": {
    "chief": [
      "dlc17****iui3e94-chief-0.t104140334615****.svc:2222"
    ],
    "evaluator": [
      "dlc17****iui3e94-evaluator-0.t104140334615****.svc:2222"
    ],
    "ps": [
      "dlc17****iui3e94-ps-0.t104140334615****.svc:2222"
    ],
    "worker": [
      "dlc17****iui3e94-worker-0.t104140334615****.svc:2222",
      "dlc17****iui3e94-worker-1.t104140334615****.svc:2222",
      "dlc17****iui3e94-worker-2.t104140334615****.svc:2222",
      "dlc17****iui3e94-worker-3.t104140334615****.svc:2222"
    ]
  },
  "task": {
    "type": "chief",
    "index": 0
  }
}| Field | Description |
|---|---|
cluster | The TensorFlow cluster topology. Each key is a role (chief, worker, evaluator, ps); each value is the list of network addresses for that role. |
task.type | The role of the current instance. |
task.index | The index of the current instance within its role's address list. |
PyTorch (PyTorchJob)
For PyTorch jobs, KubeDL injects the following environment variables:
| Variable | Description |
|---|---|
RANK | The role of the instance. 0 = master node; any other value = worker node. |
WORLD_SIZE | Total number of instances in the job. |
MASTER_ADDR | Network address of the master node. |
MASTER_PORT | Port of the master node. |
Example (2-instance distributed job):
RANK=0
WORLD_SIZE=2
MASTER_ADDR=train1pt84cj****-master-0
MASTER_PORT=9999
XGBoost (XGBoostJob)
For XGBoost jobs, KubeDL injects the following environment variables:
| Variable | Description |
|---|---|
RANK | The role of the instance. 0 = master node; any other value = worker node. |
WORLD_SIZE | Total number of instances in the job. |
MASTER_ADDR | Network address of the master node. |
MASTER_PORT | Port of the master node. |
WORKER_ADDRS | Addresses of all worker nodes, sorted by RANK. Not available for single-instance jobs. |
WORKER_PORT | Port of the worker node. Not available for single-instance jobs. |
Example: distributed job (6 instances)
WORLD_SIZE=6
RANK=0
MASTER_ADDR=train1pt84cj****-master-0
MASTER_PORT=9999
WORKER_ADDRS=train1pt84cj****-worker-0,train1pt84cj****-worker-1,train1pt84cj****-worker-2,train1pt84cj****-worker-3,train1pt84cj****-worker-4
WORKER_PORT=9999
Example: single-instance job
WORLD_SIZE=1
RANK=0
MASTER_ADDR=train1pt84cj****-master-0
MASTER_PORT=9999
For single-instance XGBoost jobs,WORKER_ADDRSandWORKER_PORTare not injected.
ElasticBatch (ElasticBatchJob)
ElasticBatch is a distributed offline inference job type with the following capabilities:
High parallelism with double throughput.
Reduces waiting time for jobs. Worker nodes can run immediately after the nodes are allocated resources.
Automatic replacement of slow-starting instances with backup workers, preventing long-tail delays or job hangs.
Global dynamic data shard distribution — faster workers process more data than slower ones.
Early job termination — once all data is processed, unstarted worker nodes are not launched.
Single-worker fault tolerance — if one worker fails, the system automatically restarts it.
An ElasticBatch job consists of two node types:
AIMaster: the control node. Manages global job coordination, dynamic data shard distribution, throughput monitoring, and fault tolerance.
Worker: the compute node. Fetches a data shard from AIMaster, processes it, and writes the result back.
Your code runs on worker nodes. KubeDL injects the ELASTICBATCH_CONFIG environment variable into each worker:
{
  "task": {
    "type": "worker",
    "index": 0
  },
  "environment": "cloud"
}| Field | Description |
|---|---|
task.type | The role of the current instance (worker). |
task.index | The index of the current instance within its role. |
Appendix 2: How data is passed to your component
Obtain pipeline and hyperparameter data
Input pipeline data
PAI injects each input pipeline's local path using the PAI_INPUT_{CHANNEL_NAME} environment variable (channel name in uppercase).
Example: For a component with two input pipelines named train and test:
PAI_INPUT_TRAIN=/ml/input/data/train/
PAI_INPUT_TEST=/ml/input/data/test/test.csv
Output pipeline data
PAI injects each output pipeline's local path using PAI_OUTPUT_{CHANNEL_NAME} (channel name in uppercase).
Example: For output pipelines named model and checkpoints:
PAI_OUTPUT_MODEL=/ml/output/model/
PAI_OUTPUT_CHECKPOINTS=/ml/output/checkpoints/
Hyperparameter data
PAI provides hyperparameters through three environment variables:
`PAI_USER_ARGS` — all hyperparameters as a single command-line string in --name value format.
For hyperparameters {"epochs": 10, "batch-size": 32, "learning-rate": 0.001}:
PAI_USER_ARGS="--epochs 10 --batch-size 32 --learning-rate 0.001"`PAI_HPS_{HYPERPARAMETER_NAME}` — each hyperparameter as an individual variable. Unsupported characters in the name (including hyphens) are replaced with underscores and converted to uppercase.
For hyperparameters {"epochs": 10, "batch-size": 32, "train.learning_rate": 0.001}:
PAI_HPS_EPOCHS=10
PAI_HPS_BATCH_SIZE=32
PAI_HPS_TRAIN_LEARNING_RATE=0.001
`PAI_HPS` — all hyperparameters as a JSON string.
For hyperparameters {"epochs": 10, "batch-size": 32}:
PAI_HPS={"epochs": 10, "batch-size": 32}Input and output directory structure
When a job runs in a container, PAI creates the following directory structure:
| Path | Description |
|---|---|
/ml/usercode/ | Your algorithm code (also the working directory; accessible via PAI_WORKING_DIR). |
/ml/input/config/ | Job configuration files (accessible via PAI_CONFIG_DIR). |
/ml/input/config/hyperparameters.json | Hyperparameter configuration. |
/ml/input/config/training_job.json | Training job configuration. |
/ml/input/data/{channel_name}/ | Input pipeline data, one directory per input pipeline. |
/ml/output/{channel_name}/ | Output pipeline data, one directory per output pipeline. Accessible via PAI_OUTPUT_{OUTPUT_CHANNEL_NAME}. |
Example directory layout:
/ml
|-- usercode                    # Algorithm code and working directory
|   |-- requirements.txt
|   |-- main.py
|-- input
|   |-- config                  # Job configuration files
|   |   |-- training_job.json
|   |   |-- hyperparameters.json
|   |-- data                    # Input pipelines
|       |-- test_data
|       |   |-- test.csv
|       |-- train_data
|           |-- train.csv
|-- output                      # Output pipelines
    |-- model
    |-- checkpoints
Detect GPU availability
After the job starts, use the NVIDIA_VISIBLE_DEVICES environment variable to check GPU availability. For example, NVIDIA_VISIBLE_DEVICES=0,1,2,3 indicates the instance has four GPUs.