This topic explains how to use Security Token Service (STS) to quickly set up a direct data upload service for your mobile application in under 30 minutes. This service lets your mobile app upload and download data directly to and from Object Storage Service (OSS). Your application server only needs to manage access control, ensuring efficient and secure data transfers.
Why use a direct upload service
As mobile apps handle increasing amounts of data, you can use OSS to manage your storage needs and focus on your application's core logic. Using OSS for direct data uploads from mobile applications offers the following advantages:
-
Data security: Use a flexible permission model to securely manage data uploads and downloads.
-
Cost-effectiveness: Reduce the need for a large number of servers. Mobile applications connect directly to OSS, and only the control flow is handled by your application server.
-
High concurrency: Easily handle high-concurrency requests to ensure a smooth user experience.
-
Elastic scaling: Storage capacity scales on demand to meet your business growth.
-
Data processing: Seamlessly integrate image processing and audio/video transcoding for flexible data handling.
Prerequisites
-
You have activated OSS. For more information, see Activate OSS.
-
You have created a bucket. For more information, see Create a bucket.
How it works
The following diagram shows the development workflow for the direct mobile upload service.

Follow these steps:
-
The mobile application requests temporary access credentials from the application server.
NoteDo not store an AccessKey directly in your Android or iOS application. This creates a high risk of data leakage. Instead, your application must request temporary access credentials from your application server. These credentials have a limited lifetime. For example, if your application server specifies a 30-minute expiration time, the mobile app can use the token to upload and download data from OSS for that period. After 30 minutes, the app must request new temporary access credentials.
-
The application server uses an STS SDK to call the AssumeRole operation and obtain temporary access credentials.
-
STS generates and returns the temporary access credentials to the application server.
-
The application server returns the temporary access credentials to the mobile app.
-
The mobile application uses an OSS SDK and the temporary access credentials to upload a file to OSS.
-
OSS returns a success response to the mobile app.
Procedure
Step 1: Activate STS and configure the application server
1. Create a RAM user
First, create a RAM user and get its AccessKey pair. This pair serves as the long-term identity credential for your application server.
-
Log on to the RAM console by using your Alibaba Cloud account or as an account administrator.
-
In the left-side navigation pane, choose Identities > Users.
-
Click Create User.
-
Enter a Logon Name and a Display Name.
-
In the Access Mode section, select OpenAPI Access, and then click OK.
The AccessKey secret for a RAM user is displayed only when you create it. You cannot view it later. Make sure to save it securely.
-
In the Actions column, click Copy to save the AccessKey pair (AccessKey ID and AccessKey secret).
2. Grant the RAM user AssumeRole permissions
After creating the RAM user, you must grant it permission to call the STS AssumeRole operation. This lets the user assume a RAM role to obtain temporary access credentials.
-
In the left-side navigation pane, choose Identities > Users.
-
On the Users page, find the target RAM user, and then click Add Permissions in the Actions column.
-
On the Grant Permission page, select the AliyunSTSAssumeRoleAccess system policy.
NoteThe AliyunSTSAssumeRoleAccess policy grants the RAM user permission to call the STS AssumeRole operation. This permission is separate from the permissions required to obtain the temporary access credentials or to use those credentials to make OSS requests.
-
Click OK.
3. Create a RAM role
Create a RAM role for the current Alibaba Cloud account and obtain the corresponding ARN of the role (Alibaba Cloud Resource Name) for a RAM user to assume.
-
In the left-side navigation pane, choose Identities > Roles.
-
Click Create Role and select Cloud Account as the trusted entity type.
-
Select the current Alibaba Cloud account and click OK.
-
Enter a role name and click OK.
-
On the Roles page, find the role that you created and click its name. On the role details page, click Copy next to the ARN to save the role's ARN.
4. Create a policy for file uploads
Following the principle of least privilege, create a custom policy for the RAM role that restricts uploads to a specific OSS bucket.
-
In the left-side navigation pane, choose Permissions > Policies.
-
Click Create Policy.
-
On the Create Policy page, click the JSON Editor tab. In the policy editor, replace with the name of the bucket that you created, for example,
web-direct-upload.{ "Version": "1", "Statement": [ { "Effect": "Allow", "Action": "oss:PutObject", "Resource": "acs:oss:*:*:<your-bucket-name>/*" } ] } -
After configuring the policy, click Next to edit policy information.
-
In the Basic Information section, enter a name for the policy, and then click OK.
5. Grant permissions to the RAM role
Grant the custom policy to the RAM role. This ensures that when the role is assumed, it has the necessary permissions.
-
In the left-side navigation pane, choose Identities > RAM Role.
-
On the RAM Role page, find the target RAM role, and then click Grant Permission in the Actions column.
-
On the Grant Permission page, select Custom Policy and choose the custom policy you created.
-
Click OK.
6. Create an ECS instance as the application server
Create an ECS instance to serve as your application server for generating temporary credentials.
In a production environment, you can integrate the STS API calls into your existing application server instead of creating a new ECS instance.
|
Parameter |
Example value |
|
Billing Method |
pay-as-you-go |
|
Region |
China (Hangzhou) |
|
Public IP |
Assign Public IPv4 Address |
|
Security Group |
Allow access on TCP port 80 (HTTP) |
For more information, see Create an ECS instance.
7. Obtain temporary credentials on the application server
Integrate the STS SDK into your web application to create an API endpoint that provides temporary access credentials. When the mobile app makes an HTTP GET request to this endpoint (for example, /get_sts_token), the server generates and returns temporary access credentials.
The following example shows how to use the Flask framework on an ECS instance to quickly build a web application that provides an endpoint for temporary access credentials:
-
Connect to the ECS instance.
For more information, see Connect to an ECS instance.
-
Install Python 3.
-
Create and switch to a project directory.
mkdir my_web_sample cd my_web_sample -
Install dependencies.
pip3 install Flask pip3 install attr pip3 install yarl pip3 install async_timeout pip3 install idna_ssl pip3 install attrs pip3 install aiosignal pip3 install charset_normalizer pip3 install alibabacloud_tea_openapi pip3 install alibabacloud_sts20150401 pip3 install alibabacloud_credentials -
Write the backend code.
-
Create a file named
main.py. -
Add the following Python code to the file.
import json from flask import Flask, render_template from alibabacloud_tea_openapi.models import Config from alibabacloud_sts20150401.client import Client as Sts20150401Client from alibabacloud_sts20150401 import models as sts_20150401_models from alibabacloud_credentials.client import Client as CredentialClient app = Flask(__name__) # Replace <YOUR_ROLE_ARN> with the ARN of your RAM role. role_arn_for_oss_upload = '<YOUR_ROLE_ARN>' # Set this to the region of the STS service, for example, cn-hangzhou. region_id = 'cn-hangzhou' @app.route("/") def hello_world(): return render_template('index.html') @app.route('/get_sts_token', methods=['GET']) def get_sts_token(): # If no parameters are specified when you initialize CredentialClient, the default credential chain is used. # When running locally, you can specify the AccessKey pair via the ALIBABA_CLOUD_ACCESS_KEY_ID and ALIBABA_CLOUD_ACCESS_KEY_SECRET environment variables. # When running on an ECS instance, an ECI instance, or in Container Service, you can specify the attached instance role via the ALIBABA_CLOUD_ECS_METADATA environment variable. The SDK automatically fetches temporary STS credentials. config = Config(region_id=region_id, credential=CredentialClient()) sts_client = Sts20150401Client(config=config) assume_role_request = sts_20150401_models.AssumeRoleRequest( role_arn=role_arn_for_oss_upload, # Set <YOUR_ROLE_SESSION_NAME> to a custom session name. role_session_name='<YOUR_ROLE_SESSION_NAME>' ) response = sts_client.assume_role(assume_role_request) token = json.dumps(response.body.credentials.to_map()) return token app.run(host="127.0.0.1", port=8000) # If you need to listen on other addresses, such as 0.0.0.0, you must add an authentication mechanism on the server side. -
In the code, replace
<YOUR_ROLE_ARN>with the role ARN you saved in Step 1.3. -
In the code, replace
<YOUR_ROLE_SESSION_NAME>with a custom session name, such asrole_session_test.
-
-
Start the application using the AccessKey pair from Step 1.1.
ALIBABA_CLOUD_ACCESS_KEY_ID=<YOUR_AK_ID> ALIBABA_CLOUD_ACCESS_KEY_SECRET=<YOUR_AK_SECRET> python3 main.py -
In a web browser, go to
http://<your_ecs_instance_public_ip>/get_sts_token.A successful response looks like this:

-
Press
Ctrl+Cto stop the application.
Step 2: Download and set up the mobile app
Android
-
Download the mobile application source code.
You can use this mobile application to upload images to OSS. It supports both simple uploads and resumable uploads. For unreliable networks, resumable uploads are recommended. You can also use the image processing service to resize or add watermarks to images before uploading.
-
Open the mobile application and configure the parameters.
-
STS authentication server: Enter the address of the application server you deployed in Step 1: Activate STS and configure the application server.
-
Destination bucket: The bucket where the mobile application will upload data.
-
Region: The region where the destination bucket is located.
-
-
Click Configure.
iOS
-
Download the mobile application source code.
You can use this mobile application to upload images to OSS. It supports both simple uploads and resumable uploads. For unreliable networks, resumable uploads are recommended. You can also use the image processing service to resize or add watermarks to images before uploading.
-
Open the mobile application and configure the parameters.
Before you run the demo, you must configure the required parameters in the OSSTestMacros.h file, including
OSS_BUCKET_PRIVATE,OSS_ENDPOINT, andOSS_STSTOKEN_URL. SetOSS_STSTOKEN_URLto the address of the application server you deployed in Step 1: Activate STS and configure the application server.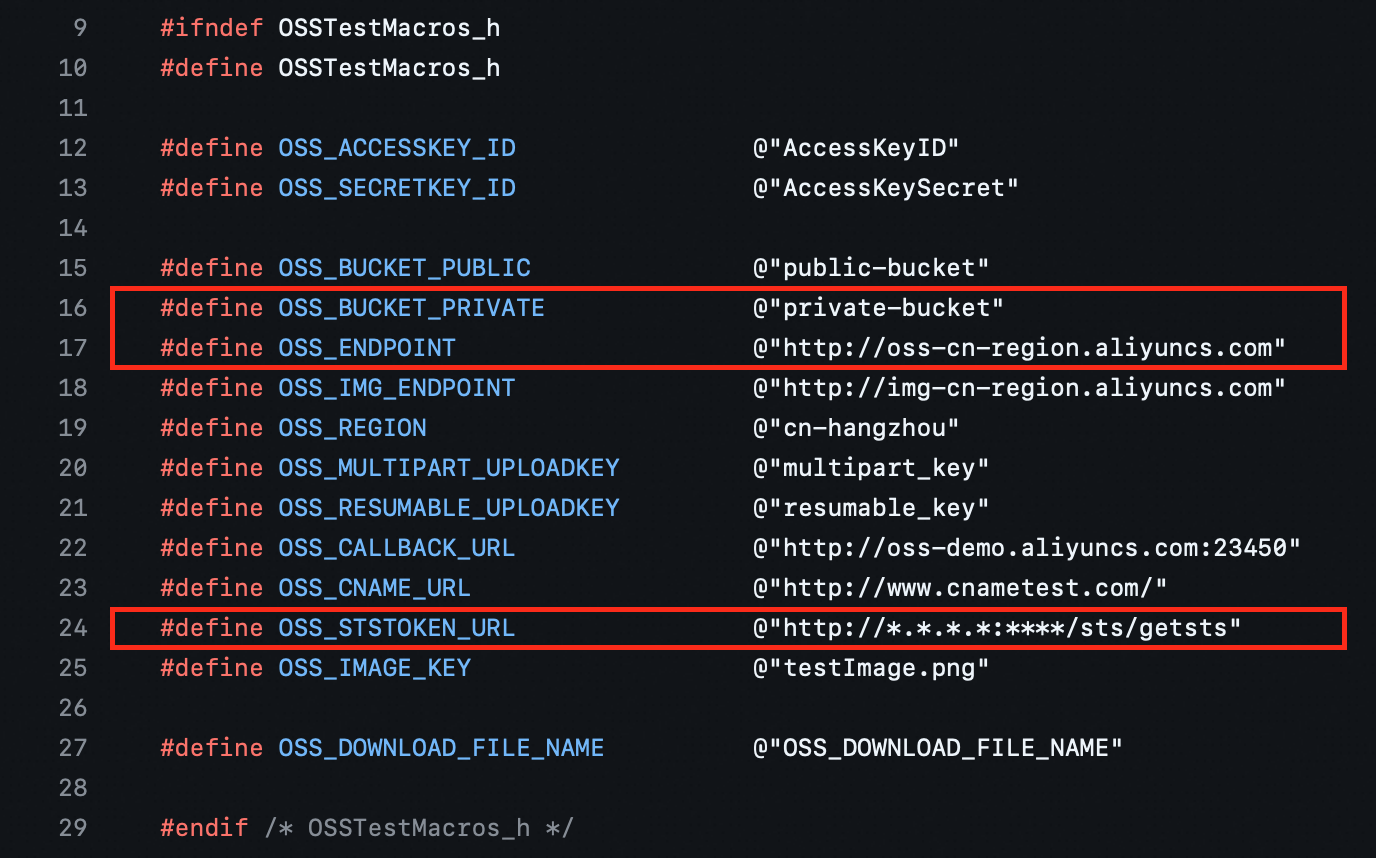
-
Run the demo.
Step 3: Test the direct upload service
-
Specify a name for the OSS object. Click Upload and select an image to upload.
-
After a successful upload, you can view the result in the OSS console.