This topic describes how to migrate DolphinScheduler scheduling workflows to DataWorks using the LHM scheduling migration tool. The process involves exporting tasks from DolphinScheduler, converting them, and then importing them into DataWorks.
1. Export DolphinScheduler workflows
The export tool retrieves project, workflow definition, data source definition, and resource file information by calling the DolphinScheduler API. The tool supports all versions of DolphinScheduler, including 1.x, 2.x, and 3.x. To export your workflows, follow these steps.
1. Prerequisites
Prepare a JDK 17 runtime environment. Ensure network connectivity between the runtime environment and DolphinScheduler. Download the scheduling migration tool and decompress it locally.
To test the network connectivity, you can call the DolphinScheduler ListProject API to verify that it returns information and that the returned list contains the project you want to migrate. For information about how to obtain a token, see the next section.
# DolphinScheduler 1.x
curl -H "token:<YourToken>" -X GET http://<YourIp>:12345/dolphinscheduler/projects/query-project-list

# DolphinScheduler 2.x
curl -H "token:<YourToken>" -X GET http://<YourIp>:12345/dolphinscheduler/projects/list

# DolphinScheduler 3.x
curl -H "token:<YourToken>" -X GET http://<YourIp>:12345/dolphinscheduler/projects/list
2. Configure connection information
In the `conf` folder of the project directory, create an export configuration file in JSON format, such as `read.json`.
Delete the comments from the JSON file before use.
{
  "schedule_datasource": {
    "name": "YourDolphin", // Give your DolphinScheduler data source a name.
    "type": "DolphinScheduler", // Data source type (DolphinScheduler)
    "properties": {
      "endpoint": "http://localhost:12345", // Endpoint
      "project": "Comprehensive Test", // Project name
      "token": "***********************" // Token
    },
    "operaterType": "AUTO" // Connection type (AUTO: Automatically get scheduling information through the API)
  },
  "conf": {

  }
}
2.1. Obtain the endpoint
The endpoint is the API endpoint, which is usually the same as the frontend page address. For example, the endpoint is `http://120.55.X.XXX:12345` in the following figure.
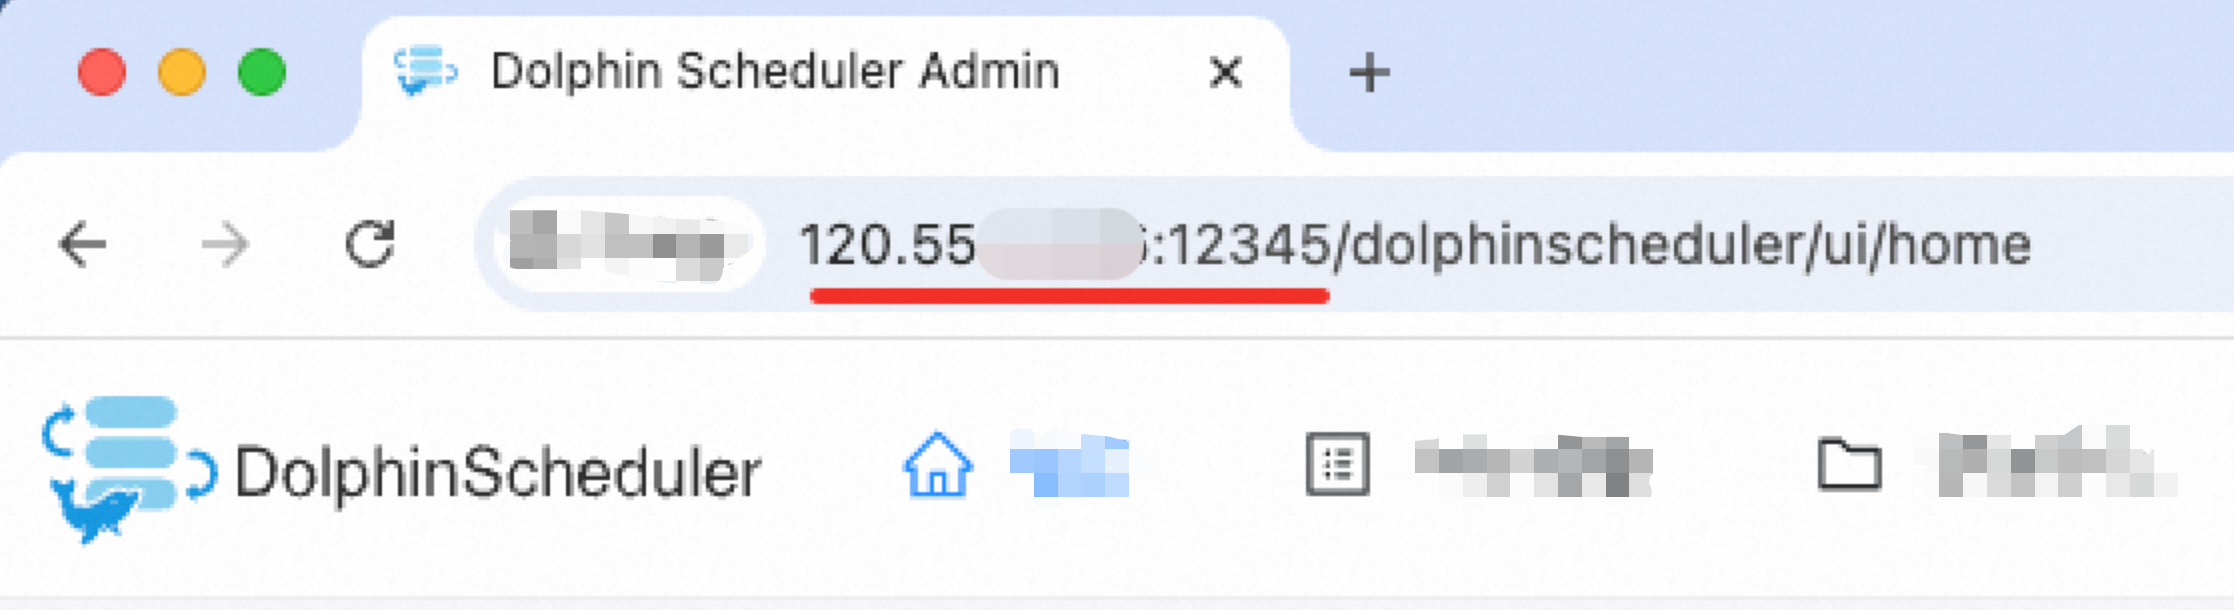
If the DolphinScheduler address is `http://your-company:12345/dolphinscheduler/ui/home`, the endpoint is `http://your-company:12345`.
Because DolphinScheduler is an open-source scheduling engine, its API module may be customized. If an API call fails, you can go to the Swagger page and run simple tests to confirm the API attributes.
2.2. Obtain the token
In the Security Center, go to the Token Management page, create a token, and set a sufficiently long expiration time.
The user token must have permissions for the project that you want to migrate.
2.3. Obtain the project
Go to the Project Management page. Copy the name of the project that you want to migrate and enter it in the `project` field.
3. Run the scheduling discovery tool
When you run the scheduling discovery tool, it generates two files that store the following content:
The raw information from the DolphinScheduler API, which is referred to as the ApiOutput package.
The discovery tool parsing package, which standardizes the data structure of the raw information. This is referred to as the ReaderOutput package.
The ReaderOutput package is the final result of the scheduling export. The ApiOutput package is an intermediate result used only for troubleshooting during the export process.
You can call the discovery tool from the command line. The command is as follows:
sh ./bin/run.sh read \
-c ./conf/<your_config_file>.JSON \
-f ./data/0_OriginalPackage/<api_raw_info_package>.zip \
-o ./data/1_ReaderOutput/<source_discovery_export_package>.zip \
-t <PluginName>
The `-c` parameter specifies the path of the configuration file. The `-f` parameter specifies the storage path for the ApiOutput package. The `-o` parameter specifies the storage path for the ReaderOutput package. The `-t` parameter specifies the name of the discovery plugin.
The export plugins for DolphinScheduler 1.x, 2.x, and 3.x are `dolphinv1-reader`, `dolphinv2-reader`, and `dolphinv3-reader`, respectively.
For example, to export Project A from DolphinScheduler 3.2.0:
sh ./bin/run.sh read \
-c ./conf/projectA_read.JSON \
-f ./data/0_OriginalPackage/projectA_ApiOutput.zip \
-o ./data/1_ReaderOutput/projectA_ReaderOutput.zip \
-t dolphinv3-reader
4. View the export results
You can open the generated `ReaderOutput.zip` package in the `./data/1_ReaderOutput/` directory to preview the export results.
The statistical report provides a summary of the basic information about workflows, nodes, resources, functions, and data sources in DolphinScheduler.
The `data/project` folder contains the standardized data structure of the DolphinScheduler scheduling information.
Statistical report:
Sheet 1, named "Overview", displays a summary of the Reader export results. The other sheets, such as "WORKFLOW" and "WORKFLOWNODE", contain specific information about workflows, nodes, resources, functions, and data sources.
The statistical report provides two special features:
1. You can change some properties of workflows and nodes in the report. The editable fields are marked with blue font. During the initialization phase of the next stage, which is scheduling transformation, the tool retrieves and applies the property changes from the table.
2. The report lets you skip certain workflows during transformation by deleting their corresponding rows in the workflow child table, which acts as a blacklist. Note: If workflows have dependencies on each other, the related workflows must be transformed in the same batch. Do not separate them using the blacklist, because this will cause an exception.
For more information, see Use the overview report in scheduling migration to supplement and modify scheduling properties.
5. Q&A
5.1. (Batch discovery) Can I discover multiple projects at once?
Yes, you can. You can enter multiple project names in the `project` configuration item, separated by a comma. Do not add spaces between the names, because DolphinScheduler project names can contain spaces, and the tool treats spaces as part of the name for matching.
Before you use the file, delete the comments in the JSON code.
{
  "schedule_datasource": {
    "name": "YourDolphin", // Name your Dolphin data source.
    "type": "DolphinScheduler", // Data source type (DolphinScheduler)
    "properties": {
      "endpoint": "http://localhost:12345", // Endpoint
      "project": "Project1,Project2", // Project name
      "token": "***********************" // Token
    },
    "operaterType": "AUTO" // Connection type (AUTO: Automatically obtain scheduling information through the API)
  },
  "conf": {

  }
}
In the run command, the `-f` and `-o` parameters must specify a folder path. The tool automatically creates a separate export package for each project.
sh ./bin/run.sh read \
-c ./conf/<your_config_file>.JSON \
-f ./data/0_OriginalPackage/ \
-o ./data/1_ReaderOutput/ \
-t <dolphinv1/2/3-reader>
5.2. (Manual mode) What if there is no API?
Some developers remove the API module from DolphinScheduler, which prevents you from obtaining scheduling information through an API connection. As an alternative, you can manually construct the raw information package in the `./data/0_OriginalPackage/` directory and change the `operaterType` to `MANUAL` in the configuration. The tool will then use the manually constructed package as input to complete the discovery of DolphinScheduler.
Before you use the file, delete the comments in the JSON code.
{
  "schedule_datasource": {
    "name": "YourDolphin", // Name your Dolphin data source.
    "type": "DolphinScheduler", // Data source type (DolphinScheduler)
    "properties": {
      "endpoint": "http://localhost:12345", // Endpoint
      "project": "ComprehensiveTest", // Project name
      "token": "***********************" // Token
    },
    "operaterType": "MANUAL" // Connection type (MANUAL: Offline mode)
  },
  "conf": {

  }
}
Example of the raw package structure:
.
├── package_info.JSON
├── projects.JSON
├── projects
│   └── ComprehensiveTest
│       └── processDefinition
│           └── process_definitions_page_1.JSON
├── datasource
│   └── datasource_page_1.JSON
├── resource
│   └── resources.JSON
└── udfFunction
    └── udf_function_page_1.JSON
`package_info.json` contains package information, including the DolphinScheduler version.
{
  "version": "3.2.0"
}
`projects.json` contains project information. When you construct it manually, focus on filling in the `id`, `userId`, `code`, and `name` fields.
[
  {
    "id": 2,
    "userId": 1,
    "code": 16372996967936,
    "name": "Comprehensive Test",
    "description": "",
    "createTime": "2025-01-20 11:40:39",
    "updateTime": "2025-01-20 11:40:39",
    "perm": 0,
    "defCount": 0,
    "instRunningCount": 0
  }
]
The `projects` folder stores workflow definitions. When you construct it manually, change the next-level directory to the project name. Then, export the workflow definitions from the DolphinScheduler interface, rename them sequentially to `process_definitions_page_*.json`, and place them in the `processDefinition` directory.
`datasource`, `resource`, and `udfFunction` contain data source information, resource file information, and UDF information, respectively. Because the DolphinScheduler interface does not have an export feature for these elements, they can be omitted. You can fill `datasource_page_1.json`, `resources.json`, and `udf_function_page_1.json` with an empty array (`[]`). Omitting these elements has a minor impact on the details of the workflow migration. This affects the mapping of SQL nodes associated with data sources, the mapping of DataX nodes in non-custom template mode that are associated with data sources, and the migration of reference relationships between nodes and resources. The affected nodes are created normally in DataWorks, but you must manually configure the binding of nodes to data sources and resources in DataWorks.
5.3. What if the token is valid but some workflows are missing from the export?
First, check whether the token has permissions for the project.
Additionally, the APIs of some minor versions of DolphinScheduler 1.x may cause data loss during export. You can use the statistical report in the export results to identify and add the missing workflows.
2. Transform DolphinScheduler workflows for DataWorks
DolphinScheduler is a popular open source scheduling engine. DataWorks fully supports the scheduling capabilities of DolphinScheduler. After the migration tool transforms the workflows, they can run in DataWorks with the same effect as in DolphinScheduler.
1. Prerequisites
The discovery tool has run successfully, the DolphinScheduler scheduling information has been exported, and the `ReaderOutput.zip` file has been generated.
(Optional but recommended) Open the discovery export package and check the statistical report to verify that all items within the migration scope have been exported.
2. Transformation configuration items
2.1. Transformation configuration template
Before you use the file, delete the comments in the JSON code.
{
  "conf": {},
  "self": {
    "if.use.default.convert": false,
    "if.use.migrationx.before": false,
    "if.use.dataworks.newidea": true,
    "owner.map": [ // Owner mapping
      {
        "src": "1", // DolphinScheduler user ID
        "tgt": "202006995118212119" // DataWorks user ID
      }
    ],
    "conf": [
      {
        "nodes": "all", // Scope of the rule group
        "rule": {
          "settings": {
            // Convert DolphinScheduler Shell nodes to DataWorks Shell nodes
            "workflow.converter.shellNodeType": "DIDE_SHELL",
            // Convert unknown nodes to DataWorks virtual nodes by default
            "workflow.converter.target.unknownNodeTypeAs": "VIRTUAL",
            // Convert DolphinScheduler SQL nodes to corresponding DataWorks SQL or database nodes based on the data source type
            "workflow.converter.dolphinscheduler.sqlNodeTypeMapping": {
              "CLICKHOUSE": "CLICK_SQL",
              "HIVE": "ODPS_SQL",
              "STARROCKS": "StarRocks",
              "DORIS": "HOLOGRES_SQL",
              "MYSQL": "MYSQL",
              "REDSHIFT": "Redshift",
              "SQLSERVER": "SQLSERVER",
              "PRESTO": "EMR_PRESTO",
              "POSTGRESQL": "POSTGRESQL",
              "ORACLE": "Oracle",
              "ATHENA": "MYSQL"
            },
            // Mapping of DolphinScheduler and DataWorks data source names
            "workflow.converter.connection.mapping": {
              "mysqlDb1": "dataworks_mysqlDb1",
              "srDb1": "dataworks_srDb1"
            },
            // Main compute engine bound on DataWorks (EMR/MaxCompute/Hologres)
            "workflow.converter.target.engine.type": "EMR",
            // Convert DolphinScheduler Spark nodes to DataWorks MaxCompute Spark nodes
            "workflow.converter.sparkSubmitAs": "ODPS_SPARK",
            "workflow.converter.sparkVersion": "3.x",
          }
        }
      }
    ]
  },
  "schedule_datasource": {
    "name": "DsProject",
    "type": "DolphinScheduler"
  },
  "target_schedule_datasource": {}
}
2.2. Owner mapping
DolphinScheduler records the owner of each workflow. The owner is crucial information for team development. The tool supports mapping DolphinScheduler users to DataWorks users to assign the corresponding owners to workflows and nodes.
You can obtain the DolphinScheduler username and ID from the User Management page.
In a DataWorks workspace, you can add users as members. You can obtain the user ID from the upper-right corner.
You can also obtain the ID from the Owner drop-down list on the DataStudio page.
2.3. Node transformation rules
2.3.1. Scope of rules
You can set the scope for node transformation rules. For example, to convert all nodes according to a uniform rule, you can configure `"nodes": "all"` and fill in the `Settings`. Typically, you only need to configure one `all` rule group.
Before you use the file, delete the comments in the JSON code.
{
  "conf": {},
  "self": {
    "conf": [
      {
        "nodes": "all", // The scope of the rule group is ALL. All nodes are transformed according to this rule.
        "rule": {
          "settings": {
            // Settings
          }
      }
    ]
  }
}
If some nodes require separate transformation rules, you can specify the scope of the rule in `nodes` by entering the task ID or name. To set a rule for a batch of nodes, separate the IDs or names with commas. We recommend using IDs to specify the scope, because using names may lead to incorrect settings. You can also use regular expressions to match node names. In addition, we strongly recommend that you set up a `normal` rule group to provide a default transformation rule for the remaining nodes.
Before you use the file, delete the comments in the JSON code.
{
  "conf": {},
  "self": {
    "conf": [
      {
        "nodes": "node1Name, node2Id", // The scope of the rule group is node1 and node2.
        "rule": {
          "settings": {
            // Settings 1
          }
        },
        {
        "nodes": "node3Name, node4Id", // The scope of the rule group is node3 and node4.
        "rule": {
          "settings": {
            // Settings 2
          }
        },
        {
        "nodes": "regexExpression", // Supports filtering node names with regular expressions.
        "rule": {
          "settings": {
            // Settings 3
          }
        },
        {
        "nodes": "normal", // Transformation rule for the remaining nodes.
        "rule": {
          "settings": {
            // Settings 4
          }
        }
        ]
  }
}
2.3.2. Transformation rules
DolphinScheduler 1.x, 2.x, and 3.x support different types of nodes. Therefore, the transformation solutions and configuration items vary. The details are as follows.
2.3.2.1. DolphinScheduler 3.x transformation configuration
The tool currently supports the transformation of the following DolphinScheduler 3.x node types:
SHELL, SQL, PYTHON, DATAX, SQOOP, SEATUNNEL, HIVECLI, SPARK (Java, Python, Sql), MR, PROCEDURE, HTTP, CONDITIONS, SWITCH, DEPENDENT, SUB_PROCESS
The types for which you can configure DataWorks mapping rules include the following:
SHELL (workflow.converter.shellNodeType):
We recommend that you convert them to DIDE_SHELL, EMR_SHELL, or VIRTUAL nodes.
SQL (workflow.converter.dolphinscheduler.sqlNodeTypeMapping):
We recommend that you convert them to various SQL nodes or database nodes.
PROCEDURE (workflow.converter.dolphinscheduler.sqlNodeTypeMapping):
We recommend that you convert them to various SQL nodes or database nodes.
PYTHON (workflow.converter.pyNodeType):
We recommend that you convert them to PYTHON, PYODPS, PYODPS3, or EMR_SHELL.
HIVECLI (workflow.converter.dolphinscheduler.sqlNodeTypeMapping/HIVE):
We recommend that you convert them to EMR_HIVE or ODPS_SQL.
SPARK (workflow.converter.sparkSubmitAs):
We recommend that you convert SparkJava and SparkPython nodes to ODPS_SPARK or EMR_SPARK nodes.
We recommend that you convert SparkSql nodes to ODPS_SQL or EMR_SPARK_SQL nodes.
MR (workflow.converter.mrNodeType):
We recommend that you convert them to ODPS_MR or EMR_MR nodes.
For more information about DataWorks node types, see the following enumeration class:
Node types with fixed transformation rules:
DATAX: These nodes are converted to DI nodes. The conversion supports both custom template mode (JSON Script mode) and regular mode (frontend form-filling mode).
The following data source reader plugin configurations are supported: MYSQL -> mysql, POSTGRESQL -> postgresql, ORACLE -> oracle, SQLSERVER -> sqlserver, ODPS -> odps, OSS -> oss, HIVE -> hdfs, HDFS -> hdfs, CLICKHOUSE -> clickhouse, MONGODB -> mongodb.
The following data source writer plugin configurations are supported: MYSQL -> mysql, POSTGRESQL -> postgresql, ORACLE -> oracle, SQLSERVER -> sqlserver, ODPS -> odps, OSS -> oss, HIVE -> hdfs, HDFS -> hdfs, CLICKHOUSE -> clickhouse, MONGODB -> mongodb.
SQOOP: These nodes are converted to DI nodes.
The following data source reader plugin configurations are supported: Mysql -> mysql, Hive -> hive, HDFS -> hdfs.
The following data source writer plugin configurations are supported: Mysql -> mysql, Hive -> hive, HDFS -> hdfs.
SEATUNNEL: Transforms a component into a DI node.
Script transformation is not yet supported. Only the node and its scheduling information are transformed.
HTTP: These nodes are converted to DIDE_SHELL (general Shell) nodes. The migration tool automatically concatenates the request parameters into a curl command.
SWITCH: These nodes are converted to CONTROLLER_BRANCH (branch) nodes. The functionality is the same before and after migration.
SUB_PROCESS: These nodes are converted to SUB_PROCESS nodes. The functionality is the same before and after migration. Note that when importing into DataWorks, the migration tool enables the 'Can be referenced' switch for the referenced workflow. The referenced workflow can be started only by a SUB_PROCESS call and cannot be scheduled to run on its own.
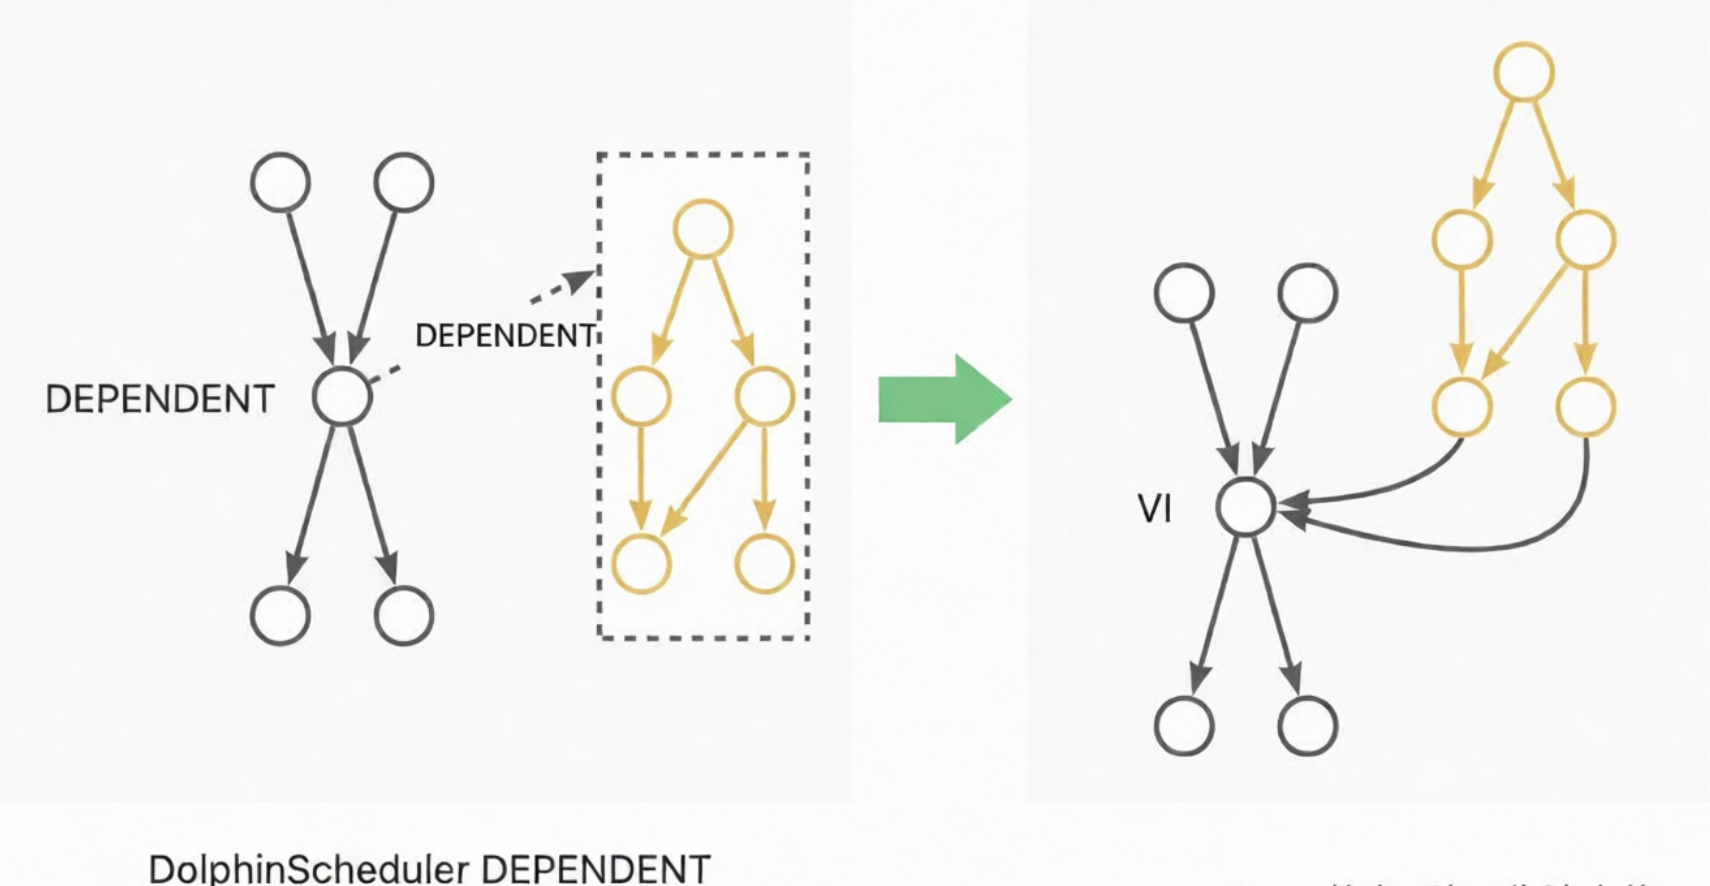
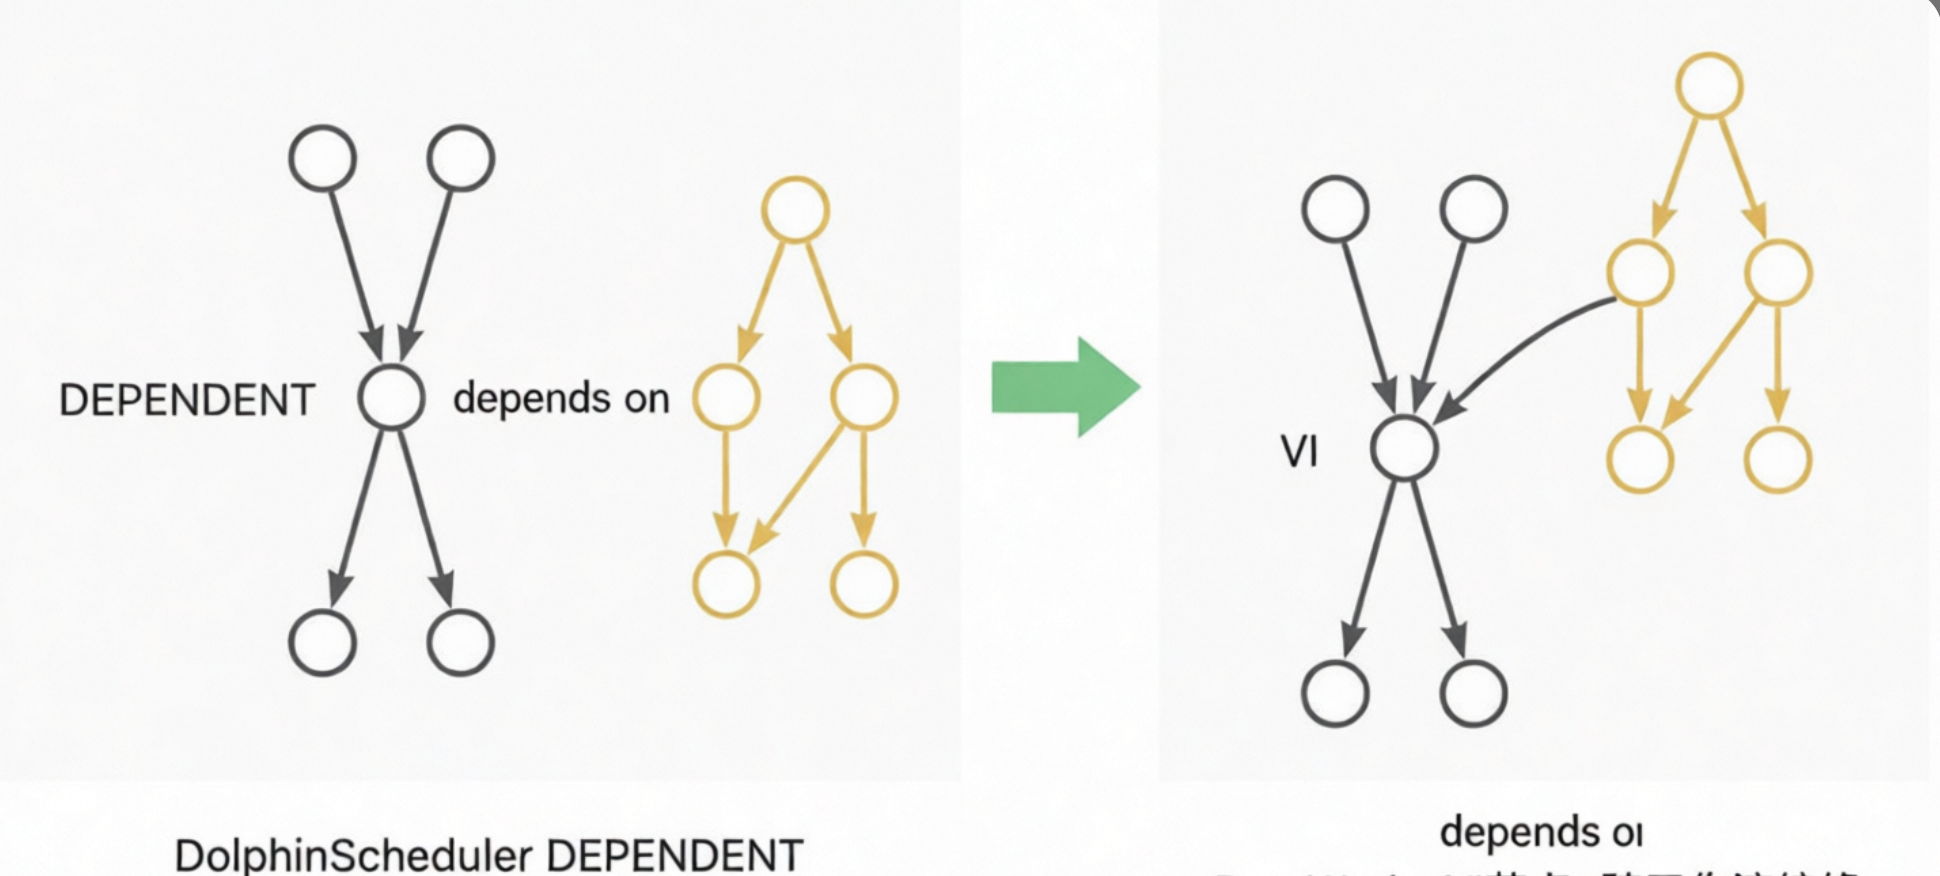
DEPENDENT: These nodes are converted to VIRTUAL nodes. The dependency is converted to a node lineage dependency. For example, if a Dependent node depends on Workflow A, the dependency is converted to a lineage from the tail node of Workflow A to the Dependent node. If a Dependent node depends on Node A, the dependency is converted to a lineage from Node A to the Dependent node. The following diagrams show these examples:
CONDITIONS: This node contains two layers of logic, which are implemented using a two-layer CONTROLLER_JOIN (join) node. A CONDITIONS node has two upstream nodes, A and B, and two downstream nodes, C and D. The logical expression is `((!A&B)|(A&!B)|(!A&!B))`. If the expression is true, the flow proceeds to C. If the expression is false, the flow proceeds to D. The upper layer generates three join nodes to calculate the results of `!A&B`, `A&!B`, and `!A&!B`. The lower layer generates two nodes. One node triggers the execution of downstream node C when `((!A&B)|(A&!B)|(!A&!B))==true`. The other node triggers the execution of downstream node D when `(!(!A&B)&!(A&!B)&!(!A&!B))==true`. This process achieves the same effect as the original CONDITIONS node.
2.3.2.2. DolphinScheduler 2.x transformation configuration
The tool currently supports the transformation of the following DolphinScheduler 2.x node types:
SHELL, SQL, PYTHON, DATAX, SQOOP, HIVECLI, SPARK (Java, Python, Sql), MR, PROCEDURE, HTTP, CONDITIONS, SWITCH, DEPENDENT, SUB_PROCESS
Compared with version 2.x, DolphinScheduler 3.x adds only the SEATUNNEL node type. The transformation solutions and configuration items for the other nodes are the same as for DolphinScheduler 3.x. For more information, see the previous section.
2.3.2.3. DolphinScheduler 1.x transformation configuration
The tool currently supports the transformation of the following DolphinScheduler 1.x node types:
SHELL, SQL, PYTHON, DATAX, SQOOP, SPARK (Java, Python, Sql), MR, CONDITIONS, DEPENDENT, SUB_PROCESS
The transformation solutions and configuration items for these nodes are the same as for DolphinScheduler 3.x. For more information, see the previous section.
3. Run the scheduling transformation tool
You can call the transformation tool from the command line. The command is as follows:
sh ./bin/run.sh convert \
-c ./conf/<your_config_file>.JSON \
-f ./data/1_ReaderOutput/<source_discovery_export_package>.zip \
-o ./data/2_ConverterOutput/<transformation_result_package>.zip \
-t <PluginName>
The `-c` parameter specifies the path of the configuration file. The `-f` parameter specifies the storage path for the ReaderOutput package. The `-o` parameter specifies the storage path for the ConverterOutput package. The `-t` parameter specifies the name of the transformation plugin. The transformation plugins for DolphinScheduler 1.x, 2.x, and 3.x are `dolphinv1-dw-converter`, `dolphinv2-dw-converter`, and `dolphinv3-dw-converter`, respectively.
For example, to transform Project A from DolphinScheduler 3.x:
sh ./bin/run.sh convert \
-c ./conf/projectA_convert.JSON \
-f ./data/1_ReaderOutput/projectA_ReaderOutput.zip \
-o ./data/2_ConverterOutput/projectA_ConverterOutput.zip \
-t dolphinv3-dw-converter
The transformation tool prints process information during operation. Pay attention to any errors that occur. After the transformation is complete, statistics on successful and failed transformations are printed in the command line. Note that the failure of some nodes to transform does not affect the overall transformation process. If a small number of nodes fail to transform, you can modify them manually after you migrate them to DataWorks.
4. View the transformation results
You can open the generated `ConverterOutput.zip` package in the `./data/2_ConverterOutput/` directory to preview the transformation results.
The statistical report provides a summary of the basic information about the transformed workflows, nodes, resources, functions, and data sources.
The `data/project` folder is the main part of the transformed scheduling migration package.
The statistical report provides two special features:
1. You can change some properties of workflows and nodes in the report. The editable fields are marked with blue font. During the next stage, importing into DataWorks, the tool will retrieve and apply the property changes from the table.
2. The report lets you skip certain workflows when importing into DataWorks by deleting their corresponding rows in the workflow child table (workflow blacklist). Note: If workflows have dependencies on each other, the related workflows must be imported in the same batch. Do not separate them using the blacklist. Separating them will cause an exception.
For more information, see Use the overview report in scheduling migration to supplement and modify scheduling properties.
3. Import into DataWorks
The heterogeneous transformation feature of the LHM migration tool converts the scheduling elements from the source system to the DataWorks scheduling format. The tool provides a unified upload entry for different migration scenarios, which lets you import workflows into DataWorks.
The import tool supports multiple rounds of writing and automatically creates or updates workflows in Overwrite mode.
1. Prerequisites
1.1. Successful transformation
The transformation tool has run successfully, the source scheduling information has been converted to the DataWorks scheduling format, and the `ConverterOutput.zip` file has been generated.
(Optional but recommended) Open the transformation output package and check the statistical report to verify that the scope of the migration has been successfully transformed.
1.2. DataWorks configuration
In DataWorks, perform the following actions:
1. Create a workspace.
2. Create an AccessKey pair and ensure it has administrative permissions for the workspace. We strongly recommend that you create an AccessKey pair that is bound to your account to facilitate troubleshooting if writing issues occur.
3. In the workspace, create data sources, bind compute resources, and create resource groups.
4. In the workspace, upload resource files and create UDFs.
1.3. Network connectivity check
Verify that you can connect to the DataWorks endpoint.
List of endpoints:
ping dataworks.aliyuncs.com2. Import configuration items
In the `conf` folder of the project directory, you can create a JSON configuration file for the export, such as `writer.json`.
Before you use the file, delete the comments in the JSON code.
{
  "schedule_datasource": {
    "name": "YourDataWorks", // Name your DataWorks data source.
    "type": "DataWorks",
    "properties": {
      "endpoint": "dataworks.cn-hangzhou.aliyuncs.com", // Endpoint
      "project_id": "YourProjectId", // Workspace ID
      "project_name": "YourProject", // Workspace name
      "ak": "************", // AK
      "sk": "************", // SK
    },
    "operaterType": "MANUAL"
  },
  "conf": {
    "di.resource.group.identifier": "Serverless_res_group_***_***", // Data integration resource group
    "resource.group.identifier": "Serverless_res_group_***_***", // Scheduling resource group
    "dataworks.node.type.xls": "/Software/bwm-client/conf/CodeProgramType.xls", // Path to the DataWorks node type table
    "qps.limit": 5 // QPS limit for sending API requests to DataWorks
  }
}
2.1. Endpoint
Select the endpoint based on the region where your DataWorks workspace is located. For more information, see:
2.2. Workspace ID and name
Open the DataWorks console. Go to the workspace product page and obtain the workspace ID and name from the basic information on the right side of the page.
2.3. Create and authorize an AccessKey pair
On your user page, create an AccessKey pair. The AccessKey pair must have administrator read and write permissions for the target DataWorks workspace.
Permission management is performed in two places. If the account is a RAM user, you must first grant the RAM user authorization for DataWorks operations.
Policy page: https://ram.console.alibabacloud.com/policies
Then, in the DataWorks workspace, grant workspace permissions to the account.
Note: You can set a network access restriction policy for the AccessKey. Make sure that the IP address of the machine on which the migration tool is running is allowed access.
2.4. Resource groups
In the navigation pane on the left of the DataWorks workspace product page, choose Resource Groups. On the Resource Groups page, attach a resource group and obtain its ID.
A general-purpose resource group can be used for both node scheduling and data integration. You can configure the scheduling resource group (`resource.group.identifier`) and the data integration resource group (`di.resource.group.identifier`) to be the same general-purpose resource group.
2.5. QPS settings
The tool imports data by calling DataWorks APIs. Different editions of DataWorks have different queries per second (QPS) limits and daily call limits for read and write OpenAPI calls. For more information, see Limits.
For DataWorks Basic Edition, Standard Edition, and Professional Edition, we recommend that you set `"qps.limit"` to `5`. For the Enterprise Edition, we recommend that you set `"qps.limit"` to `20`.
Note: Avoid running multiple import tools at the same time.
2.6. DataWorks node type ID settings
In DataWorks, some node types are assigned different TypeIDs in different regions. The specific TypeID depends on the DataWorks DataStudio interface. This characteristic mainly applies to database nodes. For more information, see Database nodes.
For example, the NodeTypeId for a MySQL node is 1000039 in the China (Hangzhou) region and 1000041 in the China (Shenzhen) region.
To adapt to these regional differences in DataWorks, the tool provides a configurable way for you to specify the node TypeID table that the tool uses.
You can specify the table using a configuration item in the import tool:
"conf": {
    "dataworks.node.type.xls": "/Software/bwm-client/conf/CodeProgramType.xls" // Path to the DataWorks node type table
 }
To obtain the node type ID from the DataWorks DataStudio interface, create a workflow, create a node in the workflow, and then click Save. After that, you can view the workflow's Spec.
If the node type is configured incorrectly, the following error is reported when the workflow is published.
3. Run the DataWorks import tool
Run the conversion tool from the command line. The command is as follows:
sh ./bin/run.sh write \
-c ./conf/<your_config_file>.json \
-f ./data/2_ConverterOutput/<conversion_result_output_package>.zip \
-o ./data/4_WriterOutput/<import_result_storage_package>.zip \
-t dw-newide-writer
In the command, `-c` specifies the configuration file path, `-f` specifies the storage path for the ConverterOutput package, `-o` specifies the storage path for the WriterOutput package, and `-t` specifies the submission plugin name.
For example, to import Project A to DataWorks:
sh ./bin/run.sh write \
-c ./conf/projectA_write.json \
-f ./data/2_ConverterOutput/projectA_ConverterOutput.zip \
-o ./data/4_WriterOutput/projectA_WriterOutput.zip \
-t dw-newide-writer
The import tool prints process information during operation. Check for any errors during the process. After the import is complete, statistics on successful and failed imports are printed on the command line. Note that the failure of some node imports does not affect the overall import process. If a few nodes fail to import, you can manually modify them in DataWorks.
4. View the import results
After the import is complete, you can view the results in DataWorks. You can also monitor the workflows as they are imported one by one. If you find a problem and need to stop the import, you can run the `jps` command to find `BwmClientApp` and then run the `kill -9` command to stop the import.
5. Q&A
5.1. The source is under continuous development. How can I submit these increments and changes to DataWorks?
The migration tool runs in overwrite mode. You can rerun the export, conversion, and import processes to submit incremental changes from the source to DataWorks. Note that the tool matches workflows by their full path to decide whether to create or update them. To migrate changes, do not move the workflows.
5.2. The source is under continuous development, and I am also modifying and managing workflows on DataWorks. Will incremental migration overwrite the changes on DataWorks?
Yes, it will. The migration tool runs in overwrite mode. We recommend that you make further modifications in DataWorks after the migration is complete. Alternatively, you can migrate in batches. After you confirm that a batch of migrated workflows will not be overwritten again, you can start modifying them in DataWorks. Different batches do not affect each other.
5.3. The entire package takes too long to import. Can I import only a part of it?
Yes, you can. You can manually crop the package to be imported to perform a partial import. In the `data/project/workflow` folder, keep the workflows that you need to import and delete the others. Recompress the folder into a package and then run the import tool. Note that workflows with mutual dependencies must be imported together. Otherwise, the node lineage between the workflows is lost.