Install the SchedulerX agent in Kubernetes to schedule native Pods and Jobs. SchedulerX provides status monitoring, alerting, log collection, and diagnostics for your jobs.
How it works
The following diagram shows how SchedulerX schedules a Kubernetes job:
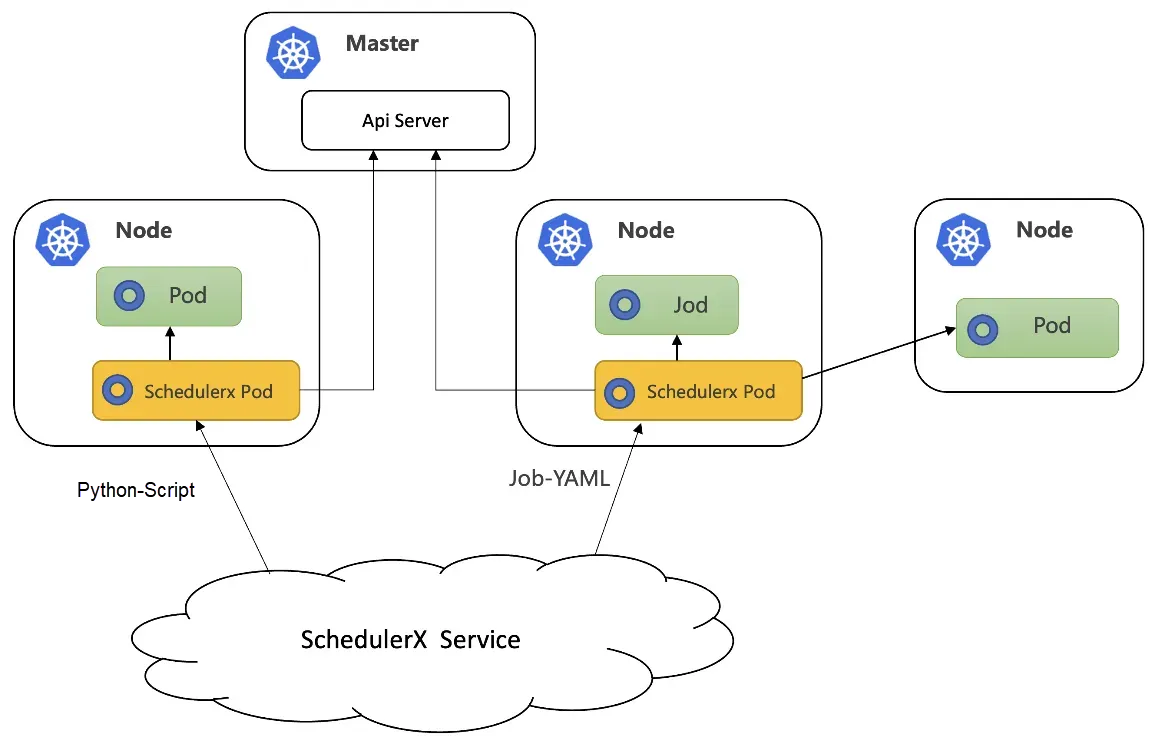
The following table compares Kubernetes jobs and script jobs.
|
Scenario |
Script job |
Kubernetes job |
|
Infrequent execution with high resource consumption. |
Not recommended. Forking a child process for each run consumes resources on the agent's machine and can overload the system. |
Recommended. Kubernetes uses its load balancing strategy to launch a new Pod for each run, ensuring high stability. |
|
Frequent execution with low resource consumption. |
Recommended. Forking a child process is fast and resource-efficient. |
Not recommended. Pulling an image and starting a Pod for each run is slow. Frequent API server calls to schedule Pods or Jobs can lead to rate limiting. |
|
How to build dependencies. |
Manually deploy dependencies to ECS instances in advance. |
Build dependencies into a base image. You must rebuild the base image if dependencies change. |
Prerequisites
Connect to SchedulerX. For more information, see Deploy SchedulerX in a Kubernetes cluster.
Create a Kubernetes job
Shell script
To run a shell script in a Pod without building your own image, create a Kubernetes job on the Tasks page and select Shell-Script as the resource type. The default image is BusyBox, which you can replace with your own.
Example configuration: Set Task type to K8s and resource type to Shell-Script. The default Image is BusyBox. Enter your shell script content, such as echo hello schedulerx, in the script editor.
Click Run once. A Pod named schedulerx-shell-{JobId} starts in the Kubernetes cluster.
$ kubectl get pods
NAME                          READY   STATUS    RESTARTS   AGE
schedulerx-shell-xxx          1/1     Running   0          xxx
On the Task Management page in the SchedulerX console, you can view the execution history and Pod logs. The log output area displays the script's result, such as hello schedulerx, along with the execution time and status.
Python script
To run a Python script in a Pod without building your own image, create a Kubernetes job on the Tasks page and select Python-Script as the resource type. The default image is python, which you can replace with your own.
Example configuration: Set Task type to K8s and resource type to Python-Script. The default Image is python. Enter your Python script content, such as print('hello schedulerx'), in the script editor.
Click Run once. A Pod named schedulerx-python-{JobId} starts in the Kubernetes cluster.
$ kubectl get pods
NAME                            READY   STATUS    RESTARTS   AGE
schedulerx-python-xxx           1/1     Running   0          xxx
On the Task Management page in the SchedulerX console, you can view the execution history and Pod logs. The procedure is the same as for shell scripts. The log output area displays the script's result.
PHP script
To run a PHP script in a Pod without building your own image, create a Kubernetes job on the Tasks page and select Php-Script as the resource type. The default image is php:7.4-cli, which you can replace with your own.
Example configuration: Set Task type to K8s and resource type to Php-Script. The default Image is php:7.4-cli. Enter your PHP script content in the script editor.
Click Run once. A Pod named schedulerx-php-{JobId} starts in the Kubernetes cluster.
$ kubectl get pods
NAME                         READY   STATUS    RESTARTS   AGE
schedulerx-php-xxx           1/1     Running   0          xxx
On the Task Management page in the SchedulerX console, you can view the execution history and Pod logs. The procedure is the same as for shell scripts. The log output area displays the script's result.
Node.js script
To run a Node.js script in a Pod without building your own image, create a Kubernetes job on the Tasks page and select Node.js-Script as the resource type. The default image is node:16, which you can replace with your own.
Example configuration: Set Task type to K8s and resource type to Node.js-Script. The default Image is node:16. Enter your Node.js script content, such as console.log('hello schedulerx'), in the script editor.
Click Run once. A Pod named schedulerx-node-{JobId} starts in the Kubernetes cluster.
$ kubectl get pods
NAME                          READY   STATUS    RESTARTS   AGE
schedulerx-node-xxx           1/1     Running   0          xxx
On the Task Management page in the SchedulerX console, you can view the execution history and Pod logs. The procedure is the same as for shell scripts. The log output area displays the script's result.
Job-YAML
You can also use SchedulerX to run a native Kubernetes Job. Set the task type to K8s and the resource type to Job-YAML.
Example configuration: Set Task type to K8s and resource type to Job-YAML. Enter the standard Kubernetes Job definition in the YAML editor, including fields such as apiVersion, kind, metadata, and spec.
Click Run once. The Job and its associated Pod start in the Kubernetes cluster.
$ kubectl get jobs
NAME                COMPLETIONS   DURATION   AGE
schedulerx-xxx      1/1           xxx        xxx

$ kubectl get pods
NAME                     READY   STATUS      RESTARTS   AGE
schedulerx-xxx           0/1     Completed   0          xxx
On the Task Management page in the SchedulerX console, you can view the execution history and Pod logs. The log output area displays the Job's result, execution time, and status.
When running a Kubernetes Job with SchedulerX, we recommend against using a CronJob. Instead, configure the schedule in SchedulerX to ensure that it collects the execution history and logs for each Pod.
Pod-YAML
You can also use SchedulerX to run a native Kubernetes Pod. Set the task type to K8s and the resource type to Pod-YAML.
Example configuration: Set Task type to K8s and resource type to Pod-YAML. Enter the standard Kubernetes Pod definition in the YAML editor, including fields such as apiVersion, kind, metadata, and spec.
Click Run once. The Pod starts in the Kubernetes cluster.
$ kubectl get pods
NAME                        READY   STATUS    RESTARTS   AGE
schedulerx-xxx              1/1     Running   0          xxx
On the Task Management page in the SchedulerX console, you can view the execution history and Pod logs. The log output area displays the Pod's result, execution time, and status.
When you use SchedulerX to run a Kubernetes Pod, we recommend that you do not run long-lived Pods, such as those for web applications that never terminate. You must set the restart policy to Never. Otherwise, the Pod will restart continuously.
Job parameters from environment variables
SchedulerX injects job parameters as environment variables. Scripts, Pods, and Jobs can read these parameters directly from the environment.
This feature requires SchedulerX agent version 1.10.14 or later.
|
Parameter |
Description |
|
SCHEDULERX_JOB_NAME |
The name of the job. |
|
SCHEDULERX_SCHEDULE_TIMESTAMP |
The job's scheduling timestamp. |
|
SCHEDULERX_DATA_TIMESTAMP |
The data timestamp for the job. |
|
SCHEDULERX_WORKFLOW_INSTANCE_ID |
The ID of the workflow instance, if the job is part of a workflow. |
|
SCHEDULERX_JOB_PARAMETERS |
The job parameters. |
|
SCHEDULERX_INSTANCE_PARAMETERS |
The instance parameters of the job. |
|
SCHEDULERX_JOB_SHARDING_PARAMETER |
The sharding parameters, if the job is a sharded job. |
The following example retrieves a SchedulerX job parameter:
Example: Enter a value in the Job Parameters field in the job configuration. In your script, you can then read the SCHEDULERX_JOB_PARAMETERS environment variable to access this value. For example, a shell script can use echo $SCHEDULERX_JOB_PARAMETERS to print the parameter.
Advantages
Scheduling a Kubernetes Job with SchedulerX offers the following advantages over native Kubernetes Jobs:
Online script editing
Kubernetes Jobs are commonly used for data processing or operations tasks implemented as scripts. Natively, you must package each script into an image and configure the command in a YAML file, rebuilding and redeploying the image for every change. For example:
apiVersion: batch/v1
kind: Job
metadata:
  name: hello
spec:
  template:
    spec:
      containers:
      - name: hello
        image: busybox
        command: ["sh",  "/root/hello.sh"]
      restartPolicy: Never
  backoffLimit: 4
SchedulerX eliminates the need to build images or write YAML for scripts. You can edit Shell, Python, PHP, and Node.js scripts directly in the console, and the system runs them in a Pod automatically. Updates take effect at the next scheduled run.
For example:
On the job editing page in the SchedulerX console, you can write and modify script content directly in the script editor. After you finish, click Save. The latest version of the script will automatically run at the next scheduled time.
Visual job orchestration
In the Kubernetes ecosystem, Argo is a popular solution for workflow orchestration. For example:
# The following workflow executes a diamond workflow
#
#   A
#  / \
# B   C
#  \ /
#   D
apiVersion: argoproj.io/v1alpha1
kind: Workflow
metadata:
  generateName: dag-diamond-
spec:
  entrypoint: diamond
  templates:
  - name: diamond
    dag:
      tasks:
      - name: A
        template: echo
        arguments:
          parameters: [{name: message, value: A}]
      - name: B
        depends: "A"
        template: echo
        arguments:
          parameters: [{name: message, value: B}]
      - name: C
        depends: "A"
        template: echo
        arguments:
          parameters: [{name: message, value: C}]
      - name: D
        depends: "B && C"
        template: echo
        arguments:
          parameters: [{name: message, value: D}]

  - name: echo
    inputs:
      parameters:
      - name: message
    container:
      image: alpine:3.7
      command: [echo, "{{inputs.parameters.message}}"]
SchedulerX lets you visually orchestrate Kubernetes Jobs by using a drag-and-drop interface.
Compared to Argo, SchedulerX provides a visual workflow graph at runtime that tracks job progress, making it easy to identify bottlenecks or failures.
In the workflow instance view, each task node is color-coded by its status (for example, green for success and red for failure), allowing you to visually pinpoint the failure.
Monitoring and alerting
SchedulerX includes built-in monitoring and alerting for Pods and Jobs.
-
Supported alert channels: SMS, phone call, email, and webhook (for DingTalk, WeCom, and Lark).
-
Supported alert policies: alert on failure and alert on execution timeout.
Log service
SchedulerX automatically collects logs from Pod execution without requiring a separate log service. If a Pod fails, you can view the failure reason in the SchedulerX console for quick troubleshooting.
Task instance details include complete Pod execution logs with stack traces and failure reasons.
Monitoring dashboard
SchedulerX provides a built-in job monitoring dashboard, eliminating the need to set up Prometheus or a similar service.
The dashboard displays key metrics such as job execution counts, success and failure rates, and execution duration trends.
Mixed job deployment
SchedulerX supports both Java and Kubernetes job types for mixed deployment. Use in-process method invocation for latency-sensitive online jobs such as order processing, and run resource-intensive offline jobs such as report exports as scripts in separate Pods.