This topic describes how to configure Identity as a Service (IDaaS) authentication on your cloud-native gateway.
Prerequisites
Alibaba Cloud IDaaS is activated.
Create authentication
Log on to the MSE console.
In the left-side navigation pane, choose Cloud-native Gateway > Gateways. In the top navigation bar, select a region.
On the Gateways page, click the name of the gateway.
In the left-side navigation pane, choose Security Management > Global Authentication.
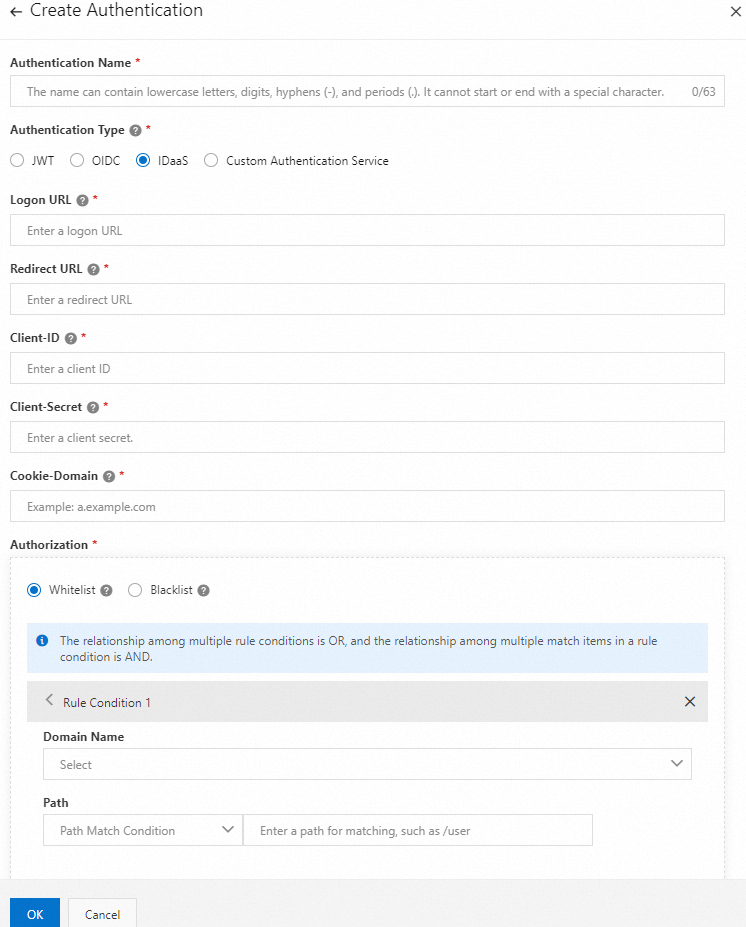
In the upper-left corner of the page that appears, click Create Authentication. In the Create Authentication panel, configure the parameters and click OK.

The following table describes the parameters.
Parameter
Description
Authentication Name
Enter a name for the authentication that you want to configure for the cloud-native gateway.
Authentication Type
Select IDaaS.
Logon URL
Enter a URL that is used to log on to the IDaaS instance.
Redirect URL
Enter a URL for redirection after IDaaS authentication is successful. The URL must be the same as the URL for redirection that you configured in the IDaaS console.
Client-ID
Enter the ID of the IDaaS OAuth2 application.
Client-Secret
Enter the secret of the IDaaS OAuth2 application.
Cookie-Domain
Enter the domain name of the cookie. After the authentication is passed, the cookie is sent to the specified domain name to maintain the user logon status. For example, if the setting
Cookie-Domain=a.example.comis used, the cookie is sent to the domain name a.example.com. If the settingCookie-Domain=.example.comis used, the cookie is sent to all subdomains of example.com.Authorization
Select Whitelist or Blacklist.
Whitelist: Only requests with the hosts and paths that you specify in the whitelist can access the cloud-native gateway without authentication.
Blacklist: Only requests with the hosts and paths that you specify in the blacklist require authentication.
Click Rule Condition and specify Request Host and Request Path.
Domain Name: the hosts that require access to the cloud-native gateway.
Path: the paths that require access to the cloud-native gateway.
View authentication details
Log on to the MSE console.
In the left-side navigation pane, choose Cloud-native Gateway > Gateways. In the top navigation bar, select a region.
On the Gateways page, click the name of the gateway.
In the left-side navigation pane, choose Security Management > Global Authentication.
On the Authentication page, click the name of the authentication rule that you created. You can also find the authentication rule, and click Details in the Actions column. On the page that appears, view the information in the Authentication configuration and Authorization Info sections.
To create an authorization rule, click Create Authorization Info in the Authorization Info section. In the Create Authorization Info dialog box, configure the Request Host and Request Path parameters.
Verify the result
Go to the Authentication page. If the authentication configuration is created, it is displayed on this page.
What to do next
You can perform the following operations on the authentication rules of a cloud-native gateway:
Enable an authentication rule: On the Global Authentication page, find the authentication rule that you want to manage and click Enable in the Actions column.
Disable an authentication rule: On the Global Authentication page, find the authentication rule that you want to manage and click Disable in the Actions column.
Modify an authentication rule: On the Global Authentication page, find the authentication rule that you want to manage and click Edit in the Actions column.
Delete an authentication rule: On the Global Authentication page, find the authentication rule that you want to manage and click Delete in the Actions column.
You can delete an authentication rule only if the authentication rule is disabled.