A standard canary release routes synchronous HTTP and RPC traffic to new application versions but leaves asynchronous message queues untouched. Messages produced by a canary instance can still reach baseline consumers, breaking traffic isolation across the call chain. Microservices Engine (MSE) solves this by extending canary releases to RocketMQ message flows. Tagged traffic stays within the canary environment end-to-end -- no changes to business code required.
How it works
MSE isolates message traffic through two mechanisms:
Consumer group splitting: MSE appends the environment tag to each consumer group name. For example, a consumer group named
group1becomesgroup1_grayfor instances tagged with thegrayenvironment. Each environment gets its own consumer group, so canary consumers process only canary messages.SQL92 message filtering: MSE injects SQL92 filter expressions into message consumers. Each environment pulls only messages that carry its own environment label. For open-source Apache RocketMQ, this requires
enablePropertyFilter=truein the broker configuration. If SQL92 filtering is not available, MSE can fall back to client-side filtering withFilterMessageHook, though this increases load on both producers and consumers and is not recommended for production.
Combined with tag-based routing for synchronous calls and tag propagation across the call chain, these mechanisms create a fully isolated canary environment that spans HTTP, RPC, and message queue traffic.
Demo architecture
The demo uses a four-service application deployed on Container Service for Kubernetes (ACK). The call chain combines Spring Cloud, Dubbo, and RocketMQ to represent a typical microservices architecture:
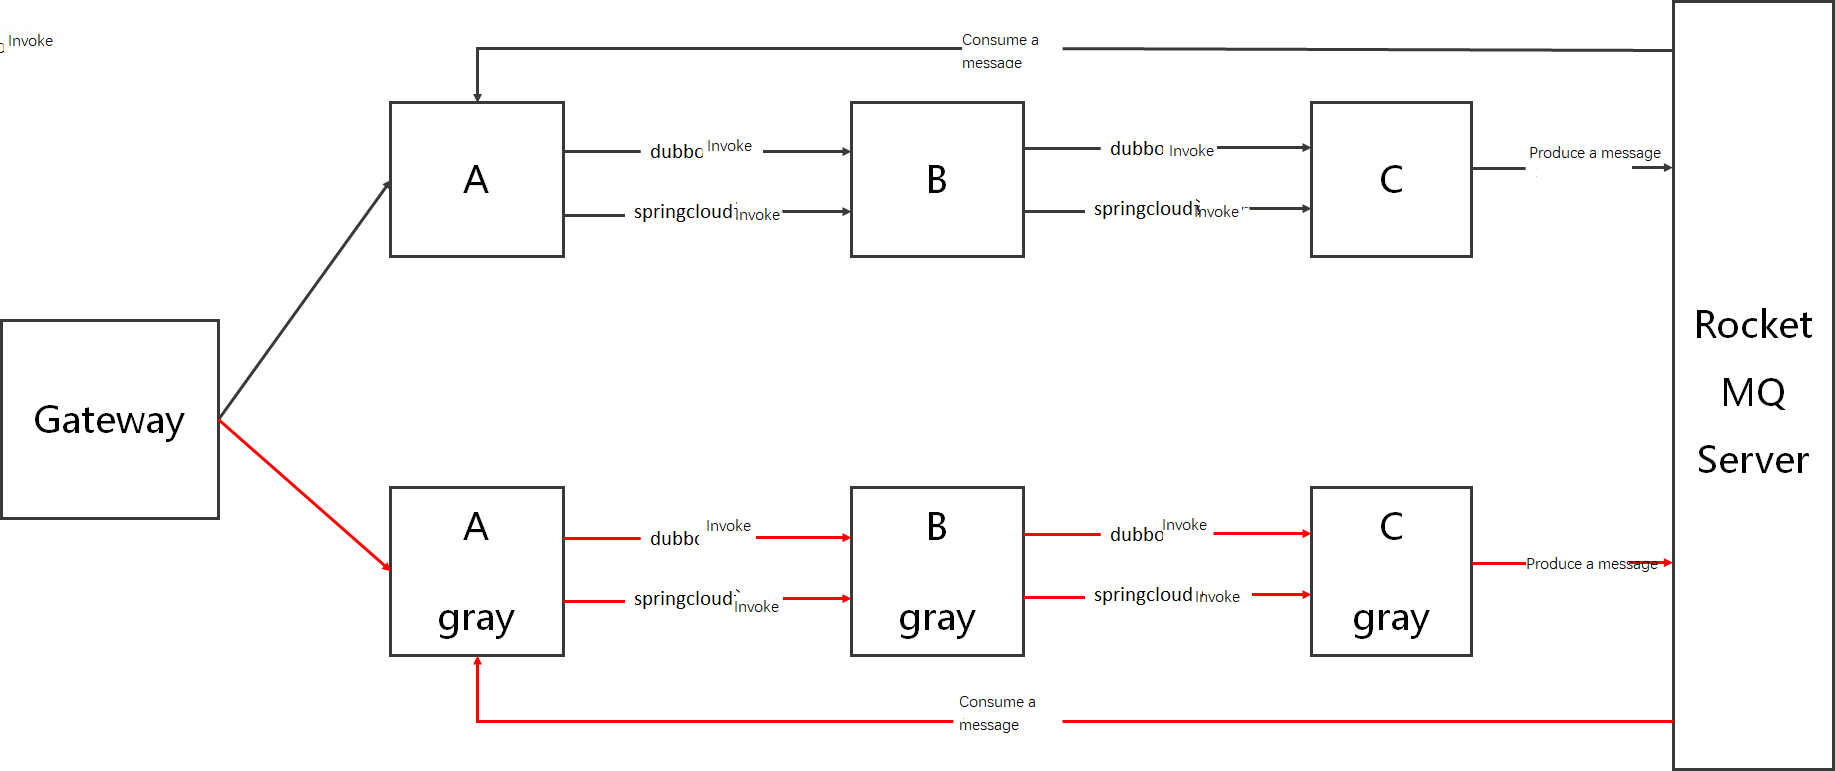
Synchronous path: A request to /A/dubbo enters through spring-cloud-zuul (gateway) and is forwarded to spring-cloud-a. spring-cloud-a calls spring-cloud-b over Dubbo, and spring-cloud-b calls spring-cloud-c.
Asynchronous path: After handling the request, spring-cloud-c produces a RocketMQ message. spring-cloud-a consumes the message and calls spring-cloud-b over Spring Cloud, which calls spring-cloud-c.
A call to /A/dubbo returns the complete synchronous path:
A[10.25.xx.xx] -> B[10.25.xx.xx] -> C[10.25.xx.xx]spring-cloud-a logs the asynchronous path after consuming the message:
2021-12-28 10:58:50.301  INFO 1 --- [essageThread_15] c.a.mse.demo.service.MqConsumer
          : topic:TEST_MQ,producer:C[10.25.xx.xx],invoke result:A[10.25.xx.xx] -> B[10.25.xx.xx] -> C[10.25.xx.xx]
Get the demo source code from the GitHub repository.
Prerequisites
Before you begin, make sure that you have:
Step 1: Connect applications to MSE Microservices Governance
Enable MSE Microservices Governance for your ACK cluster applications. Choose one of the following methods. For detailed instructions, see Enable Microservices Governance for Java microservice applications in an ACK or ACS cluster.
Option A: Enable by namespace
This method enables governance for all applications in a given ACK namespace.
Log on to the MSE console and select a region in the top navigation bar.
In the left-side navigation pane, choose Microservices Governance > Application Governance.
On the Application list page, click ACK Application Access.
In the ACK Application Access dialog box, configure the following parameters and click OK.
- To view the ack-onepilot component details, go to the ACK console, click the cluster name, and choose Operations > Add-ons. - After ack-onepilot is installed, the agent is automatically injected. Application startup time may increase by up to 10 seconds. - If the cluster is not in one of the following regions, it must have internet access and be able to connect to
acm.aliyun.com:8080: China (Qingdao), China (Hangzhou), China (Beijing), China (Shanghai), China East 2 Finance, China (Shenzhen), China (Hong Kong), Singapore, Germany (Frankfurt), Australia (Sydney), US (Silicon Valley), and US (Virginia).Parameter Description Cluster type Select ACK Cluster, ACK Serverless Cluster, or ACS Cluster. If ACK lacks the permissions to call MSE, click the authorization link to grant them. Cluster Name/ID Select the target cluster. Search by cluster name or ID. ack-onepilot Shows the status of the ack-onepilot component. If not installed, click Click Install. See ack-onepilot and Install and update the Microservices Governance component. Access Type Select Namespace Access. ACK Cluster Namespace Select the namespace to enable. Microservices Governance Namespace Select the MSE governance namespace. 
Option B: Enable for a single application
This method enables governance for one specific application by adding labels to its Deployment spec.
Log on to the MSE console and select a region in the top navigation bar.
In the left-side navigation pane, choose Microservices Governance > Application Governance.
On the Application list page, click ACK Application Access.
In the ACK Application Access dialog box, configure the following parameters and click OK.
Parameter Description Cluster type Select ACK Cluster, ACK Serverless Cluster, or ACS Cluster. If ACK lacks the permissions to call MSE, click the authorization link to grant them. Cluster Name/ID Select the target cluster. ack-onepilot Shows the status of the ack-onepilot component. If not installed, click Click Install. Access Type Select Single Application Access. 
Add the following labels to your Deployment YAML in the ACK console (Workloads > Deployments > click the application name > View in YAML):
   spec:
     template:
       metadata:
         labels:
           # Set to "on" to enable Microservices Governance. Must be enclosed in double quotation marks.
           msePilotAutoEnable: "on"
           # The MSE governance namespace. If it does not exist, it is created automatically.
           mseNamespace: default
           # The application name for MSE governance. Must be enclosed in double quotation marks.
           msePilotCreateAppName: "your-deployment-name"
Step 2: Deploy the demo applications
Deploy the Nacos server, RocketMQ server, and four business applications: spring-cloud-zuul, spring-cloud-a, spring-cloud-b, and spring-cloud-c.
Log on to the ACK console. In the left-side navigation pane, click Clusters.
On the Clusters page, click the name of your cluster.
In the left-side navigation pane, choose Workloads > Deployments.
Select a Namespace and click Create From YAML. Use the following YAML to deploy all services:
Verify the deployment: Expected output:
kubectl get svc,deployNAME TYPE CLUSTER-IP EXTERNAL-IP PORT(S) AGE service/kubernetes ClusterIP 192.168.xx.xx <none> 4xx/TCP 7d service/mqnamesrv ClusterIP 192.168.xx.xx <none> 98xx/TCP 47h service/nacos-server ClusterIP 192.168.xx.xx <none> 88xx/TCP 47h service/zuul-slb LoadBalancer 192.168.xx.xx 123.56.xx.xx 80:302xxx/TCP 47h NAME READY UP-TO-DATE AVAILABLE AGE deployment.apps/nacos-server 1/1 1 1 4m deployment.apps/rockectmq-broker 1/1 1 1 4m deployment.apps/rocketmq-name-server 1/1 1 1 5m deployment.apps/spring-cloud-a 1/1 1 1 5m deployment.apps/spring-cloud-b 1/1 1 1 5m deployment.apps/spring-cloud-c 1/1 1 1 5m deployment.apps/spring-cloud-zuul 1/1 1 1 5m
Step 3: Enable message-based canary release
Enable message-based canary release for both the message producer (spring-cloud-c) and the message consumer (spring-cloud-a). The feature takes effect only when enabled on both sides.
Before you start
Review the following requirements and limitations:
| Requirement | Details |
|---|---|
| Redeployment | After enabling or disabling message-based canary release, redeploy the application in the ACK console for the change to take effect. |
| Supported message types | Only RocketMQ messages (open-source and Alibaba Cloud commercial versions). |
| Open-source RocketMQ | Server and client must both be version 4.5.0 or later. |
| ApsaraMQ for RocketMQ 4.x | Enterprise Edition required for SQL92 filtering. This restriction does not apply to client-side filtering or ApsaraMQ for RocketMQ 5.x. |
| ONS client | Version 1.8.0.Final or later. |
| Consumer group name | MSE appends the environment tag to the consumer group name (for example, group1 becomes group1_gray). If you use Alibaba Cloud ApsaraMQ for RocketMQ, create the new consumer group in advance. |
| SQL92 filtering | Enabled by default. For open-source Apache RocketMQ, add enablePropertyFilter=true to broker.conf. |
| Client-side filtering | If SQL92 filtering is unavailable, use FilterMessageHook instead. This requires enabling message-based canary release in all applications and selecting client-side filtering. Because every environment processes all messages and filters locally, this approach increases load. Avoid it in production. |
Enable the feature
Log on to the MSE console and select a region in the top navigation bar.
In the left-side navigation pane, choose Microservices Governance > Application Governance.
On the Application list page, click the resource card of the application (spring-cloud-c or spring-cloud-a).
In the left-side navigation pane, click Traffic management.
On the Message Grayscale tab, turn on the Enable Message Grayscale switch and click OK.

Log on to the ACK console and redeploy the application for the configuration to take effect.
Repeat steps 3-6 for the other application (spring-cloud-a or spring-cloud-c).
Step 4: Deploy canary versions
Deploy canary versions of three applications: spring-cloud-a-gray, spring-cloud-b-gray, and spring-cloud-c-gray. Each canary Deployment uses the same container image as the baseline but includes the alicloud.service.tag: gray label to identify it as a canary instance. The msePilotCreateAppName label uses the baseline application name so that MSE treats the canary and baseline as versions of the same application.
Log on to the ACK console. In the left-side navigation pane, click Clusters.
On the Clusters page, click the name of your cluster.
In the left-side navigation pane, choose Workloads > Deployments.
Select a Namespace and click Create From YAML. Use the following YAML to deploy the canary versions:
Step 5: Configure traffic routing and verify the result
Create a tag-based routing rule
Log on to the MSE console and select a region in the top navigation bar.
In the left-side navigation pane, choose Microservices Governance > Application Governance.
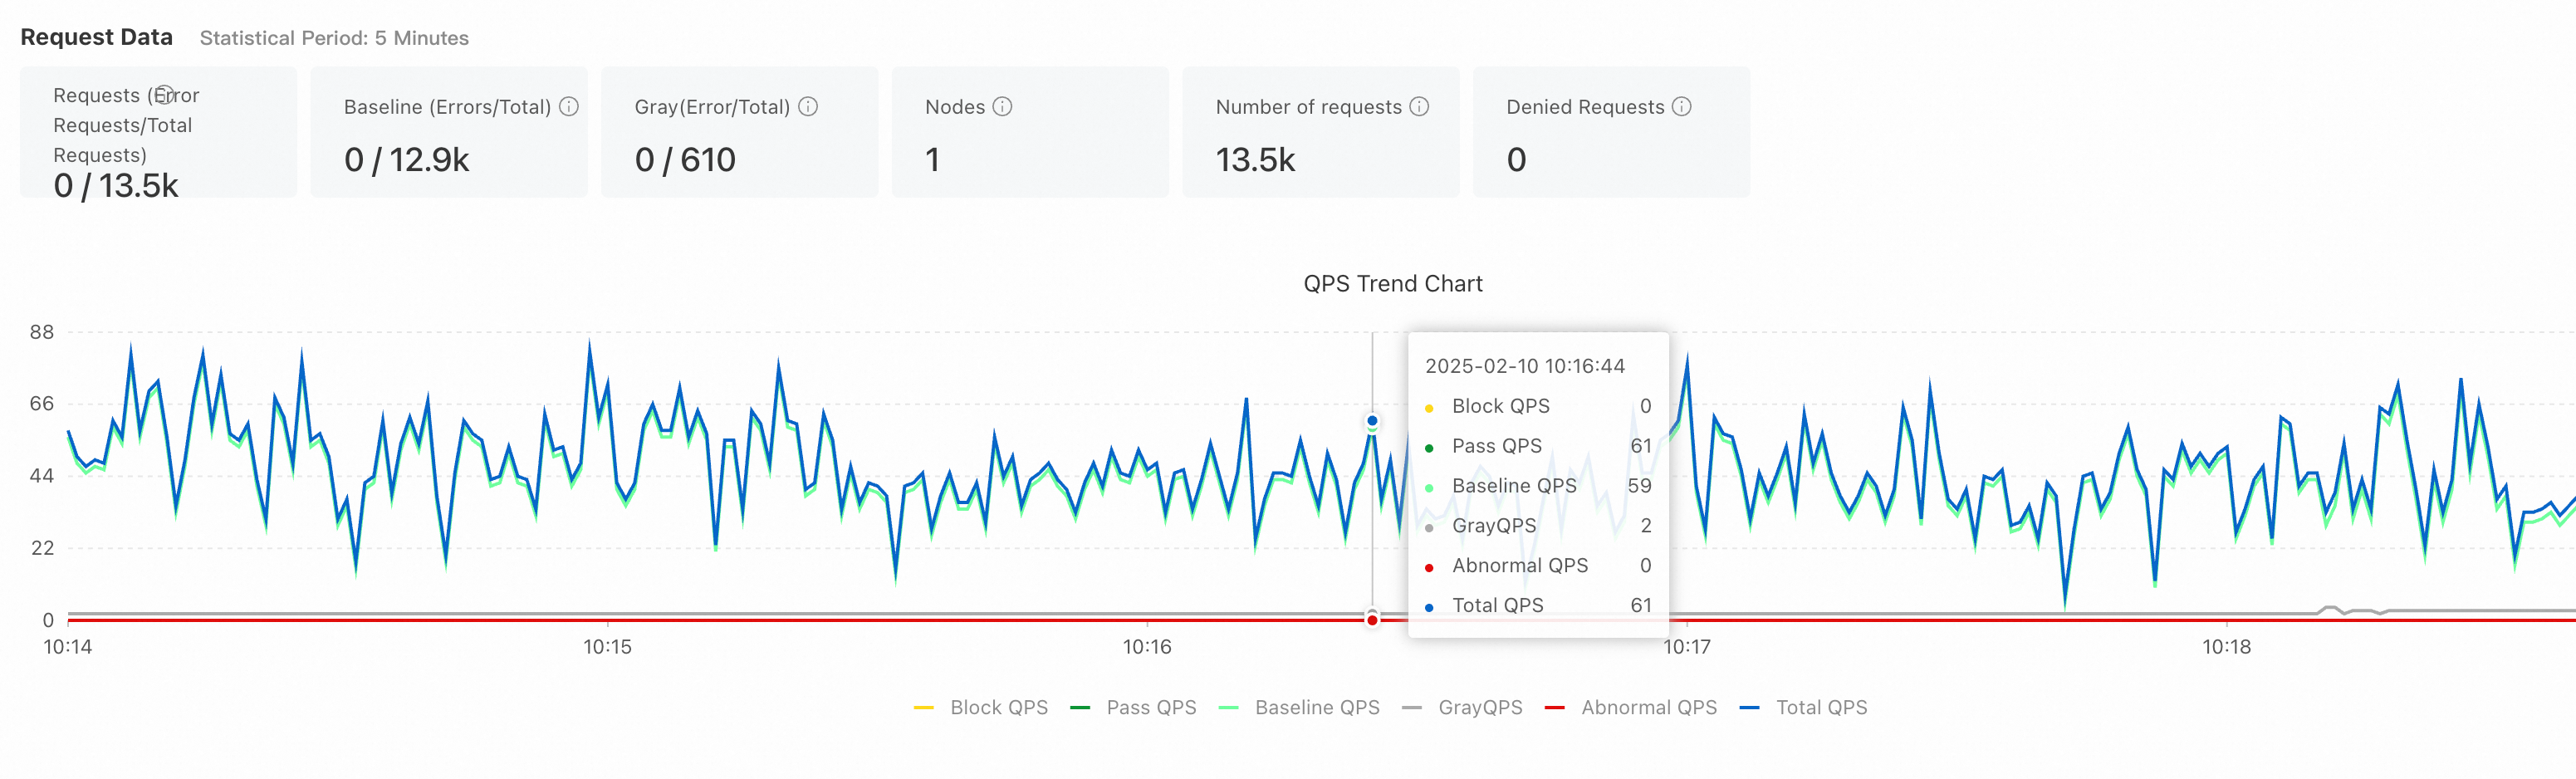
Click the resource card for the spring-cloud-a application. On the Application Overview page, the QPS Trend Graph confirms that all traffic goes to the baseline version.
In the left-side navigation pane, click Traffic Governance, and then click the Tag-based Routing tab.
In the Traffic Rule column for the
graytag, click Add.
In the Create Label Route panel, define a traffic rule and click OK. This example routes requests where
name=xiaomingto the canary environment. For details on available conditions and operators, see Configure tag-based routing.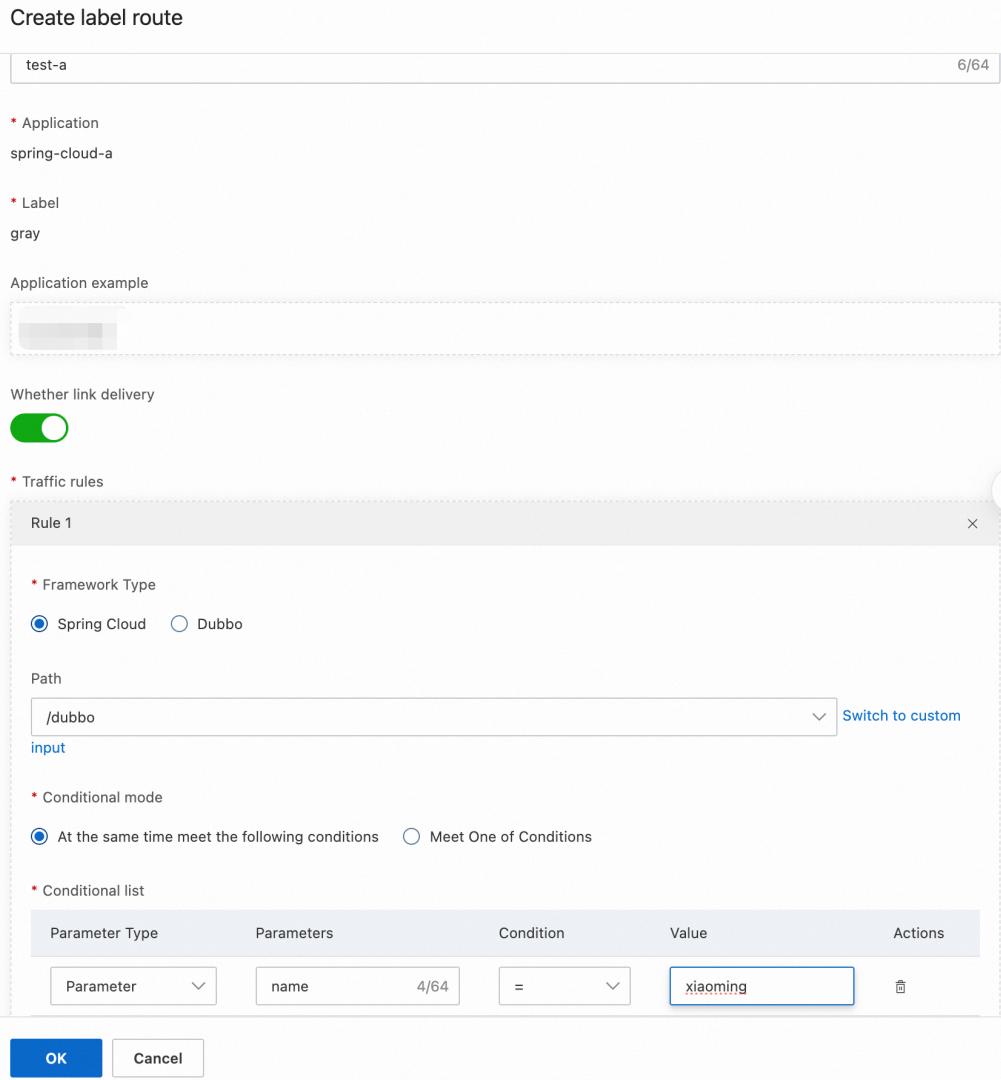
Enable tag propagation
Tag propagation passes the canary tag through the entire call chain. After you enable tag propagation, traffic that matches the routing rule is passed through end-to-end, and you do not need to configure the rule repeatedly.
On the Tag-based Routing tab, click the name of the routing rule for the
graytag.In the Rule Details panel, click Edit.
In the Modify Tag-based Routing Rule panel, enable the Tag Propagation switch and click OK.
Verify the end-to-end canary release
Log on to the ACK console. In the left-side navigation pane, click Clusters.
Click the name of your cluster. In the left-side navigation pane, choose Network > Services.
Click the zuul-slb service. Under Basic Information, click the address next to External IP Address (External IP).
On the service call page, enter
/A/dubbo?name=xiaomingand click Start Call.
The response confirms end-to-end routing through the canary environment:

The traffic data for spring-cloud-b confirms that canary traffic is isolated from baseline traffic:
Step 6: Control baseline message consumption
By default, baseline consumers receive messages from all environments, including canary. To prevent baseline instances from consuming canary messages, configure the Tags To Be Ignored By The Baseline Environment parameter.
Log on to the MSE console.
In the left-side navigation pane, choose Microservices Governance > Application Governance. Click the resource card for the spring-cloud-a application.
In the left-side navigation pane, click Traffic Governance, and then click the Message Grayscale tab.
Click the Edit button next to Tags To Be Ignored By The Baseline Environment. Select
grayin the input box and click OK.
After this change, messages with the gray environment tag are consumed only by spring-cloud-a-gray, not by the baseline spring-cloud-a instance. The setting takes effect immediately -- no application restart is required.
Verify
Check the logs for the spring-cloud-a application in the ACK console. Before the change, the baseline consumes messages from both environments. After setting Tags To Be Ignored By The Baseline Environment to gray, the baseline consumes only baseline-produced messages.

What's next
Configure tag-based routing: Set up advanced routing conditions and operators beyond simple parameter matching.
Enable Microservices Governance for Java microservice applications in an ACK or ACS cluster: Explore additional methods for connecting applications to MSE governance.