A standard canary release covers only one service at a time. When a canary version of an upstream service calls a downstream service, the request falls back to the downstream base version, which may not be compatible. End-to-end canary release solves this by routing tagged traffic through canary versions of every service in the call chain, even when some services have no canary deployment. Microservices Engine (MSE) propagates the canary context across service-to-service calls automatically. Combined with Application Load Balancer (ALB) Ingress for traffic splitting at the gateway, this delivers end-to-end canary release without changes to your business code.
How it works
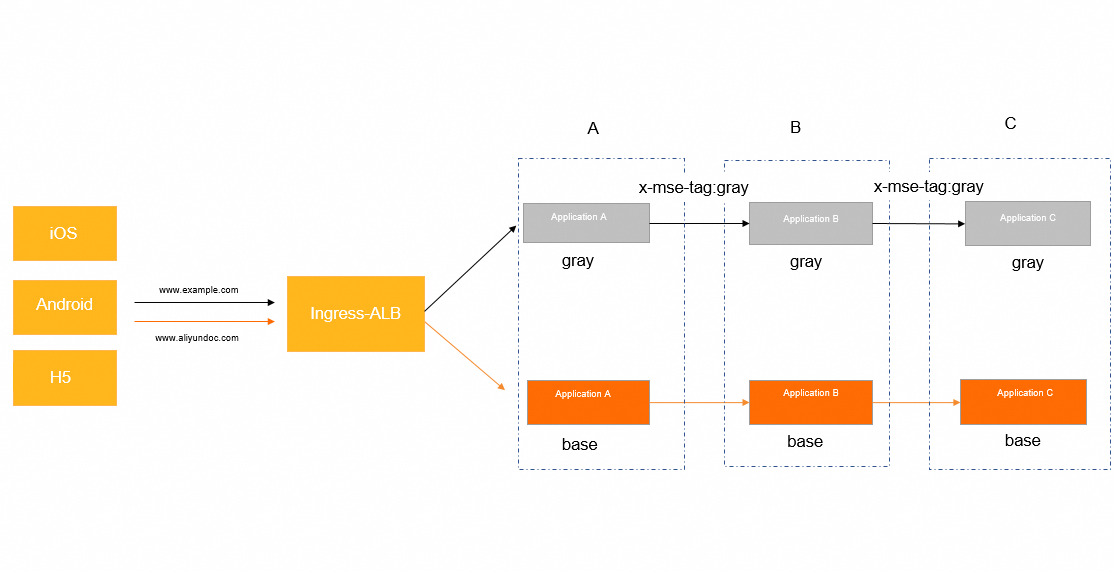
ALB Ingress splits incoming traffic by domain name and sends canary traffic to the canary version of the first service. MSE then propagates the canary tag through each subsequent call, so every downstream service routes the request to its own canary version.
Call flow in this example:
Client request --> ALB Ingress gateway --> Application A --> Application B --> Application C-
Requests to
www.aliyundoc.comgo to the base environment (stable versions of all applications). -
Requests to
www.example.comgo to the canary environment (canary versions of all applications).

MSE organizes end-to-end canary release around two concepts:
-
Lane group -- a set of applications that participate in a call chain.
-
Lane -- a traffic isolation environment (such as "canary") within a lane group. Each lane is identified by a tag, for example
gray.
Sample scenario
The application architecture in this example:
-
ALB Ingress gateway -- splits traffic at the ingress layer
-
Three Spring Cloud applications -- a transaction center (Application A), a commodity center (Application B), and an inventory center (Application C)
-
Nacos -- handles service discovery among the applications
-
Access methods -- client-based or HTML-based
Application A can be a Spring Boot application. The call order is: ALB Ingress gateway > Application A > Application B > Application C.
Domain-based routing separates the base environment from the canary environment:
| Domain | Environment |
|---|---|
www.aliyundoc.com |
Base (stable versions) |
www.example.com |
Canary (new versions) |
Usage notes
-
If the cluster uses the Flannel network plug-in, the backend services of the ALB Ingress gateway must be of the NodePort or LoadBalancer type.
-
The vSwitch of the ALB Ingress gateway must be in the same Virtual Private Cloud (VPC) as the Container Service for Kubernetes (ACK) cluster. For supported regions, see Supported regions and zones.
Prerequisites
Before you begin, make sure that you have:
-
An ACK cluster running Kubernetes V1.18 or later. See Create an ACK managed cluster or Create an ACK dedicated cluster (discontinued)
-
kubectl connected to the ACK cluster. See Get a cluster kubeconfig and connect using kubectl
-
The ALB Ingress Controller component installed in the cluster. Install it during cluster creation by selecting ALB Ingress for Ingress in the Component Configuration step, or install it later from the Add-ons page. See Manage components
-
Microservices Governance Professional Edition activated on the Microservice Governance page. See Billing overview of Microservices Governance
-
MSE Microservices Governance enabled for applications in the ACK cluster. See Enable Microservices Governance for Java microservice applications in an ACK or ACS cluster
Enable MSE Microservices Governance
Enable Microservices Governance at the namespace level or for a single application.
Option 1: Enable by namespace
-
Log on to the MSE console and select a region in the top navigation bar.
-
In the left-side navigation pane, choose Microservices Governance > Application Governance.
-
On the Application list page, click ACK Application Access.
-
In the ACK Application Access dialog box, set the following parameters and click OK.

| Parameter | Description |
|---|---|
| Cluster type | Select ACK Cluster, ACK Serverless Cluster, or ACS Cluster. If you have not authorized ACK to call MSE, click Please Authorize. |
| Cluster Name/ID | Select the target cluster. Search by keyword if needed. |
| ack-onepilot | Shows the installation status. If not installed, the system installs it automatically when you select the cluster. If you use a Resource Access Management (RAM) user without the required permissions, go to the ACK console, open the cluster details, click Add-ons, find ack-onepilot, and click Install. See ack-onepilot component and Install and upgrade the MSE microservice governance component. |
| Access Type | Select Namespace Access. |
| Cluster Namespace | Select the target namespace. |
| Microservices Governance Namespace | Select a governance namespace. |
After ack-onepilot is installed, it injects an agent automatically, which may increase application startup time by up to 10 seconds.
If the cluster is not in one of these regions -- Qingdao, Hangzhou, Beijing, Shanghai, Shanghai-Finance Cloud, Shenzhen, Hong Kong (China), Singapore, Frankfurt, Sydney, Silicon Valley, or Virginia -- make sure the cluster can access the Internet and connect to acm.aliyun.com:8080.
Option 2: Enable for a single application
-
Log on to the MSE console and select a region in the top navigation bar.
-
In the left-side navigation pane, choose Microservices Governance > Application Governance.
-
On the Application list page, click ACK Application Access.
-
In the ACK Application Access dialog box, set the following parameters and click OK.

| Parameter | Description |
|---|---|
| Cluster type | Select ACK Cluster, ACK Serverless Cluster, or ACS Cluster. If you have not authorized ACK to call MSE, click Please Authorize. |
| Cluster Name/ID | Select the target cluster. Search by keyword if needed. |
| ack-onepilot | Shows the installation status. See Option 1 above for details. |
| Access Type | Select Single Application Access. |
| Access Procedure | Follow these steps: 1. Go to Workloads > Deployments in the ACK console and switch to the application namespace. 2. Find the target application and click View In YAML. 3. Add the following labels and click Update. |
spec:
  template:
    metadata:
      labels:
        # Set to "on" to enable MSE governance. The value must be enclosed in double quotation marks.
        msePilotAutoEnable: "on"
        # Specify the governance namespace. If the namespace does not exist, it is created automatically.
        mseNamespace: default
        # Specify the application name for MSE. The name must be enclosed in double quotation marks.
        msePilotCreateAppName: "your-deployment-name"
Step 1: Deploy the demo applications
Deploy base and canary versions of Applications A, B, and C, plus a Nacos server for service discovery. Each application has two deployments: a base version and a canary version tagged with alicloud.service.tag: gray.
-
Log on to the ACK console. In the left navigation pane, click Clusters.
-
On the Clusters page, find your cluster and click its name. In the left navigation pane, choose Workloads > Deployments.
-
Select a namespace and click Create from YAML. Copy the following YAML content and click Create.
# Base version of Application A (transaction center)
---
apiVersion: apps/v1
kind: Deployment
metadata:
  name: spring-cloud-a
spec:
  replicas: 2
  selector:
    matchLabels:
      app: spring-cloud-a
  template:
    metadata:
      labels:
        msePilotCreateAppName: spring-cloud-a
        app: spring-cloud-a
    spec:
      containers:
      - env:
        - name: JAVA_HOME
          value: /usr/lib/jvm/java-1.8-openjdk/jre
        image: registry.cn-hangzhou.aliyuncs.com/mse-governance-demo/spring-cloud-a:3.0.1
        imagePullPolicy: Always
        name: spring-cloud-a
        ports:
        - containerPort: 20001
        livenessProbe:
          tcpSocket:
            port: 20001
          initialDelaySeconds: 10
          periodSeconds: 30

# Canary version of Application A
# "alicloud.service.tag: gray" identifies this deployment as a canary version.
# MSE uses this label to route canary-tagged traffic to these pods.
---
apiVersion: apps/v1
kind: Deployment
metadata:
  name: spring-cloud-a-new
spec:
  replicas: 2
  selector:
    matchLabels:
      app: spring-cloud-a-new
  strategy:
  template:
    metadata:
      labels:
        # This label tells MSE that the pod belongs to the "gray" (canary) lane.
        alicloud.service.tag: gray
        msePilotCreateAppName: spring-cloud-a
        app: spring-cloud-a-new
    spec:
      containers:
      - env:
        - name: JAVA_HOME
          value: /usr/lib/jvm/java-1.8-openjdk/jre
        # Enables canary context propagation across downstream calls.
        - name: profiler.micro.service.tag.trace.enable
          value: "true"
        image: registry.cn-hangzhou.aliyuncs.com/mse-governance-demo/spring-cloud-a:3.0.1
        imagePullPolicy: Always
        name: spring-cloud-a-new
        ports:
        - containerPort: 20001
        livenessProbe:
          tcpSocket:
            port: 20001
          initialDelaySeconds: 10
          periodSeconds: 30

# Base version of Application B (commodity center)
---
apiVersion: apps/v1
kind: Deployment
metadata:
  name: spring-cloud-b
spec:
  replicas: 2
  selector:
    matchLabels:
      app: spring-cloud-b
  strategy:
  template:
    metadata:
      labels:
        msePilotCreateAppName: spring-cloud-b
        app: spring-cloud-b
    spec:
      containers:
      - env:
        - name: JAVA_HOME
          value: /usr/lib/jvm/java-1.8-openjdk/jre
        image: registry.cn-hangzhou.aliyuncs.com/mse-governance-demo/spring-cloud-b:3.0.1
        imagePullPolicy: Always
        name: spring-cloud-b
        ports:
        - containerPort: 8080
        livenessProbe:
          tcpSocket:
            port: 20002
          initialDelaySeconds: 10
          periodSeconds: 30

# Canary version of Application B
---
apiVersion: apps/v1
kind: Deployment
metadata:
  name: spring-cloud-b-new
spec:
  replicas: 2
  selector:
    matchLabels:
      app: spring-cloud-b-new
  template:
    metadata:
      labels:
        alicloud.service.tag: gray
        msePilotCreateAppName: spring-cloud-b
        app: spring-cloud-b-new
    spec:
      containers:
      - env:
        - name: JAVA_HOME
          value: /usr/lib/jvm/java-1.8-openjdk/jre
        image: registry.cn-hangzhou.aliyuncs.com/mse-governance-demo/spring-cloud-b:3.0.1
        imagePullPolicy: Always
        name: spring-cloud-b-new
        ports:
        - containerPort: 8080
        livenessProbe:
          tcpSocket:
            port: 20002
          initialDelaySeconds: 10
          periodSeconds: 30

# Base version of Application C (inventory center)
---
apiVersion: apps/v1
kind: Deployment
metadata:
  name: spring-cloud-c
spec:
  replicas: 2
  selector:
    matchLabels:
      app: spring-cloud-c
  template:
    metadata:
      labels:
        msePilotCreateAppName: spring-cloud-c
        app: spring-cloud-c
    spec:
      containers:
      - env:
        - name: JAVA_HOME
          value: /usr/lib/jvm/java-1.8-openjdk/jre
        image: registry.cn-hangzhou.aliyuncs.com/mse-governance-demo/spring-cloud-c:3.0.1
        imagePullPolicy: Always
        name: spring-cloud-c
        ports:
        - containerPort: 8080
        livenessProbe:
          tcpSocket:
            port: 20003
          initialDelaySeconds: 10
          periodSeconds: 30

# Canary version of Application C
---
apiVersion: apps/v1
kind: Deployment
metadata:
  name: spring-cloud-c-new
spec:
  replicas: 2
  selector:
    matchLabels:
      app: spring-cloud-c-new
  template:
    metadata:
      labels:
        alicloud.service.tag: gray
        msePilotCreateAppName: spring-cloud-c
        app: spring-cloud-c-new
    spec:
      containers:
      - env:
        - name: JAVA_HOME
          value: /usr/lib/jvm/java-1.8-openjdk/jre
        image: registry.cn-hangzhou.aliyuncs.com/mse-governance-demo/spring-cloud-c:3.0.1
        imagePullPolicy: IfNotPresent
        name: spring-cloud-c-new
        ports:
        - containerPort: 8080
        livenessProbe:
          tcpSocket:
            port: 20003
          initialDelaySeconds: 10
          periodSeconds: 30

# Nacos server for service discovery
---
apiVersion: apps/v1
kind: Deployment
metadata:
  name: nacos-server
spec:
  replicas: 1
  selector:
    matchLabels:
      app: nacos-server
  template:
    metadata:
      labels:
        app: nacos-server
    spec:
      containers:
      - env:
        - name: MODE
          value: standalone
        image: registry.cn-hangzhou.aliyuncs.com/mse-governance-demo/nacos-server:v2.1.2
        imagePullPolicy: Always
        name: nacos-server
      dnsPolicy: ClusterFirst
      restartPolicy: Always

# Nacos server service
---
apiVersion: v1
kind: Service
metadata:
  name: nacos-server
spec:
  ports:
  - port: 8848
    protocol: TCP
    targetPort: 8848
  selector:
    app: nacos-server
  type: ClusterIP
Configure network settings
Create two Kubernetes Services for Application A: one for the base version and one for the canary version. ALB Ingress routes traffic to these Services based on domain names.
# Service for the base version of Application A
apiVersion: v1
kind: Service
metadata:
  name: spring-cloud-a-base
spec:
  ports:
    - name: http
      nodePort: 32605
      port: 20001
      protocol: TCP
      targetPort: 20001
  selector:
    app: spring-cloud-a
  sessionAffinity: None
  type: NodePort

---
# Service for the canary version of Application A
apiVersion: v1
kind: Service
metadata:
  name: spring-cloud-a-gray
spec:
  ports:
    - name: http
      nodePort: 31622
      port: 20001
      protocol: TCP
      targetPort: 20001
  selector:
    app: spring-cloud-a-new
  sessionAffinity: None
  type: NodePort
Step 2: Configure ALB Ingress routing
-
Create an AlbConfig object. See Create an AlbConfig object.
ImportantThe vSwitch of the ALB Ingress gateway must be in the same VPC as the cluster. Otherwise, your business is adversely affected.
-
Create an Ingress resource. Save the following YAML as
gray-ingress.yaml.-
For clusters running Kubernetes earlier than V1.19:
apiVersion: networking.k8s.io/v1beta1 kind: Ingress metadata: name: demo namespace: default spec: ingressClassName: alb rules: - host: www.aliyundoc.com http: paths: - path: /a backend: serviceName: spring-clud-a-base servicePort: 20001 - host: www.example.com http: paths: - backend: serviceName: spring-cloud-a-gray servicePort: 20001 path: /a pathType: ImplementationSpecific -
For clusters running Kubernetes V1.19 or later:
apiVersion: networking.k8s.io/v1
kind: Ingress
metadata:
  name: cafe-ingress
spec:
  ingressClassName: alb
  rules:
   - host: www.aliyundoc.com
     http:
      paths:
      - path: /a
        pathType: ImplementationSpecific
        backend:
          service:
            name: spring-clud-a-base
            port:
              number: 20001
   - host: www.example.com
     http:
      paths:
      - path: /a
        pathType: ImplementationSpecific
        backend:
          service:
            name: spring-clud-a-base-gray
            port:
              number: 20001
-
-
Apply the Ingress resource:
kubectl apply -f gray-ingress.yaml

If the ADDRESS field is empty in the output, check the events on the Ingress detail page and revisit the prerequisites to troubleshoot.
Step 3: Create a lane group and lane in the MSE console
-
Log on to the MSE console and select a region in the top navigation bar.
-
In the left-side navigation pane, choose Microservices Governance > Full link Grayscale.
-
Click Create lane groups and lanes.. If a lane group already exists, click + to Create Lane Group.
-
In the Create Lane Group panel, add the three applications --
spring-cloud-a,spring-cloud-b, andspring-cloud-c-- and click OK. -
In the lower part of the Full link Grayscale page, click Create First Split Lane. In the Create Lane panel, select the tag gray and click OK.
Verify the result
Send test requests to confirm that traffic flows correctly through the entire call chain.
Verify base environment routing:
curl -H"Host:aliyundoc.base.com" http://<alb-endpoint>/aExpected output:
A[172.18.XX.XX] -> B[172.18.XX.XX] -> C[172.18.XX.XX]%No application name has a "gray" suffix, which confirms that all three services handled the request using their base versions.
Verify canary environment routing:
curl -H"Host:www.example.com" http://<alb-endpoint>/aExpected output:
Agray[172.18.XX.XX] -> Bgray[172.18.XX.XX] -> Cgray[172.18.XX.XX]%The "gray" suffix on each application name confirms that MSE propagated the canary context through the entire call chain -- from Application A to B to C. This proves that domain-based routing at the ALB layer and lane-based routing at the MSE layer are both working correctly.
Replace <alb-endpoint> with the actual ALB Ingress gateway endpoint (for example, alb-828vagckg5omzfy49n.cn-beijing.alb.aliyuncs.com). Find this endpoint in the output of kubectl get ingress.