Build and integrate Java/Golang/Python applications from scratch
Applications that use a self-managed task scheduling system based on the open source XXL-JOB may encounter challenges such as complex task configuration, low execution efficiency, and difficult monitoring and management. Alibaba Cloud provides an open source solution that supports scheduled task scheduling and task sharding, helping you quickly connect self-managed scheduled tasks to a task scheduling platform.
Prerequisites
-
Add the required RAM permissions for XXL-JOB to your RAM user. For more information, see Authorize XXL-JOB in SchedulerX.
-
Create an XXL-JOB instance. For more information, see Create an instance.
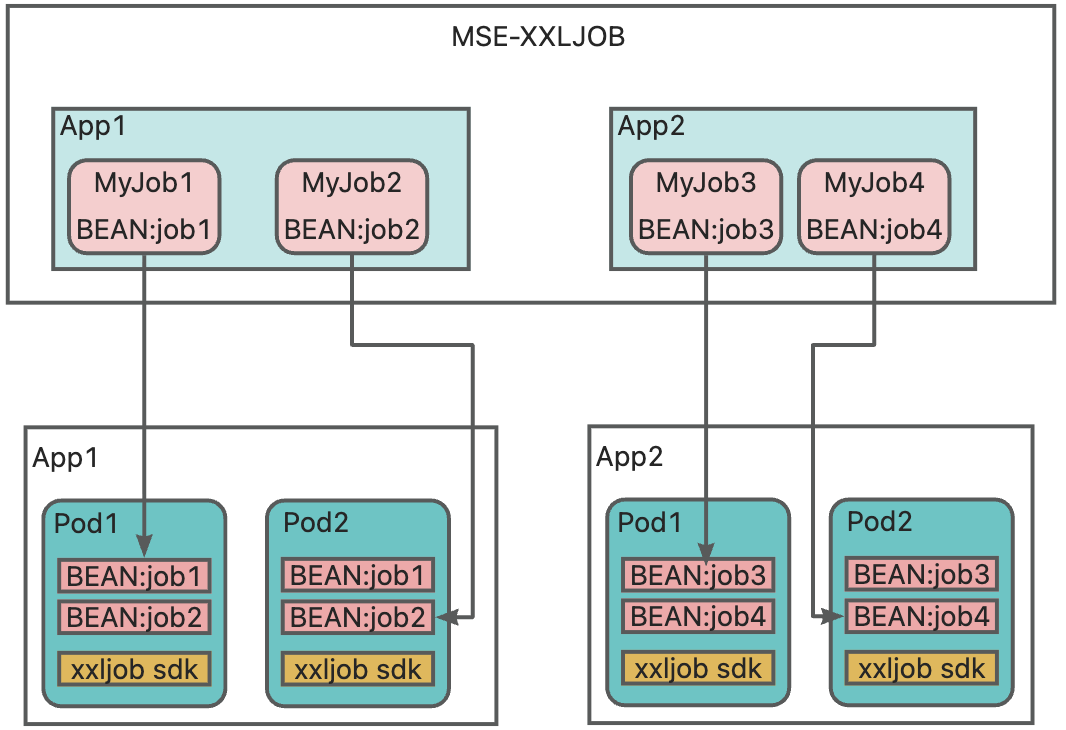
Solution overview
This solution describes how to use the SDK to connect Java, Go, or Python applications to MSE-XXLJOB and schedule and execute scheduled tasks.
Implement your scheduled task logic in code and expose it as a Bean-labeled task component. In the console, configure the Bean name to trigger the corresponding task logic.
This solution includes the following steps:
-
Create an application: Manage scheduled tasks centrally to simplify viewing, configuration, and scheduling, improving operational efficiency.
-
Develop and deploy the application: Write scheduled task code, build a Docker image, and upload it to an Alibaba Cloud image repository to enable containerized management and deployment.
-
Test and verify: Confirm that the connected application can be automatically scheduled and managed on the XXL-JOB platform, and that tasks execute accurately and on time.
Step 1: Create an application
-
Log on to the MSE XXL-JOB console and select a region from the top menu bar.
-
Click the target instance to go to its details page. In the navigation pane on the left, select and click Create Application. Enter an AppName and a Name, use the system-generated AccessToken, and click OK.
Step 2: Develop and deploy the application
1. Develop an XXL-JOB task
XXL-JOB supports applications written in Java, Go, and Python. For more information, see the open-source XXL-JOB demo project:
-
Go: xxl-job-executor-go.
-
Python: xxl-job-executor-python.
Java
-
Configure the environment: Add the Maven dependency for
xxl-job-corein your pom.xml file. For version details, refer to xxl-job-executor-sample-springboot.<!-- xxl-job-core --> <dependency> <groupId>com.xuxueli</groupId> <artifactId>xxl-job-core</artifactId> <version>2.2.x</version> </dependency> -
Initialize the executor.
@Configuration public class XxlJobConfig { private Logger logger = LoggerFactory.getLogger(XxlJobConfig.class); @Value("${xxl.job.admin.addresses}") private String adminAddresses; @Value("${xxl.job.accessToken}") private String accessToken; @Value("${xxl.job.executor.appname}") private String appname; @Value("${xxl.job.executor.address}") private String address; @Value("${xxl.job.executor.ip}") private String ip; @Value("${xxl.job.executor.port}") private int port; @Value("${xxl.job.executor.logpath}") private String logPath; @Value("${xxl.job.executor.logretentiondays}") private int logRetentionDays; @Bean public XxlJobSpringExecutor xxlJobExecutor() { logger.info(">>>>>>>>>>> xxl-job config init."); XxlJobSpringExecutor xxlJobSpringExecutor = new XxlJobSpringExecutor(); xxlJobSpringExecutor.setAdminAddresses(adminAddresses); xxlJobSpringExecutor.setAppname(appname); xxlJobSpringExecutor.setAddress(address); xxlJobSpringExecutor.setIp(ip); xxlJobSpringExecutor.setPort(port); xxlJobSpringExecutor.setAccessToken(accessToken); xxlJobSpringExecutor.setLogPath(logPath); xxlJobSpringExecutor.setLogRetentionDays(logRetentionDays); return xxlJobSpringExecutor; } } -
Write task execution code (using version 2.2.x as an example).
NoteInterfaces differ across XXL-JOB versions. Refer to the open source demo project for details.
@Component
public class SampleXxlJob {
    private static Logger logger = LoggerFactory.getLogger(SampleXxlJob.class);
    @XxlJob("helloworld")
    public ReturnT<String> helloworld(String param) throws Exception {
        XxlJobLogger.log("XXL-JOB, Hello World, start...");
        for (int i = 0; i < 5; i++) {
            XxlJobLogger.log("beat at:" + i);
            TimeUnit.SECONDS.sleep(2);
        }
        System.out.println("XXL-JOB, Hello World, finished");
        return ReturnT.SUCCESS;
    }
}
Golang
-
Configure the environment: Run the following command to pull the latest tagged version of the Go SDK for XXL-JOB. For version details, refer to xxl-job-executor-go.
go get github.com/xxl-job/xxl-job-executor-go@{latest tag} -
Write the executor initialization code.
package main import ( "context" "fmt" xxl "github.com/xxl-job/xxl-job-executor-go" "github.com/xxl-job/xxl-job-executor-go/example/task" "log" ) func main() { exec := xxl.NewExecutor( xxl.ServerAddr("xxxxxx"), // Request URL, obtained from the console under Application Management > Access Configuration xxl.AccessToken("xxxxxxx"), // Access token, obtained from the console under Application Management > Access Configuration xxl.ExecutorPort("9999"), // Default is 9999 (optional) xxl.RegistryKey("golang-jobs"), // Executor name xxl.SetLogger(&logger{}), // Custom logger ) exec.Init() exec.Use(customMiddleware) // Set log viewing handler exec.LogHandler(customLogHandle) // Register task handlers exec.RegTask("task.test", task.Test) exec.RegTask("task.shardingTest", task.ShardingTest) log.Fatal(exec.Run()) } // Custom log handler func customLogHandle(req *xxl.LogReq) *xxl.LogRes { return &xxl.LogRes{Code: xxl.SuccessCode, Msg: "", Content: xxl.LogResContent{ FromLineNum: req.FromLineNum, ToLineNum: 2, LogContent: "This is a custom log handler", IsEnd: true, }} } // Implementation of xxl.Logger interface type logger struct{} func (l *logger) Info(format string, a ...interface{}) { fmt.Println(fmt.Sprintf("Custom log - "+format, a...)) } func (l *logger) Error(format string, a ...interface{}) { log.Println(fmt.Sprintf("Custom log - "+format, a...)) } // Custom middleware func customMiddleware(tf xxl.TaskFunc) xxl.TaskFunc { return func(cxt context.Context, param *xxl.RunReq) string { log.Println("I am a middleware start") res := tf(cxt, param) log.Println("I am a middleware end") return res } } -
Write the task execution code.
package task
import (
	"context"
	"fmt"
	xxl "github.com/xxl-job/xxl-job-executor-go"
)
func Test(cxt context.Context, param *xxl.RunReq) (msg string) {
	fmt.Println("test one task" + param.ExecutorHandler + " param: " + param.ExecutorParams + " log_id:" + xxl.Int64ToStr(param.LogID))
	return "test done"
}
func ShardingTest(cxt context.Context, param *xxl.RunReq) (msg string) {
	fmt.Println("shardingId:" + xxl.Int64ToStr(param.BroadcastIndex) + ", shardingTotal:" + xxl.Int64ToStr(param.BroadcastTotal))
	return "ShardingTest done"
}
Python
-
Install dependencies. For version details, refer to xxl-job-executor-python.
pip install pyxxl # If logs need to be written to Redis pip install "pyxxl[redis]" # If loading configuration from .env pip install "pyxxl[dotenv]" # Install all features pip install "pyxxl[all]" -
Write the task execution code.
import asyncio
import time
from pyxxl import ExecutorConfig, PyxxlRunner
from pyxxl.ctx import g
config = ExecutorConfig(
    xxl_admin_baseurl="http://xxljob-1b3fd81****.schedulerx.mse.aliyuncs.com/api/",
    executor_app_name="xueren-test",
    access_token="default_token",
    # executor_listen_host="0.0.0.0",  # Omit if xxl-admin can directly connect to the executor's IP
)
app = PyxxlRunner(config)
@app.register(name="demoJobHandler")
async def test_task():
    # You can get task parameters using "g"
    g.logger.info("get executor params: %s" % g.xxl_run_data.executorParams)
    for i in range(10):
        g.logger.warning("test logger %s" % i)
    await asyncio.sleep(5)
    return "Success..."
@app.register(name="sync_func")
def test_task4():
    # To view execution logs in xxl-admin, always use g.logger (logs info level and above by default)
    n = 1
    g.logger.info("Job %s get executor params: %s" % (g.xxl_run_data.jobId, g.xxl_run_data.executorParams))
    # In synchronous tasks with loops, check g.cancel_event each iteration to support cancellation
    while n <= 10 and not g.cancel_event.is_set():
        # Use your own logger if logs don't need to appear in xxl-admin
        g.logger.info(
            "log to {} logger test_task4.{},params:{}".format(
                g.xxl_run_data.jobId,
                n,
                g.xxl_run_data.executorParams,
            )
        )
        time.sleep(2)
        n += 1
    return "Success3"
if __name__ == "__main__":
    app.run_executor()
2. Deploy the application to Alibaba Cloud
Alibaba Cloud XXL-JOB only supports Alibaba Cloud networks. You must deploy your application on Alibaba Cloud. The following example shows how to deploy a Java application to Container Service for Kubernetes.
The Container Service cluster must reside in the same VPC as the SchedulerX XXL-JOB cluster.
-
Create a Dockerfile in the root directory of your Spring Boot application.
# Replace with your own base image FROM reg.docker.alibaba-inc.com/xxx/xxxx-java:1.0-beta MAINTAINER xueren ENV JAVA_OPTS="" ADD target/xxl-job-executor-sample-springboot-*.jar /app.jar ENTRYPOINT ["sh","-c","java -jar $JAVA_OPTS /app.jar] -
Use Docker to build the image and push it to the Alibaba Cloud image repository.
docker login --username=xxx@aliyun.com registry.cn-hangzhou.aliyuncs.com --password=xxxxxx docker buildx build --platform linux/amd64 -t schedulerx-registry.cn-hangzhou.cr.aliyuncs.com/schedulerx3/xxljob-demo:2.4.1 . docker push schedulerx-registry.cn-hangzhou.cr.aliyuncs.com/schedulerx3/xxljob-demo:2.4.1 -
In the navigation pane on the left, go to the page and click Access Configuration in the Actions column for your target application.
-
Log on to Alibaba Cloud Container Service and go to your target cluster. In the navigation pane on the left, choose and click Create Resource Using YAML in the upper-right corner to create a Deployment. The following example uses access method 2 (restarting the application with -D parameters). Replace the JAVA_OPTS value in the YAML to inject JVM parameters via environment variables.
apiVersion: apps/v1
kind: Deployment
metadata:
  name: xxljob-xueren-test
  labels:
    app: xxljob-xueren-test
spec:
  replicas: 2
  selector:
    matchLabels:
      app: xxljob-xueren-test
  template:
    metadata:
      labels:
        app: xxljob-xueren-test
    spec:
      containers:
      - name: xxljob-executor
        image: schedulerx-registry.cn-hangzhou.cr.aliyuncs.com/schedulerx3/xxljob-demo:2.4.1
        ports:
        - containerPort: 9999
        env:
          - name: JAVA_OPTS
            value: >-
              -Dxxl.job.admin.addresses=http://xxljob-xxxxx.schedulerx.mse.aliyuncs.com
              -Dxxl.job.executor.appname=xueren_test
              -Dxxl.job.accessToken=xxxxxxx
Step 3: Test and verify
1. Verify executor connection
Go to the instance details page, click Application Management in the navigation pane on the left, and then click the executor count for your target application to view the connected executor addresses and online status.
2. Task testing and verification
Single-node task test
A single-node task runs once per execution on one executor selected from all executors for the application, based on the routing policy.
-
In the navigation pane on the left, select Task Management and click Add Task. Complete basic configuration: enter a Task Name and a jobHandler name, select your target application for Associated Application, choose Round Robin for Routing Policy, and click Next.
Set Task Type to BEAN, Blocking Handling Policy to Serial Execution on Single Node, and Priority to Medium.
-
Configure Scheduling Settings. Select cron for Time Type and click Use Generator to generate a cron expression. This example runs once daily at 12:00. Click Next.
Enter
0 0 12 * * ?in the cron expression field. -
Configure Notifications. You can set timeout alerts, success notifications, failure alerts, notification methods, and notification recipients. This example uses the console default settings.
-
After creation, click Run Once in the Actions column for your task. In the manual execution dialog, specify a Target Machine, configure Instance Parameters, and click OK.
-
Click to view task execution records.
The execution list displays task records, including Execution ID, Task ID/Name, Application, Start Time, End Time, Status, and Actions. For records with Success status, you can view Details and Logs. For Failed records, you can also Rerun.
-
In the navigation pane on the left, click Execution List, then click Log in the Actions column for your target execution record to view the task execution log.
2024-08-21 12:00:00 [com.xxl.job.core.thread.JobThread#run]-[124]-[Thread-10]
----------- xxl-job job execute start -----------
----------- Param:123456
2024-08-21 12:00:00 [com.xxl.job.executor.service.jobhandler.SampleXxlJob#helloworld]-[38]-[Thread-10] XXL-JOB, Hello World,
2024-08-21 12:00:00 [com.xxl.job.executor.service.jobhandler.SampleXxlJob#helloworld]-[40]-[Thread-10] beat at:0
2024-08-21 12:00:02 [com.xxl.job.executor.service.jobhandler.SampleXxlJob#helloworld]-[40]-[Thread-10] beat at:1
2024-08-21 12:00:04 [com.xxl.job.executor.service.jobhandler.SampleXxlJob#helloworld]-[40]-[Thread-10] beat at:2
2024-08-21 12:00:06 [com.xxl.job.executor.service.jobhandler.SampleXxlJob#helloworld]-[40]-[Thread-10] beat at:3
2024-08-21 12:00:08 [com.xxl.job.executor.service.jobhandler.SampleXxlJob#helloworld]-[40]-[Thread-10] beat at:4
2024-08-21 12:00:10 [com.xxl.job.core.thread.JobThread#run]-[164]-[Thread-10]
----------- xxl-job job execute end(finish) -----------
----------- ReturnT:ReturnT [code=200, msg=null, content=null]
2024-08-21 12:00:10 [com.xxl.job.core.thread.TriggerCallbackThread#callbackLog]-[191]-[xxl-job, executor TriggerCallbackThread]
----------- xxl-job job callback finish.
Sharded broadcast task test
A sharded broadcast task executes on all executors for the application during each run. Each executor receives a unique shard number, enabling distributed batch processing. Open source XXL-JOB lacks aggregation for sharded broadcasts, but Alibaba Cloud XXL-JOB aggregates and displays all shard results for each execution.
-
In the navigation pane on the left, select Task Management and click Add Task. Complete basic configuration: enter a Task Name and a jobHandler name, select your target application for Associated Application, choose Sharded Broadcast for Routing Policy, and click Next.
-
Configure Scheduling Settings. Select cron for Time Type and click Use Generator to generate a cron expression. This example runs once every hour at the 10th minute. Click Next.
Enter
0 10 * * * ?in the cron expression field. -
Configure Notifications. You can set timeout alerts, success notifications, failure alerts, notification methods, and notification recipients. This example uses the console default settings.
-
After creation, click Run Once in the Actions column for your task. In the manual execution dialog, specify a Target Machine, configure Instance Parameters, and click OK.
-
Click to view task execution records.
-
In the navigation pane on the left, click Execution List. On the task execution list page, click Details in the Actions column for your target execution record. The Shard Details section aggregates execution status for each machine.
The execution result shows 100% overall progress, with both shards (shard 0 and shard 1) succeeding.
-
For each shard, click Log in the Actions column to view the execution log.
2024-08-21 12:00:00 [com.xxl.job.core.thread.JobThread#run]-[124]-[Thread-10]
----------- xxl-job job execute start -----------
----------- Param:
2024-08-21 12:00:00 [com.xxl.job.executor.service.jobhandler.SampleXxlJob#shardingJobHandler]-[74]-[Thread-10] Shard parameters: total xxx
2024-08-21 12:00:00 [com.xxl.job.executor.service.jobhandler.SampleXxlJob#shardingJobHandler]-[79]-[Thread-10] Shard 0, processing xxx
2024-08-21 12:00:00 [com.xxl.job.executor.service.jobhandler.SampleXxlJob#shardingJobHandler]-[81]-[Thread-10] Shard 1, skipping xxx
2024-08-21 12:00:00 [com.xxl.job.core.thread.JobThread#run]-[164]-[Thread-10]
----------- xxl-job job execute end(finish) -----------
----------- ReturnT:ReturnT [code=200, msg=null, content=null]
2024-08-21 12:00:00 [com.xxl.job.core.thread.TriggerCallbackThread#callbackLog]-[191]-[xxl-job, executor TriggerCallbackThxxx]
----------- xxl-job job callback finish.