If you want to use ApsaraVideo Media Processing (MPS) for transcoding, you can create a transcoding job or workflow in the MPS console or by calling an API operation. This topic describes how to create a regular transcoding job or workflow in MPS.
Before you begin
Make sure that the following operations are performed:
Enable an MPS queue. For more information, see Create an MPS queue. You can use a standard MPS queue for regular transcoding jobs or workflows.
Upload the video to be processed to OSS.
If you want to create a job, directly upload the video to OSS. For more information, see Upload a video.
If you want to create a workflow and automatically trigger the workflow, you must add media buckets and create a workflow before you upload the video. After you specify the input and output media buckets and upload a media file to the input media bucket, MPS receives a message about the upload and triggers the associated workflow. After the workflow is complete, the processed media file is uploaded to the output media bucket. For more information, see Add media buckets.
Configure a transcoding template.
Optional. Configure a watermark template. If you want to add a watermark to a video, we recommend that you use a watermark template to simplify the process. For more information, see Manage watermark templates.
Optional. Enable the notification feature. If you want MPS to send notifications on jobs and workflows to MNS topics or queues, configure an MNS queue or topic as required. For more information, see Enable the notification feature for MPS jobs or workflows.
Create a regular transcoding job or workflow in the console
Create a regular transcoding job
Log on to the MPS console.
In the top navigation bar, select a region from the drop-down list.
In the left-side navigation pane, click Job Management.
On the Encode tab, click Create Task.
Configure the parameters that are described in the following table.
Parameter
Description
Input File URL
Specify the URL of the input file that is stored in an Object Storage Service (OSS) bucket. Click Select next to the Input File URL field. In the Select File dialog box, select an OSS bucket from the Bucket drop-down list. Then, folders in the OSS bucket are automatically displayed in the Path section. Select a file from a folder as the input file.
NoteIf no bucket is displayed in the Bucket drop-down list, go to the OSS console and create a bucket in the specified region. For more information, see Add media buckets.
If no files are displayed after you select an OSS bucket, go to the OSS console and upload files to the specified bucket.
If you are prompted to activate OSS, go to the OSS console and activate OSS.
If an error message informs you that the current Resource Access Management (RAM) role is invalid or you do not have the required permissions, go to the RAM console and grant the RAM user the permissions to access OSS. You can attach the AliyunOSSFullAccess policy to the RAM user to grant the RAM user full permissions on OSS, or you can customize permissions based on your business requirements. For more information, see Create a RAM user and grant permissions to the RAM user.
Encoding Pipeline
Select an MPS queue for transcoding from the drop-down list.
NoteIf no MPS queue is displayed in the Encoding Pipeline drop-down list, enable an MPS queue for transcoding. For more information, see Create an MPS queue.
The maximum number of jobs that an MPS queue for transcoding can concurrently process is not guaranteed because the concurrent processing capability depends on available resources. By default, an MPS queue for transcoding can concurrently process a maximum of 200 jobs.
Output File Name
Enter a name in the Output File Name field. You must include a file name extension for all types of files except for M3U8 files. Example: example_video01.mp4.
Output Path
Specify the URL of the output file to be stored in an OSS bucket. Click Select next to the Output Path field. In the Select Output Path dialog box, select an OSS bucket from the Bucket drop-down list. Then, folders in the OSS bucket are automatically displayed in the Path section. Select a folder as the output path.
NoteIf the output path is the same as the input path, specify an output file name that is different from the input file name. This way, the input file is not overwritten. If the input file and output file share the same name, the relevant OSS settings determine whether the output file overwrites the input file. For information about how to disable file overwriting, see Prevent objects from being overwritten by objects that have the same names. If you disable file overwriting, the transcoded output file that shares the same name as the input file fails to be written to the OSS bucket. We recommend that you do not specify the same name for the input and output files.
For more information about answers to other frequently asked questions, see the description of the Input File URL parameter.
Click Next.
Configure the parameters that are described in the following table.
Parameter
Description
Template Type
Select the type of the transcoding template. For more information about preset templates, see the "Preset template" section of the Transcoding template topic. For information about how to create a custom transcoding template, see Transcoding templates.
Output Format
Select an output format from the drop-down list. Default value: mp4.
Templates
Select a transcoding template from the list. Default value: MP4-4K.
Watermark Templates
Optional. If you turn on this switch, you also need to perform the following operations:
Select a watermark template from the Watermark Templates drop-down list. If no watermark template is displayed in the drop-down list, create one. For more information, see Manage watermark templates.
Click Select next to the Watermark Image field. In the Select File dialog box, select a bucket from the Bucket drop-down list. Then, folders in the bucket are automatically displayed in the Path section. Select a file as the watermark.
NoteYou can select a PNG image, an animated PNG image, or a MOV video.
Clip Output
Optional. If you turn on this switch, you can configure the start time for video editing and the length to be trimmed out to specify the duration of the video clip.
In the Start From time picker, select the hour, minute, and second for the time from which the video editing starts.
NoteThe start time cannot be greater than the total duration of the video. Otherwise, the transcoding job fails.
In the Clip Length time picker, select the hour, minute, and second for the duration of the video clip.
NoteIf the specified duration of the video clip exceeds the length of the rest part of the video, the video clip from the start time to the ending part of the video is retained.
Rotate Angle
Optional. Enter a value in the Rotate Angle field. The video is rotated clockwise. Valid values: 0 to 360. Unit: degree.
Click Submit. The transcoding job is created and submitted.
After the transcoding job is submitted, you can view the execution status and configurations of the job. You can also click the name of the job to view other information, such as the input and output paths.
NoteIf Failed is displayed in the Encoding Status column for a transcoding job after the job is submitted but no details are provided for the failure, check the network condition and submit the job again after the network condition is back to normal.
Create a regular transcoding workflow
Log on to the MPS console.
In the top navigation bar, select a region from the drop-down list.
In the left-side navigation pane, choose .
Click Create Workflow.
Configure the following parameters based on your business requirements:
Workflow Name: enter a name in the field.
Configuration Plan: select a workflow type from the drop-down list.
NoteMPS provides multiple preset workflows to meet your business requirements in different scenarios. You can select a preset workflow for quick editing or customize a workflow based on your business requirements.
Edit the topology of the workflow.
Click the Plus icon on the right side of the required node and select Encode.
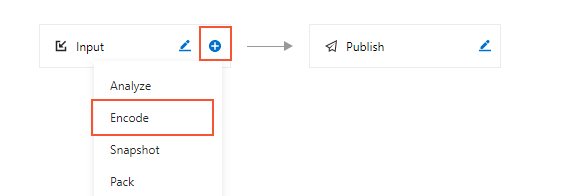
Click the Pen icon on the right side of the Encode node. The Encoding dialog box appears.

In the Encoding dialog box, configure the parameters that are described in the following table.
Parameter
Description
Name
The name of the Encode node.
Transcoding Templates
Click Select next to the Transcoding Templates field. In the Encoding Template dialog box, perform the following operations:
Configure the Template Type parameter.
Select an output format from the Output Format drop-down list.
Select a template from the Templates list.
Click OK.
NoteFor more information about preset templates, see the "Preset template" section of the Transcoding template topic. For information about how to create a custom transcoding template, see Transcoding templates.
Output Path
Click Select next to the Output Path field. In the Select Output Path dialog box, select a bucket from the Bucket drop-down list. Then, folders in the bucket are automatically displayed in the Path section. Select a folder as the output path.
NoteThe following two situations may occur if the output path and the input path are the same:
If the input file and output file have different names, the output file does not overwrite the input file.
If the input file and output file share the same name, the relevant OSS settings determine whether the output file overwrites the input file. For information about how to disable file overwriting, see Prevent objects from being overwritten by objects that have the same names. If you disable file overwriting, the transcoded output file that shares the same name as the input file fails to be written to the OSS bucket. We recommend that you do not specify the same name for the input and output files.
To prevent an output file from being overwritten when a workflow is run multiple times, you can specify an output path by using the following built-in UC variables in combination:
{RunId}: the ID of the workflow execution instance.
{ObjectPrefix}: the original file path that does not include the bucket information.
{FileName}: the original file name that contains the file name extension. The extension name varies based on the format of the transcoding template.
{ExtName}: the file name extension of the original file.
Watermark
Optional. If you turn on the switch, perform the following operations:
Select a watermark template from the Watermark Template drop-down list.
NoteIf no watermark template is displayed in the drop-down list, create one. For more information, see Manage watermark templates.
Click Select next to the Watermark Image field. In the Select Path dialog box, select the path of a watermark image.
NoteYou can select a PNG image, an animated PNG image, or a MOV video.
Encryption
Optional. If you turn on the switch, perform the following operation:
Set the Encryption Method parameter to Alibaba Cloud Private Encryption or HLS Standard Encryption. For more information about video encryption, see Video encryption.
Clip
Optional. If you turn on the switch, perform the following operation:
Set the Clip Method parameter to Video Clip or Video Ending Clip.
Set the Start From parameter to the time at which the video clipping starts.
Set the Length parameter to the length of the clip.
NoteThe start time cannot be greater than the total duration of the video. Otherwise, the transcoding job fails.
If the specified duration of the video clip exceeds the length of the rest part of the video, the video clip from the start time to the ending part of the video is retained.
Add Credits
Optional. If you turn on the switch, perform the following operation: Click Select next to the File Path field and select the path of an ending part.
Rotate Angle
Optional. Enter a value in the Rotate Angle field. The video is rotated clockwise. Valid values: 0 to 360. Unit: degree.
Click OK. The Encode node is configured.
Click Save. The workflow is created.
Create a regular transcoding job by calling an API operation
If the transcoding jobs and workflows created in the MPS console cannot meet your business requirements, you can call the SubmitJobs operation to submit transcoding jobs and configure transcoding parameters based on your business logic.
Call the SubmitJobs operation to submit a transcoding job.
For more information, see SubmitJobs. Set the request parameters based on the following instructions:
PipelineId: the ID of the MPS queue. Set this parameter to the ID of a standard MPS queue.
TemplateId: the ID of the transcoding template. Set this parameter to the ID of a preset template or custom template based on your business requirements. For information about how to create a custom transcoding template, see AddTemplate.
Optional. If you want to encrypt the output file, set the Encryption parameter in the Output parameter based on your business requirements.
NoteThe encrypted file is generated in the M3U8 format. You call an API operation to encrypt a file by using the Base64 algorithm or Key Management Service (KMS). For more information, see Parameter details.
Receive a callback notification.
If you have configured a Simple Message Queue (SMQ) queue or topic to receive notifications, MPS sends a notification to the SMQ queue or topic after the transcoding job is complete. For more information, see Receive notifications.
Query the results of the transcoding job.
You can call the QueryJobList operation to query the results of the transcoding job and the URL of the output file.
You can call the ListJob operation to query multiple transcoding jobs at a time based on the MPS queue ID, job status, and creation time interval.