This guide covers two methods for restoring a downloaded ApsaraDB for MongoDB backup to a self-managed MongoDB database: using mongorestore for logical backups, and using mongod directly for physical backups. Both methods support single-node and replica set targets.
Restore from a logical backup
Prerequisites
Before you begin, make sure that you have:
-
MongoDB installed on your client (local server or ECS instance) at the same version as the source ApsaraDB for MongoDB instance. See Install MongoDB.
-
Downloaded the logical backup file. See Download a backup file.
MongoDB is constantly updated, and older versions ofmongorestoremay not be compatible with newer MongoDB versions. Select amongorestoreversion that matches your MongoDB version. See mongorestore compatibility.
Usage notes
-
Sharded cluster target: Set
<hostname>to the address of the Mongos component, and add--nsExclude="config.*"to the command to prevent errors during restoration. -
Restoring from a sharded cluster source: Download the backup data for each shard separately and import each one into the target database. If the source cluster contains orphaned documents, dirty data may be introduced. When restoring multiple shards to the same target cluster, use
--droponly for the first shard.
Restore steps
-
Copy the downloaded backup file to the client where your self-managed MongoDB database is running. The
mongorestoretool must be installed on this client. -
Run the following command to import data from the backup file:
Placeholder Description Example <hostname>Server address of the self-managed MongoDB database. For a local server, use 127.0.0.1. For a sharded cluster target, use the Mongos address.127.0.0.1<port>Port of the self-managed MongoDB database 27017<username>A database user with permissions on all databases. Use the rootaccount.root<password>Password for the database user — <backup-file>Name of the downloaded logical backup file hins1111_data_20190710.arFlag Description --dropDrops each collection before restoring. When restoring multiple shard backups to the same cluster, use this flag only for the first shard. --gzipDecompresses gzip-compressed backup data. Supported since MongoDB 3.1.4. -vvvvVerbose output. More vcharacters produce more detailed logs.--stopOnErrorStops the import if an error occurs. --nsExclude="config.*"Excludes matching namespaces from restoration. Required for sharded cluster targets. mongorestore -h <hostname> --port <port> -u <username> -p <password> \ --drop --gzip --archive=<backup-file> -vvvv --stopOnErrorReplace the following placeholders: The remaining flags do not need to be changed: Example:
mongorestore -h 127.0.0.1 --port 27017 -u root -p ******** \ --drop --gzip --archive=hins1111_data_20190710.ar -vvvv --stopOnError -
Verify the restoration by connecting to the database and running
show dbs. Confirm that your expected databases appear in the output.
Restore from a physical backup
Physical backup files contain raw data directory files from the source instance. These files are not compatible with mongorestore. Instead, start a mongod instance that points to the decompressed backup directory, then reconfigure it for replica set mode.
Prerequisites
Before you begin, make sure that:
-
The source instance is a replica set instance.
-
Transparent Data Encryption (TDE) is disabled on the instance. See Configure TDE.
-
The storage engine of the instance is WiredTiger or RocksDB.
-
To check the storage engine, go to the Basic Information page in the ApsaraDB for MongoDB console.
-
If the storage engine is TerarkDB, see Restore data from a disk backup.
-
If the storage engine is RocksDB, compile and install a MongoDB build that includes the RocksDB storage engine.
-
Version compatibility
The ApsaraDB for MongoDB instance version and the self-managed MongoDB database version must be compatible:
| ApsaraDB for MongoDB version | Self-managed MongoDB version |
|---|---|
| 3.2 | 3.2 or 3.4 |
| 3.4 | 3.4 |
| 4.0 | 4.0 |
| 4.2 | 4.2 |
Physical backup file formats
| Format | Extension | When it applies |
|---|---|---|
| tar | .tar.gz |
Instances created before March 26, 2019 |
| xbstream | _qp.xb |
Instances created on or after March 26, 2019 |
The xbstream format requires Percona XtraBackup to decompress, which is only available on Linux. Windows is not supported for xbstream decompression.
Environment used in this guide
The steps below use an ECS instance running 64-bit Ubuntu 16.04 with MongoDB installed and the following directory layout:
-
/test/mongo/data— database directory for the restored instance -
/test/mongo/data1,/test/mongo/data2— database directories for the two additional replica set members -
/test/mongo/bin— MongoDB binary path (example)
For instructions on creating an ECS instance, see Create an ECS instance. For MongoDB installation, see the official MongoDB documentation.
Step 1: Configure environment variables
Set up MongoDB environment variables so you can run MongoDB commands without specifying full binary paths.
Skip this step if you have already configured MongoDB environment variables, and proceed to Step 2.
-
Open the
profilefile:sudo vi /etc/profile -
Press
ito enter edit mode. Add the following line at the end of the file:export PATH=$PATH:/test/mongo/bin -
Press
Esc, then type:wqto save and exit. -
Apply the changes:
source /etc/profile
Step 2: Download and decompress the physical backup file
-
Download the physical backup file. Use the following command to download it:
Enclose the download URL in single quotation marks to ensure it is parsed correctly. Verify that the downloaded file has the
.tar.gzor_qp.xbextension.wget -c '<external-download-url>' -O <filename>.<extension>Example:
wget -c 'http://rdsbak-hz-v3.oss-cn-hangzhou-internal.aliyuncs.com/custins5475****/hins1907****_data_20210906103710_qp.xb?Expires=......' \ -O backupfile._qp.xb -
Create the data directory and move the backup file into it:
mkdir -p /test/mongo/data && mv <filename>.<extension> /test/mongo/data -
Decompress the backup file based on its format:
-
`.tar.gz` format (for example,
hins20190412.tar.gz):cd /test/mongo/data/ && tar xzvf hins20190412.tar.gz -
`_qp.xb` format (for example,
hins20190412_qp.xb):-
Install Percona XtraBackup and qpress. See the Percona XtraBackup installation guide.
-
Decompress the file:
# Go to the directory where the file is located cd /test/mongo/data/ # Unpack the xbstream archive cat hins20190412_qp.xb | xbstream -x -v # Decompress the backup files innobackupex --decompress --remove-original /test/mongo/data
-
-
Step 3: Start mongod in single-node mode
Start the restored database in single-node mode first to verify the data, then reconfigure for replica set mode in Step 4.
-
Create a configuration file:
touch /test/mongo/mongod.conf vi /test/mongo/mongod.conf -
Press
ito enter edit mode. Copy the configuration for your storage engine into the file:-
WiredTiger (default for ApsaraDB for MongoDB — includes
directoryPerDBsystemLog: destination: file path: /test/mongo/mongod.log logAppend: true security: authorization: enabled storage: dbPath: /test/mongo/data directoryPerDB: true net: port: 27017 unixDomainSocket: enabled: false processManagement: fork: true pidFilePath: /test/mongo/mongod.pid -
RocksDB:
systemLog: destination: file path: /test/mongo/logs/mongod.log logAppend: true security: authorization: enabled storage: dbPath: /test/mongo/data engine: rocksdb net: port: 27017 unixDomainSocket: enabled: false processManagement: fork: true pidFilePath: /test/mongo/mongod.pid
-
-
Press
Esc, then type:wqto save and exit. -
Start MongoDB using the configuration file:
mongod -f /test/mongo/mongod.conf -
Log in to the database:
mongo --host 127.0.0.1 -u <username> -p <password> --authenticationDatabase adminThe default username is
root. If the password contains special characters, enclose it in single quotation marks — for example,'test123!@#'. -
Verify the restoration by running
show dbs. The output lists all databases in the restored instance. Confirm that your expected databases appear. -
Run
exitto leave the mongo shell.
After confirming the data is intact, proceed to Step 4 to start the database in replica set mode.
A physical backup retains the replica set configuration of the original ApsaraDB for MongoDB instance. Remove this configuration before initializing a new replica set.
-
Log in to the database as the
testuser:mongo --host 127.0.0.1 -u test -p <password_of_the_test_user> --authenticationDatabase adminIf the password contains special characters, enclose it in single quotation marks — for example,
'test123!@#'. -
Run the following commands to remove the original replica set configuration. Replace
<password_of_the_test_user>before running.-
Create a temporary role with permission to remove documents from
local.system.replset -
Use that role to delete the original replica set configuration
-
Clean up the temporary role and user
use admin
db.runCommand({
    createRole: "tmprole",
    roles: [
        {
            role: "test",
            db: "admin"
        }
    ],
    privileges: [
        {
            resource: {
                db: 'local',
                collection: 'system.replset'
            },
            actions: [
                'remove'
            ]
        }
    ]
})
db.runCommand({
    createUser: "tmpuser",
    pwd: "tmppwd",
    roles: [
        'tmprole'
    ]
})
db.auth('tmpuser','tmppwd')
use local
db.system.replset.remove({})
use admin
db.auth('test','<password_of_the_test_user>')
db.dropRole('tmprole')
db.dropUser('tmpuser')
These commands:
-
-
Shut down the MongoDB service and exit:
use admin db.shutdownServer() exit -
Create the replica set authentication file:
-
Create the keyFile directory and file:
mkdir -p /test/mongo/keyFile && touch /test/mongo/keyFile/mongodb.key -
Open the file and add the encryption content:
vi /test/mongo/keyFile/mongodb.keyPress
i, enter your encryption content (for example,MongoDB Encrypting File), then pressEscand type:wq. The encryption content must meet these requirements:-
Length: 6–1,024 characters
-
Characters: Base64 character set only
-
Must not contain the equal sign (
=)
-
-
Set the file permissions to
400sudo chmod 400 /test/mongo/keyFile/mongodb.keyNoteAll replica set members must use the same authentication file.
-
-
Prepare the two additional replica set members:
-
Copy the configuration file for the other two nodes:
cp /test/mongo/mongod.conf /test/mongo/mongod1.conf && \ cp /test/mongo/mongod.conf /test/mongo/mongod2.conf -
Create data directories for those nodes:
mkdir -p /test/mongo/data1 && mkdir -p /test/mongo/data2
-
-
Update the configuration file for each node. Open each file with
viand replace its contents with the corresponding configuration below. Key parameters across all three configuration files:-
Node 1 (
/test/mongo/mongod.confsystemLog: destination: file path: /test/mongo/mongod.log logAppend: true security: authorization: enabled keyFile: /test/mongo/keyFile/mongodb.key storage: dbPath: /test/mongo/data directoryPerDB: true net: bindIp: 127.0.0.1 port: 27017 unixDomainSocket: enabled: false processManagement: fork: true pidFilePath: /test/mongo/mongod.pid replication: replSetName: "rs0" -
Node 2 (
/test/mongo/mongod1.confsystemLog: destination: file path: /test/mongo/mongod1.log logAppend: true security: authorization: enabled keyFile: /test/mongo/keyFile/mongodb.key storage: dbPath: /test/mongo/data1 directoryPerDB: true net: bindIp: 127.0.0.1 port: 27018 unixDomainSocket: enabled: false processManagement: fork: true pidFilePath: /test/mongo/mongod1.pid replication: replSetName: "rs0" -
Node 3 (
/test/mongo/mongod2.confsystemLog: destination: file path: /test/mongo/mongod2.log logAppend: true security: authorization: enabled keyFile: /test/mongo/keyFile/mongodb.key storage: dbPath: /test/mongo/data2 directoryPerDB: true net: bindIp: 127.0.0.1 port: 27019 unixDomainSocket: enabled: false processManagement: fork: true pidFilePath: /test/mongo/mongod2.pid replication: replSetName: "rs0"
Parameter Description systemLog.pathLog file path for the node storage.dbPathData directory for the node processManagement.pidFilePathPID file path for the node security.keyFilePath to the replica set authentication file. All members must reference the same file. net.bindIpIP address the node listens on. If all members run on the same server, use the same IP. net.portPort for the node. If all members run on the same server, each must use a different port. replication.replSetNameName of the replica set. Must be the same across all members. -
-
Start all three nodes:
mongod -f /test/mongo/mongod.conf && \ mongod -f /test/mongo/mongod1.conf && \ mongod -f /test/mongo/mongod2.conf -
Log in to the primary node using the
testaccount:mongo --host 127.0.0.1 -u test -p <password_of_the_test_account> --authenticationDatabase adminIf the password contains special characters, enclose it in single quotation marks.
-
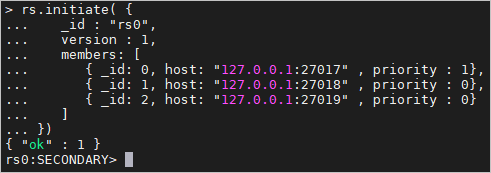
Initialize the replica set:
rs.initiate({
   _id: "rs0",
   version: 1,
   members: [
      { _id: 0, host: "127.0.0.1:27017", priority: 1 },
      { _id: 1, host: "127.0.0.1:27018", priority: 0 },
      { _id: 2, host: "127.0.0.1:27019", priority: 0 }
   ]
})
A successful initialization returns output similar to:
For more information about
rs.initiate(), see the official MongoDB documentation. After initialization, the two new members begin synchronizing data from the primary. Synchronization time depends on the backup file size. -
Verify that the replica set started successfully:
-
Run
exitto leave the mongo shell. -
Log in again:
mongo -u <username> -p <password> --authenticationDatabase adminThe default username is
root. Enclose passwords with special characters in single quotation marks. -
Check the prompt on the left side of the mongo shell. If it shows
<replica-set-name>:PRIMARY>, the replica set is running successfully.
-
Troubleshooting
Why does the database fail to start with the `mongod.conf` configuration file?
The most common causes are:
-
A `storage.bson` file exists in the data directory. This file is auto-generated when MongoDB starts without a configuration file. Move or delete it, then restart with the
mongod.conffile. -
Another `mongod` process is already running. Find the process ID by running
ps -e | grep mongod, then stop it withkill <process-id>. Restart the database with themongod.conffile. -
The `systemLog.path` in `mongod.conf` is incorrect. The path must exist and include a filename — for example:
path: /<Log_file_path>/<Log_file_name>.log.
Why does starting the database in replica set mode fail?
The keyFile authentication file permissions may not be set correctly. Run the following command to set them to 600, then try again:
sudo chmod 600 <path-to-keyFile>Why is the system slow after starting in replica set mode?
After startup, the two new members automatically sync data from the primary. The system returns to normal speed once synchronization is complete. Wait for the sync to finish before running workloads.
How do I restore data if the instance architecture does not support downloading backup files?
Two alternatives are available:
-
Use DTS to migrate data. See Migrate data from a self-managed MongoDB database or an ApsaraDB for MongoDB instance.
-
Use mongodump and mongorestore to back up and restore the instance.