An SSL-VPN tunnel routes traffic between your local client and an ApsaraDB for MongoDB instance entirely over Alibaba Cloud's private network — no database port is exposed to the Internet. Use this approach when:
-
Your local client has a dynamic public IP address, making it impractical to maintain an accurate IP address whitelist.
-
Your workload requires a high-security connection over the Internet.
-
You need to access the instance from an Elastic Compute Service (ECS) instance over the Internet while keeping ECS management permissions separate from database permissions.
If none of these apply — for example, your client already runs inside the same VPC as the instance — connect directly using the instance's internal endpoint instead.
Billing
Creating a VPN gateway incurs charges. For pricing details, see Billing.
Prerequisites
Before you begin, make sure that:
-
The ApsaraDB for MongoDB instance uses VPC as its network type. If the instance uses classic network, switch it to VPC first.
-
The CIDR block of your local client does not overlap with the CIDR block of the instance.
-
Your local client can reach the Internet.
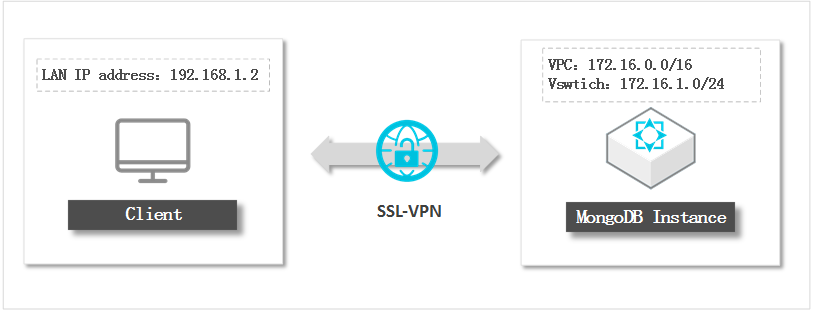
Network architecture
Connect to the instance
The connection setup involves five sequential steps:
-
Create a VPN gateway
-
Create an SSL server
-
Create an SSL client certificate
-
Establish the SSL-VPN connection on your local client
-
Log in to the ApsaraDB for MongoDB instance
Step 1: Create a VPN gateway
Follow the instructions in Create and manage a VPN gateway. When configuring the gateway, set the parameters as follows:
| Parameter | Description |
|---|---|
| Region | The region where the VPN gateway resides. Must match the region of the ApsaraDB for MongoDB instance. |
| VPC | The VPC to which the VPN gateway belongs. Must match the VPC of the ApsaraDB for MongoDB instance. |
| IPsec-VPN | Set to Disable. IPsec-VPN provides site-to-site connections between data centers or VPCs; it is not needed for this scenario. |
| SSL-VPN | Set to Enable. SSL-VPN establishes a connection between your local client and the VPN gateway without requiring a gateway on the client side. |
Step 2: Create an SSL server
Follow the instructions in Create and manage an SSL server. When configuring the SSL server, set the parameters as follows:
Make sure that the Client CIDR Block does not overlap with the Local Network. An overlap prevents the VPN gateway from assigning IP addresses to clients.
| Parameter | Description | Example value |
|---|---|---|
| VPN gateway | The VPN gateway associated with the instance. Select the gateway you created in Step 1. | — |
| Local network | The CIDR block of the vSwitch in the VPC where the instance resides. The subnet mask must be 16–29 bits. | 172.16.1.0/24 |
| Client CIDR block | The address range from which the VPN gateway assigns an IP address to the local client when it connects. Do not enter the CIDR block where the local client itself resides. | 192.168.100.0/24 |
Step 3: Create an SSL client certificate
Follow the instructions in Create and manage an SSL client certificate.
After the certificate is created:
-
Install the certificate on your local client by following the Connect a client to a VPC guide.
Step 4: Establish an SSL-VPN connection
The instructions differ by operating system.
Linux
-
Install OpenVPN and create the configuration directory.
CentOS
yum install -y openvpn
mkdir -p /etc/openvpn/conf
Ubuntu
apt-get update apt-get install -y openvpn mkdir -p /etc/openvpn/conf -
Extract the SSL client certificate package and copy the certificate files to
/etc/openvpn/conf/. -
Start the VPN connection:
openvpn --config /etc/openvpn/conf/config.ovpn --daemon
Windows
-
Download and install the OpenVPN client. If the download link is unavailable, contact your account manager or Alibaba Cloud engineer.
-
Extract the SSL client certificate package and copy the certificate files to the
OpenVPN\configdirectory (for example,C:\Program Files\OpenVPN\config). -
Double-click the OpenVPN GUI icon on your desktop to launch the client.
-
Right-click the VPN icon in the system tray and click Connect.
-
Verify that State shows Connected and that an IP address has been assigned.
Step 5: Log in to the ApsaraDB for MongoDB instance
-
Add the local client CIDR block specified in Step 2 to all IP address whitelists of the instance. In this example, add
172.16.1.0/24. -
Log in to the ApsaraDB for MongoDB console.
-
Retrieve the internal endpoint of the instance. For details, see Connect to a replica set instance.
-
Connect to the instance using the mongo shell or another database client. For mongo shell instructions, see Connect to an ApsaraDB for MongoDB replica set instance by using the mongo shell.
Always connect using the internal endpoint, not the public endpoint.