When using Wan for image generation, if Text-to-video/image-to-video prompt guide cannot meet your customization needs for specific styles, IP characters, or visual effects, use model fine-tuning.
Scope
-
Supported region: This document applies only to the Singapore region. You must use an API key from this region.
-
Supported fine-tuning method: SFT-LoRA efficient fine-tuning.
-
Supported models:
-
Image generation (text-to-image/image-to-image): wan2.7-image-pro, wan2.7-image.
-
How to fine-tune a model
Text-to-image
Fine-tuning objective: Train a character LoRA model.
Expected result: Given a text prompt, the model generates images of a specific character in the scene described by the prompt.
|
Input prompt A person in a crowded morning rush hour subway car, holding onto the handrail, with blurred passengers in the background and tunnel lights visible through the windows, wearing an ordinary office worker white shirt and black trousers, standing facing the camera, half-body shot, realistic candid feel. |
Output image (before fine-tuning - text-to-image)
Without a reference image, the model cannot generate a specific character. |
Output image (after fine-tuning)
After fine-tuning, the model can reliably reproduce the specific character from the training set. |
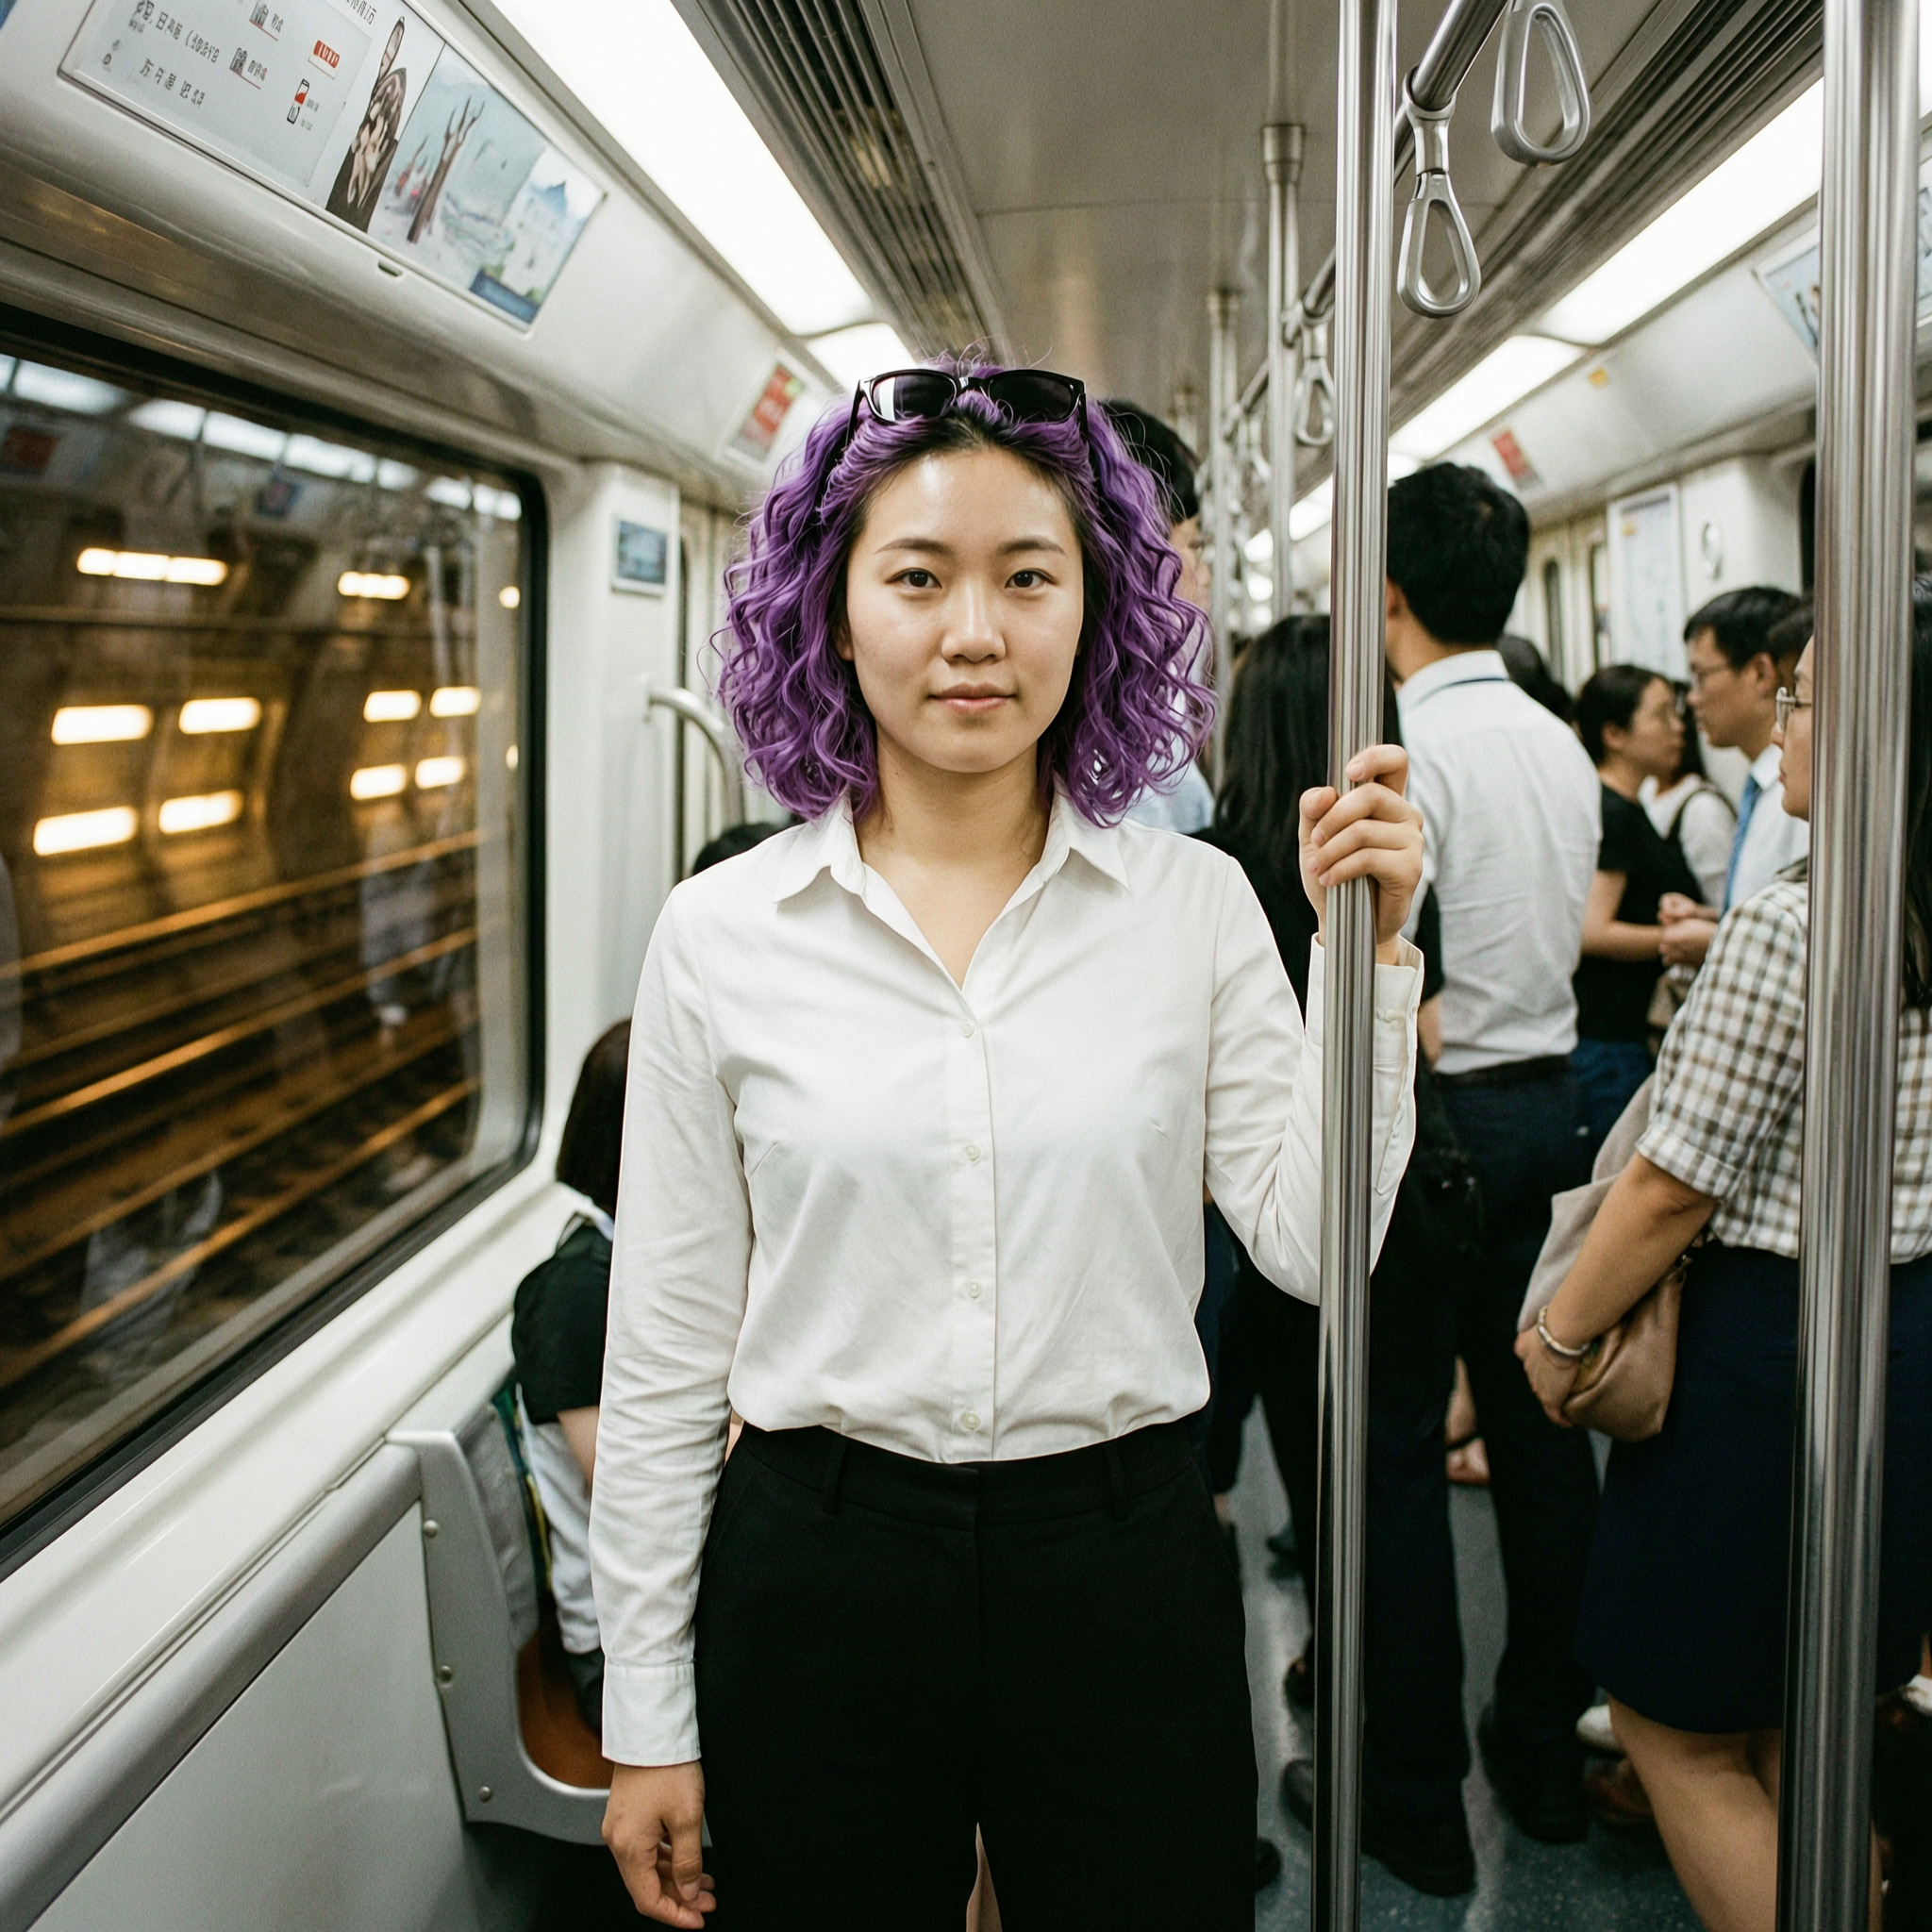
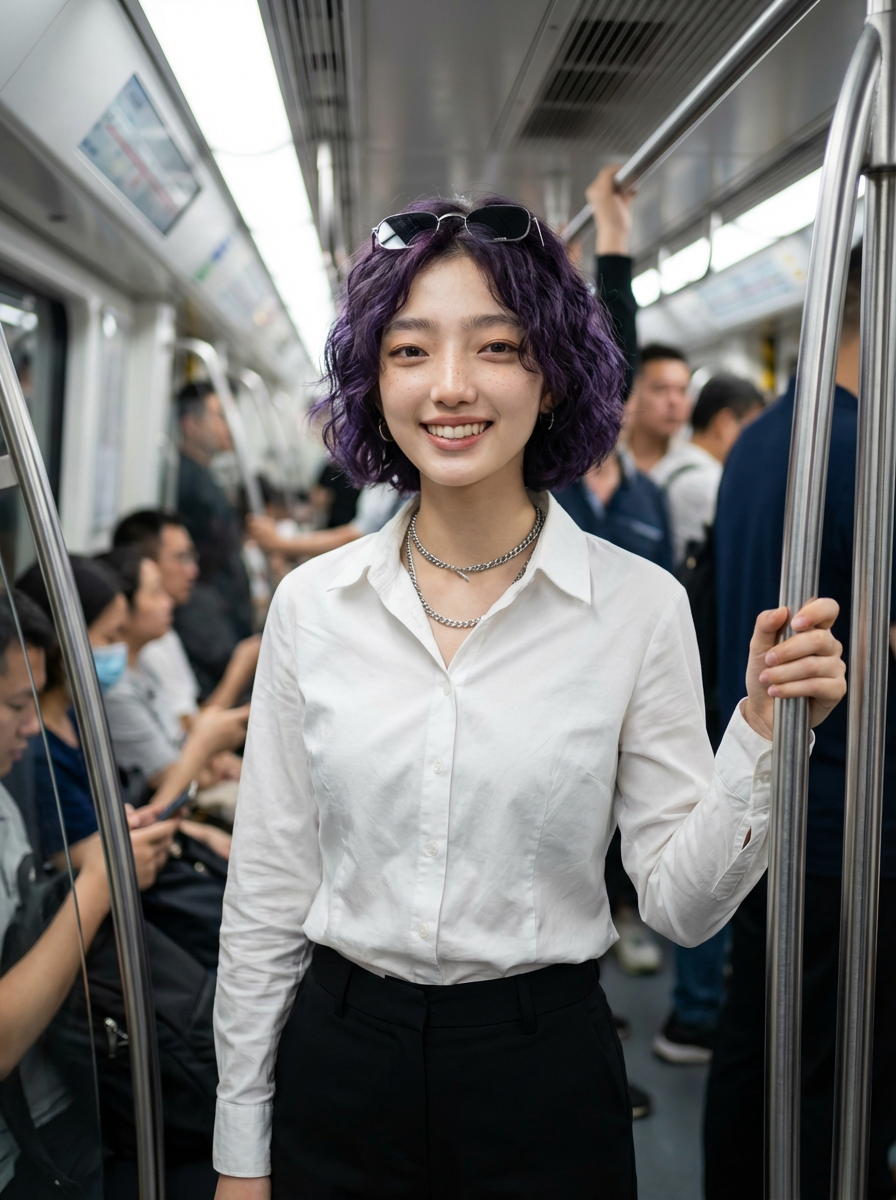
Image-to-image
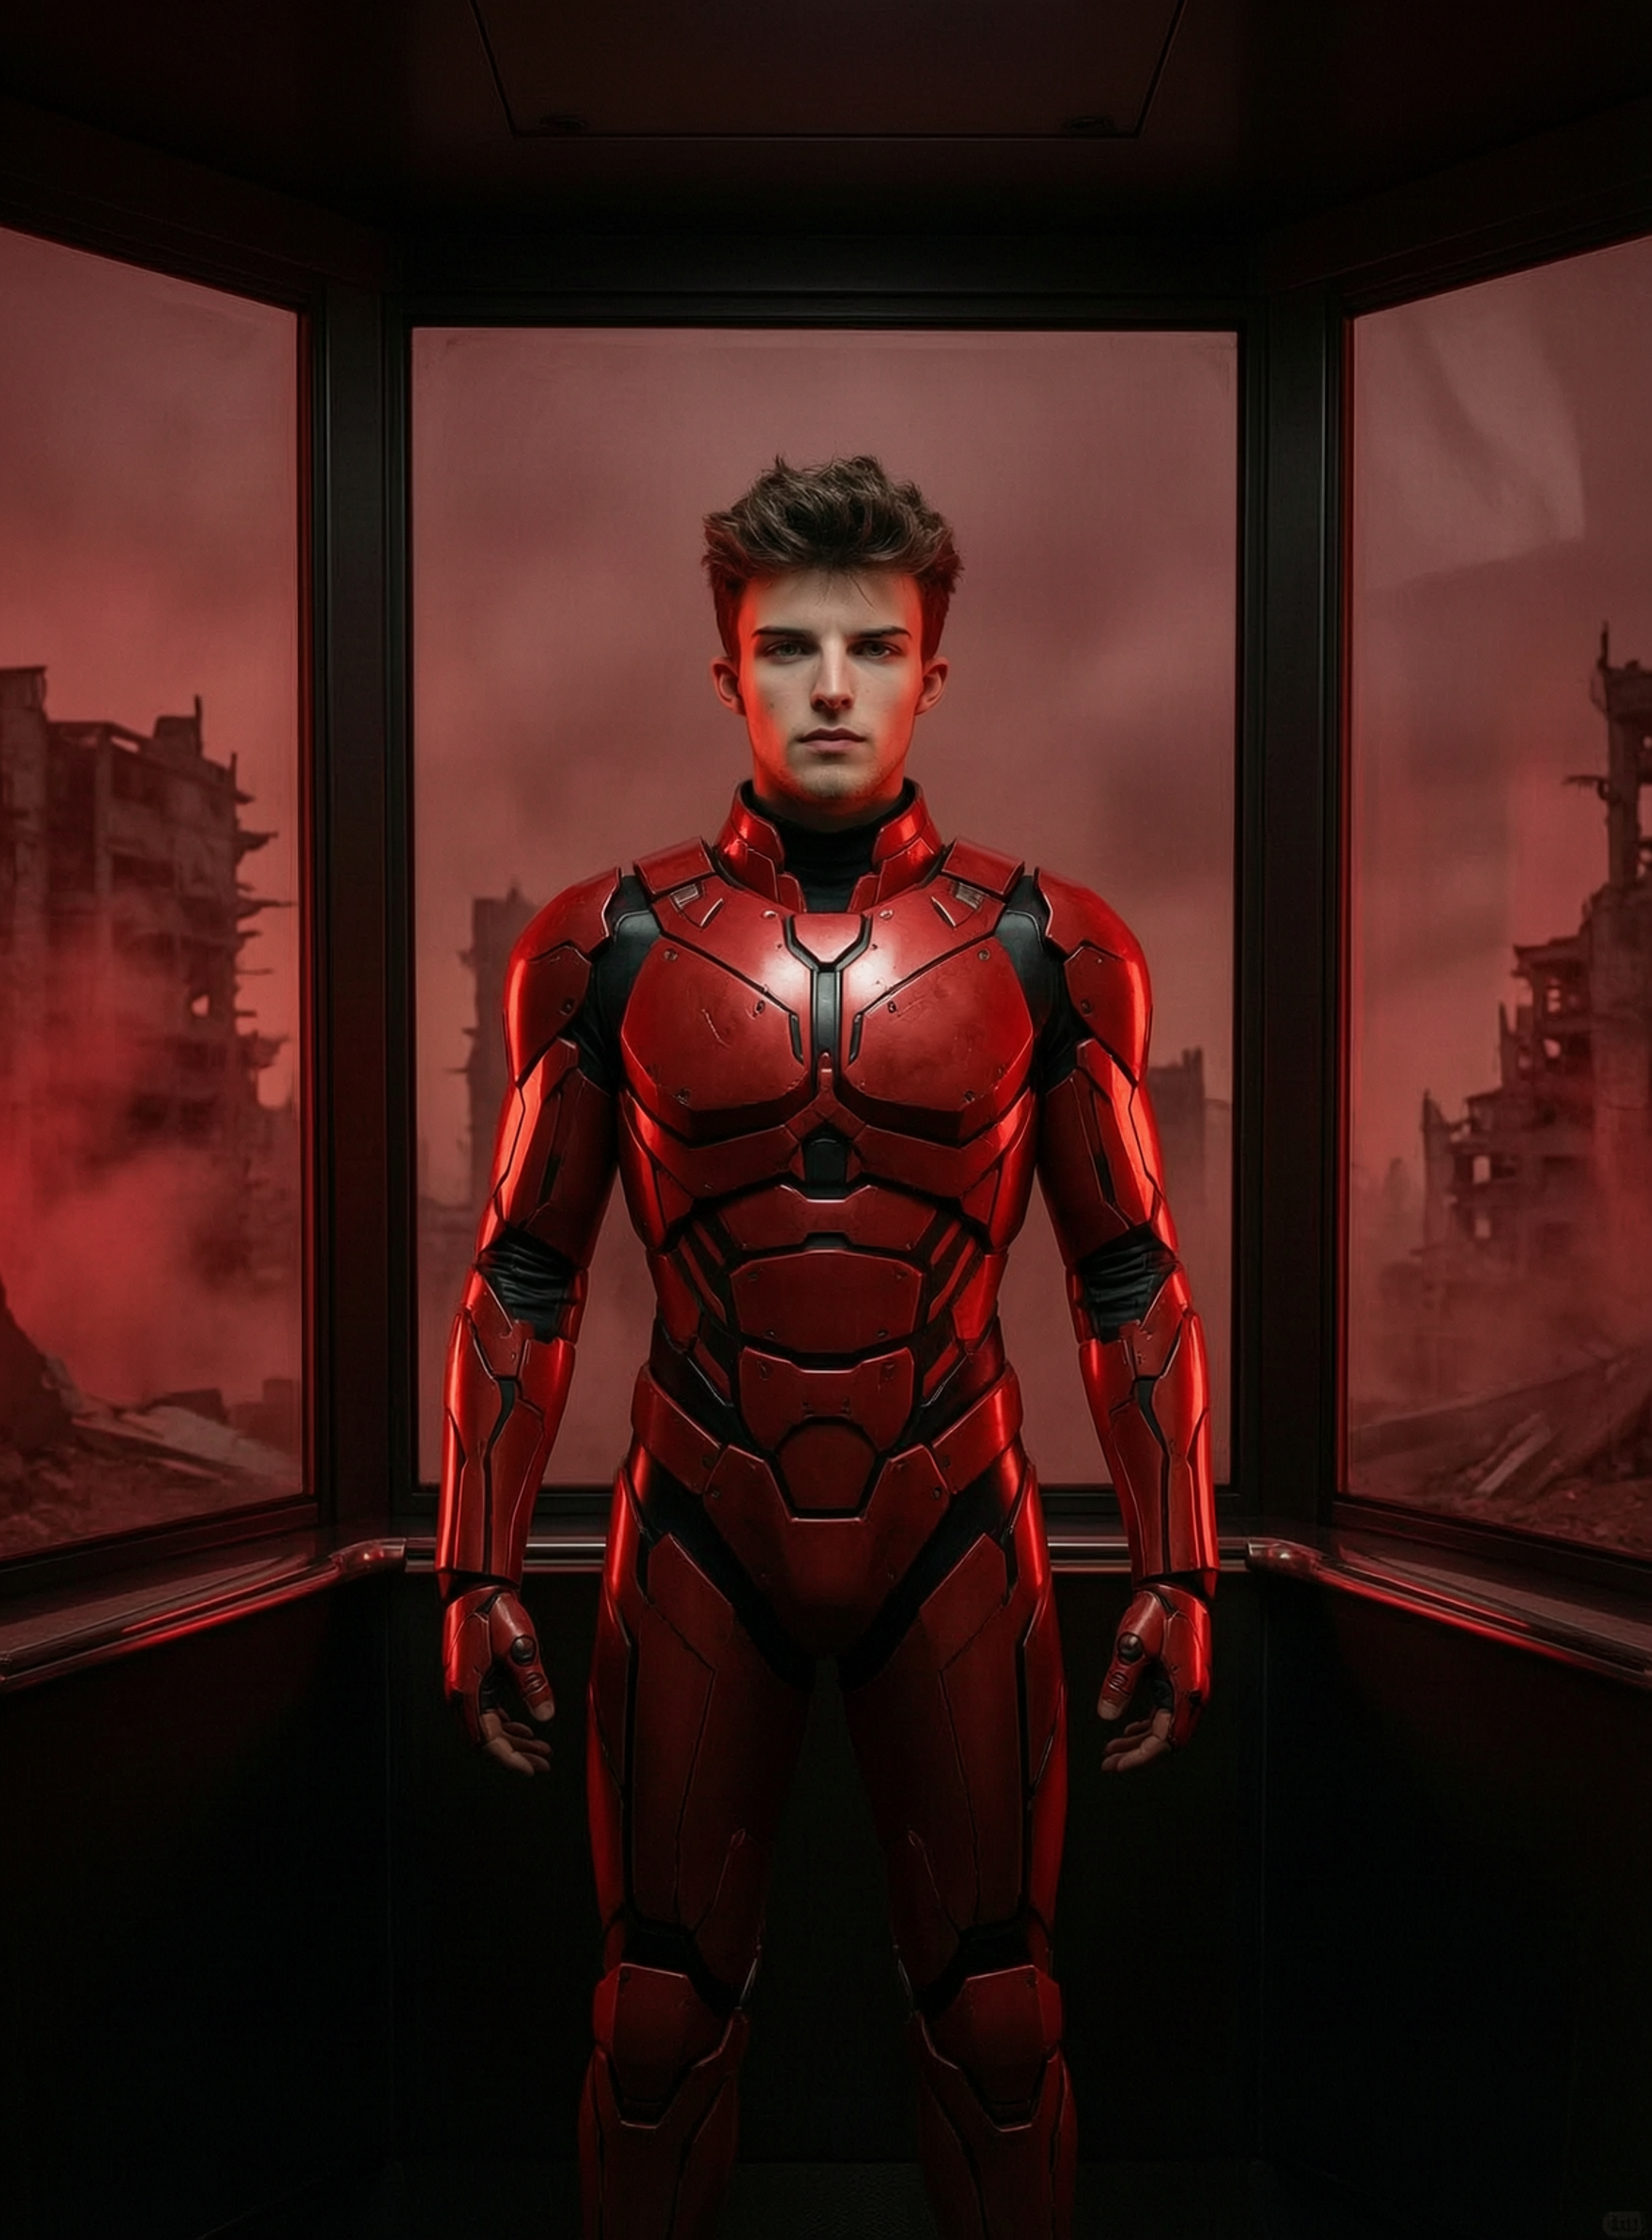
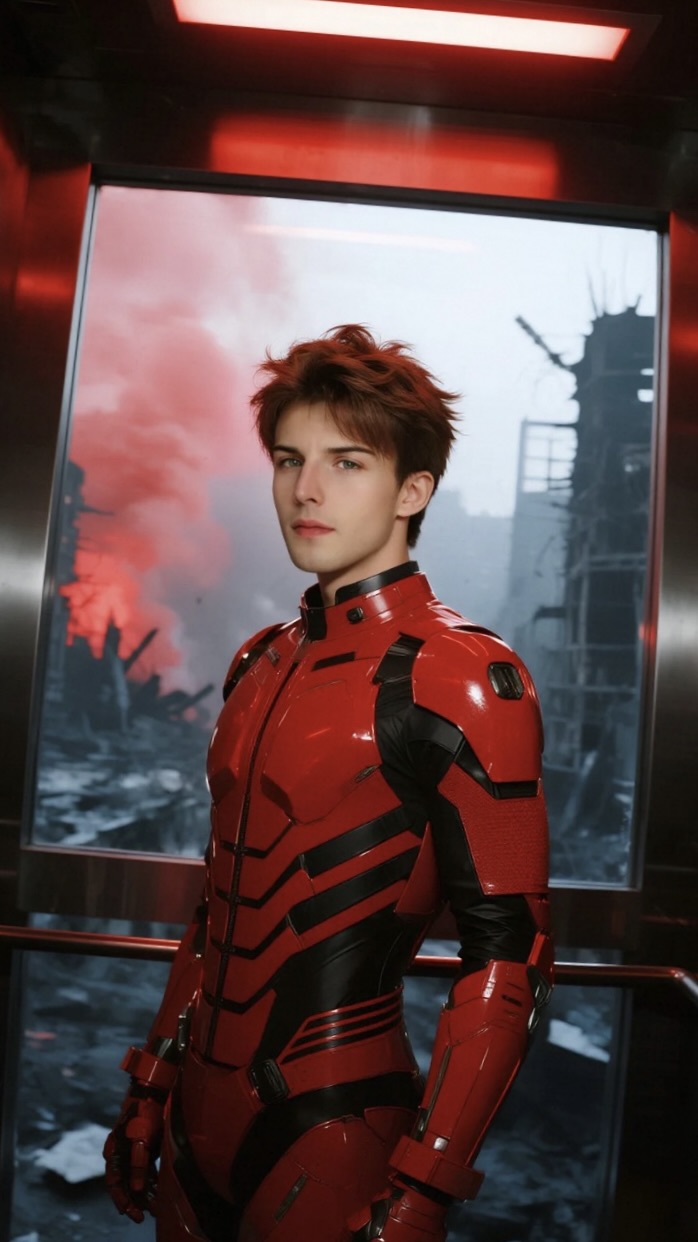
Fine-tuning objective: Train a "post-apocalyptic red-black mech armor" LoRA model.
Expected result: Given a character image, the model generates a "post-apocalyptic red-black mech armor" stylized version of the character without requiring a text prompt.
|
Input image
|
Output image (before fine-tuning)
Text prompts alone cannot reliably produce the specific "post-apocalyptic red-black mech armor" effect every time. |
Output image (after fine-tuning)
After fine-tuning, the model can reproduce the "post-apocalyptic red-black mech armor" effect from the training set without requiring a text prompt. |

Before running the following code, Obtain an API key and Configure API key as an environment variable.
Step 1: Upload the dataset
Upload your local dataset (in .zip format) to the Alibaba Cloud Model Studio platform and obtain the file ID (id).
Sample training data: For the format, see Training set.
-
Image generation - text-to-image: wan-image-t2i-training-dataset.zip
-
Image generation - image-to-image: wan-image-i2i-training-dataset.zip
Request example
This example uses text-to-image and uploads only the training set. The system automatically splits a portion of the training set as the validation set.
curl --location --request POST 'https://dashscope-intl.aliyuncs.com/compatible-mode/v1/files' \
--header "Authorization: Bearer $DASHSCOPE_API_KEY" \
--form 'file=@"./wan-image-t2i-training-dataset.zip"' \
--form 'purpose="fine-tune"'
Response example
Save the id. This is the unique identifier for the uploaded dataset.
{
    "id": "file-ft-3c67043a747c-xxxxxx",
    "object": "file",
    "bytes": 73310369,
    "filename": "wan-image-t2i-training-dataset.zip",
    "purpose": "fine-tune",
    "status": "processed",
    "created_at": 1782271893
}
Step 2: Fine-tune the model
Step 2.1: Create a fine-tuning job
Use the file ID from Step 1 to start a training job.
Request example
Replace <replace_with_training_dataset_file_id> with the id obtained in the previous step. For the complete parameter reference and format constraints, see Hyperparameters.
curl --location 'https://dashscope-intl.aliyuncs.com/api/v1/fine-tunes' \
--header "Authorization: Bearer $DASHSCOPE_API_KEY" \
--header 'Content-Type: application/json' \
--data '{
    "model": "wan2.7-image-pro",
    "training_datasets": [
        {
            "data_source_type": "file_id",
            "file_id": "<replace_with_training_dataset_file_id>"
        }
    ],
    "training_type": "efficient_sft",
    "hyper_parameters": {
        "learning_rate": 3e-5,
        "max_steps": 800,
        "eval_steps": 200,
        "max_token_length": "1k",
        "gradient_clip": 0.5,
        "weight_decay": 0.02,
        "max_pixels": "1k",
        "val_img_size": "1k",
        "generation_type": "t2i",
        "lora_rank": 32,
        "save_total_limit": 10
    }
}'Training duration reference:
-
Text-to-image (t2i): approximately 77 minutes for 300 steps.
-
Image-to-image (i2i): approximately 110 minutes for 300 steps.
Response example
Pay attention to three key parameters in the output field:
-
job_id: The job ID, used to query progress. -
finetuned_output: The name of the fine-tuned model. You must use this name for subsequent deployment and invocation. -
status: The training status. After creating a fine-tuning job, the initial status is PENDING, indicating that training has not yet started.
{
    ...
    "output": {
        "job_id": "ft-202511111122-xxxx",
        "status": "PENDING",
        "finetuned_output": "xxxx-ft-202511111122-xxxx",
        ...
    }
}
Step 2.2: Query the fine-tuning job status
Use the job_id obtained in Step 2.1 to query the job progress. Poll the following API until the status changes to SUCCEEDED.
Request example
Replace <replace_with_fine_tuning_job_id> in the URL with the value of job_id.
curl --location 'https://dashscope-intl.aliyuncs.com/api/v1/fine-tunes/<replace_with_fine_tuning_job_id>' \
--header "Authorization: Bearer $DASHSCOPE_API_KEY" \
--header 'Content-Type: application/json'
Response example
Pay attention to two parameters in the output field:
-
status: When its value changes to SUCCEEDED, the model training is complete and you can proceed with model deployment. -
usage: The total number of tokens consumed during model training, used for billing purposes.
{
    ...
    "output": {
        "job_id": "ft-202511111122-xxxx",
        "status": "SUCCEEDED",
        "usage": 432000,
        ...
    }
}
Step 3: Deploy the fine-tuned model
Step 3.1: Deploy the model as an online service
After the fine-tuning job status changes to SUCCEEDED, deploy the model as an online service.
Request example
Replace <replace_with_model_name> with the finetuned_output value from the Create a fine-tuning job output.
curl --location 'https://dashscope-intl.aliyuncs.com/api/v1/deployments' \
--header "Authorization: Bearer $DASHSCOPE_API_KEY" \
--header 'Content-Type: application/json' \
--data '{
    "model_name": "<replace_with_model_name>",
    "capacity": 1,
    "plan": "lora"
}'
Response example
Pay attention to two parameters in the output field:
-
deployed_model: The deployed model name, used to query the deployment status and invoke the model. -
status: The model deployment status. After deploying the fine-tuned model, the initial status is PENDING, indicating that deployment has not yet started.
{
    ...
    "output": {
        "deployed_model": "wan2.7-image-pro-xxxxxxxxxxxx",
        "status": "PENDING",
        ...
    }
}
Step 3.2: Query the deployment status
Query the deployment status. Poll the following API until the status changes to RUNNING.
For the fine-tuned model in this example, the deployment process takes approximately 5-10 minutes.
Request example
Replace <replace_with_deployed_model> with the deployed_model value from the Step 3.1 output.
curl --location 'https://dashscope-intl.aliyuncs.com/api/v1/deployments/<replace_with_deployed_model>' \
--header "Authorization: Bearer $DASHSCOPE_API_KEY" \
--header 'Content-Type: application/json'
Response example
Pay attention to two parameters in the output field:
-
status: When the status changes to RUNNING, the model has been deployed successfully and you can start invoking it. -
deployed_model: The deployed model name.
{
    ...
    "output": {
        "status": "RUNNING",
        "deployed_model": "wan2.7-image-pro-xxxxxxxxxxxx",
        ...
    }
}
Step 4: Invoke the model to generate images
After the model is deployed successfully (deployment status is RUNNING), you can start making invocations.
The currently deployed model only supports asynchronous calls, and there is no type field in message.content.
Build custom datasets
In addition to using the sample data in this document to experience the fine-tuning workflow, you can also build your own datasets for fine-tuning.
A dataset should contain a training set (required) and a validation set (optional; supports automatic splitting from the training set). Package all files in .zip format. File names should contain only English characters, digits, underscores, or hyphens.
Dataset format
Training set: Required
Text-to-image
The training set includes training target images and an annotation file (data.jsonl).
-
Training set sample: wan-image-t2i-training-dataset.zip
-
Zip package directory structure:
wan-image-t2i-training-dataset.zip ├── data.jsonl # Must be named data.jsonl, maximum 20MB ├── 1_0.png # Training target image, max resolution 4096*4096, max 20MB per image, supports PNG/JPG/JPEG/WEBP/BMP ├── 1_1.png # File names support only English characters, flat structure (no subdirectories) └── 1_2.png -
Annotation file (data.jsonl): Each line represents one training sample and must be a JSON object.
{
  "prompt": "s86b5p, A person in a quiet private library on a peaceful afternoon, with tall dark walnut bookshelves behind them, sunlight streaming through venetian blinds casting striped shadows, wearing a soft beige cable-knit sweater, standing facing the camera, half-body shot, the image has a delicate film grain texture.",
  "img_path": "./1_0.png"
}
Image-to-image
The training set includes reference images (input), training target images (output), and an annotation file (data.jsonl).
-
Training set sample: wan-image-i2i-training-dataset.zip
-
Zip package directory structure:
wan-image-i2i-training-dataset.zip ├── data.jsonl # Must be named data.jsonl, maximum 20MB ├── 1_0.jpg # Training target image (output) ├── 1_1.jpg # Reference image (input) ├── 6_0.jpg # Training target image (output) └── 6_1.jpg # Reference image (input) -
Annotation file (data.jsonl): Each line represents one training sample and must be a JSON object.
{
  "prompt": "s86b5p, Change the background to an elevator with red lighting, featuring large floor-to-ceiling windows. Change the character's clothing to red tight-fitting mech armor with black stripe decorations.",
  "input_img": "./1_1.jpg",
  "img_path": "./1_0.jpg"
}
Multi-image-to-image
The training set includes multiple reference images (input), training target images (output), and an annotation file (data.jsonl). Unlike single image-to-image, multi-image-to-image supports inputting multiple reference images simultaneously (e.g., a character photo + a pose image, up to 9 reference images). The model generates the target image based on the combined information from all reference images.
-
Training set sample:
-
Zip package directory structure:
wan-image-multi-i2i-training-dataset.zip ├── data.jsonl # Must be named data.jsonl, maximum 20MB ├── 1_0.jpg # Training target image (output) ├── 1_ref.jpg # Reference image 1 (e.g., character photo) ├── 1_pose.jpg # Reference image 2 (e.g., pose image) ├── 6_0.jpg # Training target image (output) ├── 6_ref.jpg # Reference image 1 └── 6_pose.jpg # Reference image 2 -
Annotation file (data.jsonl): Each line represents one training sample and must be a JSON object. Use the
input_imgsfield (array type) to pass multiple reference image paths.{ "prompt": "s86b5p, Change the background to an elevator with red lighting, featuring large floor-to-ceiling windows. Outside the windows, there is a post-apocalyptic scene with red mist. Change the character's clothing to red tight-fitting mech armor with black stripe decorations. Standing with both arms stretched horizontally to form a T-shape.", "input_imgs": ["./1_ref.jpg", "./1_pose.jpg"], "img_path": "./1_0.jpg" }
-
Multi-image-to-image uses
input_imgs(array), while single image-to-image usesinput_img(string). Please note the difference. -
The order of images in the
input_imgsarray should be consistent with the training intent (e.g., the first image as character reference, the second as pose reference). -
input_imgssupports up to 9 reference images.
-
data.jsonl must be in line-delimited JSONL format (one independent JSON object per line). Using JSON array format (where the first character of the file is
[) is not allowed. -
Files within the zip package must be placed in a flat structure. Subdirectories are not allowed. File names support only English characters (Chinese characters, spaces, and special characters are not allowed).
Validation set: Optional
The validation set includes an annotation file (data.jsonl) and optional reference images (required for image-to-image mode). Target images are not needed. At each evaluation checkpoint, the training job automatically invokes the model service to generate preview images using the prompts (and reference images) from the validation set.
-
Validation set:
-
Text-to-image: wan-image-t2i-valid-dataset.zip
-
Image-to-image: wan-image-i2i-valid-dataset.zip
-
-
Zip package directory structure:
wan-image-i2i-valid-dataset.zip ├── data.jsonl # Must be named data.jsonl, maximum 20MB ├── input_001.png # Optional, reference image for image-to-image mode └── input_002.png -
Annotation file (data.jsonl): Each line represents one validation sample and must be a JSON object.
Text-to-image
{
    "prompt": "s86b5p, A person in a crowded morning rush hour subway car, holding onto the handrail, with blurred passengers in the background and tunnel lights visible through the windows, wearing an ordinary office worker white shirt and black trousers, standing facing the camera, half-body shot, realistic candid feel."
}
Image-to-image
{
    "prompt": "s86b5p, Change the background to an elevator with red lighting, featuring large floor-to-ceiling windows. Change the character's clothing to red tight-fitting mech armor with black stripe decorations.",
    "input_img": "./input_001.png"
}
Multi-image-to-image
The multi-image-to-image validation set uses
input_imgs(array) to pass multiple reference image paths, supporting up to 9 images.{ "prompt": "s86b5p, Change the background to an elevator with red lighting, featuring large floor-to-ceiling windows. Outside the windows, there is a post-apocalyptic scene with red mist. Change the character's clothing to red tight-fitting mech armor with black stripe decorations. Standing with both arms stretched horizontally to form a T-shape.", "input_imgs": ["./input_001.png", "./input_002.png"] }
Data scale and limits
-
Data volume: We recommend providing at least 25 images (50 or more is recommended for better results). Use the same character or style across multiple scenes and angles with consistent content descriptions.
-
Zip package: When uploading via API, the total package size must be no larger than 1 GB.
-
Training image requirements:
-
Supported image formats: BMP, JPEG, PNG, and WEBP.
-
Image resolution must be no larger than 4096×4096.
-
Individual image file size must be no larger than 20 MB.
-
Data collection and cleaning
1. Determine the fine-tuning scenario
Wan supports the following fine-tuning scenarios for image generation:
-
IP character stylization: Train the model to learn the drawing style of a specific IP character, such as anime characters or mascot images.
-
Fixed visual style: Improve the model's ability to reproduce a specific art style, such as flat illustration, ink painting, or pixel art.
-
Specific scene generation: Replicate specific composition patterns or scene templates, such as product display images or poster layouts.
2. Obtain raw materials
-
AI generation and selection: Use the Wan base model to generate images in bulk, then manually select the high-quality samples that best match the target effect. This is the most commonly used method.
-
Real photography: If your goal is to achieve highly realistic scenes (such as real product photos or portrait photography), using real-shot footage is the best choice.
-
3D software rendering: For scenes that require fine detail control or 3D rendering styles, we recommend using 3D software (such as Blender or C4D) to create source materials.
3. Clean the data
|
Dimension |
Best practice |
Anti-pattern |
|
Consistency |
Core features must be highly consistent. For example: When training a "flat illustration style", all images must share the same line thickness and color scheme. |
Mixed styles. The dataset contains both impasto style and flat style images. The model cannot determine which style to learn. |
|
Diversity |
The more diverse the subjects and scenes, the better. Cover different subjects (men, women, elderly, children, cats, dogs, buildings) and different compositions (long shot, close-up, extreme close-up). Resolution and aspect ratios should also be as varied as possible. |
Single scene or subject. All images show "a person in red clothes against a white wall". The model may mistakenly learn that "red clothes" and "white wall" are part of the style, and fail to generate correctly in different scenes. |
|
Balance |
Balanced proportions across data types. If multiple styles are included, the quantity should be roughly equal. |
Severely imbalanced proportions. 90% are portrait images and 10% are landscape images. The model may perform poorly when generating landscape images. |
|
Cleanliness |
Clean and clear images. Use original materials without distractions. |
Contains distracting elements. Images contain watermarks, obvious black borders, or noise. The model may learn the watermarks as part of the style. |
|
Resolution |
Moderate resolution. We recommend that training image resolution does not exceed 2048×2048. Excessively large images increase training time. |
Resolution varies too widely. Having both 256×256 small images and 4096×4096 large images in the training set affects training stability. |
Image annotation: Writing prompts for images
In the dataset annotation file (data.jsonl), each image has a corresponding prompt. The prompt describes the content of the target image. The quality of the prompt directly determines what the model learns.
Prompt writing formula
Prompt = [Subject description] + [Background description] + [Trigger word] + [Style description]
|
Prompt component |
Description |
Recommendation |
Example |
|
Subject description |
Describes the people or objects in the image |
Required |
A young woman wearing a red Chinese-style long shirt... |
|
Background description |
Describes the environment where the subject is located |
Required |
The background is a brick wall covered with green vines... |
|
Trigger word |
A rare word with no actual meaning |
Recommended |
s86b5p or m01aa |
|
Style description |
Describes the art style and visual characteristics of the target image in detail |
Recommended |
Rendered in flat illustration style with clean flowing lines and vivid flat colors to emphasize three-dimensionality and modern design aesthetics. |
Evaluate models with validation sets
Specify the validation set
A fine-tuning job must include a training set, while a validation set is optional. You can choose to have the system automatically split or manually upload a validation set. The specific methods are as follows:
Method 1: No validation set uploaded (system automatic split)
When Video generation model fine-tuning API, if no validation set is uploaded separately (i.e., the validation_file_ids parameter is not provided), the system splits a validation set from the training set based on split, which defaults to 0.9. This means 90% is used for training and 10% for validation.
Method 2: Manually upload a validation set (specified via validation_file_ids)
If you want to use your own prepared data to evaluate checkpoints instead of relying on system random splitting, you can upload a custom validation set.
Note: Once you choose to upload manually, the system completely ignores the automatic split rules above and uses only the data you uploaded for validation.
Select the best checkpoint for deployment
During training, the system periodically saves model "snapshots" (i.e., checkpoints). By default, the system outputs the last checkpoint as the final fine-tuned model. However, checkpoints produced during intermediate stages may perform better than the final version. You can select the most satisfactory one for deployment.
The system runs checkpoints on the validation set and generates preview images at intervals set by the Hyperparameters (hyper_parameters) eval_steps.
-
How to evaluate: Judge the results by directly observing the generated preview images.
-
Selection criteria: Find the checkpoint with the best results and the most closely matching style.
Procedure
Step 1: View preview results generated by checkpoints
Step 2: Export the checkpoint and obtain the model name for deployment
Step 3: Deploy and invoke the model
Billing
-
Model training: Charged.
-
Cost = Total training tokens × Unit price. See Training and deployment pricing.
-
After training is complete, check the total number of tokens consumed during training in the
usagefield of the Retrieve a fine-tuning job API.
The following table lists the training step counts and estimated costs for wan2.7-image, wan2.7-image-pro. This data is for reference only. The actual training results are subject to the final delivery, and the costs are subject to the official bill. For detailed billing formulas, see Training and deployment pricing.
generation_type
Image Resolution
Common Step Count
Estimated Token Consumption
Estimated Cost
t2i (text-to-image)
1K
500
6,400,000
$96
1,000
12,800,000
$192
2,000
25,600,000
$384
2K
500
11,610,000
$174.15
1,000
23,220,000
$348.3
2,000
46,440,000
$696.6
i2i (image-to-image)
1K
500
11,610,000
$174.15
1,000
23,220,000
$348.3
2,000
46,440,000
$696.6
2K
500
16,000,000
$240
1,000
32,000,000
$480
2,000
64,000,000
$960
-
-
Model deployment and invocation: Deployment is free. Invocations are billed at the standard rate of the fine-tuned base model.
Model ID
LoRA Deployment & Invocation Price
wan2.7-image-pro
$0.075/image
wan2.7-image
$0.03/image
API reference
FAQ
Q: How do I design a good trigger word?
A: The rules are as follows:
-
We recommend using rare character combinations with no actual semantic meaning, such as s86b5p, m01aa, or EVEAven638123. Ensure there is no semantic meaning in the base model's vocabulary.
-
Avoid using common English words (such as beautiful, fire, or dance), as this would pollute the model's original understanding of these words.