Use AOQ to connect to fun-asr-realtime, stream microphone audio, and receive transcription results in real time. The client code uses Android Java, and other AOQ-supported platforms provide the same interfaces.
Solution overview
fun-asr-realtime transcribes an audio stream into punctuated text in real time. The AOQ SDK transports media and events over separate tracks: the client sends audio over the Audio track and uses the Data track to send control events and receive recognition events. The model uses the Inference event protocol, not the Realtime event protocol.
This solution is suitable for live captions, meeting transcription, voice input, and intelligent assistants. The Audio track eliminates the need to encode audio in event messages, while the Data track preserves task semantics such as run-task, result-generated, and finish-task.
- The client requests temporary AOQ connection credentials from the application server.
- The application server uses an API key to request a token from Model Studio and returns the connection fields to the client.
- The client establishes an AOQ connection and sends run-task. After task-started is received, the client starts sending microphone audio.
- The server continuously returns result-generated events. After the client sends finish-task, it waits for the final result and task-finished.
Prerequisites
- Enable Alibaba Cloud Model Studio and create an API key as described in Obtain and configure an API key. Store the API key only on the application server. Do not include it in client code or commit it to a code repository.
- Select an AOQ endpoint for the region in which your application is deployed. For endpoint selection, see Select a region, deployment scope, and endpoint.
- Download the latest AOQ Client SDK as described in SDK download. This tutorial transports Opus audio and requires the Opus plugin.
- Set up an application server as described in Token authentication and implement server-side proxy authentication for the AOQ Inference protocol. Before each new connection, the client must obtain new connection credentials from the application server.
Import the SDK
Select the SDK integration instructions for your development platform. The client implementation uses Android Java; other platforms follow the same API design and event flow.
Android
- Place libPluginOpus.so from the Opus plugin in app/src/main/jniLibs/armeabi-v7a/ and app/src/main/jniLibs/arm64-v8a/ for the corresponding ABIs. Place AoqClientSdk-release.aar in app/libs and configure the dependency and ABIs in app/build.gradle:
android {
    defaultConfig {
        minSdk 21
        ndk { abiFilters 'armeabi-v7a', 'arm64-v8a' }
    }
}

dependencies {
    implementation fileTree(dir: 'libs', include: ['*.aar'])
}
- Declare network and recording permissions in AndroidManifest.xml:
<uses-permission android:name="android.permission.INTERNET" />
<uses-permission android:name="android.permission.ACCESS_NETWORK_STATE" />
<uses-permission android:name="android.permission.RECORD_AUDIO" />
<uses-permission android:name="android.permission.MODIFY_AUDIO_SETTINGS" />
- Request the RECORD_AUDIO runtime permission before recording starts. Speech recognition does not require the CAMERA permission.
iOS
- Drag AoqClientSdk.framework and PluginOpus.framework into the Xcode project. In Target > General > Frameworks, Libraries, and Embedded Content, select Embed & Sign. The SDK supports arm64 devices that run iOS 13.0 or later.
- Add NSMicrophoneUsageDescription to Info.plist. Speech recognition does not require NSCameraUsageDescription.
- Use import AoqClientSdk in Swift, or #import <AoqClientSdk/AoqClientSdk.h> in Objective-C.
HarmonyOS
- Place libPluginOpus.so from the Opus plugin in entry/libs/arm64-v8a/. Place AoqClientSdk.har in entry/libs and declare the dependency in entry/oh-package.json5. The SDK is compatible with API 12 and supports arm64-v8a:
{
  "dependencies": {
    "@aoq/client-sdk": "file:./libs/AoqClientSdk.har"
  }
}
- Declare network and microphone permissions in entry/src/main/module.json5:
"requestPermissions": [
  { "name": "ohos.permission.INTERNET" },
  {
    "name": "ohos.permission.MICROPHONE",
    "reason": "$string:perm_mic_reason",
    "usedScene": { "abilities": ["EntryAbility"], "when": "inuse" }
  }
]
- Before recording starts, call abilityAccessCtrl.createAtManager().requestPermissionsFromUser to request microphone access.
Linux (Python)
- Extract the SDK and keep aoq_client_sdk.py, libAoqClientSdk.so, and libonnxruntime.so.1.16.3 in the same directory.
- Add the SDK directory to the Python module and shared-library search paths:
export PYTHONPATH="$PWD/AoqClientSdk:$PYTHONPATH"
export LD_LIBRARY_PATH="$PWD/AoqClientSdk:$LD_LIBRARY_PATH"
- Use import aoq_client_sdk in Python. You can also set AOQ_CLIENT_SDK_LIB to the absolute path of libAoqClientSdk.so.
Try the demo
Use the Android demo from Alibaba Cloud Model Studio to quickly verify AOQ connectivity. Download the APK and configure the API key and workspaceId to try selected models.
Scan the following QR code to download the demo:

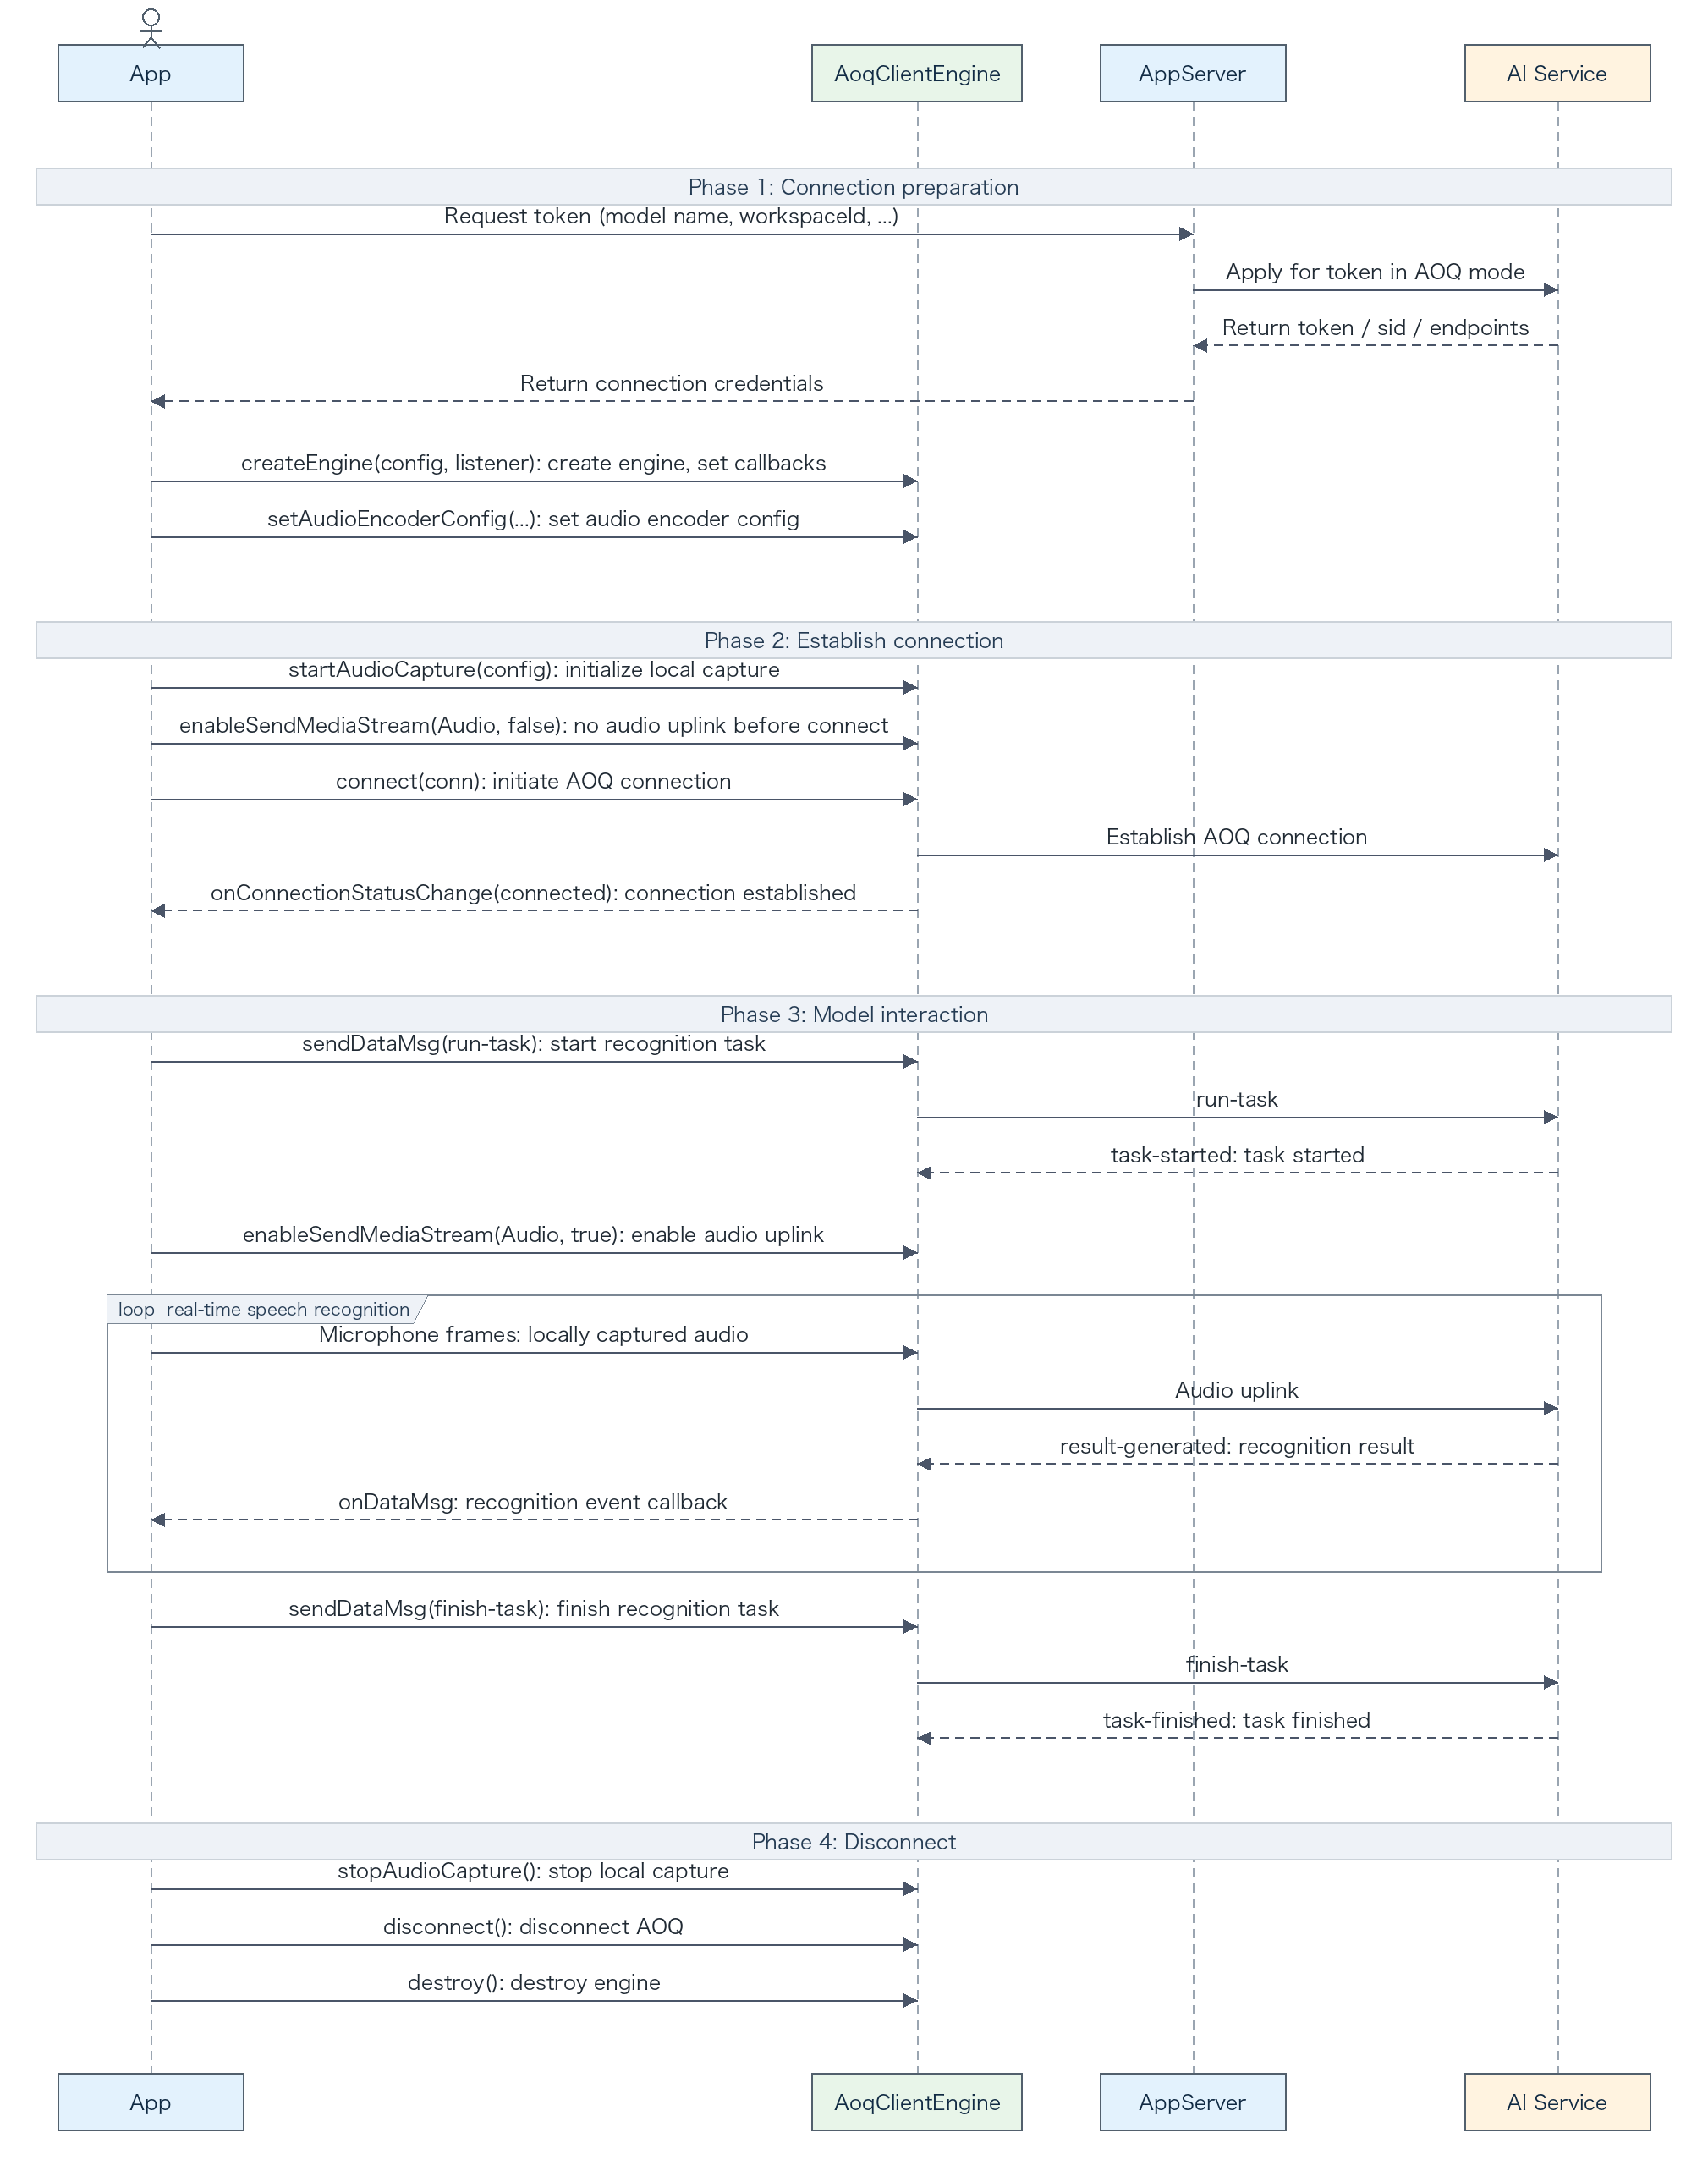
Implementation flow
- The application server uses the Inference token URL to obtain AOQ connection parameters for fun-asr-realtime.
- The client maps the token response to AoqConnectConfig, publishes the Audio and Data tracks, and subscribes to the Data track.
- The client configures audio encoding parameters based on business and model requirements, starts microphone capture with audio sending disabled, and establishes the AOQ connection.
- After the connection is established, the client sends run-task and enables Audio-track sending after task-started is received.
- The client handles result-generated in onDataMsg. To stop recognition, it first disables Audio-track sending and then sends finish-task.
- After task-finished is received, the client can start another task on the same connection with a new task_id, or disconnect and destroy the engine.
Obtain a token on the application server
Set DASHSCOPE_API_KEY on the application server and send a request to the endpoint for the selected region. clientIp is the actual public IP address of the client device. The field is optional, but we recommend that you provide it so that the service can select an appropriate relay endpoint.
curl -X POST \
  "https://{endpoint}/api/v1/webrtc/inference?model=fun-asr-realtime" \
  -H "Content-Type: application/json" \
  -H "Authorization: Bearer ${DASHSCOPE_API_KEY}" \
  -H "x-dashscope-rtc-transport: moq" \
  -d "{\"clientIp\": \"${CLIENT_REAL_IP}\"}"
NoteIf the application server cannot obtain the actual public IP address of the client device, omit clientIp from the request body instead of passing an empty string.
Return the following response fields to the client. Never return the API key to the client. For all request and response fields, see Token authentication.
Response field | SDK field |
aoqTokenForClient | AoqConnectConfig.token |
sid | AoqConnectConfig.sid |
clientRelayCertFingerprint | AoqConnectConfig.certFingerprint |
clientRelayEndpoints | AoqConnectConfig.relayEndpoints |
extraInfo.workspaceIdHash | AoqConnectConfig.workspaceIdHash |
Implement the Android client
The following steps divide the Android Java client code according to the actual connection and task sequence. Each snippet is taken from the complete example later in this topic.
1. Create the engine and register callbacks
Create an AOQ client engine and register callbacks for connection state changes and Data-track events. Implement the callback logic for your application, and start recognition only after the connection is established.
AoqClientListener listener = new AoqClientListener() {
    @Override
    public void onConnectionStatusChange(AoqClientEngine.AoqConnectionStatus status) {
        connected = status == AoqClientEngine.AoqConnectionStatus
                .AoqConnectionStatusConnected;
        if (connected) {
            beginRecognition();
        }
    }

    @Override
    public void onDataMsg(AoqClientEngine.AoqDataMsg msg) {
        handleServerEvent(msg);
    }
};

AoqClientEngine.AoqCreateConfig createConfig = new AoqClientEngine.AoqCreateConfig();
createConfig.workDir = context.getFilesDir().getAbsolutePath();
engine = AoqClientEngine.createEngine(context, createConfig, listener);
2. Configure audio encoding
Configure the audio encoding sent to the model. Set the format, sample rate, and channel count based on your application and model requirements. The following code uses 16 kHz mono Opus as an example. For supported values, see the run-task parameters in Client events.
AoqClientEngine.AoqAudioCodecConfig encoder =
        new AoqClientEngine.AoqAudioCodecConfig();
encoder.trackType = AoqClientEngine.AoqTrackType.AoqTrackTypeAudio;
encoder.codecType = AoqClientEngine.AoqEncoderType.AoqEncoderTypeAudioOpus;
encoder.sampleRate = 16000;
encoder.channel = 1;
encoder.bitrate = 24000;
engine.setAudioEncoderConfig(encoder);
3. Configure the connection and transport tracks
Configure the AOQ connection with the credentials returned by the application server, and select the tracks to publish and subscribe to based on your application. For real-time speech recognition, this example publishes Audio and Data tracks and subscribes to the Data track.
addTrack(connectConfig, true,
        AoqClientEngine.AoqTrackType.AoqTrackTypeAudio);
addTrack(connectConfig, true,
        AoqClientEngine.AoqTrackType.AoqTrackTypeData);
addTrack(connectConfig, false,
        AoqClientEngine.AoqTrackType.AoqTrackTypeData);
4. Start audio capture and establish the connection
Configure audio capture and establish the AOQ connection. Choose built-in or external capture, whether to enable VoIP mode, and the channel count based on your application. Keep Audio-track sending disabled until task-started is received.
AoqClientEngine.AoqAudioCaptureConfig capture =
        new AoqClientEngine.AoqAudioCaptureConfig();
capture.isExternal = false;
capture.isVoipMode = true;
capture.channel = 1;
engine.startAudioCapture(capture);

// Do not send audio until task-started is received.
engine.enableSendMediaStream(
        AoqClientEngine.AoqTrackType.AoqTrackTypeAudio, false);
engine.connect(connectConfig);
5. Start a recognition task
After the connection is established, generate a task ID and send run-task to start recognition. Configure model, format, sample_rate, and other task parameters for the model and audio input that you use. For details, see Client events.
taskId = UUID.randomUUID().toString();
JSONObject header = createHeader("run-task");
JSONObject parameters = new JSONObject()
        .put("format", "pcm")
        .put("sample_rate", 16000);
JSONObject payload = new JSONObject()
        .put("task_group", "audio")
        .put("task", "asr")
        .put("function", "recognition")
        .put("model", "fun-asr-realtime")
        .put("parameters", parameters)
        .put("input", new JSONObject());
send(new JSONObject().put("header", header).put("payload", payload));
6. Handle server events
Handle task states, recognition results, and errors, and pass the results to your application. Implement callbacks based on your UI and state-management requirements. Send audio only after task-started is received, and exclude heartbeat events from displayed transcripts. For the complete response schema, see Server events.
String eventName = header.optString("event", "");
if ("task-started".equals(eventName)) {
    taskStarted = true;
    engine.enableSendMediaStream(
            AoqClientEngine.AoqTrackType.AoqTrackTypeAudio, true);
} else if ("result-generated".equals(eventName)) {
    JSONObject payload = event.optJSONObject("payload");
    JSONObject output = payload == null ? null : payload.optJSONObject("output");
    JSONObject sentence = output == null ? null : output.optJSONObject("sentence");
    if (sentence != null && !sentence.optBoolean("heartbeat", false)) {
        String text = sentence.optString("text", "");
        if (!text.isEmpty()) {
            resultListener.onResult(
                    text, sentence.optBoolean("sentence_end", false));
        }
    }
} else if ("task-finished".equals(eventName)) {
    resetTaskState();
    resultListener.onTaskFinished();
} else if ("task-failed".equals(eventName)) {
    String message = header.optString("error_message", "Recognition failed");
    resetTaskState();
    resultListener.onError(message);
}
7. Finish the recognition task
When the user finishes the current recording, stop sending audio and send finish-task. Keep the connection open until the final transcript and task-finished arrive. You can then start another task or release the connection based on your application flow. For the event format, see Client events.
engine.enableSendMediaStream(
        AoqClientEngine.AoqTrackType.AoqTrackTypeAudio, false);
JSONObject payload = new JSONObject().put("input", new JSONObject());
send(new JSONObject()
        .put("header", createHeader("finish-task"))
        .put("payload", payload));
8. Disconnect and destroy the engine
Release audio capture, the AOQ connection, and engine resources when the page is destroyed or recognition is no longer needed. Choose the release point based on your application lifecycle, and do not release resources immediately after finish-task is sent.
engine.enableSendMediaStream(
        AoqClientEngine.AoqTrackType.AoqTrackTypeAudio, false);
engine.stopAudioCapture();
engine.disconnect();
AoqClientEngine.destroy();
Complete example
This Android Java class maps the JSON response from the application server to AoqConnectConfig and combines the preceding connection, capture, task, and resource-release logic.
import android.content.Context;

import com.alibaba.aoq.clientsdk.AoqClientEngine;
import com.alibaba.aoq.clientsdk.AoqClientListener;

import org.json.JSONArray;
import org.json.JSONObject;

import java.nio.charset.StandardCharsets;
import java.util.UUID;

public final class AsrClient {
    public interface ResultListener {
        void onResult(String text, boolean sentenceEnd);

        void onTaskFinished();

        void onError(String message);
    }

    private final AoqClientEngine engine;
    private final ResultListener resultListener;
    private String taskId;
    private boolean connected;
    private boolean taskStarted;

    public AsrClient(Context context, AoqClientEngine.AoqConnectConfig connectConfig,
                     ResultListener resultListener) {
        this.resultListener = resultListener;
        AoqClientListener listener = new AoqClientListener() {
            @Override
            public void onConnectionStatusChange(AoqClientEngine.AoqConnectionStatus status) {
                connected = status == AoqClientEngine.AoqConnectionStatus
                        .AoqConnectionStatusConnected;
                if (connected) {
                    beginRecognition();
                }
            }

            @Override
            public void onDataMsg(AoqClientEngine.AoqDataMsg msg) {
                handleServerEvent(msg);
            }
        };

        AoqClientEngine.AoqCreateConfig createConfig = new AoqClientEngine.AoqCreateConfig();
        createConfig.workDir = context.getFilesDir().getAbsolutePath();
        engine = AoqClientEngine.createEngine(context, createConfig, listener);

        configureAudioEncoder();
        configureTracks(connectConfig);
        startAudioCapture();
        engine.connect(connectConfig);
    }

    private void configureAudioEncoder() {
        AoqClientEngine.AoqAudioCodecConfig encoder = new AoqClientEngine.AoqAudioCodecConfig();
        encoder.trackType = AoqClientEngine.AoqTrackType.AoqTrackTypeAudio;
        encoder.codecType = AoqClientEngine.AoqEncoderType.AoqEncoderTypeAudioOpus;
        encoder.sampleRate = 16000;
        encoder.channel = 1;
        encoder.bitrate = 24000;
        engine.setAudioEncoderConfig(encoder);
    }

    private static void configureTracks(AoqClientEngine.AoqConnectConfig connectConfig) {
        addTrack(connectConfig, true, AoqClientEngine.AoqTrackType.AoqTrackTypeAudio);
        addTrack(connectConfig, true, AoqClientEngine.AoqTrackType.AoqTrackTypeData);
        addTrack(connectConfig, false, AoqClientEngine.AoqTrackType.AoqTrackTypeData);
    }

    private void startAudioCapture() {
        AoqClientEngine.AoqAudioCaptureConfig capture =
                new AoqClientEngine.AoqAudioCaptureConfig();
        capture.isExternal = false;
        capture.isVoipMode = true;
        capture.channel = 1;
        engine.startAudioCapture(capture);
        engine.enableSendMediaStream(AoqClientEngine.AoqTrackType.AoqTrackTypeAudio, false);
    }

    /** Starts another recognition task on the existing AOQ connection. */
    public void beginRecognition() {
        if (!connected || taskStarted || taskId != null) {
            return;
        }
        taskId = UUID.randomUUID().toString();
        JSONObject header = createHeader("run-task");
        JSONObject parameters = new JSONObject()
                .put("format", "pcm")
                .put("sample_rate", 16000);
        JSONObject payload = new JSONObject()
                .put("task_group", "audio")
                .put("task", "asr")
                .put("function", "recognition")
                .put("model", "fun-asr-realtime")
                .put("parameters", parameters)
                .put("input", new JSONObject());
        send(new JSONObject().put("header", header).put("payload", payload));
    }

    /** Stops the current task. Wait for task-finished before closing the connection. */
    public void finishRecognition() {
        if (taskId == null) {
            return;
        }
        engine.enableSendMediaStream(AoqClientEngine.AoqTrackType.AoqTrackTypeAudio, false);
        JSONObject payload = new JSONObject().put("input", new JSONObject());
        send(new JSONObject()
                .put("header", createHeader("finish-task"))
                .put("payload", payload));
    }

    public void close() {
        engine.enableSendMediaStream(AoqClientEngine.AoqTrackType.AoqTrackTypeAudio, false);
        engine.stopAudioCapture();
        engine.disconnect();
        AoqClientEngine.destroy();
    }

    private void handleServerEvent(AoqClientEngine.AoqDataMsg msg) {
        if (msg == null || msg.data == null) {
            return;
        }
        JSONObject event = new JSONObject(new String(msg.data, StandardCharsets.UTF_8));
        JSONObject header = event.optJSONObject("header");
        if (header == null) {
            return;
        }

        String eventName = header.optString("event", "");
        if ("task-started".equals(eventName)) {
            taskStarted = true;
            engine.enableSendMediaStream(
                    AoqClientEngine.AoqTrackType.AoqTrackTypeAudio, true);
        } else if ("result-generated".equals(eventName)) {
            handleRecognitionResult(event);
        } else if ("task-finished".equals(eventName)) {
            resetTaskState();
            resultListener.onTaskFinished();
        } else if ("task-failed".equals(eventName)) {
            String message = header.optString("error_message", "Recognition failed");
            resetTaskState();
            resultListener.onError(message);
        }
    }

    private void handleRecognitionResult(JSONObject event) {
        JSONObject payload = event.optJSONObject("payload");
        JSONObject output = payload == null ? null : payload.optJSONObject("output");
        JSONObject sentence = output == null ? null : output.optJSONObject("sentence");
        if (sentence == null || sentence.optBoolean("heartbeat", false)) {
            return;
        }
        String text = sentence.optString("text", "");
        if (!text.isEmpty()) {
            resultListener.onResult(text, sentence.optBoolean("sentence_end", false));
        }
    }

    private void resetTaskState() {
        engine.enableSendMediaStream(AoqClientEngine.AoqTrackType.AoqTrackTypeAudio, false);
        taskStarted = false;
        taskId = null;
    }

    private JSONObject createHeader(String action) {
        return new JSONObject()
                .put("action", action)
                .put("task_id", taskId)
                .put("streaming", "duplex");
    }

    private void send(JSONObject event) {
        AoqClientEngine.AoqDataMsg msg = new AoqClientEngine.AoqDataMsg();
        msg.data = event.toString().getBytes(StandardCharsets.UTF_8);
        engine.sendDataMsg(msg);
    }

    private static void addTrack(AoqClientEngine.AoqConnectConfig config, boolean publish,
                                 AoqClientEngine.AoqTrackType type) {
        AoqClientEngine.AoqTrackParam track = new AoqClientEngine.AoqTrackParam();
        track.trackType = type;
        if (publish) {
            config.publishTracks.add(track);
        } else {
            config.subscribeTracks.add(track);
        }
    }

    /** Maps the AppServer token response to an SDK connection configuration. */
    public static AoqClientEngine.AoqConnectConfig parseConnectConfig(String responseText) {
        JSONObject response = new JSONObject(responseText);
        AoqClientEngine.AoqConnectConfig config = new AoqClientEngine.AoqConnectConfig();
        config.token = response.optString("aoqTokenForClient", "");
        config.sid = response.optString("sid", "");
        config.certFingerprint = response.optString("clientRelayCertFingerprint", "");

        JSONArray endpoints = response.optJSONArray("clientRelayEndpoints");
        if (endpoints != null) {
            for (int i = 0; i < endpoints.length(); i++) {
                JSONObject item = endpoints.optJSONObject(i);
                if (item == null) {
                    continue;
                }
                AoqClientEngine.AoqRelayEndpoint endpoint =
                        new AoqClientEngine.AoqRelayEndpoint();
                endpoint.routeIndex = item.has("route_index")
                        ? item.optInt("route_index", i) : i;
                endpoint.endpoint = item.optString("endpoint", "");
                endpoint.port = item.optInt("port", 0);
                config.relayEndpoints.add(endpoint);
            }
        }

        JSONObject extraInfo = response.optJSONObject("extraInfo");
        config.workspaceIdHash = extraInfo == null
                ? "" : extraInfo.optString("workspaceIdHash", "");
        return config;
    }
}
Usage example
Pass the token response from the application server to parseConnectConfig and create the client. The first recognition task starts automatically after the connection is established. The stop button ends only the current task. Release the connection and local resources when the page is destroyed.
private AsrClient client;

void startRecognition(Context context, String tokenResponseText) {
    AoqClientEngine.AoqConnectConfig config =
            AsrClient.parseConnectConfig(tokenResponseText);

    client = new AsrClient(context, config, new AsrClient.ResultListener() {
        @Override
        public void onResult(String text, boolean sentenceEnd) {
            // Update the UI with the partial or final sentence.
        }

        @Override
        public void onTaskFinished() {
            // Enable the start button or call beginRecognition() for another task.
        }

        @Override
        public void onError(String message) {
            // Display or log the error.
        }
    });
}

void onStopButtonClick() {
    // Finish the task and keep the AOQ connection open until task-finished arrives.
    client.finishRecognition();
}

void onPageDestroyed() {
    // Release local resources only when the page is closed.
    client.close();
}
Run and verify
- Start the application server. Make sure that the token request returns HTTP 200 and includes sid, aoqTokenForClient, clientRelayEndpoints, clientRelayCertFingerprint, and extraInfo.workspaceIdHash.
- Install and run the app on an Android device, grant microphone access, and speak.
- Observe the callbacks. A normal event sequence is:
task-started
result-generated (sentence_end=false)
result-generated (sentence_end=true)
task-finished
Partial transcripts are returned while you speak. After finishRecognition is called, the final transcript for the current sentence and task-finished are returned. Do not disconnect immediately after finish-task is sent.
Common scenarios
Multiple recognition tasks over one connection
After task-finished is received, call beginRecognition to start another task over the same AOQ connection. Each task requires a new task_id. You do not need to request another token or reconnect while the connection remains active. If the connection is closed, obtain new connection credentials.
Background recognition on Android
On Android 10 or later, use a foreground service with foregroundServiceType=microphone to continue microphone capture while the app is in the background. Start the service while the app is still visible to the user.
Troubleshooting
Issue | Solution |
The connection fails | Make sure that the token is valid, the endpoint matches the application region, and the application server passes the actual public IP address of the client device. Do not reuse a token after the connection is closed. |
The task starts but no transcript is returned | Enable Audio-track sending only after task-started is received. Check the input format, sample rate, and other parameters against Client events for the model. |
The final transcript is not returned | Disable Audio-track sending before sending finish-task. Wait for the final result-generated event and task-finished instead of disconnecting immediately. |
The Android SDK fails to load | Make sure that the AAR is included as a dependency and that the app packages an SDK-supported ABI: armeabi-v7a or arm64-v8a. |
A subsequent task over the same connection is rejected | Make sure that task-finished was received for the previous task and generate a new task_id for the next run-task event. |
Related topics
For all parameters, event fields, and APIs for other platforms, see: