Schemas allow you to manage tables, resources, and functions at a finer level of granularity within a MaxCompute project. This topic covers schema concepts, permissions, and usage.
Background
A MaxCompute project is the basic organizational unit and the main boundary for multi-user isolation and access control.
A project contains tables, resources, and functions. Previously, these objects were placed directly under a project, requiring the project to serve as both a database and a schema. This made management inconvenient, especially when a project contained many objects. MaxCompute now supports schemas, which let you classify tables, resources, and functions within a project. The following figure shows the hierarchy.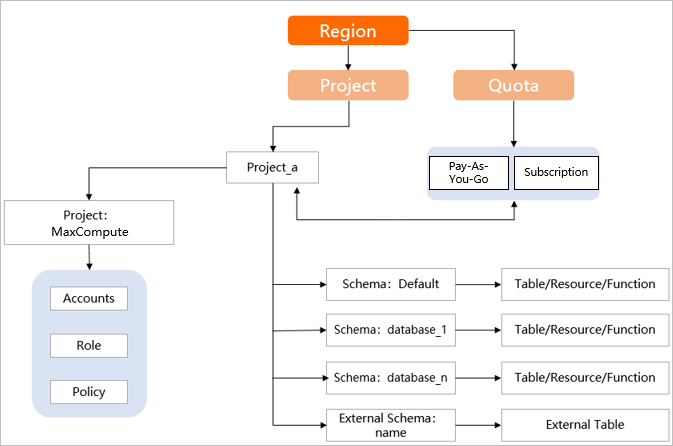
Scope
The MaxCompute schema feature is under continuous improvement. Some functional modules have not yet been adapted to schemas. Operations initiated from these modules can be used only in set odps.namespace.schema=false mode.
-
Developer tools
-
MaxCompute client v0.40.8 and later supports the schema feature.
-
MaxCompute Studio plug-in 4.0.0 and later supports the schema feature.
-
-
Job types
-
Spark jobs 3.1.1 and later support the schema feature.
-
You must set the following parameter for Spark jobs:
spark.sql.catalog.odps.enableNamespaceSchema=true -
Mars and MapReduce jobs do not support the schema feature.
-
-
Other cloud products
-
Hologres V1.3 and later supports the schema feature. To upgrade a Hologres instance, see Upgrade an instance.
-
Other cloud products, such as PAI and Quick BI, do not support the custom schema feature.
-
-
Java SDK 0.40.8 and later, Java Database Connectivity (JDBC) 3.3.2 and later, and PyODPS 0.11.3.1 and later support the schema feature.
-
DataWorks can interact with schemas in MaxCompute only after you enable the schema feature at the tenant or project level. For more information, see DataWorks support for MaxCompute schemas.
-
Views and user-defined functions (UDFs) created in
odps.namespace.schema=falsemode can be accessed only in the same mode. The same rule applies to theodps.namespace.schema=truemode.
Key terms
-
Schema
A schema classifies tables, resources, and UDFs within a project. A project can contain multiple schemas.
-
Schema syntax switch
After you enable the schema syntax switch, the system parses statements using the
project.schema.tablesemantics.-
When the schema syntax is enabled, a statement in the
a.b.cformat is parsed asproject.schema.table. A statement in thea.bformat is parsed asschema.table. -
When the schema syntax is disabled, a statement in the
a.b.cformat is not recognized. A statement in thea.bformat is parsed asproject.table. This switch can be set at the tenant level and the job level.
-
-
Default schema
When the schema feature is enabled, a built-in schema named DEFAULT is automatically created in each project. You cannot delete this schema.
-
Tenant-level setting
Determines the default semantics for data access requests submitted by the entire tenant.
-
Job-level setting
This setting affects only the current job and takes priority over the tenant-level setting. You can run the
set odps.namespace.schema=true | false;command to enable or disable the schema syntax.
Enable the feature
-
If you are new to MaxCompute and have no existing projects, you can enable the tenant-level syntax switch. After you enable it, all new projects will support the schema feature. All requests will be parsed based on the
odps.namespace.schema = truesyntax by default.-
Log in to the MaxCompute console and select a region in the upper-left corner.
-
In the left-side navigation pane, choose .
-
On the Tenants page, click the Tenant Property tab.
-
On the Tenant Property tab, enable the Tenant-level Schema Syntax switch.
-
-
If you have 10 or fewer existing projects and few or no existing jobs, follow these steps to adapt your environment. After the adaptation, new projects will support schemas, and all requests will be parsed based on the
odps.namespace.schema=truesyntax by default.-
First, upgrade all existing projects to support schemas.
-
Log in to the MaxCompute console and select a region in the upper-left corner.
-
In the left-side navigation pane, choose .
-
On the Projects page, click Enable Schema in the Actions column for the target project.
-
-
Then, turn on the Tenant-level Schema Syntax.
-
In the left-side navigation pane, choose .
-
On the Tenants page, click the Tenant Property tab.
-
On the Tenant Property tab, enable the Tenant-level Schema Syntax switch.
-
-
-
If you have existing projects and jobs and need to upgrade specific projects to support schemas, follow these steps. After the upgrade, a
SchemanamedDEFAULTis created in the project by default.-
Log in to the MaxCompute console and select a region in the upper-left corner.
-
In the left-side navigation pane, choose .
-
On the Projects page, click Enable Schema in the Actions column for the target project.
-
All requests are parsed based on the
odps.namespace.schema = falsesyntax by default. For an upgraded project, after you create a custom schema, you must enable the schema syntax at the job level by runningset odps.namespace.schema=true;to access data in the custom schema.
-
If the schema syntax is enabled, the data path for a non-upgraded project is
projectname.default.tablename. -
If the schema syntax is disabled, an upgraded project cannot access custom schemas. The path
projectname.tablenamerecognizes only data in theSchemanamedDEFAULT.
-
Usage notes
Create a project
-
Before you use schemas, you must create a MaxCompute project.
-
When you create a project in the MaxCompute console, if the tenant-level syntax switch is enabled (
odps.namespace.schema = true), the project supports schemas by default.
Manage schemas
Manage schemas using commands
-
View a list of schemas
SHOW schemas; -
Create a schema
CREATE schema <schema_name>;schema_name specifies the name of the custom schema.
-
View schema information
DESC schema <schema_name>;schema_name specifies the name of the schema.
-
Delete a schema
DROP schema <schema_name>;schema_name specifies the name of the schema.
Manage schemas using the management console
-
Log in to the MaxCompute console and select a region in the upper-left corner.
-
In the left-side navigation pane, choose .
-
On the Projects page, click Manage in the Actions column for the target project.
-
On the Project Settings page, click the Schema tab.
The Schema tab is visible only for projects that support schemas.
-
On the schema tab, you can view the list of schemas, and create or delete schemas.
Operate on objects in a schema
Use the project.schema.table format to reference objects in a schema.
All descriptions of Table objects in this topic also apply to View, Resource, and Function objects.
-
When you operate on a table across projects, you must use the full command format: project.schema.table.
-
For cross-schema operations within the same project, you can use the
schema.tableformat. If a command is in thea.bformat,ais parsed as the schema,bis parsed as the table, and the project is the current project. -
Within the same project, you can run the
use schema <schema_name>command to specify the current schema. Then, you can directly use a command such asselect * from a. In this case,ais the table, which is automatically resolved to the current project and the specified schema. -
If no schema is specified in the context, and you use a command such as
select * from a,ais the table. It is automatically resolved to the current project and the schema named default.
Examples
-
Example 1: Operate on objects in a schema within the same project (projectA).
-
Operate on objects in the default schema.
use projectA;
set odps.namespace.schema=true;-- If this is set at the tenant level, you do not need to specify it here.
-- Operate on table t_a
create table t_a(c1 string,c2 bigint);
INSERT OVERWRITE TABLE t_a VALUES ('a',1),('b',2),('c',3);
select * from t_a;
show tables;
desc t_a;

tunnel upload <path> t_a[/<pt_spc>];
tunnel download t_a[/pt_spc] <path>;

-- Operate on resource res_a.jar
add jar <path>/res_a.jar ;
desc resource res_a.jar;
list resources;
get resource res_a.jar D:\;
drop resource res_a.jar;

-- Operate on function fun_a
 create function fun_a as 'xx' using 'res_a.jar';
 desc function fun_a;
 list functions;
 drop function fun_a;
The parameters are described as follows:
-
path: the storage path and name of the file.
-
pt_spc: You must specify the lowest-level partition. The format is
partition_col1=col1_value1, partition_col2=col2_value1....
-
-
Operate on objects in custom schemas (s_1 and s_2), including cross-schema operations.
use projectA;
set odps.namespace.schema=true;-- If this is set at the tenant level, you do not need to specify it here.

-- Operate on table t_c under s_1
use schema s_1;
create table t_c(c1 string,c2 bigint);
INSERT OVERWRITE TABLE t_c VALUES ('a',1),('b',2),('c',3);
select * from t_c;
show tables;
drop table t_c;


tunnel upload <path> t_c[/<pt_spc>];
tunnel download t_c[/pt_spc] <path>;

-- Operate on table t_d under s_2
create table s_2.t_d(c1 string,c2 bigint);
insert into/overwrite table s_2.t_d values ('a',1),('b',2),('c',3);
select * from s_2.t_d;
show tables in s_2;
drop table s_2.t_d;

tunnel upload <path> s_2.t_d[/<pt_spc>];
tunnel download s_2.t_d[/pt_spc] <path>;


-- Operate on resource res_b.jar under s_1
use schema s_1;
add jar <path>/res_b.jar  ;
desc resource res_b.jar;
list resources;
get resource res_b.jar D:\;
drop resource res_b.jar;

-- Operate on resource res_c.jar under s_2
add jar xxx ;-- The add resource command can only be run in the current schema or project. It cannot be run across schemas or projects. Therefore, you must switch to schema s_2 for normal operations.
-- For cross-project or cross-schema operations, use a colon (:) to separate resource levels.
desc resource s_2:res_c.jar;
list resources in s_2;
get resource s_2:res_c.jar D:\;
drop resource s_2:res_c.jar;

-- Operate on function fun_b under s_1
 use schema s_1;
 create function fun_b as 'xx' using 'res_b.jar'
 desc function fun_b;
 list functions;
 drop function fun_b;

 -- Operate on function fun_c under s_2
 create function s_2.fun_c as 'xx' using 's_2/resources/res_c.jar'
 drop function s_2.fun_c;
 desc function s_2.fun_c;
 list functions in s_2;
 drop function s_2.fun_c;
-
-
Example 2: Perform cross-project operations (operate on objects in ProjectB from ProjectA).
use projectA;
set odps.namespace.schema=true;  -- If this is set at the tenant level, you do not need to specify it here.

-- Operate on table t_f in schema s_3 under projectB
create table projectB.s_3.t_f(c1 string,c2 bigint);
INSERT OVERWRITE TABLE projectB.s_3.t_f VALUES ('a',1),('b',2),('c',3);
select * from projectB.s_3.t_f;
show tables in projectB.s_3;
desc projectB.s_3.t_f;
drop table projectB.s_3.t_f;

tunnel upload <path> projectB.s_3.t_f[/<pt_spc>];
tunnel download projectB.s_3.t_f[/pt_spc] <path>;

-- Operate on resource res_f.jar in schema s_3 under projectB
add jar xxx ;-- The add resource command can only be run in the current schema or project. It cannot be run across schemas or projects. Therefore, you must switch to projectB and use schema s_3 for normal operations.
-- For cross-project and cross-schema operations, use a colon (:) to separate resource levels.
desc resource projectB:s_3:res_f.jar;
list resources in projectB.s_3;
get resource projectB:s_3:res_f.jar D:\;
drop resource projectB:s_3:res_f.jar;

-- Operate on function fun_f in schema s_3 under projectB
 create function projectB.s_3.fun_f as 'xx' using 'projectB/schemas/s_3/resources/res_f.jar'
 desc function projectB.s_3.fun_f;
 list functions in projectB.s_3;
 drop function projectB.s_3.fun_f;
Permissions
-
Grant permissions on schema objects.
Permissions for schema object operations (CreateTable, CreateResource, CreateFunction) are granted at the project level. If you have these permissions on a project, they apply to all schemas in that project. Schema-level access control will be available in a future release.
Note-
The schema owner has all access permissions and access control permissions for the schema and the resources within it by default.
-
If you have the CreateTable, CreateResource, and CreateFunction permissions on a project, you automatically inherit the corresponding permissions for the schemas in that project.
-
-
Permissions on resource objects in a schema.
When you grant permissions on a resource object in a schema, specify the full object name (
project.schema.table). The authorization syntax is as follows. For a list of object-level permissions, see MaxCompute permissions. You can also grant permissions in the management console. For more information, see Manage user permissions using the console.-- Grant a role permissions on all tables in a schema. GRANT schemaObjectPrivileges ON TABLE <project_name>.<schema_name>.* TO role {rolename}; -- Revoke from a role permissions on all tables in a schema. REVOKE schemaObjectPrivileges ON TABLE <project_name>.<schema_name>.* FROM role {rolename}; -- Grant a role or user permissions on a specific table in a schema. GRANT schemaObjectPrivileges ON TABLE <project_name>.<schema_name>.<tablename> TO {role|user} {rolename | USER name};-- Grant a role or user permissions on a specific table in a schema. -- Revoke from a role or user permissions on a specific table in a schema. REVOKE schemaObjectPrivileges ON TABLE <project_name>.<schema_name>.<tablename> FROM {role|user} {rolename | USER name}; -- View permissions on a table. SHOW GRANTS ON TABLE <project_name>.<schema_name>.<tablename>;NoteTo ensure data security, the
GRANT schemaObjectPrivileges ON TABLE <project_name>.<schema_name>.xxx* TO role {rolename};syntax is not supported.